Let's define what a “channel” in a router is, why is it needed and why should it be changed? The channel is a “sub-frequency” of the main 2.4 GHz frequency on which it operates. Wi-Fi routers. The 2.4 GHz frequency is divided into 11-14 channels depending on the country. In the settings of the router, you can set the channel on which the Wi-Fi network will work. The routers sold in France have 13 channels. But, for example, in devices for the USA 11 channels.
Why change the channel on a Wi-Fi router?
There are 2 routers, the signal of which intersects and operates on the same channel, then in operation wireless wifi Networks can cause a variety of errors, disconnection from the router, low Internet speed and a lot of various and most difficult to diagnose problems.
There are situations when the Internet works on the device, only when it is close to the router, within the room. But if you move further, the connection is maintained, but the Internet does not work. Perhaps there are already so many networks in the room that there are simply no free channels. And one of the wifi networks works at the same frequency as your router. This is where the low speed comes from. unstable connection etc.
AT tP-Link routers By default, the channel selection is set to Auto. Those. the router will independently occupy the free channel and use it. On the rest of the routers, the channel can be set randomly, for example, the default channel 7 is set to the popular D-Link routers. Therefore, if Dlink appears in your neighborhood, it will probably work on the same channel if the default settings are saved.
What channel to install in the router?
If you do not have a lot of Wi-Fi networks nearby, then you can not worry about changing the channel and install any one at will.
Otherwise, if you have a lot of networks in the vicinity and all 13 channels are full, then we recommend installing an automatic search and selecting a free channel.
Change the channel on the router
Why and in what case we need to change the channel for the wireless Wi-Fi network, we figured out, let's see how to do it?
Configuring the channel on TP-Link routers
We enter the administrative control panel of the router. The address is usually 192.168.0.1 or 192.168.1.1. Username and password, by default, admin and admin to enter the settings can be viewed from the bottom of the router, they are pasted on its bottom.
Go to the Wireless tab. And opposite Channel point set the desired value.
To save the settings, click the “Save” button and restart the router. This can be done using the control panel, via System Tools - Reboot, the "Reboot" button.
Channel setup on D-Link routers
In the router's control panel, open the Setup - Wireless Setup menu. If you want the router to choose the free channel itself, then you need to check the box next to the Enable Auto Channel Selection option. To select a particular channel, you must uncheck the check box and select the desired channel number opposite the Wireless Channel.
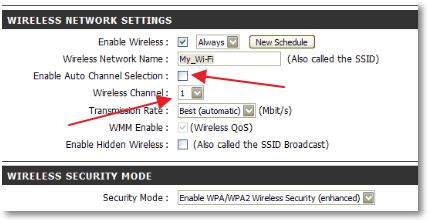
Save the settings by clicking on the “Save Settings” button.
If you need to change the channel on another router, then as a rule, the algorithm of actions is approximately the same.
Using Wi-Fi networks is very convenient. Our devices are really mobile, we forget about the extra wires and a lot of problems related to their use. Of course, wi-fi technology has its own specifics. Sometimes it happens that the network is working, configured, the Internet is there, but there is no stability. It is in such cases that the time comes for fine tuning routers.
Channels on Wi-Fi routers do not change the majority of users. Even advanced people often do not know for what purpose this is done. Meanwhile, by changing the channel, you can achieve a slight improvement in performance.
Some theory
The frequency range in which the router can operate is divided into 12 channels. The channel can be specified manually in the settings of the Wi-Fi router. It is also very important that the distribution of the Wi-Fi signal is not only in the specified channel, but also in the two on the left, and two on the right. That is, if you specify the third channel in the Wi-Fi settings, the broadcast will take place on: 1, 2, 3, 4 and 5 channels.
Accordingly, if there are a lot of Wi-Fi networks around (routers from neighbors or in other offices), we will receive a signal overlay. That is, several networks will operate on the same channels. In this case, the network will interfere with each other.
Our task is to make sure that as few of the foreign networks work as possible on our channels.
Inssider program. Choosing the right Wi-Fi channel
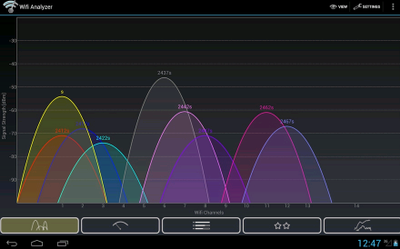
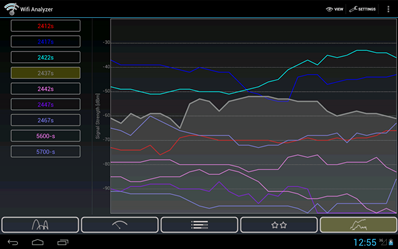
The program will show clearly how much visible networks is present in your range, on which channels they broadcast, and also draws a graph for greater clarity. .
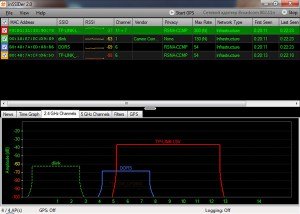
In order to work as efficiently as possible, you should choose a channel that has a smaller number of networks, and it is also very important to pay attention to the signal strength (RSSI column in the screenshot). The smaller this parameter, the better.
Change Wi-Fi channel
In order to change the Wi-Fi channel, you must first enter the settings of the router, select the tab Wirelessand then find the item Channel, set the best number in it. Then we save and work quietly.
Thank you for reading the article. If you have any questions - ask them in the comments. Just do not forget. For issues related to Wi-Fi, we are planning a whole collection of articles!
The most common problems when using routers are disappearing. Wi-Fi signalas well as low internet speed.
The most common reason for their occurrence is the use by your wireless network of the same channel that is used by other points. wi-Fi access Next door. As a result of this, in connection with the interference and the “jammed” channel, such things appear. The solution is obvious: change the channel, because in most cases, users leave the Auto value, which is set in the default settings of the router.
To change the channel and you need to determine in advance the most free.
It is necessary to download (or its mobile application), which searches for all working Wi-Fi point access in the vicinity and provides in a convenient way all the information about them: the channel on which data is being exchanged, the frequencies of operation, the equipment manufacturer, the MAC addresses of all nearby access points, SSiD, the name wireless network, the highest possible connection speed, type of encryption and much more. All this is given in the form of visual graphs.
Run this program on a device with WiFi - for example, on a laptop. And scan all the surrounding wireless networks.
The obtained data - especially the loading of channels - is used to select free bands. In our chart, these are channels 5.6.7 at 2.4 GHz, on which the author's network operates.
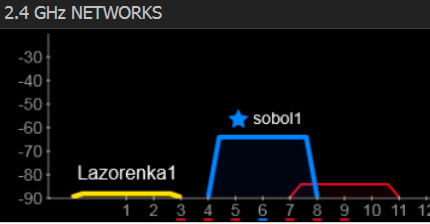
Also, it is possible to perform the described actions without a laptop, the owners of Android and iOS can use a similar function. free program WiFi Analyzer, which can be found and downloaded in official stores Google play and the Apple Store.
Channel selection method is no different from inSSIDer:
Very popular among Internet users, in particular wireless, is the issue of choosing and changing the Wi-Fi channel. These actions can be done by looking at the settings of your router. The fact that such a problem occurs very often is not at all surprising.
The reason for this is the occurrence of many interruptions in the work of the Internet due to interference on the channel. Here is what users most often complain about: low speeds data transmission, the work of the Internet is jerky (that is, access, it is not), sometimes the connection via Wi-Fi is interrupted for a long time. All these snags have one root cause - the load on your channel.
One more negative effect of increased load can be called such a problem: your computer stops seeing this particular Wi-Fi network, while seeing others.
Introduction
How to find another channel, make the transition from the old to the new, how to do it all, we will tell further in the article. We will review the solution, based on the parameters of the most popular models of routers. Among them are Tp-Link, Asus, D-Link, Zyxel, and Tenda.
The essence of the channel Wi-Fi. The need to change it.
Let's start the debriefing from the most basic. A bit of theory about wireless connection channels. Currently, most routers are tuned to frequency 2.4 GHz. So this indicator is considered standard. There are more numbers - for example, 5 GHz, but they are found in recently released models, so there are still fewer of them.
The 2.4 GHz frequency suggests the possibility of using the following channel range: from the first to the thirteenth. It is easy to conclude that any Wi-Fi router works on one of these thirteen channels. This applies to countries such as Russia and Ukraine. In America, things are different: they can use only 11 channels. Take note of this feature, because when acquiring any American device, you can easily be confronted with the fact that it will not see Wi-Fi of the 12th or 13th channels.
Problems with channel overload occur when several networks are connected to it immediately. How does this happen?
- You set, for example, the 5th channel.
- A neighbor nearby also decides to make a choice in favor of the 5th channel.
- Thus, several networks have already activated the 5th channel. And imagine when there are several such neighbors.
- Channel overload occurs.
This problem is very often found in apartment buildings, and in private - less often, since the distance to the neighbors is large.
The initial settings are as follows - when you turn on the router, any channel is automatically selected (the one that is less loaded). When you turn off and turn on the router again, another channel is selected.
Of course, you can specify such a setting — when turned on, the router will connect to a specific channel, for example, the second one. It will always happen. But one day this channel can be very busy, and you will encounter the problems that we talked about at the beginning of the article. Therefore, the advantage of automatic channel selection. You can always reboot the device, and it will find another option, more free.
A useful thing is special programs that are designed to keep track of which channels are busy and which ones are free. They will be discussed further.
But still the easiest and most affordable way to deal with wireless connection problems is this. If after the first time you can not solve the problem, then do it again. You can also experiment with the settings:
- if the installation of a static, that is, permanent, channel was chosen, go to the automatic selection;
- if, on the contrary, the router automatically selected the channel, set its specific number - first try 1.6 and 11.
Such manipulations help to cope with the arisen malfunctions.
If attempts were unsuccessful, you can refer to special programs. They're called inSSIDerWiFiInfoView. Helpful helpers will tell you information about free channel to which you can connect.
However, disruptions to the Internet are not always associated solely with the workload of a particular channel. Sometimes there are problems with the power system, interference from other gadgets, breakdowns of individual parts.
How to work with special programs?
When your device (be it a laptop, smartphone or something else) shows that there are many different networks in the nearby radius, use special programs that will indicate to you the presence of a free channel.
The most famous program of this assignment is considered to be inSSIDer. Its main advantage is free access, that is, it is absolutely free. The menu in Russian is not provided, it will be easy to understand the English.
A good alternative is WiFiInfoView (I advise you to use it).
Search channel in the program inSSIDer
The algorithm of actions under this program will be as follows:
- First you need to download it. It is available (home version 3.0.3.53 for Windows 7 and Windows 8).
- Next is the installation. Run the installer, follow the recommendations suggested in the instructions.
- Launch it by clicking on the appropriate shortcut (the shortcut will be on the desktop).
- The program is easily installed not only on computers, but also on phones (based on Android / iOS).
- Turn on Wi-Fi. If you need to customize it, you can always find practical advice.
- After starting the program, go to the tab NETWORKS. Your eyes will see a list of available Wi-Fi networks that are nearby, including yours. On the connection to the latter, you can find out if there is an asterisk next.
- We draw attention to the Channel, namely - what is displayed under this tab (information about busy channels).
- We make a choice in favor of one or another.
A small recommendation: when you analyze busy channels, pay attention to such as 1, 6, 11. In case other networks have not selected them, then first try setting up the router on them. This is due to the fact that these three channels never intersectthat can not be said about others, for example, about 10 . When the network is tuned to it, you get busy 2 before and 2 after, that is, channels 8 through 10. For example: 8,9,10,11,12.
Channel selection using WiFiInfoView
This program is even easier to learn than the previous one. It does not even have to install. Yes, it will give you less information, but it will be enough. Free access WiFiInfoView is on this.
- Opening the downloaded file. Launch WifiInfoView.exe.
- Column Channel contains information about which channel is used by the network.
- We analyze the employed, make a choice in favor of the most free. Set the number in the settings of your router. Further we will tell how to make it.
Change the channel on the router Tp-Link
In case your Tp-Link brand router, follow the instructions below if you want to change the channel:
- We establish a connection to the router (wireless or wired - no difference);
- In the browser line, enter the following numbers - 192.168.1.1 or 192.168.1.1 .
- A window will pop up asking for data entry. Standard values are admin, admin. In your case, they may be different - suddenly you changed them.
Further path is as follows: Wireless — Wireless settings (Wireless Mode - Wireless Settings) - Channel (Channel) - channel selection.
Before that, you should check the correctness of the specified region. To do this, look at the tab Region - she is here.
Changes are saved when you click Save. Next you should restart the router and check how well the Internet works.
D-Link: change channel settings
For routers of this brand, the algorithm will be basically the same: Connecting to the network - entering the settings - entering the address 192.168.0.1 and data ( admin and admin). Having trouble? Use this.
D-Link has a great tooltip in the settings. You can see at the same time which channel you are using and the workload of other numbers. An illustrative diagram allows you to make more right choice. You can not even install special programs that we talked about earlier.
What about Asus?
Working with Asus routers is no different from the options discussed above. We also make a Wi-Fi connection, enter the settings (the address is the same - 192.168.1.1 , and name and password - admin, admin). More detailed steps can be found by opening this one.
Tab Wireless network, channel number, To apply - done. The router will restart automatically.
What are the actions for Zyxel Keenetic router?
We establish an Internet connection. Open the settings page, which is located at the standard address 192.168.1.1 . Enter the necessary data. Here, the standard password is not admin, but 1234. Having difficulties? Will help you.
In the settings window, go to the tab called Wi-Fi network , edit the region (if necessary), and then set the desired channel. To set the parameters to take effect, you need to click Apply.
We set a specific channel on Tenda routers
To get to the settings page, you must specify the address 192.168.0.1 . Standard fields - login and password - will be as follows: login - admin, password is an empty box. Go to the tab Wireless settings. In the Channel line put the selected number. We will save changes - Ok.
findings
If your situation has not changed after all the methods that were proposed in this article, there remains one solution - to buy a more powerful router, namely the one we talked about at the beginning - with a frequency of 5 GHz. In practice, there were such cases, and no manipulations on changing channels did not help to solve the problem with interruptions.
Also remember that sometimes problems may be technical in nature - some element may break in the router. Then no action to change the settings will not be useful.
The article was very informative and useful for all users of the world wide web. In it, we tried to make out the easiest and most affordable ways to eliminate the most common problems with the Internet and wireless connection to wifi.
If you experience poor wireless reception, Wi-Fi disconnections, especially with heavy traffic, as well as other similar problems, it is possible that changing the Wi-Fi channel in the router settings will help solve this problem.
How to find out which channel is better to choose and find free I wrote in two articles:, (PC program). In this instruction I will describe how to change the channel using the example of popular routers: Asus, D-Link and TP-Link.
Channel change is easy
All you need to change the channel of the router is to go to its settings web interface, open the main page wi-Fi settings and pay attention to the item "Channel" (Channel), then set the desired value and do not forget to save the settings. I note that when changing the wireless network settings, if you are connected via Wi-Fi, the connection will be broken for a short time.
You can read about the entry into the web interface of various wireless routers in detail in the article.
How to change the channel on the router D-Link DIR-300, 615, 620 and others
To enter settings d-Link router, enter the address 192.168.0.1 in the address bar, and at the login and password prompt, enter admin and admin (if you have not changed the password to log in). Information about the standard parameters for entering the settings is on a sticker on the back of the device (not only on D-Link, but also on other brands).
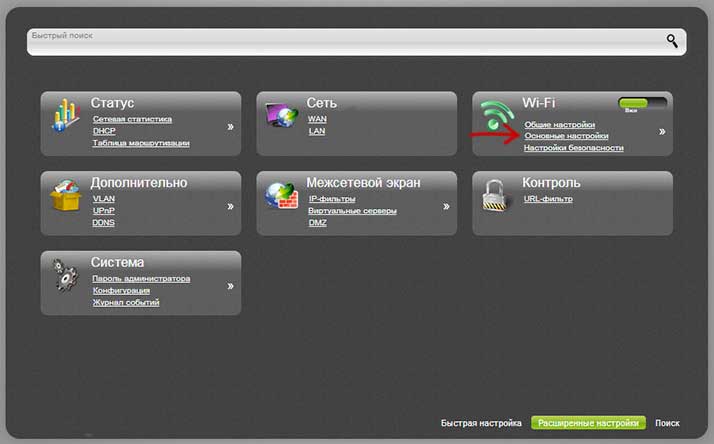
The web interface will open, click on “Advanced Settings” at the bottom, and then in the “Wi-Fi” item select “Basic Settings”.
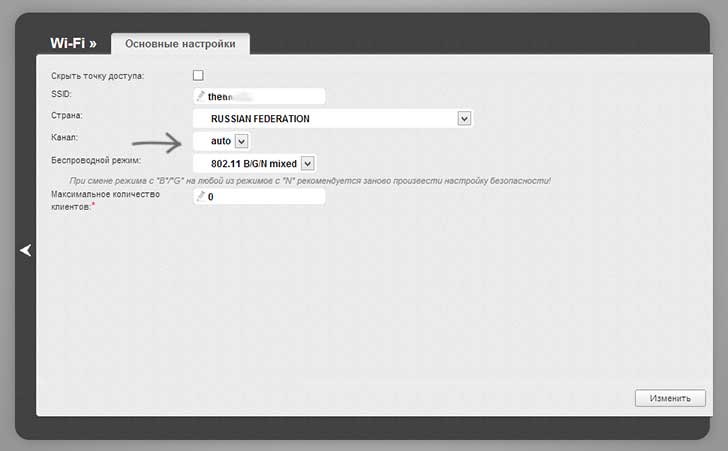
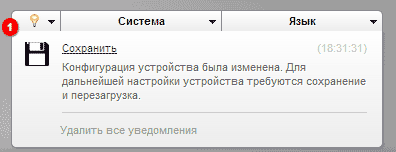
In the "Channel" set the desired value, then click "Edit". After that, the connection with the router is likely to temporarily break. If this happens, go back to the settings and look at the indicator at the top of the page, use it to permanently save the changes made.
Channel change on Asus Wi-Fi router
You can enter the settings interface of most Asus routers (RT-G32, RT-N10, RT-N12) at 192.168.1.1, the standard login and password is admin (but still, it is better to check the sticker that is behind the router). After logging in, you will see one of the interface options shown in the image below.
Change Asus Wi-Fi channel on old firmware
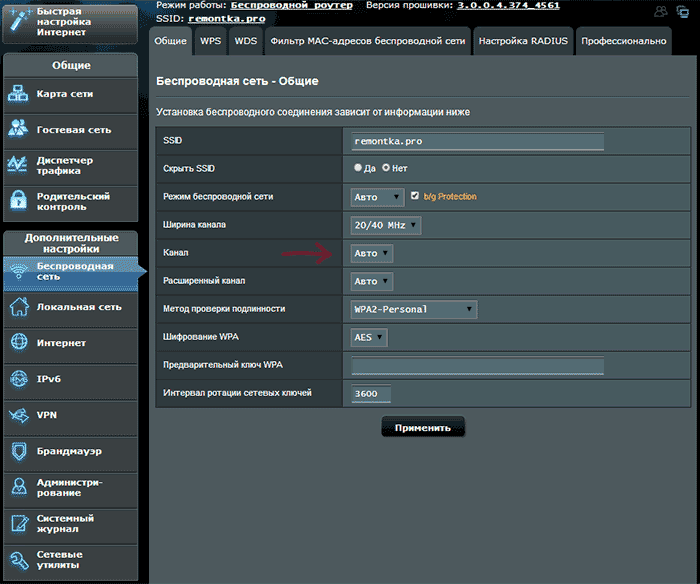
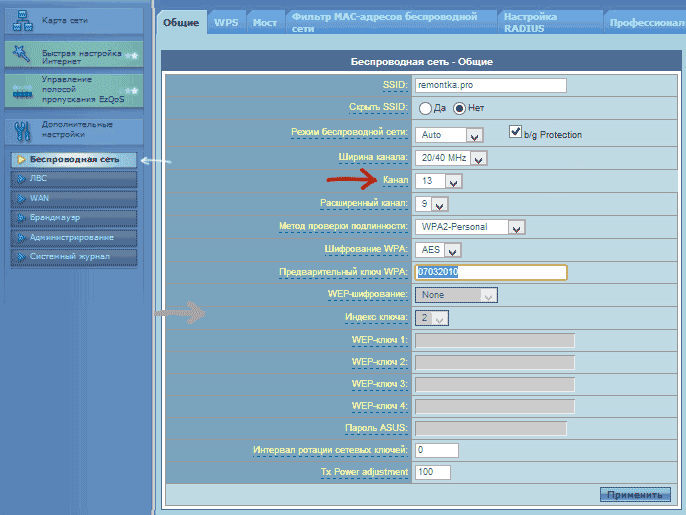
In both cases, open the left-hand menu item “Wireless Network”, on the page that appears, set the desired channel number and click “Apply” - that’s enough.
Change channel to TP-Link
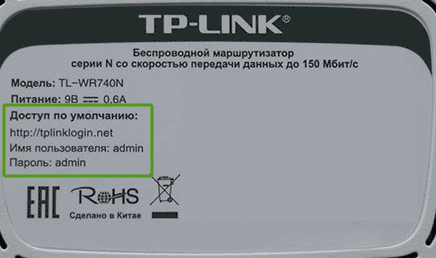
In order to change the Wi-Fi channel on the TP-Link router, also go to its settings: usually, this is the address 192.168.0.1, and the login and password is the admin. This information can be viewed on a label on the router itself. Please note that when the internet is connected, the tplinklogin.net address indicated there may not work, use consisting of numbers.
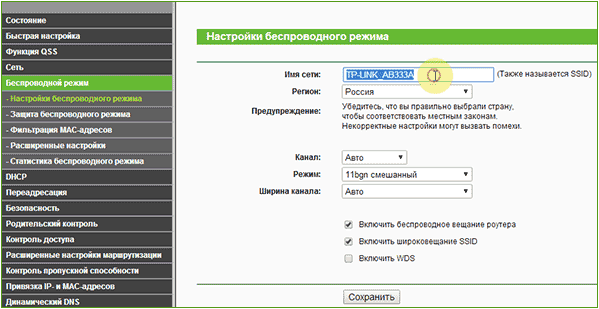
In the interface menu of the router, select “Wireless Mode” - “Wireless Mode Settings”. On the page that appears, you will see the basic settings of the wireless network, including here you can choose a free channel for your network. Do not forget to save the settings.
On devices of other brands, everything is completely the same: just get into the admin area and go to the parameters of the wireless network, there you will find the opportunity to select a channel.