(Last update: 08.07.2016)
Hello everyone! It's me again, with a helpful post - popup for WordPress- for beginners and not only WordPress users. If you are interested in popup plugin WordPress windows , it is also called a modal plugin, then you, friends, hit exactly the right place.
You can use the plugin that I'll present below to: Contact Form 7 in modal window; any contact form(feedback) in a modal (pop-up) window; video in a modal window; pictures in a pop-up window; accommodation useful information with links; mail subscription form for new articles in a modal window and so on, and so on everything, and you can't list it. The plugin is very simple, without complex settings and almost does not create additional load on / site.
Easy Modal Plugin - Popup / Modal for WordPress
 Modal Window Plugin for WordPress - Easy Modal
 You can install this plugin in a standard way, through the admin panel - Plugins - Add new and in the Search for plugins field enter the name Easy Modal, press Enter. It should be the first in the list. Install and activate it as usual. And then you can proceed to creating a new modal window.
To do this, click on the new section Easy Modal that appears and select the Modals item:
 Easy Modal - creating a new modal window
 After that, at the very top of the page, click the Add New button:
 Add a new window
 And here, everything is simple:
 Create a pop-up video window
 IN general settings(General tab) give the name of the new window (it will not be displayed, this is for you, if, for example, you create several modal windows); load type Load Sitewide (for the whole site); the title of the window and finally paste the code you need into the editor (Text mode). I have a YouTube video code inserted in my example.
 Modal window setup
 In the parameters, you can choose the size of the window; whether to use a background or not; animation type for modal / popup; the location of the window, and you can also fix the window (check the box and specify the indent from the top of the screen).
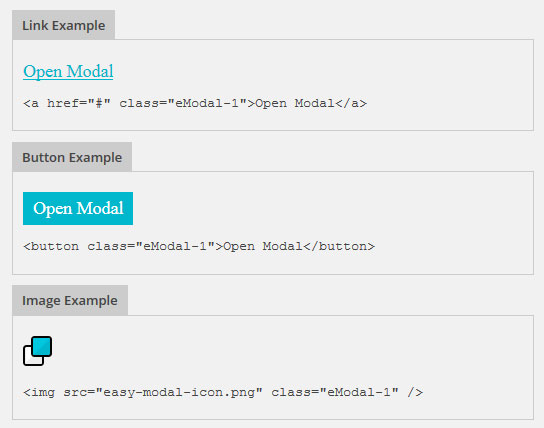
On the Examples tab, you will find code examples for displaying a popup in WordPress:
 Modal output code in WordPress
 Here you can select a simple text link, button or icon. Note that each newly created window is assigned the eModal class -. The first window created will have the class eModal - 1, the second eModal - 2, and so on. You only need to substitute the number yourself after the sign -. This code can be inserted at or anywhere in your article. Naturally, you can write any text in the code. I almost forgot that after creating the modal window on the right side of the page, do not forget to click the Publish button.
I inserted the code of the modal window with the video in the sidebar as a button:
 Blog sidebar button
 The visitor clicks on it and a window opens with a video:
 Modal window with video
 I hope, friends and comrades, the general principle of working with the Easy Modal plugin is clear to you. I will just add that you can then or immediately arrange for the modal window appearance by clicking Theme. Unfortunately in free version There is only one theme for the plugin, but you can style it as you like, the settings are enough. When customizing the appearance of the modal window, you can immediately see a preview of the design on the right:
 Editing theme - styling modal / popup
 After all the settings for the appearance of the window, click the Save button on the right. And finally, ladies and gentlemen, I'll show you an example of displaying a Contact Form 7 in a modal window.
Create a new modal as shown above and in a text editor just paste the Contact Form 7 shortcode (if you have this plugin installed, if not):
 Create Contact Form 7 in popup
  Button write to author after message
 If the reader wants to contact you, he will click a button and the contact form will open in a modal window:
 Form for contacting the author in a modal window
 Something like that. Also, all your created pop-up windows will be displayed on the page (item Modals), where, by the way, the classes for each modal window are indicated:
 Created modals in WordPress
 Hello. They were bombarded with questions about how to implement a form that appears in a modal window after clicking a button, and after submitting, a success or failure message would be displayed.
I think there is already a lot of this on the Internet, but since people ask, I decided to do it. Moreover, such functionality should be present on almost every landing page to implement a callback button. Indeed, now more and more AB - testing results appear, which say that open forms work worse than those that are hidden in a modal window and open after clicking on the button.
Some argue that this is due to the fact that people are slowly "developing immunity" and the open form is an aggressive sale. Supposedly now the time has come when the user, when he sees an open form, thinks that they are trying to "sell" something to him. I do not quite agree with this theory, but a grain of truth is present. Maybe in some types of business this is true. For now, let's get into the implementation of the form.
Note! I will not describe each action in detail, but I offer you a ready-made version in the source. If you have any questions, write in the comments. We'll figure out:)
Today we'll start not with jQuery, but with the layout of the button and form. All scripts are included at the end of the page.
The button by clicking on which the modal window will open:
Submit your application
You can set any class, but in the href write #modal - this will be the id of the container with the shading and the contact form.
Now I will give the code of the form and the block on which the form will be located:

After adding styles, it looks like this:

To create a modal window, the Remodal library was used. This is a set of css and js files, just for creating animated modal windows. You can download it from the link or already with my edits at the end of the article.
Include styles between the head tags:
And before the closing body tag - add scripts:
Script.js is a script for processing a form. The same Ajax that allows us to carry out the entire procedure without reloading the page:
$ (document) .ready (function () ($ ("form"). submit (function () (// Get the form ID var formID = $ (this) .attr ("id"); // Add a hash to the name ID var formNm = $ ("#" + formID); $ .ajax ((type: "POST", url: "mail.php", data: formNm.serialize (), success: function (data) (// Output text of the send result $ (formNm) .html (data);), error: function (jqXHR, text, error) (// Output of the send error text $ (formNm) .html (error);))); return false;) );));
I will not quote source css and js from the files responsible for the modal window and the form, since they are quite large. If anything, look at the source. But the php handler is largely standard (if I may say so):
Sender's name:$ name Telephone:$ phone "; $ send = mail ($ to, $ subject, $ message, $ headers); if ($ send ==" true ") (echo"
Please, do not forget to change the email addresses to your own.
Here's an ajax form. Sorry for not trying to explain in detail how each element was made. I just wanted to give a finished result, but there is no point in describing all the animations, appearances. Download the source and embed it on your site. And that's all for today. Good luck to all!
Guys, I urge you to test the form on a real or virtual server (hosting). Please make sure that your server supports php, you have a paid plan and not a trial period. Otherwise, in 90% of cases, the form will not work.
Do not wait for a letter in your mailbox if you just opened the index file in a browser and clicked the submit button. Php is a server-side language!
If you are too lazy to figure it out and make the form yourself, then I recommend paying attention to.
Updated version article is
There are many WordPress plugins for creating feedback forms on your blog or website. the most notable of these, it allows you to embed a contact form right in the post and WordPress pages(while many plugins force a custom template to be applied to the page, thereby limiting editing).
Embedding a form on a page is usually sufficient, but what if you want the form to appear in a popup when the user clicks on the Contact Us link? To realize this desire, you need to use two plugin WordPress simultaneously: Easy FancyBox
1. First of all, install plugins and Easy FancyBox.
2. For the sake of simplicity, we will use the Contact Form 7, already created by the plugin itself during installation for the example. On the Contact Form settings page, we take the form code that needs to be copied and pasted into WordPress editor to create a form.

3. Create new page in WordPress. In order to add a contact form, you need to paste the code in square brackets from the Contact Form 7 settings page into your page. Make sure to paste the code correctly, just like the plugin displays it.


4. Your WordPress now has a contact form. We decided to make it pop-up in a modal window after the user clicks on the link. The Easy FancyBox plugin comes into play. With its help, you can make any element of the page appear in a pop-up. Open the editing page, click on the TEXT tab and add the following HTML code:
Contact Us


5. That's it, now we have a link that "launches" the contact form in a pop-up window. Congratulations! You may need to tweak the CSS of the email forms to display the correct width and height, as well as messages about possible mistakes when filling. This should be enough for a start.

Recently, for a site, I was asked to make a WordPress feedback form in a modal window. That is, when clicking on the link "write to us", instead of going to the corresponding page, the user should open a new pop-up window, where the function of sending a message will be located. This is a more interactive solution, although not everyone likes it. I personally prefer the classic implementation with a contact page, but the forms on the sites are different - so it will be useful to consider the solution to this problem. In my work I used 2 plugins: known to many Contact Form 7 and the Easy Modal module to make a modal window in WordPress.
Update 05/18/2017: Judging by the latest reviews in the repository, in some cases there may be problems with its work. If this also affects you, try a new solution from the developers called Popup Maker. Another alternative can be considered.
I will not dwell in detail on the installation and configuration of Contact Form 7, all the information about it. The blog also had an article on what might come in handy.
Let's go directly to the Easy Modal... Find him. The developers claim that it is The best decision creating modal windows on the site with different interesting options for presenting content.

More than 10 thousand downloads, estimate 4.6. Valid versions are 3.4 - 4.0.8, although I have successfully run it on WP 4.3.1. Despite the fact that the plugin has now been transformed into a new Popup Maker solution, you can still find the usual Easy Modal version 2.0.17 on wordpress.org and when searching for plugins inside the admin area. Using his example, I will tell you about creating a modal feedback window in WordPress.
After installation, a section of the same name will appear, where there are several items. We will need the very first one - Modals... Click on the Add New button there.

This will create a new modal for your WordPress site. There will be 4 tabs in the item settings:
- General - general parameters.
- Display Options - display options.
- Close Options - settings for closing the window (using a click or the Esc button).
- Examples - code examples to use.
General settings contain the title of the window (not displayed on the site), its title, content and type of download. In the content block, after switching to HTML mode, add the shortcode of your feedback form in the modal window.

Load Type has 2 options:
- Load Sitewide (for the whole site).
- Per Page / Post (for specific posts and pages).
A very interesting option. If you need a pop-up window that will be displayed on all pages of the site (the link is located in the sidebar, for example), then knock out the first option. In the second case, the corresponding settings block will appear on the pages / posts of the site when editing:

You can activate and select your pop-up window for a particular page. If you do not check the box, then the element will not be loaded on the site.
The second tab of the module parameters - Display Options.

Here you indicate:
- window size - automatic, medium, adaptive, small, large, etc .;
- background - you can use the background for the form or display it without it;
- animation of displaying a pop-up window;
- position (location) - top center, bottom right, etc .; fixed or not;
- indentation at the top of the screen.
Examples of displaying the output of a modal window in WordPress using the Easy Modal plugin can be found in the last tab.
You need to insert this code through the widget in the sidebar or in text editor... It is no different about any other HTML code, the only thing is that it specifies the class of a specific modal window (eModal-1). For the second element you created, the class would be eModal-2, and so on. In order not to make a mistake when pasting the code, the easiest way is to copy it from this page.
Editing the skin of a modal window
In the Easy Modal plugin, in addition to settings for a specific element, you can define themes for pop-up windows (Theme). There is only one template in the basic free version of the module, but this is more than enough.

This tool has 6 tabs:
- General - specify the name of the topic;
- Overlay - background (here you can select the color and transparency of the shape's background);
- Container - different settings the modal window itself (padding, frame, shadow);
- Title - parameters of the title of the pop-up window (font, shadow);
- Content - font and color of texts in the block;
- Close - the element for closing the form (text and design).
As you can see, the appearance can be customized as you like to suit your needs. I got this simple WordPress form in a modal window:

After setting all the settings, remember to save them (click on the Save button).
Video of adding Contact Form 7 in Easy Modal pop-up window
By the way, I found a video on working with the Easy Modal plugin, which demonstrates the process of creating a feedback modal window in WordPress. There, the module interface is slightly outdated (some settings look different), but the general essence is captured. Perhaps it will be easier for someone to understand this issue with the help of a video.
Total about modal windows for wordpress
As mentioned above, now the Easy Modal plugin (judging by official page) converted to Popup Maker. I managed to find a module of the same name in the repository, but I have not tested it. I am telling you about this so that you know what to look for, if suddenly Easy Modal in WordPress of subsequent versions stops working.
Both solutions are free, although they have paid add-ons. They allow you to customize targeting, add more themes, contain analytics, and some other features. If you need a more advanced modal window mechanism, you can take a closer look at these extensions.
As for the task of opening the Contact Form 7 feedback form in a pop-up window, there are enough basic Easy Modal capabilities. Moreover this decision can also be used to display other modal windows in WordPress - useful tips, additional information etc. Given the presence of an editor for inserting HTML code, you can show videos, forms, etc. in the pop-up window. All in all a useful plugin. If you have any questions about it, write in the comments.
Hello my beloved reader! In this installment, I'll walk you through how I implemented a pop-up callback form on a WordPress site.
The fact is that the callback form is very often used by most webmasters precisely for the convenience of users, so that they take the targeted action as soon as possible - that is, leave a request on the site.
You can often see them on many commercial sites that provide services or offer to buy any product. In fact, online stores are not a full cycle, that is, when there is no basket, but there is something like a pre-order through this form. Here's how they might look:
Or in the form of a button also in the header of the site:

Someone can use them in the footer of the site, this is also allowed. It looks like this:

So friends. All these were examples, now we are implementing the same callback form for a WordPress site in practice. I will do it on the site, which is engaged in the improvement of the territory of Kaliningrad.
First of all, we need to enter and go to the plugins section, where we will add new plugin called Contact Form 7. This is the most popular solution for creating simple and complex blogs.

Not huhra muhra - 24 million downloads already speaks volumes. Click on the install button and it will appear on the left side of the admin panel.


Russian is already selected by default, so don't worry. We continue our process.

Now we need to add the fields that will participate. They are already installed by default, in principle you can leave them, do not delete them. The only thing I would add is a required field with a phone number.
To do this, we need to click on the "generate tag" button on the right side of the screen and select the appropriate item. In this way:

Click on the item "Phone number", put a tick in the required field in the checkbox and then copy the resulting tag into the form on the left along with other names and into the template for the letter.

On the left side, you will have an entry like this:

Place the phone number field below.
On the left side of the template for incoming letters, we will have the following entry:

Do not forget to check the "Use HTML email format" checkbox as well

At the bottom you will need a line like this "Please fill in the required field" to translate into Russian, something like this: "Please fill in the required field"

In the addressee field, add email where requests from the site will be sent.


Excellent! The callback form for the site is almost ready. Now we need to make it pop up when it is clicked.
Create a pop-up form
Our task is to have a pop-up callback form when we click on the link button. To create it, we need a special plugin based on the Jquery language, it is called Easy FancyBox. It is also available for installation directly from the admin area. Let's add it now.

Just click on "Install" and it will start working for you. It has settings for media files. We can go over them briefly.
Image sizes - set your own values for thumbnails, medium and large images.

FancyBox effect for the following media categories:
- Pictures
- Pdf documents
- Inline content
- SWF charts
- Youtube
- Vimeo
- Dailymotion
- IFrames
Indicate what you want to use in the future. I'll leave it for pictures only.

You can also set the opacity and color. I did not ask anything, I left everything as it is by default.

Window
- Show window close icon
- Header color and border color
- Dimensions (default 560x340x10)
- Behavior (delay in seconds when the callback form appears on the site and the closing speed).

Compatible with other browsers and devices
- Include rules for the browser IE 6 and 7 versions (styles are meant)
- Enable style rule for IE 8 browser
I did not specify anything in them, although you can experiment with the cross-browser compatibility of the form.
Images
- Autodetection for image extensions - jpeg, png, jpg. You can add your extensions
- Apply to all images links
- Further, I simply did not change the settings, left everything as it is. Do the same.

Great! Now we will save all this wealth of options.
Now we listen very carefully, watch and repeat after me. It is best to put the callback form in the most conspicuous place, that is, at the very top of the site header, under the phones and contacts. We will do so. Go to the template header. php and paste this code:
Back call