If you wear it for a long time or wash it frequently, pills may appear on the knitwear and knitwear, which will spoil the appearance of the garment. To remove them without damaging your favorite sweater, you should use a special machine.
The machine for removing the pellets can be made in the form of a hemisphere or have a slightly elongated, but comfortable handle. Outwardly, it resembles an electric razor and has a similar operating principle. Due to the mesh with small holes and sharp edges, the device can cut protruding threads and fibers from the surface of the fabric. Almost all models have a custom knife height adjustment. The device can be powered both from a home power supply with a standard voltage of 220 V, and from batteries. Some modern cars are equipped with a battery that can be charged from the mains.
The main advantages of the pellet remover
- Ease of use;
- Compact dimensions;
- The ability to use with different types of fabrics;
- Suitable for updating furniture upholstery;
- Affordable price.
Where to buy a pellet remover?
You can buy a machine for removing pellets at an affordable price in the Eldorado online store. Online orders are accepted from registered users of the site through their personal account. Delivery of goods is carried out in Moscow and other cities of Russia.
Like many others, I had such a problem - a lot of my favorite things in the closet were covered with spools, but it's a pity to throw it away. And some things are completely new, but after washing in a typewriter, everything is also in spools.
Disappointment
I originally bought a cheap battery-powered pellet remover from the local market. And what was my chagrin when I came home and tried to clear at least one thing. She was somehow weak, she cut off the pellets on her favorite sweater very badly and flew into the trash, while the sweater went into the closet to wait in the wings.
As a result, I went to my beloved Aliexpress to look for something more suitable. There are not so many options for the request, there are battery-powered ones - do not take them, it is really a waste of time, effort and money. It's like buying, there is a lot of noise - little sense.
But the copy that I liked and the reviews were very good - it's DCOVOR, here.
The car reached Khabarovsk in about three weeks. The seller must be given credit - packed properly in a bubble wrap and a hard plastic pillow.
Payment and delivery
The spare blades were in a separate bag. Everything arrived safe and sound, despite the fact that the plastic is of course flimsy. The build quality is also not very good. The case looks cheap. But this does not interfere with work, and I did not seem to be going to show off this machine in front of anyone.
I bought this miracle of technology for 604.49 rubles. Out of greed, I took it right away with 5 additional blades, in principle, it could have been taken with 3, because after going through and updating my entire wardrobe, husband and child, the blade did not dull and continues to cope well with its functions
The machine works from a 220v network, therefore, unlike battery-powered ones, it is quite powerful, it copes with a bang with the pellets. Things look like new afterwards. The photo shows before / after.
It is possible to choose the plug from which the machine will come, which is very convenient - no need to buy a separate adapter
What are the cons?
Of the minuses - the container for collecting pellets does not hold well. And it fills up quickly. Well, this is all nonsense, in fact.
Features of operation
Below are photos of BEFORE and AFTER use. Pay attention to the number of pellets and the quality of cleaning, only one area has been specially treated for clarity. Photos can be enlarged by clicking on them.
!
The fabrics from which modern things of large chain stores are sewn - alas, for the most part they cannot boast of quality. As a result, our favorite things such as shirts, trousers, hats and sweaters are worn out literally in a season. And surely many wondered how to extend life to be honest with not so old things. For these purposes, you just need a "miracle device" - a machine for removing pellets.


This copy was purchased by me last fall in the well-known fixed-price store - Fixprice. The cost of the device at the time of purchase was only 50 rubles. The machine has the following characteristics:
Country of origin - of course China;
The declared service life of this product is 2 years.
It is powered by 2 AA batteries (finger-type), and the manufacturer recommends using alkaline batteries, this is indicated in small print on the packaging.
So, I came home, "updated" with the help of a new acquisition of a sweater and that's it, the batteries ran out ...
Moreover, he used good alkaline batteries from a well-known manufacturer, who assures us that his products work up to ten times longer.
The next T-shirt in line for the ball. The pellets on it were not very noticeable, but still it was decided to walk on them with a new Chinese gadget. Alkaline batteries were not at hand. I found a couple of saline, which I bought some time ago in the same store with fixed prices.
On such a power source, the machine worked for a little more than a minute, then the engine speed began to drop, and further processing of the fabric became impossible.


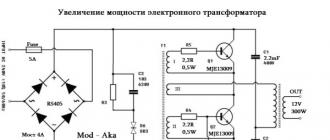
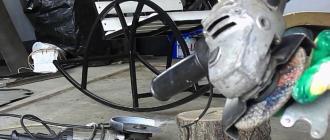
So, it was decided to remake the machine for removing the pellets, namely, to transfer it to power from a can of lithium-ion battery.

Among the available ones, a bank of 14500 AA format was chosen, it fits perfectly into the battery compartment. I soldered a charge control and deep discharge protection module to the battery. All this was installed in the plastic body of the machine, while all interfering parts of the body were removed using side cutters. I soldered the wires, closed the case and turned on the device. The machine buzzed strongly and heated up literally in a matter of seconds. It became clear that it was impossible to operate it this way - the engine would burn out. Since the LM2596 step-down dc-dc converter circuit was available, it was decided to include it in the circuit.


Just place all this electronics inside the body of the machine it will not work, there is too little space, and it is impossible to take out any of the parts outside, since it will be inconvenient to hold the machine in your hand.

But in the world famous Chinese online store - aliexpress, I stumbled upon such a product:

Its price is more than 10 times higher than the copy I have, and the device is powered, as you can see, from a 220 volt network.
I also decided to "tie" my device to an outlet. The only difference is that in my case the power supply will be external. I used this one:


This is an old charger from a Samsung push-button phone. Charging has good characteristics: input 100-220V, 0.15A, output - 5V, 0.7A. I think it would be perfect for such a rework.
So, we disassemble the machine.


The dc-dc buck converter module will be located in the battery compartment of the device.
In the back of the battery compartment cover, you need to make a hole through which we will pass the power supply cable. The hole can be drilled with a small drill with a diameter of 2-3 mm (depending on the thickness of the wire), or you can simply cut it with a breadboard knife, since the plastic from which the body of our gadget is made is not particularly durable and can be easily processed by almost any more or less sharpened tool, be it a screwdriver, knife or even scissors.

When we have coped with the top cover of the case, we thread the wire into the hole made for it and put on it a small piece of heat shrink tubing in order to strengthen the strength at the bend (contact of the wire from the power supply to the case).


Then we solder the incoming wires to the corresponding pins of the dc-dc buck converter board. There is nothing complicated here, all contacts are marked, it is difficult to make a mistake. We fix the heat shrink tube with a lighter or hair dryer.


Next, you need to configure the buck voltage converter board. To do this, you need to plug in the charger (power supply) and, using a multimeter and a trimming resistor on the board, set the voltage corresponding to two series-connected AA batteries - about 3V (a little more, about 3.1-3.3V).

When I connected the lowering voltage module, a surprise awaited me. The fact is that of all the LM2596 DC-DC boards I ordered, only on this copy the indicator LED turned out to be blue. On all other boards from the same kit, the LED emits red. And by the way, the boards turned out to be different. If you take a step-down module with a red indicator LED, then when you turn on the machine, the LED goes out for a while. Then it gradually restores the strength of the glow, but at the same time it does not affect the operation of the machine for removing the pellets (well, at least I did not notice anything unusual). I decided to leave this scarf with a blue LED, since the body of the machine is white and blue, and when the power supply is plugged into the outlet, the LED turns on, the light of which shines through the white cover of the battery compartment, and the body almost completely turns blue. It looks pretty interesting.
Then it is necessary to insulate the lower part of the positive contact of the machine with electrical tape in order to avoid contact with the converter board.


Next, we solder the wires coming from the car's motor to the outputs of the down-converter. It is important to observe the polarity, because if you confuse "+" and "-", then the motor will rotate in the wrong direction, respectively, the blades will not be able to remove the spools.


The buck converter module must be placed inside the battery compartment.
After making sure that the battery compartment cover is closed and the voltage converter board does not interfere, fix the board with hot glue. We check if everything was done correctly and close the lid.