So, we need:
Seven disks, - a hacksaw (a jigsaw, a hot nail or a husband with a grinder :-) to choose from), - 2-3 sheets from a school notebook in a box (for drawing patterns), - the drawing tools themselves (pencil, pen - who is more convenient) ... - sandpaper or a file for edging.
1. We circle the disk on paper outside and inside. Include a square in the larger circle. This will be the basis for all templates. Further on the photographs it will be seen what remains to be completed.
2. Cut out the templates and use the awl to transfer the key points to the discs. Then, already on the discs themselves, we connect these points and get the cut lines.
A) This is the central part, let's call it A. Cut out on one disk.  b) Central part B. Also in a single copy.
  c) Bottom (denote B, just in case). One detail.
  d) Side part D. They must be made on two disks.
  e) And the last, side part D, also two parts. (in general, it is cut out one to one as the central part of A ... just now noticed, so you can simply cut out the three central parts of A).
3. Now we take a hacksaw, a jigsaw (this time I made a hole with a hot piece of cloth from a jigsaw - it seemed to me more convenient) and proceed to sawing along the outlined lines. It should look like this:
 - it turned out that on some discs the shiny layer does not adhere well ... And I did not know that ...
Here is the finished bottom:

4. The edges of the cuts are processed with sandpaper or a file so that there are no burrs. After finishing the edges, I covered one side of the discs with silver paint from a spray can, so that the inscriptions and drawings on the discs were not visible. I did not paint the shiny side - it is already beautiful.
5. Now we collect:
a) We connect the central part A with the central part B:

b) In the remaining cuts on the central part of B, insert the sides of D:

c) We connect the resulting structure with the remaining sidewalls G:
So 
and like this 
The stand is almost ready, only the bottom is missing:
 (this is a bottom view)
d) Put on the bottom B:

Turn over

PS: If you will be sawing at home (on a table, stool, etc.), place a cloth under the disc so as not to scratch the shiny surface of the disc with sawdust.
And if you burn these slots, then put something like a corrugated board from an unnecessary box under the disk (so as not to burn out the table surface at the same time).


Here, I got together and created a master class.
If something is not clear -
ask!
So, we need:
Seven disks, -
hacksaw (jigsaw, hot nail or husband with a grinder :-) to choose from), -
2-3 sheets from a school notebook in a box (for drawing patterns), -
the drawing tools themselves (pencil, pen - whoever is more comfortable) .-
sandpaper or a file for edging.
1.
We circle the disk on paper outside and inside. We enter into a larger circle
square. This will be the basis for all templates. Further on the photos will be
you can see what will be left to finish.
2. Cut out the templates and using
sewing, we transfer the key points to the disks. Then, already on the disks themselves
we connect these points and get the cut lines.
a) This
the central part, let's call it A. Cut out on one disk.  b)
b)
Central part B. Also in a single copy.  c) Bottom (denote B, just in case).
One detail.  d) Side
part D. They must be done on two disks.  e) And the last, side part D, too
two details. (in general, it is cut one to one as the central part
Ah ... I just noticed, so you can just cut out three
central part A). 
3. Now we take a hacksaw,
jigsaw (this time I made a hole with a hot piece of cloth from a jigsaw - it seemed to me
more convenient) and proceed to sawing along the outlined lines. Must
turn out like this:
- it turned out that on some discs the shiny layer does not adhere well ... And I did not know that ...
Here is the finished bottom:

Note:
so that after assembly the structure does not "grimace" and lasts longer,
the thickness of the cut should not be thinner than the thickness of the disc, and it is necessary to saw as
lines as straight as possible - no bends and waves. And one more note: Discs are fragile in places, they can burst during cutting. Therefore, lay down the disc so that it protrudes just a couple of millimeters beyond the working surface (beyond the edge of the table on which you are sawing) and hold it tight!
4. Edges
we process the cuts with sandpaper or a file so that there are no burrs.
After finishing the edges, I covered one side of the discs with silver paint
from a spray can, so that the inscriptions and drawings on the disks are not visible.
I did not paint the shiny side - it is already beautiful.
5. Now
collect:
a) We connect the central part A with the central part B:
b)
In the remaining cuts on the central part of B, insert the sides of D:

in)
We connect the resulting structure with the remaining sidewalls G:
So 
and
like this
Stand
almost ready, only the bottom is missing:

(this is a bottom view)
d) Put on the bottom B:

Turn over

view
above:

and
we fill. Here's what happened!

(left
assistant and part-time owner of the legs that flicker on
photos)
Happy creativity to all!
PS: If you will be sawing at home (on a table, stool, etc.), place a cloth under the disc so as not to scratch the shiny surface of the disc with sawdust.
And if you burn these slots, then put something like a corrugated board from an unnecessary box under the disk (so as not to burn out the table surface at the same time).
The time of CDs has almost passed, many still have a large number of them - music, with films, cartoons, with outdated computer programs - with images of heroes of fairy tales and films, flowers, graphic pictures on them.
They sparkle and shimmer with all the colors of the rainbow on the one hand, on the other - they have beautiful drawings. Throwing them away does not raise a hand - and it is not necessary, from them you can make a lot of original, beautiful and useful things for the home.

In addition, it is very simple to work with them - they already have the correct circle shape, which in some crafts will only need to be slightly changed in order to give the future product or decoration the desired look. At the same time, they are easily cut with ordinary office scissors and are glued to the surface of almost any material.
It happens that some home interior items have lost their appearance, there is no way to replace them with new ones, or it is simply a pity to throw away an old favorite thing that has served faithfully for many years. Discs will help give things new life.

For example, they can decorate an old mirror, making an original frame from pieces of different shapes and sizes, sparkling and shimmering in the rays of sunlight from a window or in the light of an electric lamp with all the colors of the rainbow.

You can make a beautiful frame for a photo, decorate the edges of the drawers of the cabinet with a mosaic of pieces of discs.

Frame for a mirror or photograph
You will need a lot of discs, scissors, paints, glue, thick cardboard, colorless transparent varnish.

First you need to cut a frame out of cardboard in the shape and size of a mirror or photo. Then cut the discs into pieces of different shapes - squares, irregular quadrangles, rhombuses, triangles.

Take glue and stick it on the frame of the figure so that there is a distance of one or two millimeters between them. As a result, you will get a mosaic of iridescent geometric shapes on the frame.

When the glue dries, and the figures cut from the disk stick well, use black ink or paint to carefully and carefully go through the joints of the figures. After that, the frame is covered with transparent varnish, allowed to dry and fixed to the wall with a mirror or photograph.

Mirrored disc frames look mysterious and original.

If the apartment has interior doors with glass, glass can also be laid out with a mosaic of disks. In this case, there is no need to paint the joints between the pieces, but simply cover everything with transparent varnish, then there will be a feeling of light and space.

Clock from discs
An option is to purchase a clock mechanism with hands or take it out of an old watch, lay a clock of any configuration on the wall with disks, stick them in the wall, and fix the clock mechanism in the middle.
Wall decoration with discs
On the wall in the room or in the kitchen, you can lay out an interesting composition from disks with beautiful pictures, selected according to the theme. Or you can use them to create your own picture.
To do this, you need to take the disks and paint their shiny side with black ink, when the ink dries, outline the lines of the future image along it, and then go over them with something sharp - a thick needle, a special scraper or a sharp knife with a thin blade and a sharp tip.

Iridescent lines on a black background will look very beautiful - you can draw anything: unusual birds, flowers, abstract drawing. And hang the disks on the wall in no particular order.

Decorating the kitchen with discs
In the kitchen, the disks can turn out to be an unusual "apron" in the desktop area. It will look extremely original, and in terms of working properties, the discs are not inferior to tiles - they are just as easy to wash from splashes of fat and juice of vegetables and fruits.

The principle of working with them is the same as with frames for mirrors and photographs - just stick on the wall.

Whether for a room or a kitchen, you can make a mosaic panel from discs by gluing pieces of the desired shape and color onto cardboard, and then covering the composition with transparent varnish.
Household items from disks
The disks will make an excellent hot stand. In this case, the disc will play the role of a base, you need to pull a nice cover made of fabric onto it, and the stand is ready.

It will be original to update the coffee table top with cut pieces of discs. To do this, cut them, fix them on the countertop with a plasticizer in any order or make a pattern from the pieces, and then pour a thin layer of transparent varnish on the countertop, making it even.

The coating will be durable. The table top will sparkle and sparkle beautifully.

Two discs and a thick tree branch can be used to make a holder for women's earrings.
The core of the rack is made of a smoothly processed branch, turned along the diameter of the hole in the center of the discs, one disc will be the base, the second shelf, in it - make holes and insert the earring arches into them.

How to decorate a suburban area with disks
Creativity and imagination - space. For example, you can make a flower bed out of old car tires and wheels by decorating the outer surface of the tires with a mosaic of shiny pieces.

Or you can cut a peacock out of a rubber tire, and make the tail from whole round discs - for this, they must be glued in pairs with shiny sides outward, and then they have a large triangle-tail, gluing the glued blanks in pairs with an overlap.

On a summer cottage fence made of discs, you can depict a huge iridescent caterpillar. You can paint the discs under a ladybug - red paint, black make spots and draw a head, and plant them on fruit bushes and trees.

Christmas decorations from disks
Due to the fact that the discs in the rays of light shimmer with all the colors of the rainbow, beautiful snowflakes will come out of them for the New Year's holiday - they are easily cut with scissors, you can cut out the most intricate pattern. You can hang snowflakes both on the tree and on the walls.

You can cut the discs into small pieces, thickly paste over a regular ball with them and hang it from the ceiling on a thread - it will rotate and sparkle, reflecting the lights of the New Year's garlands.

The application can be very different. From the disks, you can make an interior curtain in the likeness of a bamboo - to collect disks on long threads. They can make an ultramodern necklace, a fridge magnet, a vase, a candlestick, a stand for ballpoint pens and pencils, a box, you can even decorate a summer bag with them.

Unnecessary CDs are an excellent material for creativity, a means of spending leisure time - making certain little things out of them, and the opportunity to decorate a house or a summer cottage in an original and unusual way, without spending a lot of money.

Photo of ideas for fakes from discs


Nowadays, such information carriers as CDs are gradually fading into the background. Do not rush to throw away the iridescent circles that have become unnecessary, they can become an excellent material for creativity.
A second life for discs?
There are many ways to give a second life to old CD drives, in this article you will see some of them. Crafts from CD disks can be an excellent solution for an interior and a summer residence, or just help to have an interesting time while developing creative thinking along the way.

Creative people have long invented a huge number of options for beautiful crafts from discs for children and adults, you just have to reproduce their ideas, and maybe come up with your own.
Throwing away such wonderful and interesting material is a huge mistake. Using CDs, you can make unique interior items, original and stylish gifts are close, decorations for a summer residence and a garden: whatever your heart desires and what your imagination and perseverance will be enough for.

Check out some ideas for unusual uses for old computer disks and create wonderful new things with your own hands!

Lamp made of CD disks
If you are in urgent need of a new original lighting fixture - old discs will come to the rescue. This craft can be used both in the home interior and in the country.

You do not need special materials for this work: the main condition will only be to apply a little imagination and patience.

Be sure to follow our detailed step-by-step guide:

You will need 12 unnecessary discs, a protractor, metal staples or paper clips, a lamp holder and a thin drill.

First, we divide one of the disks into five identical segments. For these purposes, use a protractor: the angle between the segments should be approximately 72 degrees. This disc will serve as a template for the rest.

On the line of segments, about 3-4 millimeters from the edge, drill five small holes. The next step: put the rest of the discs in a stack and using the first disc (placing it on the very top of the stack) make exactly the same holes in the rest.

Support rods are required to keep the craft strong and hold well. For this, rods from ballpoint pens are ideal: insert the rods necessary for the role of guides into the holes just made.
If you've used a really thin, correct drill, you don't even need to fix the holes: they will fit perfectly.

The luminaire is almost ready, now we attach the remaining discs to the structure with brackets.

Now all that remains is to work with light: the last step is to screw the desired lamp into the socket.

Flower
If you've been dismantling old boxes in the country and found a lot of unnecessary discs, there is a great way to apply them to the beauty of your site. Crafts from garden discs look very original and interesting, in addition, they are incredibly easy to make.
In this mini-lesson, I propose to make small flowers from discs to decorate a garden, vegetable garden or yard in the country.
Note!


The toolkit for this craft does not require anything fancy: the right number of discs (it all depends on how many flowers you are going to make), a candle, scissors and paints to make the flowers brighter.

The manufacturing process does not require special skills, it is very fast, but at the same time it will captivate you from the first second.

All you need to do is to gently melt the discs over the candle (remember the safety precautions: it is best to do this not indoors and with a little water nearby to extinguish the fire in case of danger) so that the plastic goes in beautiful waves, similar to flower petals.

I offer step-by-step instructions for making a beautiful rose from disks:
- First, you need to cut the disc evenly along the entire length of the radius and heat one edge of the cut over the candle.
- When the plastic is hot and soft, take a pair of pliers and use them to roll the edge slightly to the side.
- Rotate the disc slowly over the flame and continue bending the molten fragments.
- At the end, you should have a small spiral that will become the rosebud.
- You can paint it in any color, attach a stalk of wire, cut leaves from other leaves and form a whole flower bed! It all depends on your imagination.

So, today you have learned how to make some simple crafts from old disks. I hope you found this tutorial useful and you learned a lot from it.
Note!


Photo of crafts from disks


Note!


And then I came up with!
It was decided to make a mug stand on my desk at work. It turned out like this:
The idea is clear from the photos. We take three corks and two CDs (I took the first discs I came across from the “CD Trash” box at my work, but, in principle, you can choose a disc with a very effective picture - experiment).
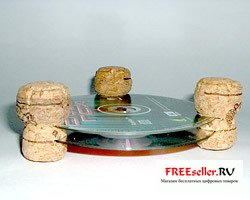
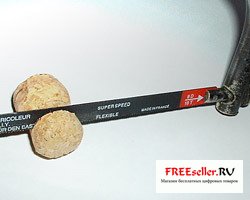
On the corks, we make cuts across half the diameter of the cork in the place where it was washed.
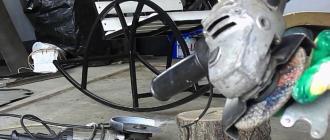
I used a hacksaw for metal. The cuts were obtained just to the depth of the hacksaw blade.
Of course, it is not necessary to use only two disks, more can be used.
When using three plugs, the stand always stands firmly on the table (three points describe the plane).
Therefore, the filing accuracy was not very important. If you are going to use more than three plugs, then you must be careful to make cuts at the same distance from the base of the plugs, otherwise the stand may wobble.

In principle, you don't need to glue anything, because if you use a hacksaw for metal, the thickness of the cuts turns out to be such that the disc is inserted with an interference fit and holds there very reliably - it easily withstands a mug of tea:
And if the discs are not glued, then from time to time (or as they wear / scratch) they can be replaced. Such "replaceable panels" are obtained :-).
I used plugs simply because I had them. In principle, anything can be used as supports.

Turned supports made of aluminum or stainless steel (with special equipment) would look especially cool. But if it goes, then the disks can be replaced with real glass.
But I had an idea to make a cool thing out of scrap materials that are usually thrown away.
Of course, you can complement this idea, for example, with bright LEDs installed inside, between the discs.
And if you install a switch that will work when something appears on the stand, then you can make the LEDs start blinking, and when the load is removed, they just light up (or not light up). In short, a huge field for creativity.
Another option for a homemade CD stand:
For work you will need:
1.4 CD.
2. 3 old, crumbling, unnecessary 3.5 "floppy disks.
3. Superglue (and best of all - dichloroethane).
4. Some medium grit sandpaper.
5. Liter PET bottle.
6. Sewing needle.
7. Gas lighter.
1) Take an old CD and sit along the line as shown in the figure.

The CD should be bent so that the protective side of the CD (with a picture) turns out to be outside, and the working side is inside the resulting corner.
The disc bends like this: we put it (protective surface up) on the edge of a table, stool, board or something like that.
Condition: the end should be perpendicular to the surface.
2) Begin to gently warm up the CD along the fold line with a lighter. When the plastic has softened, bend the disc around the edge.
3) Repeat the above operation with 2 more CDs to get 3 folded CDs.
4) Sand the bent parts of these discs from the protective layer of paint and aluminum spraying with sandpaper.
5) Using a heated needle, punch holes in the discs as shown in the figure.

6) Glue 3 discs to the fourth with superglue. You need to glue to the working surface of the fourth disc.

Advice for gluing CDs:
While the glue dries, we pick out the floppy disks and take out the springs from the sliding protective covers from them.
After the glue dries, insert these springs into the holes made with a needle.
7) Cut off the bottom of the PET bottle and insert it inside our structure.
8) And we get a ready-made stand from fear of CDs for pencils, pens and other stationery.