RUB 84,900
Freestanding washing machine ASKO W4086C.T.P
Leak proof. ... Maximum spin speed 1600 rpm. Noise level during washing 52 dB. Loading of linen - frontal. Delayed start. Noise level during spinning 77 dB. The maximum weight of dry linen is 8.0 kg. Water consumption for washing 55 l. Electronically controlled. Washing class - A. Energy efficiency class - A +++. Category - freestanding. With a special washing program for wool. Color - silver (stainless steel). Childproof. With a program for washing delicate fabrics. Weight: 74 kg. Dimensions 85x60x58 cm.
buy in online storepickup possible
video reviewPhoto
RUB 81,590

Smeg LST147-2 fully built-in washing machine
White colour. Electronic control. With a spinning noise level of 72 dB. Washing program for delicate fabrics. Tank material - stainless steel... Leakage protection. Special program for washing wool. With a washing noise level of 49 dB. Category - embedded. Anti-crease program. With a water consumption of 47 liters per wash. With a maximum dry weight of 7.0 kg. Loading of linen - frontal. Delayed start. Protection from children. Washing class - A. With a maximum spin speed of 1400 rpm. Energy efficiency class - A ++. With a width: 59 cm. With a depth: 56 cm. With a height: 82 cm. With a weight: 82 kg.
buy in online store Arsenal-BT.ruPhoto
RUB 14,700

CANDY DCS4 1051D1 / 2-07
Delayed start. Maximum spin speed 1000 rpm. The maximum weight of dry linen is 5.0 kg. Washing class - A. Tank material - stainless steel. Category - freestanding. White colour. Electronically controlled. Loading of linen - frontal. Energy class - A +. Leak proof. Weight: 65 kg.
buy in online store Premier Technopickup possible
Photo
RUB 37,690

Washing machine Smeg LST147 00-5501
Washing program for delicate fabrics. Delayed start. With a maximum spin speed of 1400 rpm. With a maximum dry weight of 7.0 kg. Loading of linen - frontal. Tank material - stainless steel. Electronic control. Energy class - A +. Category - embedded. With a wash noise level of 56 dB. Anti-crease program. Protection from children. Washing class - A. Color - white. With a spinning noise level of 72 dB. Special program for washing wool. With a water consumption of 47 liters per wash. Leakage protection. With a depth: 56 cm. With a width: 59 cm. With a height: 82 cm. With a weight: 82 kg.
in online store bt-onlain.ruPhoto
RUB 15 716

Washing machine Candy GVS34 126TC2 / 2-07 403-321
Maximum spin speed 1200 rpm. Noise level during spinning 77 dB. With a program for washing delicate fabrics. Tank material - stainless steel. Category - freestanding. Noise level during washing 56 dB. White colour. Energy class - A. Delayed start. Washing class - A. The maximum dry weight is 6.0 kg. Water consumption for washing 48 liters. Loading of linen - frontal. Electronically controlled. With a depth: 34 cm. With a width: 60 cm. With a height: 85 cm. With a weight: 61 kg.
in online store euro-btPhoto
RUB 28 985
LG F4M5VS6W, white
Category - freestanding. With a maximum dry weight of 9.0 kg. With a maximum spin speed of 1400 rpm. Loading of linen - frontal. Delayed start. Tank material - stainless steel. Special program for washing wool. Energy class - A. Protection against leaks. Protection from children. White colour. With a spinning noise level of 53 dB. Washing class - A. Width: 60 cm. Height: 85 cm. Depth: 56 cm. Weight: 62 kg.
in online store CompYoupickup possible
Photo
RUB 28,990
VestFrost VFWM 1250 SWL 139853
Delayed start. Electronically controlled. Childproof. Energy class - A +++. Washing class - A. Load of laundry - frontal. Noise level during spinning 78 dB. Tank material - stainless steel. Category - freestanding. Noise level during washing 58 dB. Leak proof. With a program for washing baby clothes. Maximum spin speed 1200 rpm. With an economical program. The maximum weight of dry laundry is 7.0 kg. White colour. With a special washing program for wool. With a program for washing delicate fabrics. With a width: 60 cm. With a height: 85 cm. With a depth: 53 cm. With a weight: 68 kg.
in online store shop-4allRUB 84,900
Freestanding washing machine ASKO W4086C.W / 1
Anti-crease program. Washing class - A. Tank material - stainless steel... With a water consumption of 65 liters per wash. Electronic control. Category - freestanding. With a spinning noise level of 73 dB. Protection from children. Loading of linen - frontal. White colour. Energy class - A +++. Leakage protection. With a maximum spin speed of 1600 rpm. Delayed start. With a washing noise level of 48 dB. With a maximum dry weight of 8.0 kg. Special program for washing wool. Washing program for delicate fabrics. With height: 85 cm. With width: 60 cm. With depth: 59 cm.
in online storepickup possible
RUB 17,610

CANDY GVS34 126TC2 / 2-07
Loading of linen - frontal. Electronically controlled. Energy class - A. With a washing program for delicate fabrics. White colour. Delayed start. Tank material - stainless steel. The maximum weight of dry linen is 6.0 kg. Water consumption for washing 48 liters. Noise level during washing 56 dB. Category - freestanding. Maximum spin speed 1200 rpm. Washing class - A. Noise level during spinning 77 dB. Weight: 61 kg. Dimensions 85x60x34 cm.
in online store Premier Technopickup possible
Photo
RUB 36,760

Washing machine De Dietrich DLZ 714 B 020-601
Energy class - A +. Delayed start. Black colour. With a maximum dry weight of 7.0 kg. With a maximum spin speed of 1400 rpm. Leakage protection. Tank material - stainless steel. Loading of linen - frontal. With a water consumption of 54 liters per wash. Washing class - A. Anti-crease program. Electronic control. Special program for washing wool. Category - embedded. Washing program for delicate fabrics. With a depth: 59 cm. With a height: 82 cm. With a width: 59 cm. With a weight: 75 kg.
in online store bt-onlain.ruPhoto
RUB 11,060

Washing machine Candy CS4 1052D1 / 2-07 342-183
Loading of linen - frontal. Category - freestanding. Energy class - A +. With a special washing program for wool. Delayed start. Tank material - stainless steel. Electronically controlled. Washing class - A. Noise level during washing 58 dB. Childproof. Water consumption for washing 45 liters. Noise level during spinning 77 dB. White colour. Maximum spin speed 1000 rpm. With a program for washing delicate fabrics. Leak proof. The maximum weight of dry linen is 5.0 kg. With anti-crease program. With a width: 60 cm. With a depth: 40 cm. With a height: 85 cm. With a weight: 65 kg.
in online store euro-btRUB 13 685

Candy GVS34 116D2 / 2-07, white
Category - freestanding. Loading of linen - frontal. Anti-crease program. With a spinning noise level of 77 dB. Delayed start. Washing class - A. Tank material - stainless steel. Economical program. Washing program for baby clothes. Electronic control. White colour. With a maximum dry weight of 6.0 kg. With a maximum spin speed of 1100 rpm. Special program for washing wool. Washing program for delicate fabrics. Leakage protection. Energy efficiency class - A ++. With a wash noise level of 56 dB. With a water consumption of 48 liters per wash. Width: 60 cm. Depth: 38 cm. Height: 85 cm. Weight: 61 kg.
in online store CompYoupickup possible
RUB 32,024

Teka LI4 1270 140392
Noise level during spinning 70 dB. Loading of linen - frontal. Energy class - A +. With a special washing program for wool. Noise level during washing 56 dB. Tank material - stainless steel. Delayed start. Maximum spin speed 1200 rpm. Electronically controlled. Washing class - A. Water consumption for washing 52 liters. The maximum weight of dry laundry is 7.0 kg. White colour. Category - embedded. With a program for washing delicate fabrics. Leak proof. With a height: 82 cm. With a width: 60 cm. With a depth: 56 cm.
in online store shop-4allPhoto
RUB 65,900

Freestanding washing machine ASKO W2086C.W.P
Category - freestanding. Loading of linen - frontal. Anti-crease program. Delayed start. With a maximum spin speed of 1600 rpm. Tank material - stainless steel. Washing class - A. Childproof. Economical program. With a maximum dry weight of 8.0 kg. With a spinning noise level of 75 dB. Electronic control. With a wash noise level of 54 dB. White colour. Energy class - A +++. With a water consumption of 55 liters per wash. Special program for washing wool. Washing program for delicate fabrics. Leakage protection. With a depth: 59 cm. With a width: 60 cm. With a height: 85 cm. With a weight: 74 kg.
in online storepickup possible
Photo
RUB 24,470
LG F2J3HS0W
Category - freestanding. With a program for washing baby clothes. Loading of linen - frontal. Noise level during washing 55 dB. With a special washing program for wool. Tank material - stainless steel. Maximum spin speed 1200 rpm. Electronically controlled. Washing class - A. Noise level during spinning 73 dB. Childproof. Energy class - A. The maximum weight of dry laundry is 7.0 kg. White colour. With a program for washing delicate fabrics. Water consumption for washing 56 l. Weight: 59 kg. Dimensions 85x60x44 cm.
in online store Premier Technopickup possible
Photo
RUB 36,760
Washing machine De Dietrich DLZ 714 W 00-5000
Loading of linen - frontal. Anti-crease program. Energy class - A +. Delayed start. With a water consumption of 54 liters per wash. Washing class - A. Tank material - stainless steel. With a maximum spin speed of 1400 rpm. Electronic control. With a maximum dry weight of 7.0 kg. White colour. Special program for washing wool. Category - embedded. Washing program for delicate fabrics. Leakage protection. Depth: 59 cm. Height: 82 cm. Width: 59 cm.
in online store bt-onlain.ruIf you are a savvy person, then you will never throw away old containers, especially since they are made of stainless steel. The old washing machine has been out of service for a long time and takes up the required area. You look at a stainless steel tank from an old round washing machine and your thoughts give rise to many ideas for its use.
In life, there are many examples of the use of this reliable steel element of an obsolete structure.
Examples of using the tank on the farm
First you need to disassemble the body of the washing machine and take out the tank. To start using a stainless steel tank in your household, you need it to stand upright. So the tank needs legs.

Side view of the tank from the washing machine.

The legs for the tank can be welded to a separately invented support structure and the tank can be inserted into it. Just like in the photo.

And you can make wooden legs of the structure from scrap materials. To do this, take three pieces of wood plinth of the same length. These will be the support legs.
Then, from two pieces of perforated galvanized tape, make two hoops. Tighten the perforated bands for the hoop using the M4 bolts. Put the hoops on the tank and insert the wooden legs spaced 120 degrees apart.
Fix the hoops and legs at the intersection with six self-tapping screws. The legs rest against the top rim of the tank and provide it with a stable position even on uneven terrain.
The lid for the tank is from an old washing machine.

Pickled Apple Cooking Tank
To store liquid in the tank, you need to remove the holes there. Therefore, champagne corks are inserted into the holes for draining water and activator. There should be no leakage.
The Antonovka apple variety is simply irreplaceable in urination.

Perhaps someone is interested in the recipe for making soaked apples.
A step-by-step recipe for soaked apples.
- Wash the apples.
- Scald currant and cherry leaves.
- Cover the bottom of the tank with these leaves.
- Put apples in the tank.
The preparation of the filling is as follows... For 10 liters of water, you need to take from 100 to 300 g of sugar and 2 tablespoons of salt and mustard.
- Boil water with sugar and cool. Sugar can be replaced with double the amount of honey, but you do not need to boil it.
- Add salt and mustard, mix well.
- Pour the filling so that the fruits are completely covered.
- Place the tank with apples and filling in a warm place at a temperature of 15 - 20 degrees for 5 - 7 days.
- Then transfer the container to a storage facility where the temperature is maintained at 0 - 5 degrees.
- If mold appears on the surface, it's okay. The mold must be carefully washed off once a month.
- After 35 - 40 days the apples are ready to eat.


Bon Appetit!
Washbasin from the tank of a washing machine photo

Do-it-yourself homemade products are simple and understandable.
Grill - homemade do-it-yourself from the tank of the washing machine photo

How to make a brazier from a washing machine tank video
Thus, do not rush to throw away old things. Your ingenuity will help them find their new and useful application.
Looking at an old washing machine, any housewife wants to quickly replace it with a new assistant. A home craftsman, on the contrary, does not rush to throw the machine into the junk. He ponders where this "wealth" can be accommodated.
Answering the question of what can be done from a washing machine, we will carefully consider it from all sides.
We will see that there are many useful components and assemblies in the design that can get a new life in the hands of a good master.
Judge for yourself: the body and the engine, pulleys and drum, a window with a sealed door, relays and switches - this is a list of components from which you can make a lot of things and mechanisms useful in the household.
Let's explore together the most popular homemade options from old washing machines, both conventional and automatic.
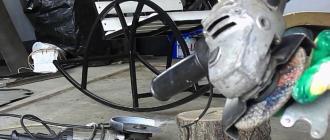
Grinder
The first thing you should pay attention to after examining an old household washing machine is the engine. It has enough power and speed to make a homemade sharpener. Complex modifications are not required here.
For the shaft, you need to make an adapter nozzle on which the grinding wheel will be attached. If we provide an additional "neck" for the cutting wheel at the seat, then together with the sharpener we will get a cutting machine. They can cut not only plastic pipes, but also metal (reinforcement, sheet or corner).
As you can see in the photo, the washing machine motor is attached to the frame with four brackets. The switch for him is removed from the same washing machine. As a base, a regular piece of thick board was used. The option turned out to be quite acceptable, especially considering its mobility and ease of manufacture (no welding required).
Here is another similar use of the engine for installing a grinding and cutting disc. Having put them on a common adapter, they are clamped with a nut with a left-hand thread.
Simple crafts from an old washing machine
Not every person knows how to masterfully work with welding or a lathe. Nevertheless, even in this case, you will be able to find a worthy use for the old washing machine. Look at the window that covers the drum. This is a masterpiece of engineering and a godsend for design.
Without further ado, many use it for its intended purpose, but in a renewed context. Cut out the washer door along with a part of the body and you get an excellent "sea" porthole. It will look original in any interior.
If you love your yard guard, then be sure to decorate his booth with such a modern "facade".
In addition to the original look, this option is of practical importance: the dog, if necessary, can be easily isolated from the guests, without fear for their legs and clothes.
Just do not forget to make side ventilation holes in the booth (the window at the washing machine is sealed!).
Washer coffee table
Your old washing machine is an automatic machine, or rather its drum, will help to decorate the interior of the apartment. You can build an original coffee table from it. Perforated stainless steel, complemented by colored lighting, looks great.
It is not difficult to make such an unusual piece of high-tech furniture. You will need a few steel rods to attach to the washer drum. A round glass or MDF board is fixed on them.
Brazier
The body of the washing drum, made of durable and high quality "stainless steel" withstands very high temperatures. Therefore, it can be used as a barbecue.
Several pipes, half an hour of welding and a convenient barbecue grill will appear on your estate. Having made the supporting part of the structure collapsible, you can take it with you to suburban picnics.
For the manufacture of barbecue, drums from front-end machines, as well as from top-loading washing machines, are suitable. In this case, you will have to cut off one of the sides of the case with a grinder, and provide it with a stable support from below.
Mobile smokehouse
Why buy an expensive smokehouse for fish and meat when an old washing machine is idle on the farm? There are many options for its use in this capacity.
We will focus only on a mobile device. It can be made from a drum removed from a top-loading washer.
To prevent smoke from escaping through the side perforated holes, they must be muffled with a thin steel sheet, wrapped and secured around the body. From above, as it should be in a real smokehouse, we make a hole for the chimney. We fix a smoking grate inside the drum (you can take it from an old gas stove).
Concrete mixer
This is a rather complex device, which, in addition to mixing concrete, must ensure its unloading. Therefore, when planning to make a concrete mixer out of an old washing machine, first weigh your locksmith skills and knowledge.
The easiest way to turn a washer-barrel into a concrete mixing device is to replace the standard activator with two-shaped blades. They can be made from 4-5 mm thick steel strip. To do this, you need to cut it to size, then bend the two blades and rotate them 90 degrees relative to each other.
Then they need to be welded to the shaft passed through the hole for the remote activator.
The drain hole, which is in every washer-barrel, must be plugged. Next, we proceed depending on how much concrete will need to be kneaded. If we are talking about 1 bucket, then you can leave the old single-phase motor.
If you need to prepare a large volume of concrete, then in place of the old motor you will have to install a more powerful one (0.75-1.2 kW) with low revolutions (1300-1500 per minute).
In addition, the "native" belt drive must be replaced by a gearbox that reduces the speed (from 1300 to 25-30) and increases the torque on the agitator blades.
Note that the best mixing quality is obtained when it is not the shaft with the activator that rotates, but the concrete mixer body itself with the blades fixed in it. However, to create such a design, a deeper and more complex modification of the washing machine is required.
Sterilizer for conservation
Another homemade product from an old washing machine-barrel will be useful for giving and part-time farming. This is a sterilizer in which you can install a dozen cans for heat treatment.
The only point that needs to be taken into account: such a device is suitable for sterilizing fruit and vegetable products. For processing meat, a higher temperature is needed (above + 100C).
The sequence of rework looks like this:
- A plug is placed on the hole of the activator;
- A thick wire mesh for cans is mounted on the bottom;
- You need to substitute a support under the mesh;
- A hole is drilled in the body for the installation of a 2 kW electric boiler.
1. Cap of the activator;
2. Water level;
3. Tank from the washing machine;
4. Cover;
5. Drain hose;
6. Banks with conservation;
7. Wire mesh;
8. Electric boiler (heating element) for 2 kW;
9. Electric cable.
Juicer
Two options are possible here:
- Using an old machine with a centrifuge and a washing compartment;
- Alteration of a conventional washing machine-barrel.
Let's say right away that the first option is better, since it allows you to implement two processes in one device with minimal modifications: chopping and squeezing fruits. To do this, you will need a washer, in which the activator is located at the bottom, and not on the side wall. Replacing it with three homemade strip steel knives, we get a fruit slicer.
Knife installation diagram:
1. Knife,
2. Shaft;
3. Clamping nut;
4. Washer;
5. The bottom of the tank;
6. Bearing unit with oil seal;
7. Activator pulley;
8. Locking screw.
The drain hole of the washing tank must be plugged.
There are few additional treatments for the second unit - the centrifuge. It is necessary to install a stainless steel mesh in it (mesh size 1.5 mm, wire thickness 0.2 mm) so that it covers the side surface of the centrifuge.
Thoroughly washing the centrifuge, washing tank, hoses and pump with baking soda, you can make the first bookmark.
The principle of operation of such a juicer is very simple. The fruits are washed and in small portions (1/2 -1 bucket) loaded into the washing tub (knives must be turned on). After 15-20 minutes of cutting, the engine is turned off and the crushed mass is transferred to a centrifuge (3-4 liters in portions). Turning on the centrifuge, squeeze the juice.
It is much more difficult to make a juicer from a washer-barrel or automatic machine. A homemade centrifuge can become a stumbling block in the barrel. Making it is half the battle, the main thing is to achieve perfectly accurate alignment. Without this, at high speeds, it begins to vibrate strongly and it will be impossible to squeeze out the juice.
Here is a drawing of a working sample. The master had to work hard to reduce the beating of the centrifuge (the engine is suspended from the washer body on 6 springs). Of these, 3 balance the engine in the horizontal plane, and 3 others press it up. The body itself rests on an old car tire that dampens vibration.
Feathering machine
The body of an old washing machine is suitable for assembling a device with which you can remove feathers from poultry carcasses. To make it, a steel disc with a thickness of 3 mm and a diameter slightly smaller than the diameter of the tank must be installed at the bottom of the tank.
Holes are drilled in it and special rubber fingers are placed in them. They are the most expensive elements of the future design ($ 1.5-2 per piece). On average, they need 120-140 pieces. The diameter of the fingers depends on the type of bird being plucked. Consider this moment when you place your order.
All other units of the washer, including the engine, can be left unchanged. Holes are drilled in the side walls of the case for installing feather (beater) fingers. To do this, you need to step back 15 cm from the bottom of the tank.
The distance between the holes for the fingers is chosen within 3-4 cm. The lower disc is mounted on the drive shaft.
The drain hole does not need to be plugged here. It will be needed to drain the water that flows from the carcasses. After scalding the bird in boiling water, it is placed in a tank and the engine is turned on. The rubber fingers remove the nib quickly and cleanly.
Craftsmen even got the hang of making various modifications of smokehouses based on a washing machine. The general principle is that sawdust is poured at the bottom of the tank, which are heated from below.
A container for collecting fat is installed inside, above - grates, covered tightly with a lid. Each hand-made product is a device for hot smoking of meat, bacon, fish, poultry. The difference is in the way the sawdust is heated to produce smoke. Let's consider several options.
Gas burner to help
The steel at the tank of the old washing machine is very durable, it is not afraid of temperature extremes. The only thing - you need to check that you are not the owner of a typewriter with an aluminum container.
Aluminum is not suitable for a smokehouse - when heated, it forms compounds that are unacceptable for getting into food! The smoker tank should be taken only from stainless steel.
There is a hole at the bottom of the container from the washing machine. You can use this moment to your advantage: connect a gas burner there. It remains to install a suitable container for chips above it. We turn on the burner to the required power - the sawdust heats up and smokes. The main thing is to adjust the heating power so that the chips do not catch fire.

An excellent option for placing products is on hooks that are welded to the lid. For small pieces or carcasses, the built-in grill works well.
You can do without a gas burner - heat the bottom of the smokehouse over a fire. For this, legs are made at the tank, and the drain hole is tightly sealed. By the way, it is convenient to make such a smokehouse with your own hands from a tank not only of an activator type machine of the old model, but also from a washing machine. Its drum, turned upside down, can be heated on the grill. The main thing is to seal it with a lid.

All plastic parts must be removed. If the rotating element is made of metal, then you can safely leave it.
Two in one - a smokehouse with a stove
An interesting option for making a smokehouse with your own hands is when an oven is built directly in the body of the washing machine, which heats the sawdust. That is, not only the tank is involved here, but also the metal case itself.
The sequence of actions is as follows:
We remove the motor from the car, take out the tank, cut a rectangular hole in the body.

Cut a hole for the firebox
We seal the tank: in order to seal the holes without using welding, you can use self-tapping screws on which metal plates are put on, they will close all the holes.
A grill from the refrigerator, oven, or some other mesh is suitable as a shelf for food. We weld it inside the tank.

We seal the lid - also with the help of a plate and self-tapping screws.
We install the tank in its original place. Put about 100 grams of sawdust on the bottom, place food on the wire rack.
If you don't have a washing machine, you can replace it!
We make a fire through the cut-out hole under the tank. If it is undesirable to do this on the surface where the smokehouse stands, then it is good to weld a metal sheet inside and put firewood on it.
When smoke comes out, you need to measure the time it takes to smoke a particular product. In the process, it is advisable to check the condition of the meat or fish and make sure that the chips do not overheat.
We collect an electric smokehouse
If you don't feel like messing around with a fire, wood, open fire, you can choose another heating source. For example, a spiral-heating element.
True, in order to equip a smokehouse with them with your own hands, you need to have certain skills and abilities. Firstly, you will have to carry out a lot of welding work with your own hands. In addition, electricity is always a danger, and everything needs to be done correctly with a heating source.
The tank is taken from the washing machine, as in the previous examples. The bottom of many machines is beveled. You can leave it that way, but then it is difficult to achieve uniform heating of the sawdust. It is better to cut it off and weld on an even piece of metal. Or systematically look for an old washing machine without a bevel.

The bottom of the tank of the machine must be leveled by welding the sheet
A good option is a smokehouse with two washing machines. We cut off the bottom of the tank at the one that will be on top and weld it with the second tank. However, here it must be borne in mind that the containers for different machines may differ in diameter. Check if you can connect them before starting work.

Next, we weld three or four legs. Inside - a grid or a pair of grids if the capacity is high, for example, from two machines. This way you can increase the amount of smoked products, and the degree of heating will be different at the top and bottom. At the very bottom, it is good to make a stand for the container, where the fat will drip - this applies to all smokers.

two tanks welded together
The most critical part is the heating source. The spiral is suitable for 1 kilowatt. If the bottom is thin, a spare stainless steel plate is welded on to avoid burning out. Fasteners for the spiral can be made by welding iron plates around its perimeter. Install heating elements, make insulation from ceramic felt and mineral wool. The bottom of the second machine is suitable as a cover. Take out the wires, install the terminals.
We fix the heating element from the bottom of the tank We cover it with a special felt
After welding, a check of the tightness of the seams is required. Before carrying out it, it is advisable to withstand a couple of days, during which microcracks may appear in the metal. The easiest way to test for leaks is with water.
There are other options for making a smokehouse with your own hands from various containers, including a tank from an old washing machine. You can use this container as a smoke generator for cold smoking. You can, on the contrary, equip the smoke source separately, and place products for smoking in the tank. The main thing is to follow the basic rules for preparing food in this way. And then you can delight yourself and loved ones for a long time with safe tasty delicacies.
If the reason for the breakdown of an automatic washing machine is a tank or a moving element located in the tank, this means that you will have to disassemble the machine to the ground. First, you will have to remove the tank, while disassembling the body of the machine, and then disassemble the tank itself, and then put everything back together. This is a rather laborious work, so repairs need to be done once and conscientiously, so that you do not have to, then re-disassemble the machine. To make a DIY repair from start to finish correctly, check out our article.
What's breaking in the car's tank?
The tank of the Indesit washing machine (or any other) is its main part, which contains the drum and other moving elements. It is in the tank that water is collected and, in fact, washing takes place in it, even though the laundry is in contact with the walls of the drum, not the tank. At first glance, it seems that the tank itself cannot break down, because it is only a reservoir. Moving elements in it are another matter, but this is a common misconception. So what can break in the tub of an automatic washing machine?
- Bearings. This is a movable element located in the tank. The bearings themselves cost a penny, but changing them will take a lot of effort. In this case, there is a risk of serious damage to the shaft, pin and other elements.
- Shaft. May deform if bearings are not repaired.
- Tank walls. May bend due to centrifugal force from contact with the drum if shock absorbers and bearings are damaged. In the worst case, the walls can be damaged, which will compromise their tightness.
- Tank drain hole. The hole itself, of course, cannot break. But a drain valve is installed on it, which may fail. In addition, the drain hole may become clogged and must be cleaned.
Note! If the bearing is not repaired in time, this can lead to the complete destruction of the tank by the backlash drum. After that, the tank will definitely have to be changed!
Features of assembly and disassembly of tanks
The procedure for disassembling the tank of an automatic washing machine is similar in all cases. Although we will be dealing with a non-collapsible "version" of the tank, even with a collapsible one. It is quite possible to disassemble the washing machine tank with your own hands, but you need to act very carefully. We deliberately decided to describe the whole process using the example of a non-separable tank, since it is somewhat more difficult to cope with it.
At the first stage, we carefully examine the tank body from all sides. Our task is to locate the welded seam, as well as outline the places where we will drill holes for future fasteners. After that, we take an electric drill, a thin 3 mm drill and drill 15-20 holes in a circle, as shown in the figure below.

Further, the crucial moment, we need, acting as carefully as possible, to saw the weld seam of the tank body into two halves with our own hands, using a hacksaw for metal. This work will take a lot of time, so please be patient and go ahead. So non-collapsible tanks turn into collapsible ones.
Important! When cutting the tank body, do not go too deep, a maximum of 5 centimeters, because the walls of the body are not thick. If the hacksaw blade slips deeper, you risk damaging the drum walls.
After you can cut the tank, you should get two halves - the front part and the back part. The front part is a small irregular plastic ring, in the middle of which there is a hatch and a rubber cuff. In the rear half of the body is the entire drum, together with the drive mechanism, which can now be removed. 
We take the rear half of the tank and turn it over with the drum hatch down. Now we need to disassemble the shaft without damaging its main fastener - the screw in the middle. To unscrew it, you need to take a metal rod (a center punch works well), point it at the screw and hit the rod several times with a bronze or ordinary hammer. Next, take a Phillips screwdriver, unscrew the screw. 
The next stage of disassembling the tank is reduced to the correct removal of the shaft from the stem. This is how it is done. First, take a small wooden block and two large blocks. We substitute large bars under the edges of the tank so that it stands on them more or less stable. We take a hammer and a small block, direct the block to the stem and hit it several times with a hammer. We apply blows like this: first a weak blow, then a little harder, then a little harder. After that, the drum should separate from the tank body. 
Note! You do not need to hit the rod with all your strength through the block. The stock looks reliable, but looks are deceiving, so in order not to damage the part, measure the force of the impact, it is better to play it safe.
The next step is related to the dismantling of the bearings from the tank housing. If the bearings are in good condition and the problem is in a deformed or leaking tank, they can not be touched, since they do not interfere with repairs. But if the malfunction is associated with bearings and seals, they must be removed. We take our metal rod, direct it to one of the bearing edges and apply a light hammer blow to it. We transfer the rod to the other end of the bearing and strike again.  You cannot hit only one edge of the bearing, as it will open up, and then it will have to be drilled with a step drill. We extract and. After replacing and repairing all faulty parts, we assemble the tank in the reverse order. At the same time, we coat the edges of the sawn parts with a sealant or cold welding and connect, and through the pre-drilled holes we pass the bolts and fix them with nuts. The bolt sizes will depend on which drill you used.
Troubleshooting
After successful disassembly of the tank, we begin do-it-yourself repairs. We have already mentioned the process of replacing bearings, so we proceed directly to repairing the tank housing. We begin repairing damaged tank walls with an inspection and assessment of the nature of the damage. Much will depend on the material from which the tank is made. If it is plastic, cracks can form on it, through which water seeps.
Some homebrew artisans suggest soldering the crack and continuing to operate the tank. In our opinion (and experts agree with us), such a spike will not last long and then it will be necessary to repair the machine over a new one. Better to get a new tank body and replace it. A plastic tank body is cheaper than a metal one.
If the tank consists of stainless steel, and a "hole" has formed in it, it is quite possible to weld it up, and it will still serve for some time. In this case, we recommend delegating the welding work to an experienced welder who must do everything quickly and accurately. After welding, paint over the weld seam with waterproof enamel - this will further extend the life of the tank. In general, there are no other adequate ways to repair broken metal tanks - only welding or a complete replacement of the unit. No amount of sealant or cold welding will help in this case. 
To repair the bent metal tanks of the washing machine, it is necessary to make repairs in the following order.
- We take an ordinary hammer and a wooden block. If the dent is small and the tank has no holes, nothing else is needed.
- Using a gas burner, we heat the dent, heating the outer wall of the tank.
- We install the block on the bulge of the tank, corresponding to the dent on the outside and until the metal has cooled down, lightly hit it with a hammer. The dent should straighten out.
- We visually inspect the drain hole, remove the pile, hair, caked dirt and water stone. If you can't do this with your hands, use sandpaper.
- We check the sealing gum and the cuff of the drain valve of the washing machine tank. If the rubber from time to time "hardened", became hard and cracked, you need to change both the cuff and the sealing gum.
- We take a multimeter and check the contacts of the drain valve, if the resistance is 1, then the unit is faulty. It is necessary to replace the valve with a new one.
Important! Be careful, before checking the valve with a multimeter, thoroughly clean its contacts, and only then take measurements.
In conclusion, we note that it is quite difficult to repair the tank of a washing machine with an automatic machine. It is necessary to properly disassemble the machine, remove the tank, then disassemble the tank itself without errors, and only then proceed with the repair, and it is not a fact that this repair can be done at home at all. Everything will depend on the type of breakdown.