This article introduces the basic concepts used in Microsoft Word to help new users get started creating complex, professional-looking documents.

Heading 1
On the panel quick access 2 Preservation, Cancel, and Return
File tab 3 New, Open, Preservation, Seal and Close.
ribbon 4
Edit window 5
Scroll bar 6
Status bar 7
8
In Word, you need to save the document to exit the program without losing data. When you save a document, it is stored as a file on local computer or in network folder... A later version can open the file, edit it, and print it.
Open File Explorer and select the documents... A list of documents will appear.
If the document you want to work on is listed, click the file name to open the document. If the document is not listed, navigate to the location where the file is stored and double-click the file. The Word splash screen appears, and then the document is displayed.
Advice: file and choosing the command Open... To open a recently saved document, click the last.
Most of the text formatters can be found by clicking on the tab home, and then, choosing in the group " Font ».

1 it's on the tab home.
2 this group " Font"on the tab" home ".
3 Font ».
|
Change the font. |
||
|
Font size |
Change the size of the text. |
|
|
Increase the font |
Increase the size of the text. |
|
|
Decrease the font |
Decrease the size of the text. |
|
|
Change case |
Change the selected text to uppercase, lowercase, or other common word styles. |
|
|
Removes all formatting from the selected text, leaving only plain text. |
||
|
Bold |
Bold the selected text. |
|
|
Italicizes the selected text. |
||
|
Underlined |
Draws a line below the selected text. Click the drop-down arrow to select the type of underline. |
|
|
Crossed out |
Draws a line centered over the selected text. |
|
|
Subscript |
Creates subscript characters. |
|
|
Superscript |
Creates superscript characters. |
|
|
Text Effects |
Apply to selected text such as shadows, glow and reflection visual effects. |
|
|
Text highlight color |
Turn text attractively marked with a highlighter. |
|
|
Font color |
Change the color of the text. |
Using styles
Styles allow you to quickly format basic elements in your document, such as headings, headings, and subheadings. Follow these steps to apply styles to text in your document.
Select the text you want to change.
In the tab home in a group Styles hover over any style; live preview is available directly in the document. To view full list styles, click the arrow Additionally to open the area styles.
To apply the style that best suits your text, click it.
When you're ready to apply styles to individual elements, Word lets you use a set of styles at the same time to change the look of your entire document.
On the " Constructor" in a group Document formatting choose one of the preset style sets, for example Regular authentication or ordinary... Move the pointer over any style assigned to the live preview directly in the document. To see a preset style set, click the down arrow to the right of the group Document formatting.
To apply the style set that best suits your text, click it.
Change line spacing in a document
WITH using Word you can easily change the spacing between lines and paragraphs in your document.
On the " Constructor"select Spacing between paragraphs to see a drop-down list of paragraph spacing options. Hover over any paragraph style for live preview directly in your document.
When will you find desired view, click it.
Advice: To set your own paragraph spacing, select Custom paragraph spacing.
Preview and Print
Short review user interface Word

Heading 1 : Displays the file name of the document being edited and the name of the program you are using. It also includes standard minimize, restore, and close buttons.
On the Quick Access Toolbar 2 : commands that are commonly used, such as Preservation, Cancel, and Return Here are. At the end of the Quick Access Toolbar is a drop-down menu where you can add other commonly used or frequently used commands.
File tab 3 : Click this button to find commands that execute the document itself instead of the document content, such as New, Open, Preservation, Seal and Close.
ribbon 4 : the commands you need to work are located here. The appearance on the tape will vary depending on the size on the monitor. Word will shrink the ribbons by reordering their controls to fit smaller monitors.
Edit window 5 : shows the content of the document you are modifying.
Scroll bar 6 : allows you to change the position of the screen you are editing the document.
Status bar 7 : The display of information about the document you are changing.
View buttons 8 : allows you to change the display mode you are editing the document according to your needs.
Slide scale control 9 : Allows you to change the zoom settings of the document you are resizing.
Saving and opening a document
Specify a location to save the document in the field Save to... When the document is saved for the first time, it is pre-filled as a file name in the field File name enter the first line of text in your document. To change the file name, enter a new file name.
The document is saved in. Change the file name in the title bar to match the name of the saved file.
Can be opened Word document to continue working. To open a document, do the following:
Click the Start button and select the documents.
Browse to the location where the file is stored and double-click the file. The Word splash screen appears, and then the document is displayed.
Advice: You can also open the document in Word by going to the tab file and choosing the command Open... To open a recently saved document, select Recent
Editing and formatting text
Before you edit or format the text, you must first select the text. Follow the steps below to select text.
Place your cursor at the beginning of the text you want to edit or format and press left button mice.
Hold down the left mouse button and move it to the right (called "dragging") to select the text. A background color will be added at the location to indicate the selection range of the selected text.
Most of the text formatters are found by clicking on the tab home, and then, choosing in the group " Font ».
1 it's on the tab home.
2 this group " Font"on the tab" home ".
3 this is the Bold button. In the table below, for the names and functions of the "" buttons in the " Font ».
|
Change the font. |
||
|
Font size |
Change the size of the text. |
|
Many users who have to write a lot do not know how to use Microsoft Word 2010 (Microsoft Word 2010), and do not even pay attention to it. Meanwhile, it is the most wonderful program for doing this kind of work.
What is good about it? First of all, this is a spell checker. But that's not all. This program is practically the only one in which you can see that the punctuation marks are incorrectly placed.
Those who know how to use it can also quickly format text (change the font type, color, size, insert a hyperlink, pick a background, align the text, and much more). However.
Also, we must not forget that in Microsoft Word 2010 a system for replacing words with synonyms is very well developed, only the dictionary in it is not the largest, but the benefits from it are enormous. So, let's get down to the instructions.
How to use Microsoft Word 2010
Learning to use Microsoft Word 2010 professionally will take time, so I will focus only on the main points, which are quite enough to write high-quality texts.
First, we will learn how to insert text. To do this, copy it to the clipboard and click on the icon as shown in the figure:
As soon as you insert the text, and Microsoft Word 2010 detects an error in the word, it will immediately be underlined with a red wavy line.
If the sentence is underlined with a green line, then the punctuation marks are incorrect (in 2013, 2016 the color is different).
If you click on a word (underlined in red), but you will be presented with a choice of others. With punctuation marks a little differently, there you go to pick them up, by trial.
Immediately, I note that 100 percent Microsoft Office 2010 will not fix the error, there is no such smart program yet.
Microsoft Word 2010 instruction (synonyms)
Using Microsoft Word 2010 to replace synonyms is simple and convenient. If you need to replace a word, just click on it with the right mouse button, find synonyms in the window that opens, move the cursor there, select the most suitable one and click on it.
This article covers just a few highlights. If you need to study the Word in more detail, then you can follow the link ahead for free.
If you need to change the font, text size or format (left, right, middle), see as shown in the figure.

Click on these options to select the options you want. This instruction is of course very small, but how to use Microsoft Word 2010, I think for beginners - it will help.
In conclusion, I would only like to say that the best program than Microsoft Word 2010, I have not seen for writing text.
If you disagree, please express yourself in the comments, I think many will be grateful, not just me.
Categories: UncategorizedWe are studying the most popular text editor Microsoft Word. In this tutorial, you will learn how to create a new document, enter, edit and format text, create lists, apply styles, and much more.
With this article, we open a whole cycle of training materials with which you will learn how to create high-quality text documents in the most popular application in this area - Microsoft Word (Word). The presentation here will go in a rather primitive language, which may at first scare off readers who are already partially familiar with this editor. But, believe me, you will most likely find useful information in this cycle.
Microsoft Word is a text editor (processor) for creating professional looking documents. The name Word was not chosen by chance, because in translation from English it means “Word”.
Due to the fact that Word combines the most modern text formatting tools, it can be used to easily create documents of any complexity and organize them. In addition, with powerful editing and editing tools, this application provides an easy-to-use environment for working together multiple users over one document.
In the first part of a series of training materials on Word, you will learn how to create a new document, enter and edit text, get acquainted with some of the basic types of formatting. Here we will begin our acquaintance with the newfangled ribbon editor interface. We will also look at creating bulleted and unlabeled lists, changing document fields, and much more.
PROGRAM WINDOW
At opening Word the program window displays two of its main parts: the ribbon located at the top (highlighted in red in the figure below) and a blank document that occupies almost the entire program window.
The Ribbon contains a set of buttons and commands that you can use to perform various actions on a document and its contents (for example, resizing text or printing it). The document window itself looks like a regular one White list paper and is designed to enter all kinds of test information.
There is also a menu above the ribbon on the left. quick launch, in the middle - the name of the document, and in the upper right corner there are buttons for minimizing, resizing and closing the program window.
In the opened document, in the upper left corner of the page, you will see a cursor, that is, a small flashing vertical line. This line indicates that the characters you entered will appear from this point.
ENTERING AND EDITING TEXT
After opening the program, just start typing, and the letters, words and sentences you entered will begin to appear on the document page. In order to start typing on the same page, but one line below, you must press the Enter key. The number of pressings on Enter will correspond to the number of skipped lines. As you enter text, the cursor gradually moves to the right. When you reach the end of the line, just keep entering letters. Symbols and insertion point will be automatically wrapped to next line.
If you need to start a new paragraph, press the Enter key to do this. As a result, the cursor will automatically appear at the beginning new line... If you want to make the spacing between paragraphs a little larger, press the Enter key again before starting a new paragraph.
If you need to correct a mistake in the typed text, just place the cursor to the right of the unnecessary letter and press the Backspace key. The cursor will delete the character to the left of it. If you want to erase the whole word, press the indicated key as many times until the word disappears. There is another option for deleting an error: place the cursor at the beginning of the word, that is, to the left of it and press the Del key the required number of times.
Practice your typing and editing skills by typing a few arbitrary paragraphs, or type the variant we suggested.
.jpg)
ERROR CORRECTION
When entering text Word editor warns of grammatical or spelling errors by underlining them with a wavy green or red line. A green underline indicates that you need to check the grammar, and a red one indicates possible spelling errors or that a word (for example, a proper name or place names) is not recognized, that is, it is not in the dictionary of the Word editor.
What to do with such underscores? To do this, move the mouse cursor over the underlined word and press its right button. As a result, a small window will appear with suggested corrections. Select the required word and left-click on it. The word will be replaced and the underline removed. If the word is not recognized, Word will not offer any suggestions. Please note that if you do not correct such underlines, they will not appear on the printed pages of the document.
You can do the same with green underlines. But keep in mind that Word is good at recognizing spelling errors, most of which are quite simple to fix, but to find on their own grammatical errors and the mistakes of word usage are much more difficult. If you think you are right and Word suggests the wrong options, just skip the fix by choosing the appropriate item from the click menu right button mouse and the underline is removed.
If you are uncomfortable focusing on each underscore, you can ignore them while typing, and after you finish typing, check spelling and grammar all over the document at once. To do this, open the tab Peer review at the top of the ribbon and select Spelling in a group Spelling.
If you still have questions about working with the tape, come back to this point later, as the description of working with it will go a little below.
ISOLATING FRAGMENTS OF TEXT
In order to perform any actions with the text in the document, it must be selected, and then apply the desired command to the selected area. To select an entire word or a preposition, just double-click on it, after which the selected area will be highlighted in blue.
There are two ways to select an arbitrary piece of text. In the first case, place the blinking cursor at the beginning of the fragment that you want to select. Then press Shift key and, without releasing it, click at the end of the desired fragment. After that, the required text will be highlighted in blue to indicate that it is selected. Click anywhere in the document to deselect it.
In the second case, place the blinking cursor at the beginning of the fragment as well, but this time hold down the left mouse button and move its pointer to the end of the desired fragment. After reaching desired result, the button must be released.
If you need to select several fragments in different parts of the text, use the Ctrl key. Select the first section of text in any way, then press Ctrl and without releasing it, select the next section, after which the key can be released. If you need to select another fragment, press the Ctrl key again and continue.
TEXT FORMATTING
To draw attention to important information for example, you can make text bold, italic, or underlined. But these are trifles. You can change its size, style, color, background and apply animation elements to it. And even this is not the whole list of possibilities that Word provides to users when working with text.
Now is the time to remember the ribbon (ribbon interface), which was discussed at the very beginning of the article, and find out how you can use it.
There are several tabs at the top of the working window. Each of them contains a specific set of actions. We need to select the second tab - home(if it is not selected, you must click on it with the left mouse button).
Each tab contains several groups with commands that combine several items. In the tab home find the group Font(the names of the groups are on the bottom line of the tape). This group contains several commands and buttons that allow you to make various changes to the text.
In our case, select an arbitrary piece of text or the whole word, and then click on the corresponding buttons in the above-mentioned group to change its style.
.png)
As you can see from the figure, after pressing the button Bold, the selected text has changed its style. Now let's make it more oblique and underlined by clicking on the buttons Italics and Underlined.
In this case, the underline can be either regular solid or wavy, dotted, double, etc. Use the triangle button on the right to see the entire list of possible options.
.png)
As you can see from our example, you can apply several kinds of formatting to one selection.
As you've probably already noticed, the group Font contains quite a lot of various useful buttons that make it possible to change the type and color of the font, its size, strike out the font or convert it to superscripts and subscripts, add animation or a background. Select a piece of text and try to apply all these formatting options to it yourself by clicking on the appropriate buttons.
STYLES
The method of making changes discussed in the previous section is useful only if you need to change the format of just a few characters, words, or sentences. To apply several types of formatting at once to the entire document, there are styles.
Various kinds of styles are available in the tab home in a group Styles... It is enough to choose a style to automatically change the font, text size, attributes and paragraph formatting. For example, you can change the font style, make the text larger, and add bold formatting at the same time.
.png)
As you can see from the picture, after choosing a style called Heading 1, our first paragraph has been transformed into a heading (the font size has increased, its color and weight have changed).
To experiment, on the tab home in a group Styles hover the mouse cursor over the different styles one by one. Thus, you can see the changes that will occur to the document after you want to apply any option. To finally apply the selected style, just click on it with the left mouse button. To view other styles, you can open the collection by clicking the button in the lower right corner of the block with an arrow Other.
CREATING LISTS
If you need to create a list in a document, this can also be done on the tab home in a group Paragraph(which is to the right of the group Font).
Let's practice. First of all, separate the text that will be converted into a list in different paragraphs using the Enter key. At the same time, it can be either single words or whole sentences.
In our example, we decided to style the last paragraph with a list.
.png)
Now select the text you want to convert to a list. In the paragraph group, click the button Markers... The text will be converted to bulleted list... Without deselecting the list, press the button Numbering to create a numbered list.
.png)
.png)
PAGE FIELDS
Page margins are white space around the edges of a page. The default margins at the top, bottom, left, and right of the page are 2 cm, 2 cm, 3 cm, and 1.5 cm, respectively. This is the most common margin width and is often used for most documents. But, if you need fields of a different size, you need to know how to change them. Fields of other sizes can be useful, for example, when creating short letters, recipes, invitations or poems.
The ribbon is also used to resize the fields. Only this time use the tab Page layout... First you need to click on it to select, and then in the group Page settings select item Fields... You will see images (icons) of fields and their sizes.

The first value of the list is a field Common which is currently active. To create narrower fields, you must click the button Narrow... If you want to make the left and right margins much wider, click Wide... When you select the type of fields, they will automatically be applied to the entire document.
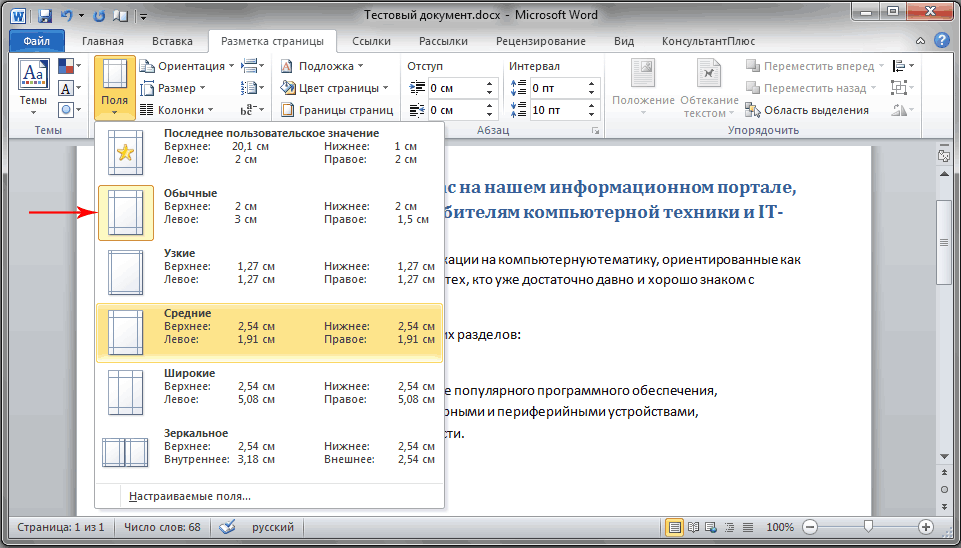
When you select fields, the background color of their icons will change. Pressing the button again Fields, by changing the background color in this way, you can determine what size of the margins is set.
WINDOWBACKSTAGE
In order not to lose the changes made in the work, they need to be saved, and the sooner you do this, the better. To do this, open the very first tab on the ribbon. File... A large window called Backstage will appear, in which you can perform various operations, for example, save, open, print documents, and so on.
In the left pane of the window that appears, select Save... A new smaller window will appear. In this window, you need to specify where on the computer you want to save the document, as well as what name it will have. After saving the document, continue working by saving it periodically. It is also very convenient to save a document at any time by pressing the Ctrl + S keyboard shortcut.
If the document is already ready to be printed, open the tab again File... In the left pane of the menu that opens, select the command Seal... A large window will appear in which you need to click on the line Seal... Of course, in this case, a printing device must be connected to the computer - a printer or an MFP. As in many other cases, you can print a document using hotkeys - in this case, this is the keyboard shortcut Ctrl + P.
After the work on the text document is completed and the document is saved, close the file. To do this, open the tab File and in the left pane click Close.
To locate the document after you have closed it, browse the list Latest documents... Click a document in the list and it will open.
To complete work in Word in the tab File choose a team Output at the very bottom of the menu or just click on the cross in the upper right corner of the program window.
CONCLUSION
On this, let me finish the first part of the training materials dedicated to the most popular text editor Microsoft Word.
To consolidate the acquired skills, be sure to practice the knowledge gained by typing several short texts yourself and applying various formatting elements in them.
In the next part, we will learn how to cut and paste chunks of text, change line spacing, align, use formatting marks, and much more.
Read also:
I will tell you how to work in the Word program included in the package Microsoft Office... In that office suite includes:
- text editor Microsoft Word. Program for typing and editing text documents;
- spreadsheet Microsoft Excel... A program for calculations, including using complex mathematical formulas, displaying results in the form of diagrams;
- Microsoft PowerPoint. Program for creating presentations;
- Microsoft Outlook. Mail program, and a few other programs.
The most commonly used are a text editor and spreadsheets... In this lesson, we will learn how to create, beautifully design documents in the Microsoft Word editor.
Before we start, a few words about text document formats. On, in the "File types" section, we looked at what the file extension is, and what it is for. Text documents have the extensions txt, rtf, doc, docx.
- .txt - simple text documents, no formatting elements. To create a document in this format, there is standard program Notepad, you can change the font size or type in it, but the font of the entire document changes. You cannot change the font or the size of an individual word.
- .rtf - from English Rich Text Format, translated as "rich text format". Main feature this format- transfer of text documents between different operating systems... You can open text typed on a Windows computer on a Mac computer. In the rtf file, you can use various fonts, apply formatting, insert pictures, tables, diagrams into the text of the document. In OS "Windows" for opening, creating or editing documents in rtf format, there is a standard program "WordPad".
- .doc (from English document - document) - a format that has become the de facto standard for text documents, Microsoft Word programs (read by Microsoft Word) included in the Microsoft Office package (Microsoft Office). Rich possibilities for formatting text, the ability to use many fonts, indents, paragraphs, bulleted and numbered lists, the use of multi-column text, insert images, tables, charts. In 2007 with the emergence Microsoft versions Office 2007 introduced the .docx format, which is a further development of the .doc format.
Microsoft Office is paid program... If you have Microsoft Office installed on your computer, it will be easier for you. If not, there are some pretty good alternative free packages out there. In terms of functionality, they are very close to the Microsoft Office package, and often even in appearance, it is difficult to distinguish the interface of these programs. These are Apache OpenOffice and WPS Office packages. At the end of this tutorial, I'll show you how to download and install one of these packages.
Launching Microsoft Word
To start the Microsoft Word program, click the "Start" button, then "All Programs", "Microsoft Office", "Microsoft Word".
A blank page of a new document opens. Depending on the version of the package, there will be a difference in the interface, but the main points that we will consider will be present everywhere. I will tell on Microsoft example Office 10.
At the top we see a tabbed menu with many items. Simply describing them is of little use. Therefore, we will type text and get to know them in the process. For example, we want to type a statement. Some points will be artificial, but this is solely in order to show the capabilities of the package.
Fig. 1 To enlarge - left-click, return back - click again
First, let's choose a font. When we move the cursor over the icon on the menu ribbon and hold it, a hint about the purpose of the icon appears. The frame in Fig. 1, number 1, shows the area where the font is selected. Where is the number 2, click on the triangle, the font selection menu opens. Number 3 - font - "Times New Roman".

Let's choose the font size. The frame in Fig. 2, number 1, shows the area where the font size is selected. Also where the number 2 is, click on the triangle, the font size menu opens. Number 3 - size 14.

The frame in Fig. 3 marks the text alignment area. It has 4 options.
- Align text to the left;
- Align Center;
- Align text to the right;
- Align Width.
We click 3 point - "Align the text to the right".
We start to recruit. After typing "Head of office" press the "Enter" key. The cursor moves to the next line, we continue to type. After we have typed "To" and "From whom" press "Enter" and in the text alignment area click on the 2 icon - "Align Center". We type "Statement" - again "Enter", in the alignment area - point 4 "Align to width" - "Enter".
We start to write a paragraph, press the "Tab" key to indent. We begin to write the text. We do not press the "Enter" key within the paragraph; as you type the text, it is evenly distributed across the width, aligning both on the left and right edges, adding additional spacing between words.
Press "Enter" for the next paragraph, or as in our example to insert a table.

To insert a table in Fig. 4 - click on the "Insert" tab, select the "Table" item, click the arrow below, the table template opens. With the mouse, move from the upper left corner to the right, thereby choosing the number of columns, lower it down, select the number of rows, in our case 4. A table appears on the sheet. The number of selected rows is not critical, if we did not have enough of them, we can easily add it in the process of filling the table. Just standing in the lower right cell of the table, press the "Tab" key and we will add a new row.

When we created the table, all columns are the same width. In order to change the width of the column, move the cursor to the dividing line in Fig. 5, when it takes the form of two dashes with arrows to the right and left, press the left mouse button and move the line in the desired direction, bring it to the desired place and release the button.

To align the text in the columns, select them - with the left mouse button Fig. 6, on the "Home" tab in the alignment section 1 and 3 columns of our table, align in the center, the 2nd to the left. We fill in the table. After filling in, to exit the table, left-click under the table and continue writing.

Our application is ready. Let's check the spelling for errors. Click the tab

"Reviewing", "Spelling". If there is an error, a window opens in Fig. 9, where the error is described,

a variant of its correction is proposed. On the right in the window, you can select the button "Change", "Skip", "Skip all", "Next". When the check is complete, the Spell Check Completed window appears.

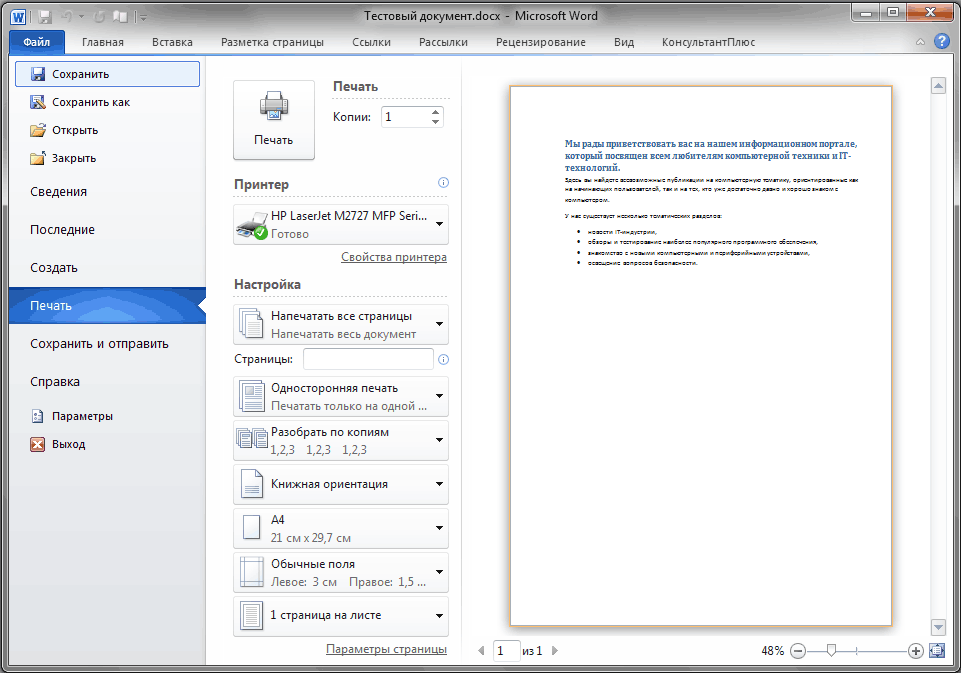
If we need to print the typed document (it is assumed that we have a printer, and it is connected and configured), click on the "File", "Print" tab.

In Figure 11, number 3 shows the layout of what the page will look like. If we have typed several sheets, number 4 shows which sheet, we look and the arrows can be used to look at other sheets. Use the number 5 to select the number of copies to print. In order to send a document to the printer, press the button with the printer, figure 6 in the figure.

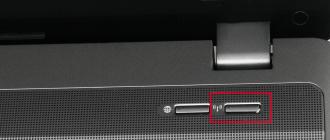
In order to save the selected document to a file, click on the floppy disk in the upper left corner in Fig. 12, number 1. By the way, on the tip, number 2, you can see that by pressing the key combination

The frame with the number 1 shows where the file will be saved. The arrow in frame 2 will help you select a different folder. Box 3 is the file name suggested by the system. We can change it, naming it as it is convenient for us, and then press the button 4 - "Save". Close the Microsoft Word program.
If we forgot to add something, we start Word again,

and no matter how long it takes to search for our document, click the "File" tab, select the "Recent" item, in the "Recent Documents" list we find the necessary one, click on it, and it opens.
Greeting card.
When creating a business document, we used a very small part of the capabilities that Microsoft Word gives us.
Let's try to create greeting card in the Word program.
Open Microsoft Word. Selecting fig. 15
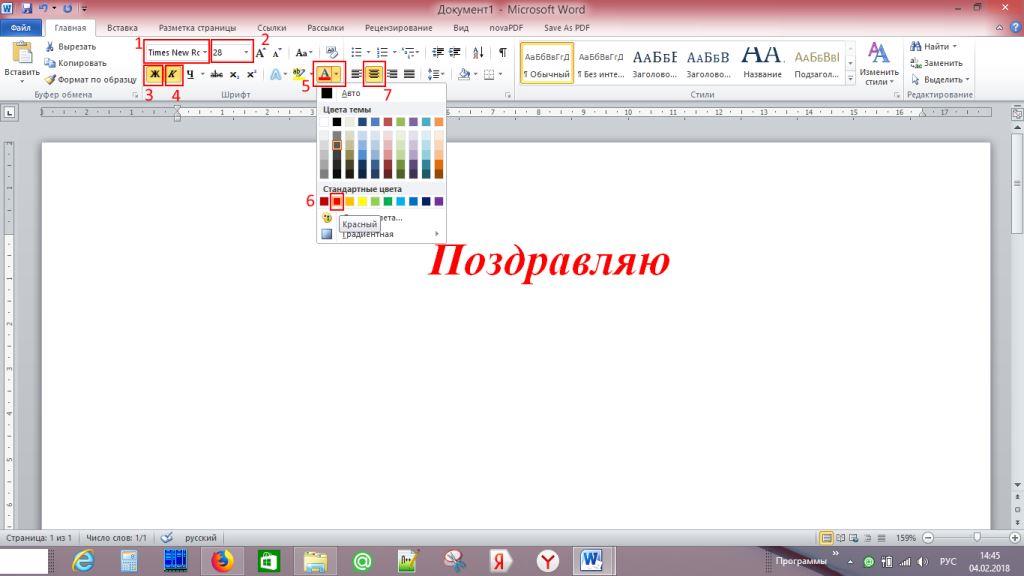
font "Times New Roman" - (1), font size - 28 (2), bold (3), italic (4), text color (5) - press the arrow next to it - select red (6), alignment - "Align to center "(7). We write "Congratulations", press "Enter".
Click on the "Insert" tab (1) Fig. 16,
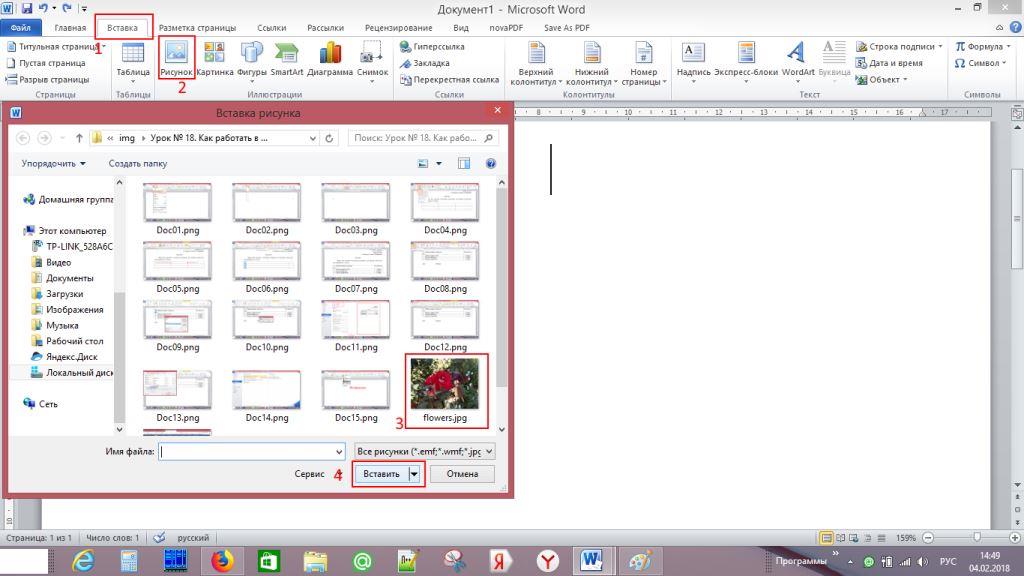
select the item "Picture" (2) and click on it. A standard file selection window opens, where we find the folder in which we have previously saved beautiful picture(3). Click on it to select it and press the "Insert" key (4).
The result is in Figure 17.

Push
We write "Happy birthday"
As a result, we have such a postcard.

greeting card
As I promised, I will tell you how to download and install on your computer free analogue Microsoft Office, WPS Office. We follow this link. We get to the WPS Office website Fig. 18.

There are two options for downloading - paid for $ 29.99 and free "Free Download", click on this button and download the installation file. After downloading, go to the "Downloads" folder and run the file we downloaded.
The installer window (Fig. 19) opens.

Press the button "Install".
The package is being installed (Fig. 20).

At the end of the installation, WPS Writer is launched, an analogue of Microsoft Word. Fig. 21.


then "Parameters (D)" (2). In the opened window Fig. 23

parameters, select the item "General and save" (1), click in the circle "New document" (2) and click "OK" (3).
Next window fig. 24

offers us three options "New blank document" (1), "Create on a different template" (2), "Open" (3). Click the first item in Fig. 25 - the WPS Writer text editor window opens.

As we can see, the interface is very similar to Microsoft interface Word. All those menu items and tabs that we worked with in Word are here as well. We can use a free alternative to Word.
We now have three new icons on our desktop in Figure 26.
WPS Writer is an analogue of Microsoft Word, WPS Presentation is an analogue of Microsoft PowerPoint, WPS Spreadsheets is an analogue of Microsoft Excel.
Since the programs are free, the advertisement window for the paid version (Fig. 27) opens upon launch.

The text highlighted in red (1) “You can skip ad in 5s” is translated as “You can skip the ad in 5 seconds” and the stopwatch is running. When the stopwatch has passed, Fig. 28,

there remains the inscription "Skip ad" (1) - "Skip" - click on it, the ad disappears, we can work.
Video on the topic of the lesson:
In contact with
This program is used by a large number of people. Andrey Sukhov decided to record a series of educational video lessons "Microsoft Word for Beginners" for novice users and invite you to familiarize yourself with the basics of this program.
Lesson 1. Video review of the appearance of the Word program window
In the first lesson, I will talk about the interface of the Word program, that is, about its main elements. Then we will learn how to enter text and perform the simplest manipulations with it:
Lesson 2. How to format text correctly in Word
Word program allows you to format text. Formatting is change appearance text, i.e. changing the font, style, color, alignment, etc.
The formatting tools of the Word program are quite diverse and allow you to format the text according to your desire and taste.
Continuing the topic of working in the Word program, which I started in the first video tutorial in the Word series for Beginners, I want to talk about the basic formatting tools of this program.
Lesson 3. How to create a numbered or bulleted list in Word
Continuing the series of video tutorials dedicated to Microsoft program Word, I present the next lesson.
This video tutorial is about creating bulleted and numbered lists in Word. From the lesson, you will learn how you can create a numbered, bulleted or multi-level list by pressing one button in the program, as well as how to work with these lists - add new items or change the nesting level of an item in a multi-level list.
At the end of the video tutorial, I'll show you how you can simply create a red line in a paragraph of text.
Lesson 4. How to insert and edit images in Word
In the fourth video tutorial on text Microsoft editor Word, I'll talk about inserting images into your document.
In this video tutorial, I will show you how you can insert any prepared in advance images and photos into a text document, how you can quickly and easily resize an image, apply various artistic effects on photos, or crop an image as you wish right in Word.
At the end of the video tutorial, I will show how you can get complete statistics on the created text document, i.e. how you can quickly get information about the number of words or characters in the text.
Lesson 5. How to create a table in a Word text document
In the fifth video tutorial on Microsoft Word, I will talk about inserting tables into a text document.
In this video tutorial, I will show you how you can insert tables with an arbitrary number of rows and columns, add or remove rows in an arbitrary place in the table, and also how to combine or split table cells as needed.
We will also walk through the process of pasting text into table cells and formatting text in a simple table.
Lesson 6. How to write a statement using Word
In everyday life, we periodically have to write various statements, reports, reports and other similar documents.
Of course, you can write such documents by hand, or you can type an application on a computer in a matter of minutes, for example, in Microsoft Word.
This is what will be discussed in the video tutorial:
Lesson 7. How to create an ad using Word
With the help of the Word program, you can create any text documents, sometimes even not quite ordinary ones.
So if you have a need to create a simple ad for the sale-buy-lease-rent of something, then you can create it in a matter of minutes in Word, and then print in the required quantity.
How to do this, see the video: