Sometimes users are faced with the fact that taskbar disappeared... Neither you go to the "Start" menu, nor see the running programs ... In general, a complete inconvenience. How do I get the taskbar back in place?
If the taskbar disappears, do not rush to panic and roll back the system or reinstall the OS: perhaps not everything is as bad as it seems. If only the taskbar is missing from the desktop, and all the shortcuts and gadgets are in place, most likely the taskbar is just hidden.
To show the taskbar again, you need to move the mouse cursor over the place where it was (the standard location is at the bottom of the screen). If the taskbar is not showing, move the cursor to the top of the screen and to the sides: the panel may have simply been moved. The cursor must be moved to the very edge of the screen.
How do I stop the taskbar from disappearing? This requires disable hiding taskbar... To do this, go to Control Panel (Start - Control Panel) and select "Taskbar and Start Menu". Alternatively, you can right-click on the taskbar and select "Properties". In the window that opens, uncheck the box next to "Automatically hide the taskbar" and click OK.
If the taskbar disappeared when starting Windows XP, it may be due to corrupted user account settings... The "symptoms" of this problem are the taskbar not being displayed at login and the inability to open the Start menu with the Ctrl + Escape key combination. In this case, if you go to Windows in, the taskbar is displayed.

there is several ways to solve this problem:
- Start Windows in clean boot mode with a minimal set of drivers - it is possible that a driver loaded by a specific program is the reason why the taskbar disappeared (usually video adapter drivers cause this problem). If so, you just need to remove the problematic drivers.
- Log in with an administrator account and create a new user account to replace the damaged one.
- If the previous methods did not help, perform a system restore. This will replace all damaged Windows files with normal ones, and your personal files and installed programs will remain intact.
If your taskbar not only disappeared, but the desktop (icons, gadgets, etc.) did not load, this means that the explorer.exe process could not be executed... We have already described the ways to solve this problem in the article "", but just in case we will repeat the main points.
To start start task managerby using the keyboard shortcut Ctrl + Alt + Delete or Ctrl + Shift + Escape. From the File menu, select New Task (Run ...), type explorer.exe, click OK. The desktop should return to its place along with the taskbar.
After that, you definitely need scan the system for virusesand also check the registry for keys HKEY_LOCAL_MACHINE \\ SOFTWARE \\ Microsoft \\ WindowsNT \\ CurrentVersion \\ Image File Execution Options \\ explorer.exe and HKEY_LOCAL_MACHINE \\ SOFTWARE \\ Microsoft \\ WindowsNT \\ CurrentVersion \\ Image File Execution Options \\ iexplorer.exe... If these keys are present, delete them.
So, if your taskbar is missing, you should suspect three main reasons:
- someone has turned on the automatic hiding of the taskbar;
- a user account in Windows XP was damaged;
- the explorer.exe process failed, most likely due to a virus.
If the "soft" methods of dealing with the problem (creating a new account, removing defective drivers, cleaning the system from viruses) do not help, you should not rush to reinstall the system. It's better try to restore the system, having made a rollback to one of the created ones, then you do not have to reinstall all programs.

Sometimes it can take a few minutes to find where to turn on the display of the bookmark bar in some browsers. Let this short instruction help users in this matter. After all, we sometimes need to quickly find a link to the desired website and quickly open it. Sometimes a lot depends on it. Below is how it is done in different browsers - from the more popular to the less common.
Google chrome
Click the button Menu.
Select item Bookmarks.
Check the box Show bookmarks bar:
Opera
Click the button Opera.
Go to the menu Bookmarks.
Check the box Show panel:

Mozilla Firefox
Right-click the empty field next to the tab title.
Check the box Bookmarks bar:

Yandex browser
Click the button Menu.
Go to the menu Bookmarks.
Please select Show bookmarks bar:

Internet Explorer 11
Right-click on the window title.
Check the box Favorites bar

The taskbar is in Windows one of the main mechanisms of control and user interaction with the system. Therefore, the comfort of your work with the OS and the computer as a whole will directly depend on its setting and setting up those important elements that are located on it.
Task bar
To go to settings Taskbars and start menu need to right click on start button in the lower left corner of the screen and in the opened context menu select the item Properties... After that, a window will open in front of you Taskbar and Start Menu Properties, the settings of the components of which we will consider.

By the way, the taskbar settings can be accessed from Control panelsby clicking on the item with the speaking name Taskbar and Start Menu.
The Taskbar and Start Menu window contains three tabs: Task bar, Start Menu and Toolbars, which are responsible for configuring the settings of the corresponding Windows components.
Customizing the Taskbar and Notification Area
At the top of the tab are the settings that are responsible for the design and display of the taskbar.
Dock the taskbar ... By selecting the checkbox in this item, you can fix the taskbar on the monitor screen in the place where it is currently located. In this case, it will be impossible to stretch, displace or collapse. As a rule, this item is checked by default. If you want to increase the height of the taskbar (when located at the top or bottom of the screen) or its width (when located on the left or right of the screen), as well as change the size of the notification area and toolbar, then uncheck this item. After that, you can do all the above operations by dragging the borders of the desired areas with the mouse.
Auto hide taskbar. Activating this parameter will allow you to use the maximum desktop area when working, since the control panel will be hidden and will no longer be displayed on the screen all the time in front of all windows. To open the panel in this mode, move the mouse cursor to the edge of the screen along which it is located.
Use small icons. This option allows you to reduce the icons for programs and open applications located on the taskbar. Thus, it is possible to achieve an expansion of the workspace and an increase in the number of displayed items on the panel itself.
Position of the taskbar on the screen. Allows you to select from the drop-down menu where the panel will be placed on the screen. You have four options: Bottom, Top, Right, or Left.
Taskbar buttons. At this point, you can choose how the icons of running programs and open windows will be displayed on the taskbar:
- Always group, hide labels. This mode is activated by default and allows you to expand the free space on the taskbar due to the fact that icons of similar open applications are grouped, and the icons themselves do not have their names. For example, if you have opened several explorer windows at once, they will be grouped in the taskbar into one icon, which will be displayed as several rectangles superimposed on each other.
- Group when filling the taskbar. Unlike the previous version, this mode is more informative for the user. All icons of open applications are located on the taskbar separately and are labeled with the names of the windows in which they are launched. Icons are grouped only when the taskbar is full and there is no free space to accommodate new icons.
- Do not group. The grouping of icons of open programs does not occur under any circumstances.
In the middle of the Taskbar tab is the item Notification area , which is responsible for setting the display of system icons and icons of background programs, as well as their messages in the notification area (tray).
After clicking on the Settings button, you will see a window with a list of all the icons of background and system applications, next to which you can select their behavior in the tray from three available options:
- Show icon and notifications
- Hide icon and notifications
- Show only notifications

Below the general list of all icons are items Turning system icons on and off (Clock, Volume, Network, Power and Help Center), as well as Restoring default icon behavior... You can also activate the option Always show icons and notifications on the taskbar.
And finally, in the lower area of \u200b\u200bthe bookmark we are considering, there is an option setting Desktop previewusingAeroPeek... Activation of this function allows when you hover the mouse over the button Minimize all windows, perform a quick temporary view of the content Desktop... At the same time, open windows are not minimized, as is the case when this button is pressed, but become transparent.
Customizing the Start Menu
Let's move on to studying the next tab of the window with a telling name. Start Menu... As you probably already guessed, options are located here that are responsible for configuring the parameters of one of the key components of Windows system management, which is called using the button of the same name located at the very beginning of the taskbar.
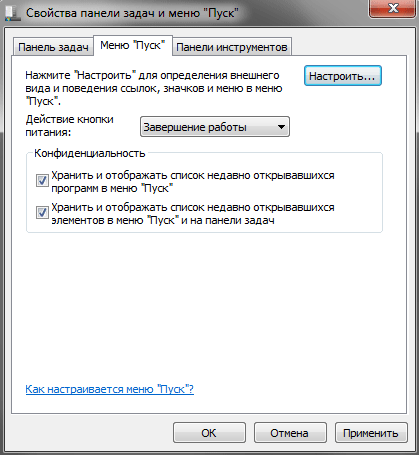
The appearance of the Start menu and the elements of which it consists, as well as the behavior of objects and icons in it, is affected by a lot of parameters that simply would not fit on this tab. This is probably why the developers took them out in a separate window that opens after clicking the button Tune... We'll talk about this a little later, but for now let's return to our tab and consider those few parameters that are still located on it.
Power button action ... With the help of this item, you can configure the action of the system that will occur after you press the physical power button located on the computer case. To do this, you must select any of the six options from the drop-down menu:
- Completion of work - leads to the complete closure of all programs, logout and shutdown of the computer. This action is set by default.
- Change user - causes the user to log out of the system to the account selection screen without closing running programs.
- End of session - causes the user to log out of the system to the account selection screen and close all running applications.
- Locking your computer - leads to system blocking without closing running programs. To resume work, the user will need to enter a password. - leads to the closure of all applications, exit the system and restart the computer.
- Sleep - puts the computer into a state of low power consumption. In this case, all parameters of the current session are saved, which allows you to quickly resume work in the future.
Confidentiality ... This option contains two items that allow you to show or hide recently opened programs, files, or documents on the left side of the Start menu. Everything is simple here - if the checkboxes are checked, then the display is allowed, if unchecked, it is prohibited.
Now let's look at the parameters that are contained in the window Customizing the Start Menucalled by the above button Tune.

This window contains quite a few settings, but there is no point in examining all of them in detail. Many points have self-explanatory names and do not need any additional comments, but for some we will nevertheless make small explanations.
Most of the Start menu settings concern the display of thematic user folders and menus, including: Videos, Music, Documents, Homegroup, Games, Pictures, Personal folder, Favorites, Recent documents, TV recordings and Downloads, as well as basic elements management: Administrative Tools group, Run command, Computer, Control Panel, Network, Connect to, Default Programs, Help, Devices and Printers.
Depending on the menu item, several display options can be applied to it:
- Do not display this item
- Display as menu - the group will be displayed on the right side of the Start menu as a folder with an arrow that opens automatically when you hover over the mouse.
- Display as link - the item will be displayed on the right side of the Start menu as a regular link, after clicking on which, a new window will open with the contents of the folder of the same name.
Highlight recently installed programs ... If this option is checked, the system in the Start menu and the All Programs group will highlight new (recently installed) applications and folders in which they are contained in dark yellow.
Search in other files and libraries ... An item that allows you to expand the places of searching for the necessary information or to speed up the search process itself by disabling scanning of shared folders.
Search Control Panel Programs and Features ... When this parameter is activated, you can search for the desired objects in Control panels systems.
Large icons ... Unchecking this item will reduce the icons of the most frequently launched programs, the list of which is located on the left side of the Start menu. This will increase the number of displayed applications in this list.
Allow context menu and object dragging ... Activation of this parameter allows you to call the context menu of the Start menu objects, as well as drag them with the mouse to various work areas of the system. For example, you can drag the program icon from the Start Menu to the Desktop, or vice versa, add a link to the application in the Start Menu by dragging the icon there from any open window.
In addition to the above parameters, at the bottom of the settings window there are two more elements with which you can adjust the size, or rather the height of the Start menu. They regulate the display of the number of positions in the lists of recently used programs and elements.
Customizing Toolbars
As in previous versions of operating systems, Windows 7 introduces the ability to work with toolbars, which are used to quickly launch program components and access resources.
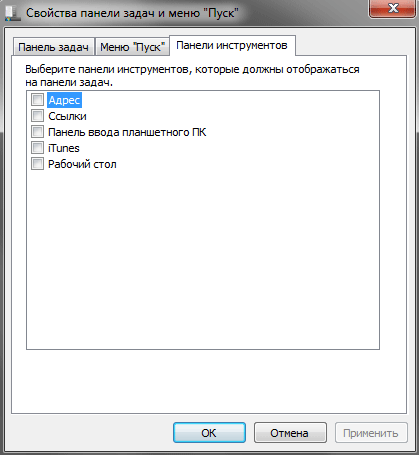
Initially, the system includes only a few standard toolbars: Address, Links, Tablet PC Input Panel, and Desktop. But as new applications are installed, the list of these panels will expand. For example, in our case, you see the appearance of an additional iTunes panel.
You can also create your own toolbars yourself. To do this, right-click on the free space on Taskbars and in the opened context menu select the item Panelsand then the command Create toolbarin.

Controlling the display of toolbars is intuitive. To do this, simply uncheck or check the box next to the desired panel and press the button Apply.


