All the facets of our life can no longer be imagined without computer equipment. The digital easel is one of the requested functions provided by not only stationary, but also portable computers. Various programs and applications are presented to the attention of users. Due to the popularity of the operating system Windows program Paint to create bitmaps with a simple set of tools has become very popular. The popularity is due to the fact that the legendary Paint was pre-installed in the operating system.
Interesting inspirational pages
The procedures described are examples only and can be used in many variations in accordance with the student's imagination. But this is just a springboard for further understanding of computer graphics. Work with the program was smooth. Good results will be achieved by almost all students.
The difference between vector and raster graphic editors is in working with graphic information. While the classic bitmap editors work with individual points of the image, image editors work with curves. Thanks to this, you can zoom in and out without any problems while maintaining the same quality. However, with the help of vectors you can now find common raster editors for inserting fonts or simple geometric shapes.
Big competition, new operating Systems and the emergence of smartphones and tablets led to fragmentation of drawing programs. Often, the user needs to create a simple drawing using elementary tools such as a pencil and eraser, and there is no time to search for the desired application and install it. There is always a way out - you can refer to the lite version of your friend. paint programs without the need for installation.
It offers many functions for working with shapes, with many ready-made forms that can be edited. Of course, support text, calligraphic brush or color transition. If you want to insert a bitmap, then of course you can.
Download the downloaded file, confirm the installation steps and wait for it to complete. The base area corresponds to A4 paper, which you also need if you decide to print an initial canvas. On the toolbar on the left edge of the program window, you can find buttons for inserting various objects, as well as for selecting various tools. Click the button with a square icon, then click on the drawing and draw a drawing by dragging it.
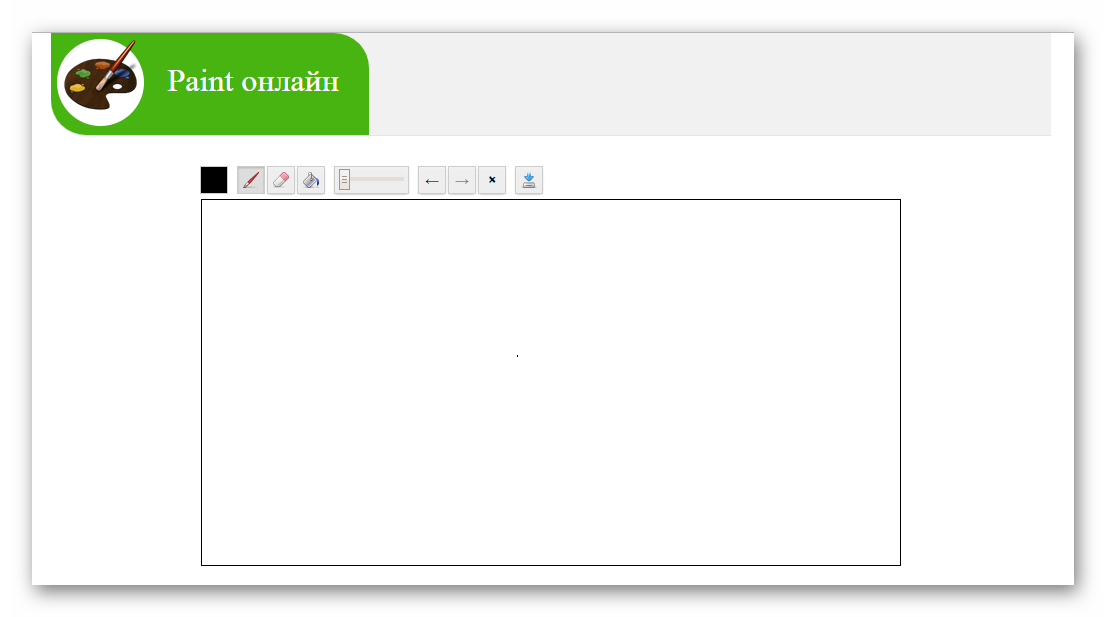
Paint online service interface
Raster drawing Paint It has only some artistic tools, the most simple and popular, such as a pencil, eraser and fill.
![]()
The principle of operation is similar to other drawing programs; it is enough to select a tool and move the mouse on the screen with the left button held down. After the release of the button drawing stops. All tools are located on the upper edge of the canvas window.
Try to create squares, rectangles, circles and oval shapes. After creating the form, the properties of the object appear in the panel at the top of the program window. Here you can set the vertical and horizontal position according to its central coordinates. You can also adjust the width and height of the object here, which you can use to check if the square has the same sides or the circle is really round.
Then you will influence it before creating the object. The bottom of the program is a set of colors. Click any of them with the right mouse button. Then use the menu to determine whether the selected color should be used as the fill color or line color. Similarly, change the colors of an existing template.
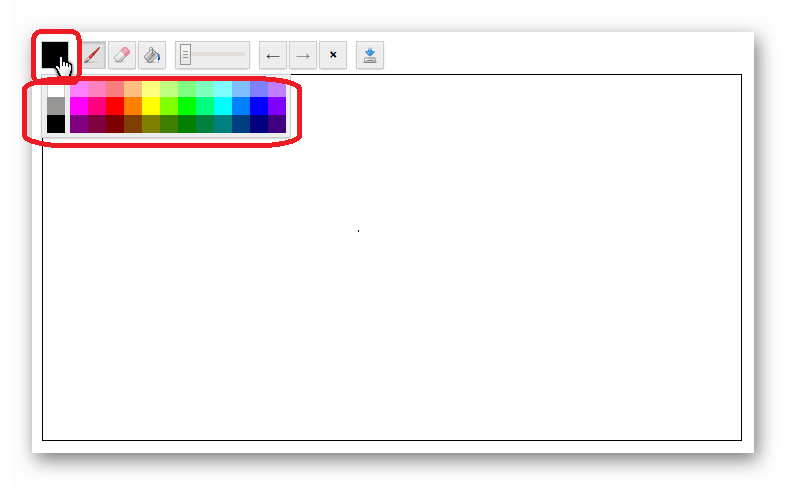
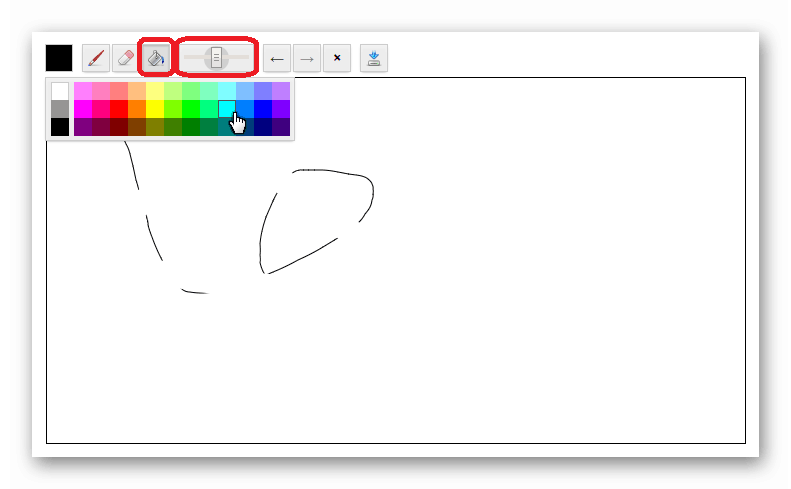
Paint Online Toolkit
First button in Paint online - dropdown Palette color choices which are here 39.
Next button BrushIts thickness is selected by moving the scroll bar to the middle of the toolbar. The brush color is selected by pressing the palette button and pressing the desired color again.
You just need to tag it in advance using the selected tool by clicking the first button on the toolbar with an arrow. You can move the color menu using the pull panel. Next to the color squares is a button showing the offer of different color palettes. You can also fill the color palette with the colors recommended for websites.
The shape of embedded objects can be changed arbitrarily. For example, draw a star and increase the number of its tabs on the toolbar. Now in the list of tools, click the second button in the line and mark the embedded object. You will see the points of individual lines. Drag these points to edit the appearance of the object. For example, in a star, you can change the distance from the edge of the rays from the star’s body and adjust their rotation. In combination with different fill colors and lines, you get interesting effects.
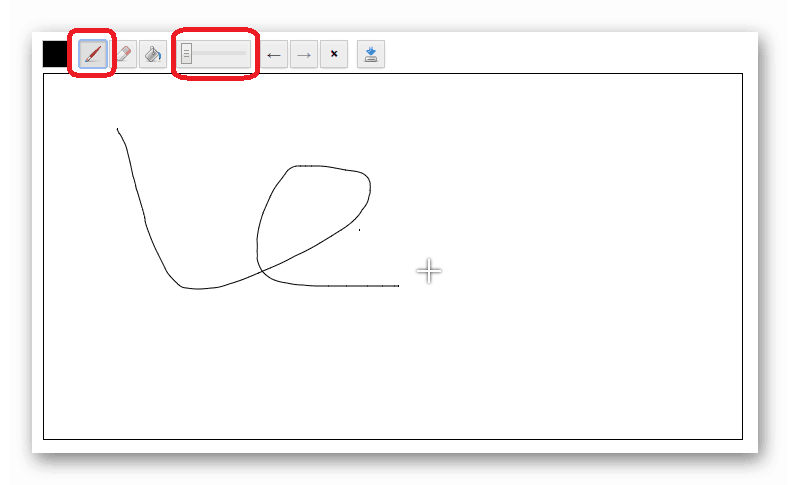
The third button is Eraserwhose thickness is also selected by the slider.

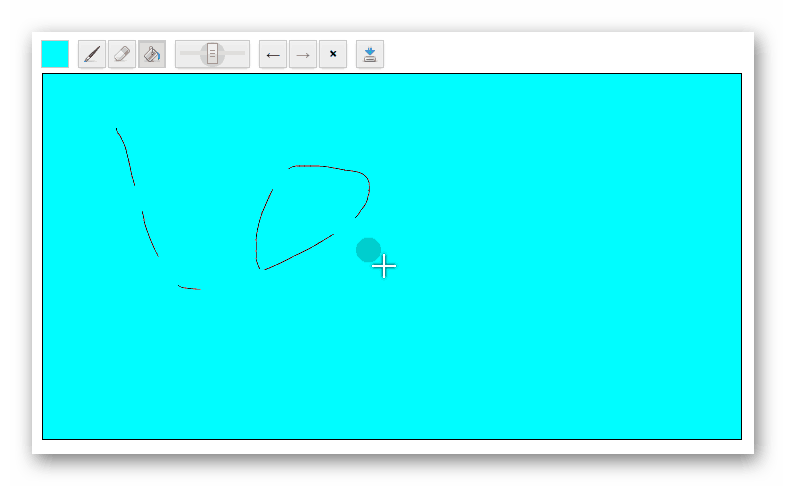
The fourth button is FillThe tool is used to fill the canvas with the necessary color.
Try another object deformation tool. Hides under the third button on the toolbar on the left. Click the button with the wave symbol and select the way to deform the object in the top panel. Now try to draw the canvas with this tool and observe the changes of the object.
In the tools for inserting objects, you will find help for inserting lines and curves. The main tool in this group is a pencil designed to draw lines from the hand. Click the tool in the drawing and try to make a few lines in the drawing. Another tool are Bezier curves. However, by drawing from point to point, if you hold down the mouse button and the mouse moves, you create two curved arcs between two points. The last line insertion tool is a calligraphic brush.
After clicking on the canvas, it will be painted in the selected color.
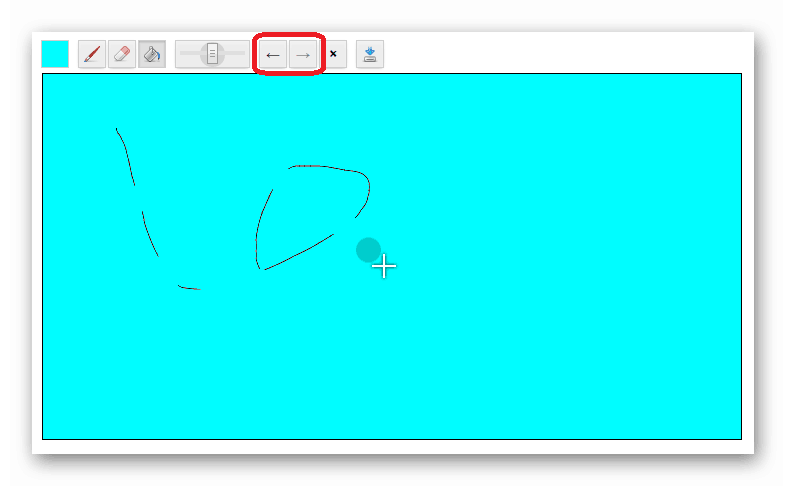
After the scroll bar with a slider are paired buttons with the image of the arrows to the left and right - Cancel action and Return to the previous.
He draws with him as well as with a pencil, his advantages can be used specifically for different curvilinear and crossed lines. Each object you paint is filled with the selected color. However, at the moment when other overlapping areas or other pencils are created, you will need a special tool to fill in colors. Select the fill color and click the tool in the closed area. Try changing the threshold setting in the toolbar.
You will influence how different the color of the area is. Without a text tool, the image editor will not be completed. Then you can start writing right away. In the horizontal bar, select the font style, size, alignment with the area, bold or italic.
Next button Cleaning canvasAfter pressing it, the canvas is cleared to clean and you can start drawing again.

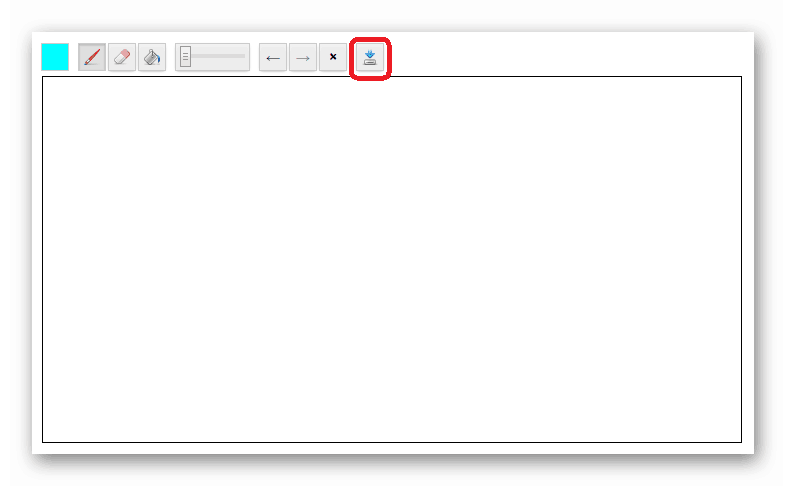
The last button on the Paint toolbar is the arrow with the disk. Preservation. After clicking on the computer, a .png image is downloaded with a resolution of 698 * 360 pixels.
Use the last two buttons on the toolbar to indicate whether the text should be written horizontally or vertically. You can also find two different styles of business cards in different prints. However, you can also manually resize it using the File Properties function.
A new window will appear in which you set the exact height and width of the canvas on the “Page” tab in the “Custom Size” group. Do not forget to switch the specified units to centimeters in the menu. Classic photos are not displayed on business cards too often, but let's say that you need a business card. For example, it may be your own photos, which is not so unusual. After installing it, you will most likely have to adjust the image size to fit your business card.
It is also possible to save and copy the image when you right-click on the canvas.

Virtues
- Run in any version of the browser;
- Intuitive, intuitive interface;
- The ability to save in one click.
disadvantages
- Inability to change the size of the canvas;
- No function open previously created image;
- The palette is limited to 39 colors.
As a user of the online service can act as a small child, and any adult. Paint is loaded at any time of the day, does not require registration. The interface is quite simple, no extra buttons.
You can use the width and height in the horizontal bar at the top of the program window. If the image disappears after resizing, enter the zero coordinates for its location, it should appear. You can have multiple effects for the embedded image.
In addition, its equipment is very rich, and also great for simple technical drawings. Today's part will be a bit atypical. We will look at the main parts of this environment and see how they work. The window is very similar. We are most interested in a couple of round and four-square square buttons at the top.
Paint belongs to the category of graphic editors, which are designed to create simple graphic images. You can create simple illustrations, charts, graphs and diagrams. Paint can be used for educational purposes. It is better to master computer graphics, starting with this program, because there are even more powerful editors (Paint.net; Gimp; Photoshop), and for their full study, it can take from several months to several years. Graphics editor Paint is present in all windows systems and to open it, you need to open Main menu (Start), choose: All Programs \\ Standard \\Paint. The program will load and this window will open:
Their functions include: starting a program, stopping a program, creating a new program, opening an existing program, saving the program, and exporting the export code to an executable form file outside of the processing process. There is also a large white area in the middle for writing code. There is almost nothing new here. In addition, we can see the color data type used to store color information. Although there is almost the same thing that we know about the field, you can detect small differences that can cause problems.
The way to create fields is slightly different. Working with field cells is the same as in wiring. In addition, processing offers an interesting function for determining the length of the field. This section is also very similar to wiring. Here are the basic comparison operators that are equal! = ,, ==, =. Here the terms and cycles have the same syntax that we already know.
As you can see from the snapshot, the main part of the window is occupied by the working field - the first and subsequent drawings and diagrams will be created on it. On top of the window is a set of tools and a color palette (in earlier versions of the editor, the toolbar was on the left, and the color palette is on the bottom). In the editor Paint You can draw various shapes, objects, and you can also work with color tools. Some of these features are considered in order.
To list text values, use the panel under the code entry section. To have a place to draw, we need to create a drawing area for the program. The following code creates a 500 × drawing board. It will create new system links for drawing objects. It is important to know how axes are defined here.
Their intersection can be found in the upper left corner of the canvas. Therefore, it is parallel to the left edge and grows down. While there is no glory - a gray rectangle and nothing more. So let's show you how to fill this rectangle. Keep in mind that the objects on the canvas layout are in the same order as we are in the program.
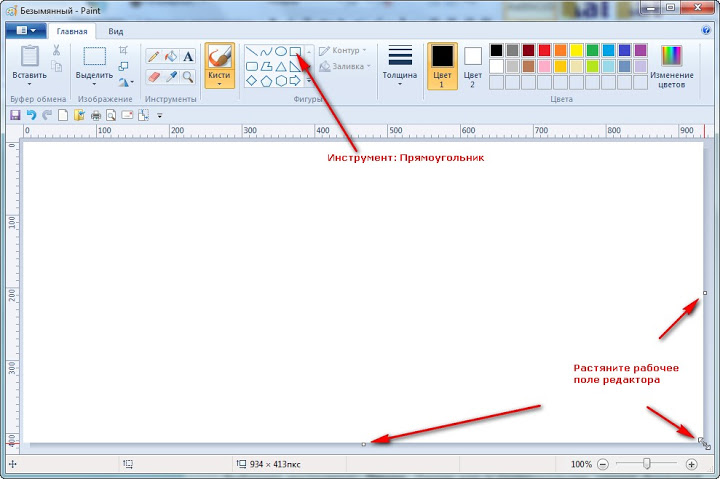
How to draw a rectangle in Paint
To draw a rectangle, use the tool, which is called: Rectangle. Stretch the editor's working field into the entire window (for convenience). Click on the button: Rectangle. Then, move the mouse cursor to the place where the upper left corner of the future rectangle will be, press the left mouse button and, without releasing the key, drag the cursor to the opposite corner, where release the key. This whole procedure is called : Function "click + broach"
 Thus, a rectangular frame of arbitrary size was formed. Experiment with drawing a few more rectangles to your taste and size. If you need to draw square: -after pressing the left mouse button, press the key on the keyboard Shift and do not release it until you finish moving the mouse and release the left key on it.
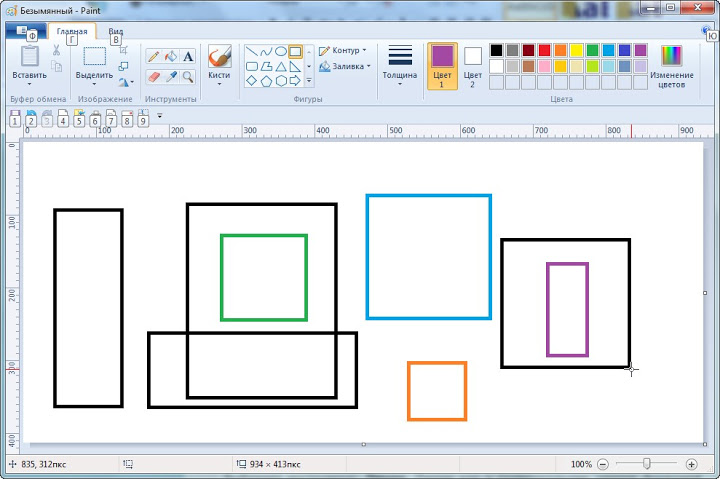
Access to colors is possible in different ways. However, these functions will not be performed. Several functions are used to adjust the color of individual parts of the drawing area. Drawn shapes usually have a border and a fill. We can also tell the program that we do not want the border or fill to be displayed. If we use any of these four functions, it affects all the formations we create after they are called.
Finally, up to a point, we reach geometric formations. Draw a canvas using a point function. With two cycles and the functions entered, we can simply create a color spectrum of two colors. To draw a line, the line function is used with the coordinates of its starting and ending points. We draw a grayscale color gradient using lines.
How to draw a straight line
Click on the tool button:. Select the line thickness and start drawing. Line as a rectangle, draw function "Click + broach". Reaching the line to the desired length, you need to release the mouse button, and then at the edges of the line you will see small squares. After hovering the mouse over any of the squares, you can correct the line (shorten, lengthen, change the angle of inclination), after which, just click the free part of the field and the adjustment cursors will disappear. In case of an error or you have determined that this line is not needed in this place, the last actions can be deleted using the button: or press the key combination Ctrl + Z.
 These are some simple pictures can be performed using the function:.
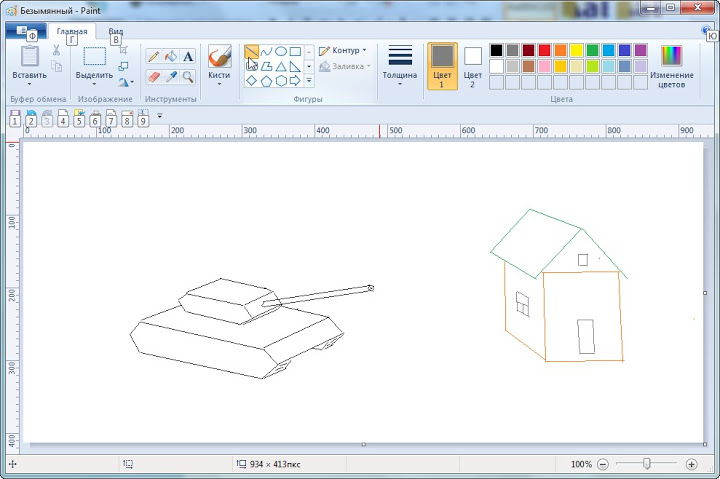
The quadrilateral is a geometric entity defined by four points. We will show the function on the deltoid. He creates a quadrilateral of its size and point coordinates. This point can be of two types: either the center of the body or its upper left corner.
If we add the fifth parameter, all corners are rounded so that their radius is the specified parameter. In the quad, we can also set the radii of each rounded corner separately. Another object of interest is the triangle. The Triangle function is used to draw it.
How to draw Ellipse or Circle
To perform this action, use the tool: Ellipse. This tool works the same as Tool: Rectangle – “Click + Push”. If you need to make the correct circle, you need to perform the broach with the key pressed Shift -will turn out a circle. Before drawing shapes, pay attention to the line thickness, since the line size remains the same as it was used last time. Also, do not forget to change the color for an ellipse or a circle. 
In processing, the same function is used for a circle, as well as for an ellipse and an ellipse. They differ only in the parameters used. Note. In the processing documentation, we also find the function of the curve. But today we will not do it. Processing can respond to mouse and keyboard actions. For example, it can determine the position of the cursor, keystroke, or the scroll wheel. For this purpose, a number of functions and variables are used. Now we will introduce some of them. But before that, we have to say that functions do not work as they do with Arduin.
What and how to paint with a brush
Brush in the editor Paint You can very much, everything will depend on your desire, imagination and experience, which you will gain very quickly. Click on the tool: Brush and, using the method of selection, the thickness and color of brushes, in just five minutes you can draw such a tree, it took me so much time to make this drawing. Open a new “canvas” and try the actions of each brush. Understanding how each of the brushes paints, you can create unique masterpieces. I'm sure you will succeed. 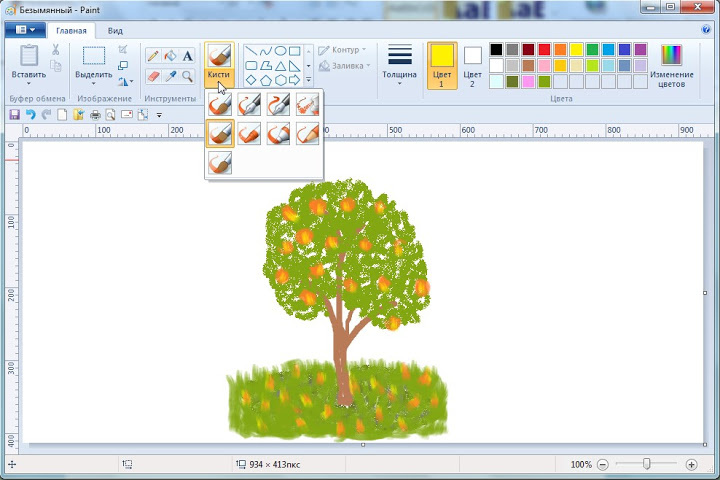
Some functions must be called the same way we declare them again. These include all mouse functions. Keep in mind that the function is executed when the button is pressed and released. The information that the button is pressed is usually insufficient. It contains information about the button pressed. We will also find other functions related to the mouse buttons.
Let's show a program that draws a line with one fixed point and a mouse cursor. Screenshots from the processing environment. If you have any questions or concerns, feel free to contact me in the comments. The layer is not easy to work and requires programming a completely new program for prologing and alpha mixing in real time.
Selection, movement and deployment of objects
Having trained with clouds and the sun, houses and trees, you can experiment with the objects in the picture. For example, a tank with a directional gun at home is not good, so it can be turned in the other direction. But as? For this we need a tool:. Press on: Highlight in the opened window select Rectangular areaselect the object in the way already known “Click + broach”. The selected object can be moved in any direction, holding and holding the left mouse button. If there are many objects in the picture and they are closely spaced from each other, then a rectangular selection can be inconvenient, so you need to use a selection. Arbitrary area. Hold down the left key and without releasing it, circle the object around to close the line. If you use the function Invert selection then the whole picture will move, and the selected object will remain in place. 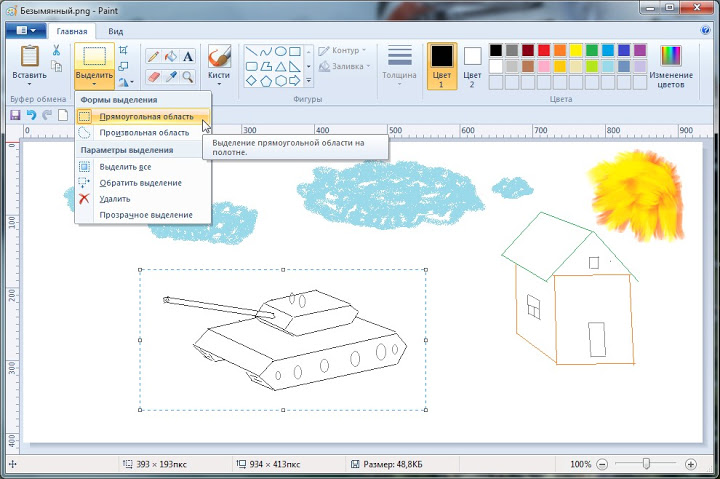 To expand an object, select the tool: In the drop-down box, select first: Flip horizontally - the object will unfold in the other direction (figure above), but this is not enough for us, and we will take and turn over the tank, choosing the function: Flip Vertically. Now this tank will no longer harm anyone ... поC experiment with the turns of the object. When moving objects, try performing actions with the key pressed Shift, feel the difference.
Reproduction of objects in Paint
If you need to show several houses or several trees in the drawing, you can copy the existing objects, put them on the clipboard and paste them into the drawing again, but in a different, appropriate place. In this case, you can change the size, slope, type of object, etc.Tank scroll and move to the left, scroll the house with Arbitrary selection
![]()
Then, press the key combination Ctrl + C or click a tool in the toolbar. A copy of the object appeared in the working field, drag it to the right place, if necessary, select it and change the size and appearance of the object (width, height, slope).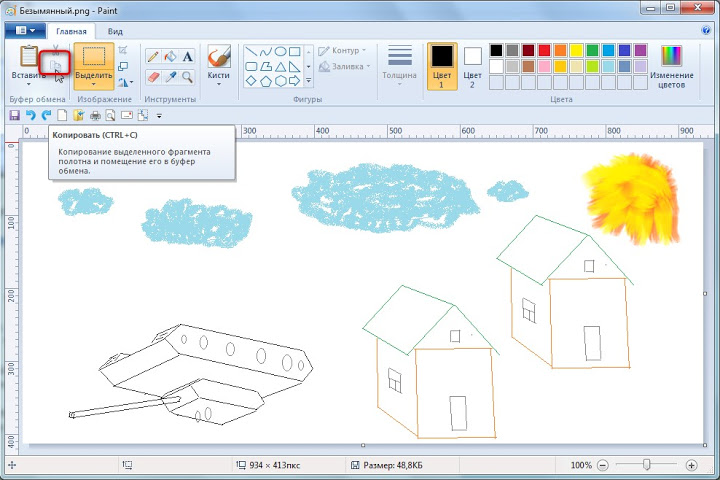
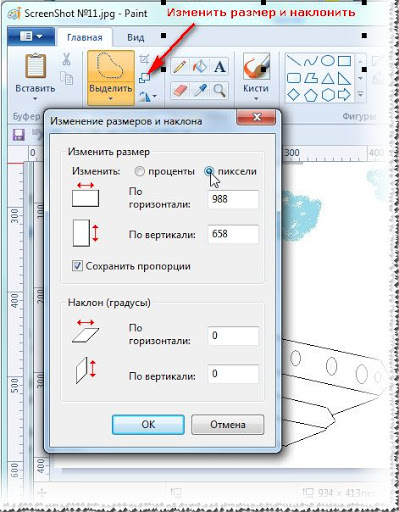
Click on the tool: Resize and tilt. In the window that opens, specify the units in which to resize, (the default is set as a percentage), but since you are viewing the image on the monitor it is more convenient in pixels. Set the size of the selected object. If you want to change only the height or width, uncheck: Keep proportions. Also, you can change the slope of the object by setting the values in degrees, by default the object rotates clockwise, if the object needs to be tilted counterclockwise, then set the degrees with minus.
Fill tool
This is perhaps the easiest and fastest tool for painting a picture. You can paint the closed contours with the selected color by filling. Select the tool, select the desired paint and left-click inside any contour in the figure. The illustration shows the sequence of color selection. Do not forget to click OK, choosing the desired color.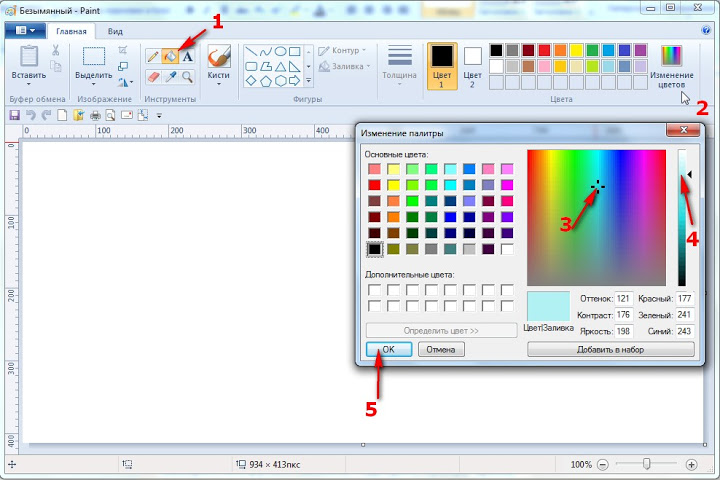
Curve tool
The new working field itself is already a closed loop, so you can immediately fill in the general background, for example, as in this figure, the background of the blue sky was first filled. Then, ellipses-clouds and a circle-sun were drawn, which were also filled with the corresponding color. The tower was built from two rectangles and covered in gray. But then, the tool was used, this is probably one of the most difficult operations in Paint. The curve is drawn in three steps. At first, a straight line is drawn; in the figure, a line has been drawn from the tower to the left to the very edge. Now you can make a maximum of two bends. Place the mouse cursor near the bend, press the left mouse button and, without releasing, drag the cursor up or down. Make the second bend in the same way. The line to the right of the tower was drawn in the same way as the line to the left.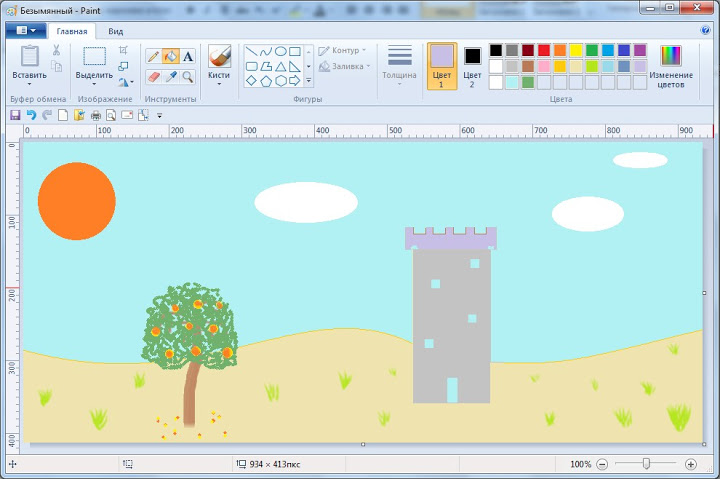
Then, the bottom field was flooded with sand color - the main backdrops. And then you can place any objects in the picture - plants, animals, etc. Do not rush, the first time may not work, but it does not matter,"marriage" can be deleted using the button or the key combination Ctrl + z. If after completing the fill, the adjacent contour is also filled in, then there is a gap somewhere in the contour to be filled. You can find this gap using the tool. Scale or .
Inscription Tool
Click on the button with the tool and move the cursor to the place where you want to make an inscription - click in this place with the left mouse button. (Numbered arrows indicate the procedure)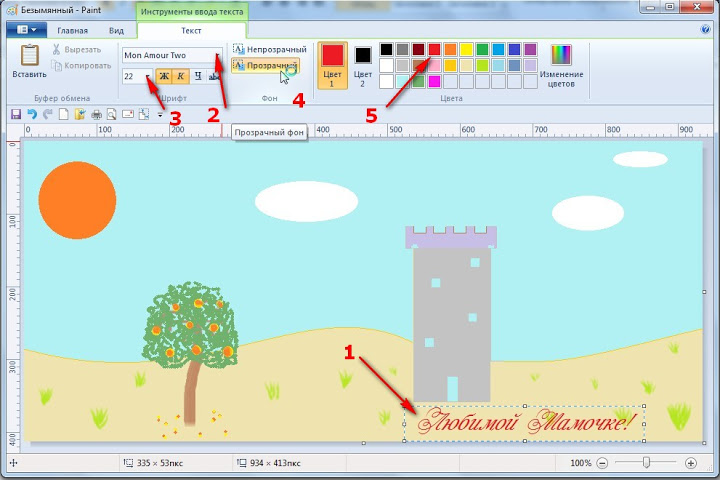
An additional section will open at the top: and all the tools for customizing the input label. Select the font and its size, select the mode Transparent, select the text color that will be displayed in the window Color 1, make an inscription. To make an inscription on a given background, select the place of the inscription and click in this place with the left mouse button. Activate the window Color 2 and select a color for background inscriptions, then activate the window Color1 and select a color for text - make an inscription.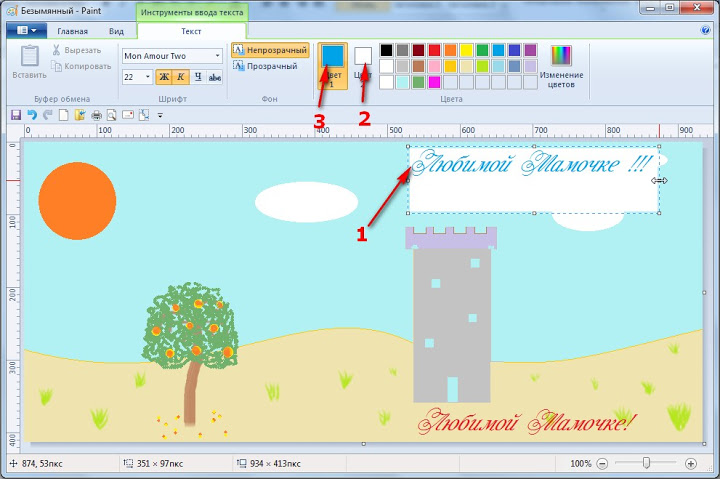
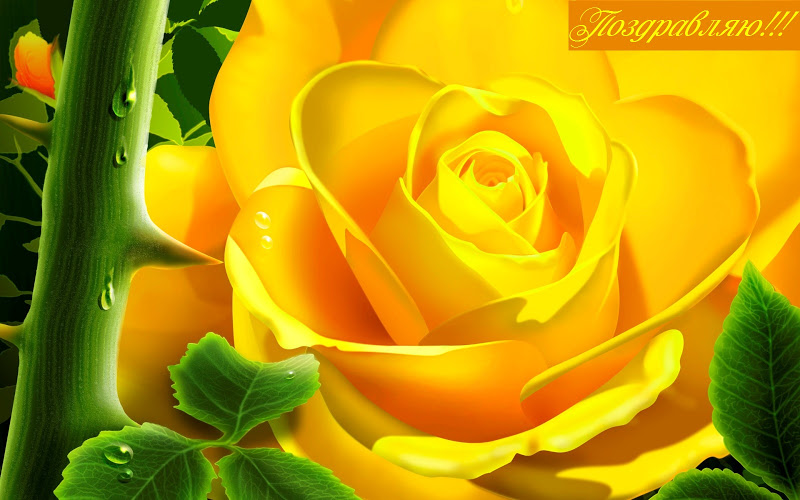
Palette or Pipette tool
It is used to quickly assign a color to a particular tool and allows you to get color from anywhere in the working field. It is enough to bring the pipette to a certain place and click the left key for some purposes or the right key for others. But to make it clearer, consider the operation of the pipette on this snapshot. To do this, load the photo into the editor.Suppose you need to put a congratulatory inscription directly on the picture. It is necessary to choose colors for the background of the inscription and for the text itself. So that the inscription does not overwhelm the beauty of the picture, we take the colors directly from it.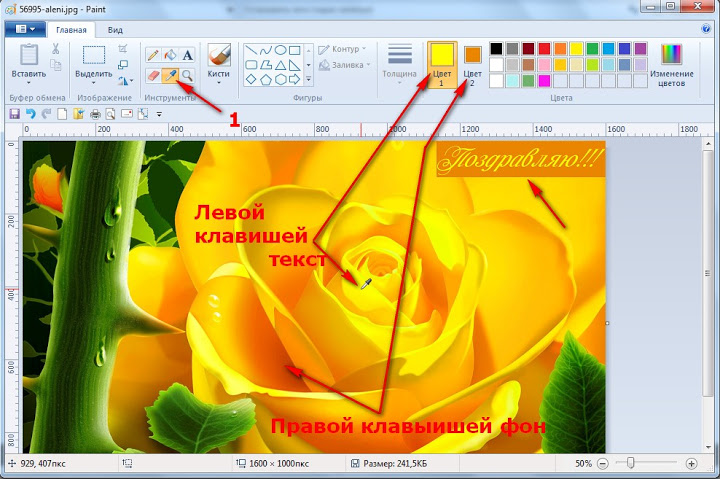
Activate the tool Palette and move the pipette to the color that you would like to see as the background of the label. Click on it right keymouse - it will be background color. Activate the tool again Options and move the pipette to the place of the image where there is a more suitable color. Click on it with the left mouse button - it will be the color of the text. Then activate the tool Inscription and write a greeting text. Save the resulting card to hDD computer, after which you can send it by e-mail or print it out on a printer and give it to your loved one, and also use it as a picture for your desktop.
Saving the picture on the computer
Even if the work on the picture is not finished, you can save it to your hard disk and then continue to work on it. Open the editor menu, in the opened window select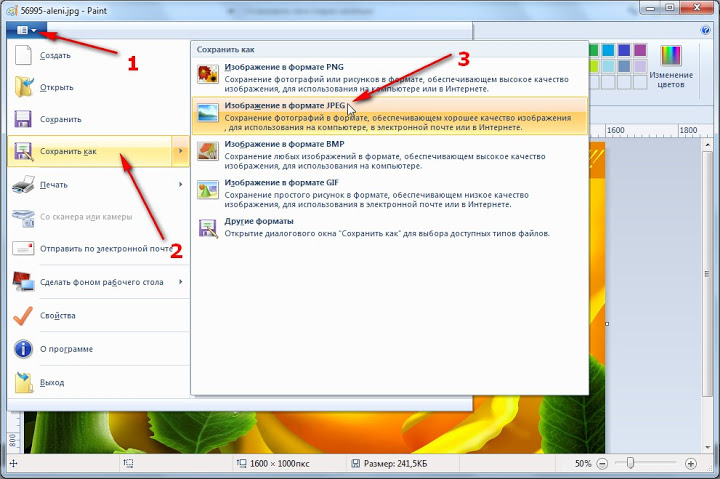
in the next window that opens, select the format in which you want to save the picture and click on it with the left mouse button. In the computer explorer that opens, select the drive and folder to save the image. Name the file and click Save.
 In the future, you can always extract a drawing for further work or other actions with it.
I wish you success!
© Mikhail Kovenkov