A small free synchronizer of folders and files for everyday needs.
The presence of two (and sometimes more) computers in home use has long ceased to be perceived as something out of the ordinary.
Today at home local network you can find up to a dozen various devices, both the PCs themselves and all kinds of network drives, DVD and Blue-Ray players, TVs with network access, etc. Even if you do not have all of the above, then all the same, most likely you use at least one flash drive to transfer the necessary data.
In any case, situations arise when the required file is changed to local computer and you have to manually transfer it to the same USB flash drive. And if there are several such files, how not to forget to "throw off" actual copies in time? For all this there are special programs - synchronizers.
A good synchronizer should be able to work in the same way both with local folders and with removable and remote storage media, track changed files in a specified directory and update them in a target folder in time, work according to a specified schedule in automatic and / or hidden mode... All these (and some others) features are possessed by a very small utility called DSynchronize.
Despite the free status and small size, it can easily compete on an equal footing with commercial programs, such as the popular abroad Synchromagic Pro.
Comparison of DSynchronize with its paid analogue Synchromagic Pro
DSynchronize has a fairly simple interface and pretty good functionality, so it can be safely offered for both home and corporate use.
Another big plus is that the program can work in service mode, which allows an ordinary user not to even think about manually synchronizing files and have only the most current versions of them at hand, having once set up the DSynchronize schedule.
The disadvantages of the program (although as anyone :)) can be attributed to the inability of DSynchronize to archive the copied files for their possible subsequent recovery. The backup function seems to be present in the form of the "Backup" window, but in fact, it was not possible to find any copies either in the program folder or in the synchronized directories :(.
Nevertheless, I am not inclined to attribute this drawback to the disadvantages, since we are unlikely to use the old versions of the files, and even if we do, we will probably create copies ourselves. So, now about working with the program.
DSynchronize does not require installation, but to save the settings, you should still unzip it to any folder on your hard drive. That's all, we can get to work.
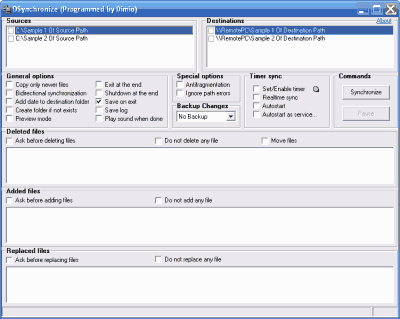
DSynchronize interface
Initially, the program interface is English, although it is intuitive. There is no Russian localization on the official website, but I made an attempt to "domesticate" DSynchronize ..
To Russify the program, it is enough to add the file to the folder where you unpacked it DSynchronize.lng from the downloaded archive (oh yes ... any modification and optimization of the above-mentioned file is allowed to fit your needs :))). Now let's launch the Russian version of DSynchronize.
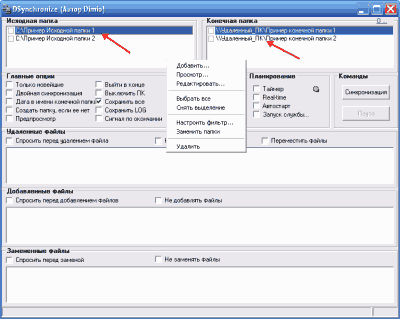
The DSynchronize window interface can be conventionally divided into three parts. At the top there are lists of pairs of directories for synchronization, below is the settings panel for all processes, and even below there are three windows that reflect work with files. At the very beginning in the list of tasks, we will see two examples. They should be deleted using the appropriate command in the context menu (right mouse button).
When the list of standard tasks is cleared, add our own. We call again context menu and select the item "Add". A couple of blank lines will appear. In these lines we will enter the full addresses of the folders in which the files are to be synchronized.
Now there are several nuances. If you plan to sync two local folders, then it will be enough to double-click on the line and, by pressing the "Browse" button, select from the list first the source folder (from which the files will be copied), and then the final one.
The same should be done if you want to synchronize a folder with a removable storage medium (for example, with a flash drive), having previously connected the device to a PC.
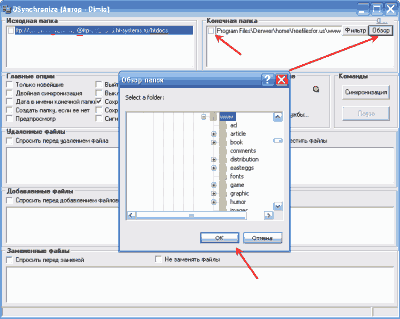
FTP sync
But to connect to a remote computer via a local network or via FTP, you will have to enter the path manually. To access a folder on a remote PC over the local network, you will need to enter the following: \\\\ Computer name (or its IP) \\ Folder name (eg, \\\\ 192.168.1.4 \\ General Documents).
The only caveat is that the folder to which we connect must be open for public access. Call the context menu of the folder and select the "Properties" item. In the window that opens, go to the "Access" tab and check the box "Open general access to this folder ".
To use the FTP sync feature, enter the full server address (for example, ftp: // Server address / Folder name). If in response you receive a window with an error message, it means that to access the server you need to specify authorization data.
This can be done by adding a login in front of the server address, then a password after the colon, and only then after the "@" sign the direct server address (see the screenshot above).
When the pair of folders to sync is ready, you can adjust some of the file sharing options. To do this, click on the "Filter" button next to the folder address, or call the corresponding command from the context menu.
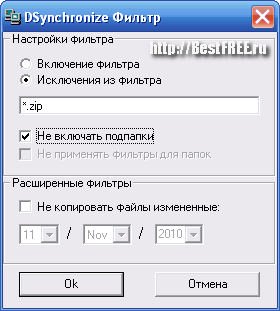
Here we can set the copying of either strictly defined files or their types by mask by selecting the "Filter Inclusion" item, or specify which files (or file types) should not be synchronized by selecting the "Filter Exclusions" item. The mask is set in a standard way: we enter a part of the file name, and everything that is not needed is marked as "*". You can separate masks with a regular semicolon.
DSynchronize settings
Consider now the options panel, which is located under the folder list.
All possibilities are divided into four groups. The first - "Main Options" - includes almost all the necessary synchronization settings. It is worth paying attention to the first two possibilities. The "Newest only" item allows you not to overwrite all existing files, but to copy only the most current versions.
Thus, time spent on synchronization is significantly saved. Another possibility is "Double Sync". If it is activated, then both folders are checked for new versions of files and as a result, only the most current copies remain in each of them.
The second group of settings is "Special options". Here you can enable anti-fragmentation of added files, skipping errors, as well as backup (which actually does not work :(). Of all the options available here, only Anti-Fragmentation is actually useful.
If it is activated, then when a new version of the file is found, the old one is deleted, and a new version is added as new file... This allows for less fragmentation than if the old file was simply replaced with a new one.
The fourth group - "Commands" - contains only buttons for controlling the synchronization process, so let's dwell on the third group - "Scheduling". This is one of the most basic sections that is responsible for automating all the processes in the work of DSynchronize.
By clicking on the first option - "Timer", we will go to the window for setting up time synchronization:
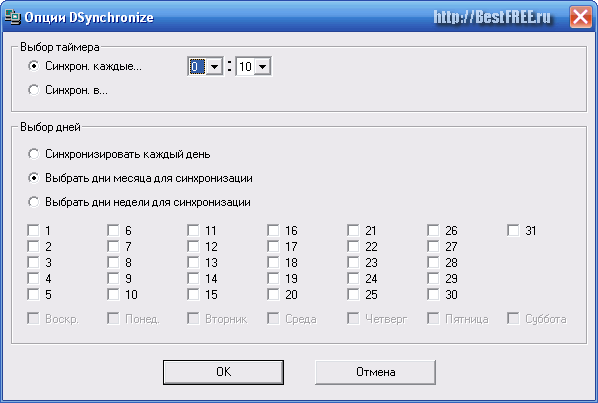
Here it is possible to set synchronization after a certain period of time or at a specific moment (at one o'clock, for example). In addition, we can set up the process of collating files not only every day, but also on strictly defined days of the month or week!
It is possible in DSynchronize to set constant synchronization in real time using the "Real-time" item. True, this feature is still experimental, and we will be warned about when we try to turn it on, so before activating it, you should make sure that the program works correctly with the selected folders in normal mode.
Next here are two items that are responsible for autostarting DSynchronize. The first - "Autostart", allows you to download the program along with the system. In this case, the program will be visible in the tray, from which it can always be called.
If you are sure that everything is configured correctly and you do not need constant access to DSynchronize, then you can set the program to work in service mode. To do this, mark the item "Starting the service ...".
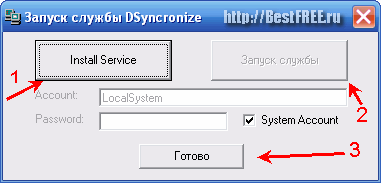
In the window that opens, you first need to click the "Install Service" button to install a new service, and then start it, after which you will only have to click the "Finish" button.
An example of working with the program
Now everything is really ready in order to start working, so we press the "Synchronize" button in the "Commands" section.
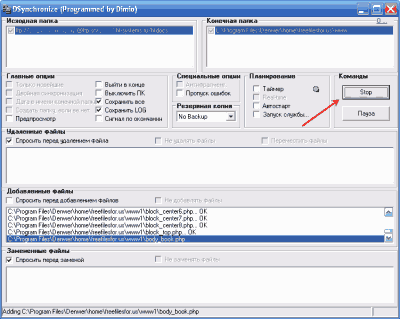
The synchronization process itself takes place in two stages, which can be seen in the status bar. The first stage is collation and formation of a list of copied files, the second is direct copying.
In three windows under the main menu we can see lists of all copied, deleted or replaced files. Here we can also establish certain prohibitions or permissions for the corresponding actions.
If you want to control the entire synchronization process, I advise you to enable the request before any DSynchronize action (except, perhaps, adding files). Such requests look like this:
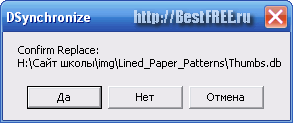
In this case, we have a window for confirming the replacement of files (Confirm Add - confirmation for adding, Confirm Remove / Delete - deleting).
Again, we learn about the completion of the synchronization process from the inscription in the status bar:

conclusions
Congratulations! Now you can finally forget about manually copying the files you need, since you can shift all the worries related to file synchronization to DSynchronize.
P.S. It is allowed to freely copy and quote this article, provided that an open active link to the source is indicated and the authorship of Ruslan Tertyshny is preserved.
Synchronization over the network
Logic dictates that the safest way to work with a document is when a document is created from scratch to the end on separate computer... Let's say the document Text.doc. In practice, you should rarely count on such a method, since you have to work with some documents in the office and even on trips. As a result of the edits, in fact, three documents are obtained, while even one's own memory cannot always tell which version of them was the last, especially since the fourth copy can also be actively changed in the "cloud". The dates of creation and access to the file are inaccurate indicators, since the time on different machines may differ from the reference. Operating systems and editors can vary, which can make the extended version of the file smaller, which can be confusing. For example, the author has repeatedly transferred programs on floppy disks for the workshop computer, on which he had to edit these programs. Due to problems with the battery, the operators did not set the correct date, so the modified file was forever dated January 1, 1980. It is clear that automatic synchronization files on the computer would immediately replace the new file old version, which is disastrously wrong. Thus, most modern synchronization programs prefer to work not with physical folders, but with logical ones, where meta tags of the history of their creation and editing can be prepared for files.
In the simplest case, programs such as Total Commander, act as follows: first in different folders files with the same name are selected, then the files are checked physically. After that, completely matching files on computer B are deleted and replaced with all remaining files from computer A in this folder. And even so, the program asks a bunch of questions about deleting data.
If you still have not felt the complexity of the question, then imagine that you copied a list of contacts from your phone to your computer, where you synchronized it. Then one entry was deleted from the computer list. What should happen - should this entry be deleted in the phone, or should it be copied from the phone again? It's time to get confused. In the era of SM computers in OS RSX, I remember that for text documents the editor automatically installed versions, writing them after the file name -; 1,; 2, etc. This helped a little with the analysis of changes, but for other file types it does not work.
Such a long introduction was necessary due to the fact that one must clearly understand: impeccable network sync programs do not exist in nature - they have to consider too many factors. Sure, a search will give you a large, highly publicized list of them, but most of them won't work. And, by the way, many foreign programs will not work correctly with files containing Cyrillic characters in their names. The situation is further complicated by the fact that many programmers are too presumptuous to position their crafts as Pro versions, demanding money, but at the same time they do not bring the quality of programs to a standard.
Of course, you can download all sorts of utilities right now like SmartSync Pro, Active File Compare, SameDir, Beyond Compare, Zsync, Compare and Merge and many others, but they will not add happiness to you. Worst of all, in the simplest cases synchronization of physical folders will go well, but in a non-standard situation required files will be skipped or deleted.
Nevertheless, there is no need to be sad, and more or less good programs is still there. For instance, groove 2010 Is a piece of Microsoft SharePoint technology with good reviews. Synchronization is provided by supporting logical folders, where each file has metadata. In simpler cases, familiar stand-alone utilities are used. So, the ViceVersa program has a good rating. We recommend that you read the article at digest.subscribe.ru/inet/review/n910694942.html, where 4 good programs are considered, but only one of them (Allway Sync) is free. Comments to the article added confidence regarding other opinions, so we won't be mistaken if we recommend that you carefully study the following packages: Sync Toy, PureSync, PowerFolder, FreeFile Sync, SynchronEx, Dropbox, SyncForce Pro, Dsynchronize, BestSync. They probably won't all work perfectly, but at least they have stood the test of time. Most of them will be useless when working with websites and the Internet in general, but in the case of local data, there will definitely be no questions. In particular, you can always sync folders on memory cards mobile devices, flash drives, network devices and folders on your computer. As a small theoretical material - read forum.ru-board.com/topic.cgi?forum\u003d5&topic\u003d4124&start\u003d0, where there is a lot of valuable information.
The directory is read using the get-childitem command. The -recurse option is added to include subfolders to be counted, and the PSIsContainer () function is used to distinguish files from folders. If it returns True, then the item is a folder, otherwise it is a regular file:
$ source \u003d ¨c: files¨
$ srcfolder \u003d get-childitem $ source -recurse | where-object ($ _. psiscontainer)
$ srcfiles \u003d get-childitem $ source -recurse | where-object (! $ _. pciscontainer)
To solve our simple problem, four lists are required: the first two contain source files and folders, and the remaining two are the resulting files and folders. The synchronization process boils down to iterating over these lists and copying files from one folder to another.
The first loop checks if the source directories exist in the backup folder, and if they do not already exist, they are created using the new-item command.
foreach ($ folder in $ srcfolders)
$ srcpath \u003d $ source -replace ¨ \\ ¨, ¨ \\ ¨ -replace ¨: ¨, ¨: ¨
$ dstpath \u003d $ folder.fullname -replace $ srcpath, $ destination
if ($ dstpath -ne ¨¨) (
if (! (test-path $ dstpath))
¨Creating the ‘$ dstpath’ folder.
new-item $ dstpath -type directory | out-null
A very similar loop is performed when comparing the resulting and original folder list, thereby creating the exact structure of subfolders. The other two loops process files: the first one copies the updated objects from the source to the target folder, the second - those that are not in the source directory - from the final one. You can find out if a file has been updated by its hash code. Note that since files are opened read-only, they are not blocked from being used by other programs. However, according to the rules of good taste, the file must be closed with the Close () function at the end of the hash code calculation:
$ md5 \u003d new-object system.security.cryptography.md5cryptoserviceprovider
$ fs \u003d new-object system.io.filestream ($ file, $ mode, $ access)
$ hash \u003d $ md5.computehash ($ fs) # file hash code
$ fs.close ()
It is pointless to overwrite a newer file with its old copy, and therefore we will add commands to compare modification dates. When moving back files that are not in the source folder, no checks are required, just execute the copy-item instruction. The entire script is shown in the listing - the paths to the source and destination folders are passed to it (do not forget to add closing slashes, for example, c: filessource), and then it does all the work on its own and only displays information on what is happening on the screen. Note, even if you have not previously created the resulting folder, the script will create it on its own:
if (! (test-path $ destination))
new-item $ destination -type directory -force | out-null
So, this script will help you copy missing photos, tables, text documents and others, without wasting time on manual file-by-file comparison. To use it, you can create a simple BAT file on the Desktop by specifying a command of the form powershell.backup.ps1 c: filessrc d: backup (the path to the script usually needs to be given in full). It is easy to sync folders later by clicking on this batch file. Recall that the command Set-ExecutionPolicy RemoteSigned, executed on behalf of the "Administrator", allows execution of unsigned scripts.
Keeping copies of important files in a completely unprotected form is perhaps not entirely correct from a security point of view. Windows system 7, despite Microsoft's best efforts, remains vulnerable to viruses, worms, and other malware. Before the documents that are constantly lying, in fact, in open accessthey get there with no problem. Fortunately, in operating system a very useful tool has appeared - virtual disks that are mounted and disconnected on the fly. They are also suitable for backing up any important files that can be accessed limited number users.
A virtual disk is represented in the system as a VHD (Virtual HardDisk) file, which has a complete structure and content similar to those of hard disk... It is created using the built-in Windows 7 utility program for computer control, which is launched through the compmgmt.msc module. In the window of this program, you need to click on the "Disk Management" line and select the "Action Create virtual disk" command from the menu. For the new virtual disk the size is set and then the volume is formatted. In the last step, you can assign a drive letter or bind the VHD file to an NTFS folder.
The last method is interesting because copying is allowed to a specific folder, regardless of where the virtual volume is located. By unmounting a virtual volume in a computer management utility, you can be sure that neither viruses nor curious users will get to the most recent copy of important documents. The virtual volume itself, that is, the file with the VHD extension, can be copied to the backup media. An additional security measure is virtual volume encryption, available with BitLocker to users of the maximum and business versions of Windows 7. When connecting such a protected volume (and it can be used on other PCs, even where BitLocker is not installed), Windows will ask for a login and password.
March 31st is international backup day. Apparently because April 1 is the day of those who don't. If the office has a problem reserve copy usually decides system Administrator, then for those who work from home, it must be solved by yourself. FreeFileSync is a great tool for backing up and synchronizing data.
Organization of backups
There are two things to consider when organizing backups. First, the more backups there are, the higher the likelihood of data leakage from them. Second, the farther the copy is geographically stored from the original, the more chances of its preservation. A good option is to make backups on remote computer through a VPN connection, then they are not afraid of either the flood or the fire. But not everyone has such an opportunity, so we will consider redundancy and synchronization on external hard disk.
Do not forget about the relevance of copies, for which periodical synchronization should be carried out. You can, of course, copy the entire amount of data anew each time, but this will only work if there are not many of them. For large volumes, this will lead to unnecessary wear on the hard drive and, in general, a waste of time. Synchronization is much faster than full backup, but it is very important to set it up correctly. Otherwise, you might lose both the copy and the original data! Before using sync, be sure to test it on unnecessary files and folders!
Setting up synchronization in FreeFileSync
After installation, launch the program and select folders for synchronization. On the left will be the original folder and on the right will be backup copy on an external hard drive.
Then, go to the file comparison settings and select the parameters. By default, files are compared by date and size. On the Filter tab, you can configure folders and files to exclude from synchronization.
On the "Synchronization" tab, configure the synchronization mode. There are 4 modes in total:
- Both sides - changes are tracked on both sides of the sync.
- Mirror - only changes on the left side are taken into account, that is, files and folders that do not exist on the left will be deleted during synchronization.
- Update - files are copied from left to right, and if new files are found on the right, user intervention is required.
- Selective - you can configure your own rules for processing files.
Setting up scheduled synchronization
FreeFileSync has useful function - this is saving the synchronization parameters in the form batch file... To create this file, click the "save as batch job" button. If necessary, you can enable recording of synchronization logs.
When you run this file, synchronization is performed in hidden mode, without starting graphical interface... Therefore, Windows can be configured to run this file on a schedule. To do this, open the panel windows management and find there the item "Schedule tasks execution". As an example, let's configure the synchronization to start when the computer is turned on. We create a task for all users. In this case, a password must be set on the computer.
Specify "At startup" as a trigger. It is also worth setting a delay in order for everything to work correctly.


