Windows 10 - newest version An OS that has rightfully earned immense popularity. This version is remarkable in that it has become equally user-friendly as on conventional computersand on tablets. Below you will find out how in Windows 10 you can activate the automatic appearance of the on-screen keyboard in windowed mode.
In order to make the operating system universal for computers and touch devices, two modes were created in Windows 10 - window and tablet. Windowed mode is a familiar desktop with a Start and taskbar, while Tablet Mode has tiles and an onscreen keyboard.
However, while tablet mode is much more convenient to use on touch devices, many users still prefer the standard windowed mode to it. The problem lies in the fact that in windowed mode, typing is provided only using the physical keyboard. However, you can fix this problem by adding on-screen keyboard support to windowed mode.
How to activate the onscreen keyboard in normal Windows 10 mode?
1. Click on the " Start"And go to the menu" Parameters". You can also quickly jump to this section by using the Win + I keyboard shortcut.Special abilities».
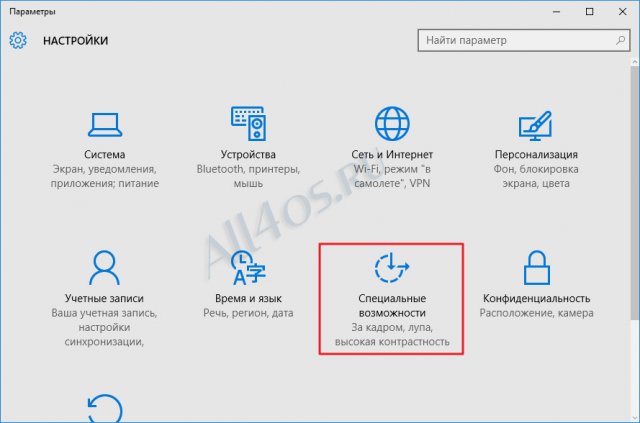
Keyboard". In chapter " Screen keyboard»Activate the option" Enable on-screen keyboard ", which is located at the very beginning of the list.
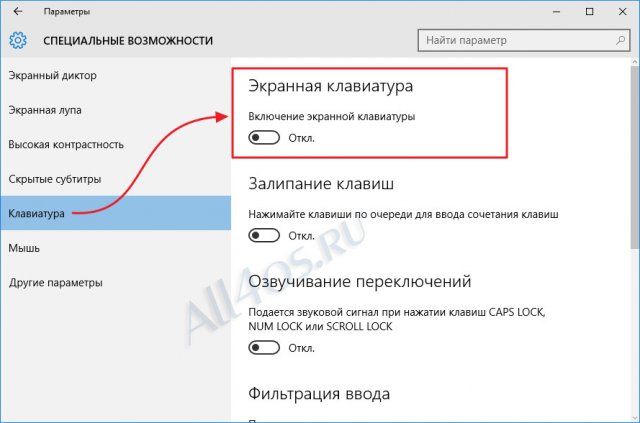
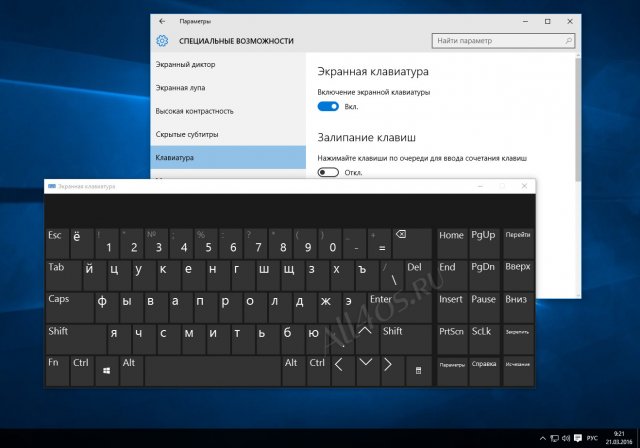
At this point, the on-screen keyboard will be activated and will immediately appear on the screen:
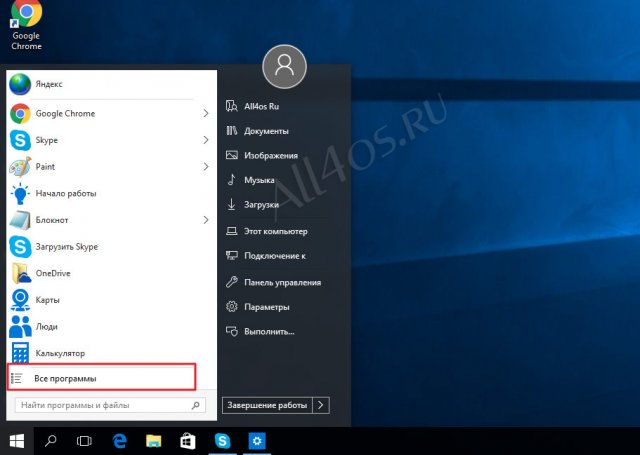
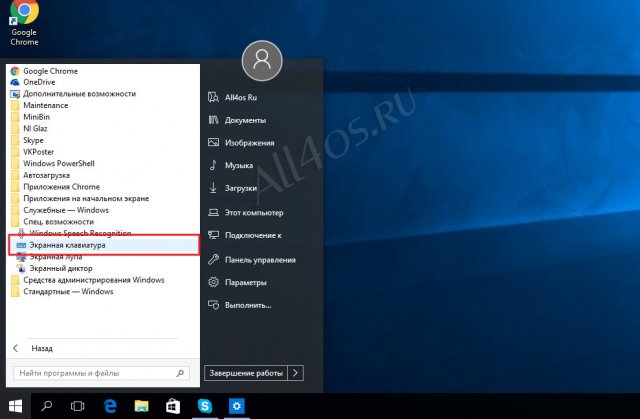
There is also another way to enable virtual keyboard in Windows 10, by the way, it is somewhat simpler and faster than the first. First, go to the Start menu and open the item " All programs»:
Activating the onscreen keyboard in Windows 10 tablet mode
If your OS is installed on a tablet-type device, then enabling the keyboard here will be slightly different from computer version... So, just like in the first case, first we need to open the section " Parameters»: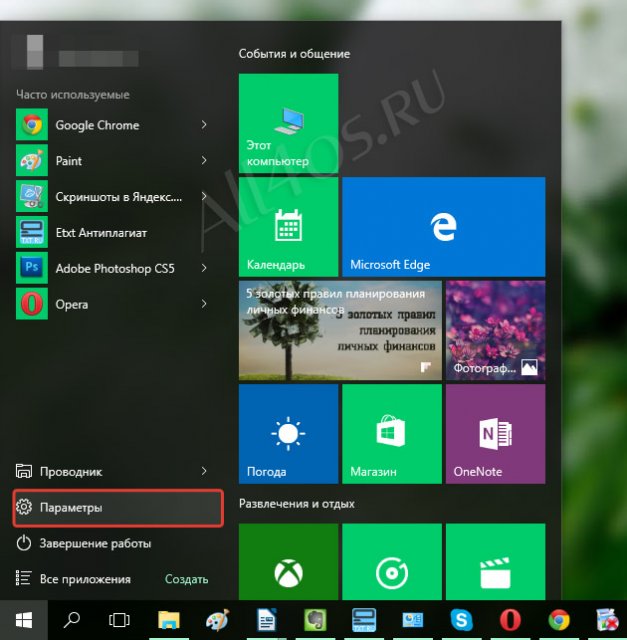
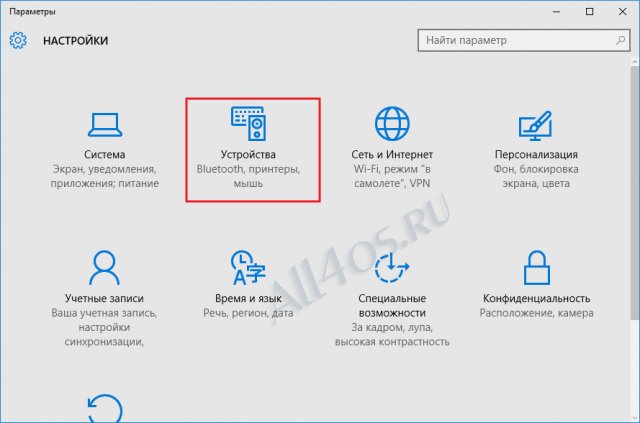
2. In the window that opens, select the section " Devices».
3. On the left side of the new window go to the “ Input". In chapter " Touch keyboard"Activate the option" Automatically display the touch keyboard in windowed applications when no keyboard is connected to the device ", which is located at the very end of the list.
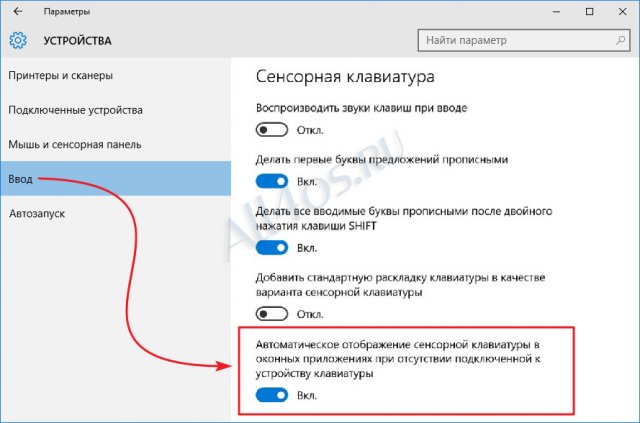
From this point on, the touch keyboard will be activated and will be displayed whenever no physical keyboard is connected to the device.
The physical condition of some people does not allow them to fully operate the keyboard. However, many of these people may use a mouse or other pointing device. Such people may find it convenient to enter characters using the on-screen keyboard.
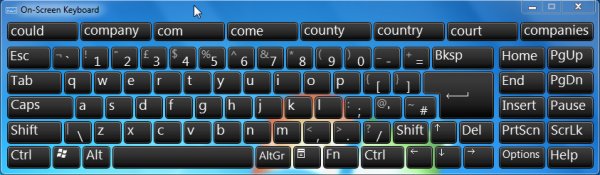
The on-screen keyboard looks like an on-screen keyboard.
The selection of characters on the on-screen keyboard is carried out using the mouse, device simple control or a joystick connected to a serial, parallel, or game port on your computer.
Using the Windows On-Screen Keyboard in Windows 7
In this windows versions the Accessibility Control Panel item has been replaced by the Accessibility Center item.
Open Accessibility Center. To do this, press the Windows logo key and the U key, or select Control Panel, Accessibility, and Ease of Access Center from the Start menu.
You can use the Windows on-screen keyboard instead of a physical keyboard when using your computer. Select characters on the on-screen keyboard using your mouse or pointing device.
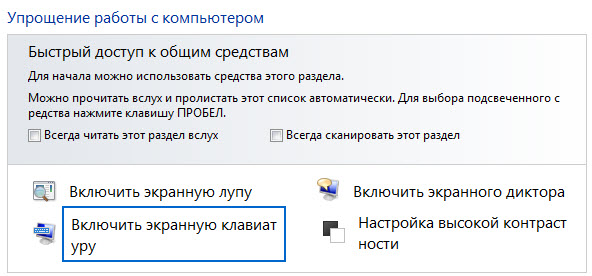
Open the Ease of Access Center window. In the Shared Tools Quick Access section, press Alt + K or click Enable onscreen keyboard"As shown in fig. 1. An onscreen keyboard appears.
Figure: 1
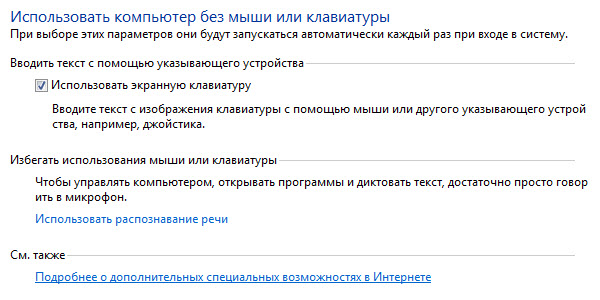
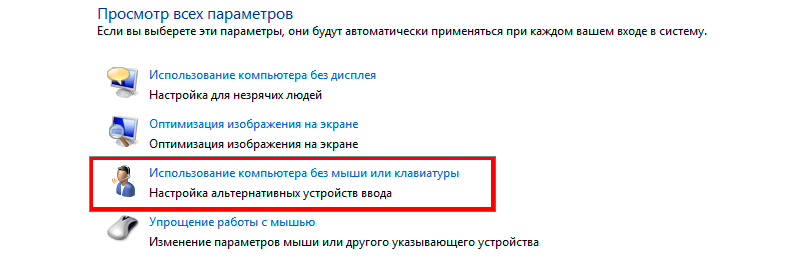
To have the on-screen keyboard launch at logon, under Show All Settings, click Use this computer without mouse or keyboard, or select it by pressing the Tab key, and then press Enter, as shown in Figure 4-2. 2.
Figure: 2
In the Enter text with a pointing device section, press Alt + K, or select the Use On-Screen Keyboard check box by clicking it, and then press Alt + S or the Save button, as shown in Figure 4-3. 3.
Figure: 3
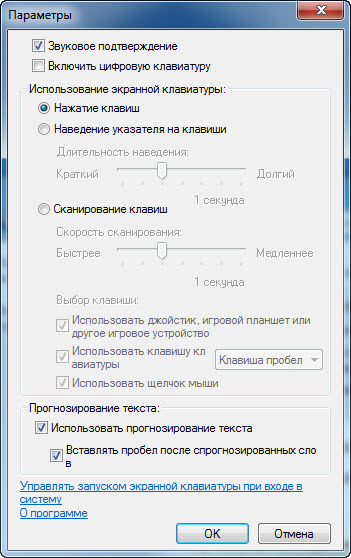
You can customize the keyboard displayed on the screen to suit your needs. To do this, press the button Options (Parameters). The options window will open.
Figure: 4
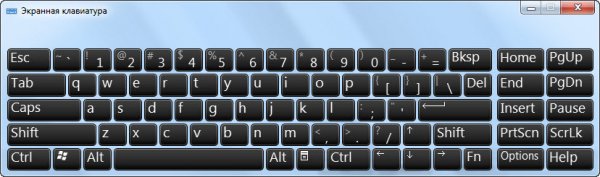
Figure: five
There are several ways to enter characters using the onscreen keyboard.
If the Keystroke radio button is selected, you must click it with your mouse or pointing device to enter a character on the onscreen keyboard. If the switch is installed Hover over keys, then to enter a character on the on-screen keyboard, you must hover the mouse or pointing device over the desired on-screen keyboard key.
The required hover duration can be changed by moving the slider in the field "Hover duration".
When the Scan Keys radio button is selected, you can use a variety of devices to operate the on-screen keyboard, including easy controllers and game pads, and the SPACEBAR.
The scanning speed can be changed by moving the slider in the Scanning speed field.
Predicting text
Screen keyboard Windows 7 contains built-in tools text predictionthat speed up text entry and help avoid typing errors.
To turn on text prediction, select the Use Text Prediction check box. To add a space after all predicted words, select the "Insert space after predicted words" checkbox, as shown in Fig. 6.
Figure: 6
Note. If this method does not work, it is possible that changing computer settings is prohibited by your organization's IT policies. To resolve this issue, contact your organization's IT support team.
How to enable the virtual keyboard in a computer (laptop) on windows 7 (windows 8), no one thinks until there are problems with the real - physical.
There is a reason for this, because real on a "full scale" ( touch screens do not mean) can never replace the real one.
For the first time I decided to turn on the virtual one on my laptop, when the "Esc" () button stopped working for some unknown reason.
The inclusion field immediately saw how many flaws she had in comparison with the physical one. The main one - "slowness" and inconvenience - nevertheless, there was no other way out, I had to "suffer" for some time.
In general, if a real keyboard starts to malfunction, the virtual one can be used for some time, and then you shouldn't even repair the old one, but immediately buy a new one.
They are not expensive, starting at $ 10. You do not need to download the virtual keyboard, unless you are satisfied with the standard one that comes with Windows 7 and Windows 8.
Enabling the virtual keyboard on the computer method one
The first method is the "longest" and at the same time the most stable. Why? The other two require a workable real keyboard, and it just might not work for you.
Immediately after that, you will see a picture as in the screenshot below. Click on the virtual keyboard and it will turn on immediately.

This is the most quick way, only two working keys are needed (if they do not work for you at the moment, I am very sorry, especially if this is a laptop).
Enabling the virtual keyboard - method three
To use the third method, to enable the virtual keyboard on a computer or laptop, in addition to pressing keys, you will need to enter a command.
It is suitable for both windows 7 and windows 8. Press the Fn + R keys. A window for entering commands will appear. Paste in two words (without quotes): "osk.exe" and click "OK".
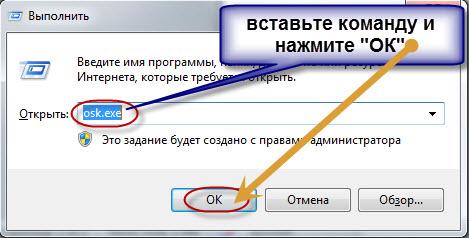
Alternatively, press the "" button and enter the word - osk.exe into the search bar at the bottom.
After that, an icon for launching the on-screen keyboard or virtual keyboard will appear at the very top, these are the same thing.
That's all. I think one of the three described ways to enable the virtual keyboard on a PC will definitely suit you.
Just do not forget that it is not itself that has the "parameters" option (in the bottom row). By using it, you will greatly facilitate your work. Good luck.
Instructions
Click on the "Start" button or press any of the two win buttons on the keyboard - this will open the main menu operating system Windows. Hover the mouse cursor over the "All programs" section in this menu, and in the submenu that appears, select the "Standard" line. In the next section of the menu that pops up, hover the cursor over the "Accessibility" folder, which will bring up the fourth, this time the last section of the main menu. In it, click on the item "On-screen keyboard" and the application you need will be launched, and in addition to it, a message will appear on the screen stating what Microsoft has to offer and more functional programs for the work of people with disabilities. After reading this, undoubtedly useful information, check the box "Do not display this message again" if one reading is enough for you, and click "OK".
Use the standard program launch dialog if you don't want to go on a multi-step journey through the main screen to open the on-screen keyboard. windows menu... To do this, first press the win and r keys simultaneously - this combination duplicates the "Run" command in the menu on the "Start" button and brings up the program launch dialog. In the dialog box that opens, type the three-letter command - osk. This is short for the full English name of the on-screen keyboard - OnScreen Keyboard. Then press the enter key or click on the "OK" button and the system will launch the desired application.
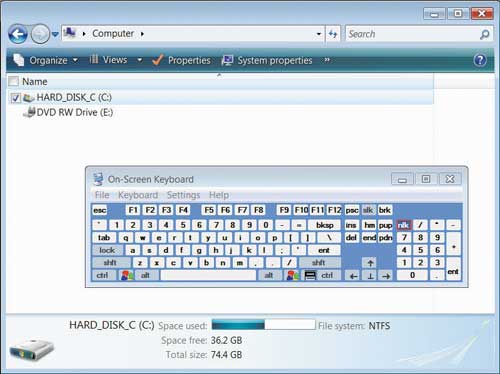
Double click the executable of this program in Windows Explorerif both of the above methods are somehow not suitable. You can start the file manager by simultaneously pressing the win and e keys (this english letter), or by double-clicking on the "My Computer" icon. Search desired file with the name osk.exe follows in a folder named system32, which is nested under wINDOWS folder on system disk your operating system.
A virtual keyboard is used in the absence of a physical one, as well as in the event that it does not have symbols of the required alphabet. In order to use it, no other programs are required except a browser.
Instructions
Make sure your browser and text editor support Unicode encoding.
Choose a site with a virtual keyboard depending on which alphabet you need to type. The most famous of these sites is the following:
http://keyboard.yandex.ru/
This resource allows you to type texts in Russian, English, Belarusian, Spanish, Italian, Kazakh, German, Tatar, Ukrainian, French and Turkish.
Use the following virtual keyboards to type in languages \u200b\u200bthat use other alphabets:
http://www.keyboard.su/ (Russian, English, Arabic, Belarusian, Hebrew, Spanish, Italian, German, Turkish, Ukrainian, French);
http://www.arabic-keyboard.org/ (Arab);
http://www.branah.com/ (several dozen languages);
http://gate2home.com/Greek-Keyboard/Wikipedia (Greek);
http://nn.translit.cc/ (where nn is the two-letter language name).
If none of the specified virtual keyboards suits you, because it does not contain the characters of the alphabet you need, enter in search engine the following line:
virtual (alphabetname) keyboard online, where (alphabetname) is the name of the desired alphabet in English.
Select a language if the virtual keyboard is multilingual. Type text using the mouse. Then select it (Control + A) and place it on the clipboard (Control + C). Switch to a text editor, and then paste a text fragment from the clipboard (Control + V) into the desired place in the edited document. Save your document.
Never use the virtual keyboard when you don't need it. Typing on a physical keyboard is much faster and less tiring. If you have children and you limit their interaction with the computer by hiding the keyboard from them, do not tell them about the existence of such services.
Screen keyboard makes it much easier for people with mobility disabilities to work with a computer, and also helps to enter data in a language that is not available on a physical keyboard and protects from outside observation when entering confidential data. The on-screen keyboard can be part of the operating system, be third party program and used on separate web pages.
Instructions
The preinstalled on-screen keyboard can be launched as follows. Go to the "Start" - "All Programs" and select the "Accessories" folder there. In this folder, you must expand the "Accessibility" list. This is where the on-screen keyboard is located, which you can launch with a mouse click. This screen keyboard can be customized to suit your own needs. For example, in the "Input Mode" menu, you can define how the selection of characters to be printed will be performed: by delay, or by clicking on the required button. In addition, you can adjust the display mode of the onscreen keyboard.
It is difficult to predict in advance when you might need a virtual keyboard on your computer. You cannot do without it if you need to reinstall the input device drivers, when physical, it will be required in the absence of other means for entering text, or if there are problems with some keys on the keyboard. The on-screen keyboard has always been in Windows operating systems, and it has never been a problem to start it. At the same time, in Windows 10, Microsoft got carried away so much that the system has two keyboards, input from which you can use the mouse. Within the framework of this article, we will present several ways at once on how to launch the virtual keyboard on Windows 10, as well as note the main reasons why it may not work.
It was noted above that on computers running the operating room windows systems 10 there are 2 types of virtual keyboards. Basically, their functionality is the same, but they have a slightly different interface. In total, you can launch the on-screen keyboard in Windows 10 different ways, each of which is quite simple, and it will not be difficult to remember them all.
Through search
The easiest and most obvious search to launch the on-screen keyboard is to use the search, which in Windows 10 does a good job. To turn on the virtual keyboard, click on the search icon in the lower left corner of the screen and enter the query "On-screen keyboard" in it, and then select the found option. 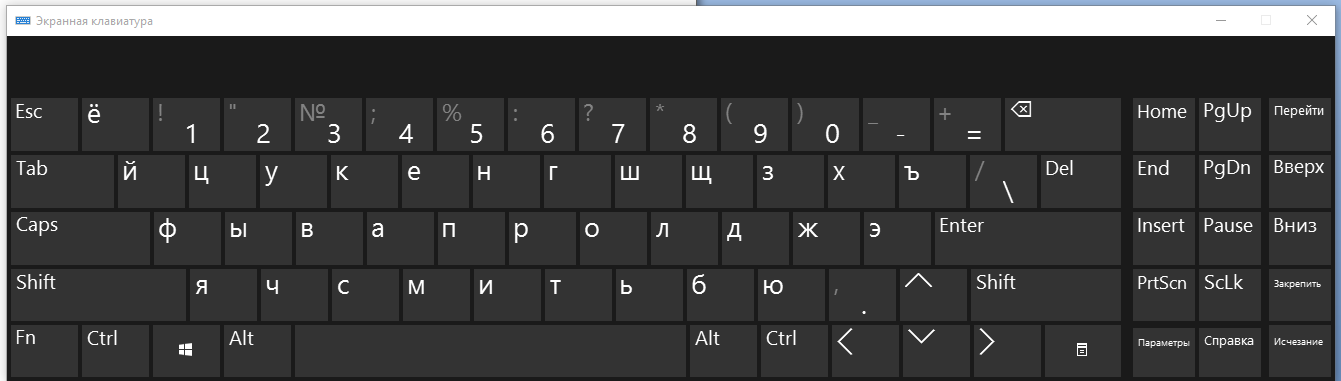
An obvious disadvantage this method in that it will be quite difficult to launch the virtual keyboard in this way if the physical keyboard does not work and there is nothing to enter a request with.
Through the command "Run"
The same type of on-screen keyboard described above can be launched via the Run command. To activate the "Run" line, press the Windows + R key combination on the keyboard or right-click on the "Start" button and select the appropriate item. AT open line "Run" write osk and click "OK", after which the on-screen keyboard will appear on the screen. 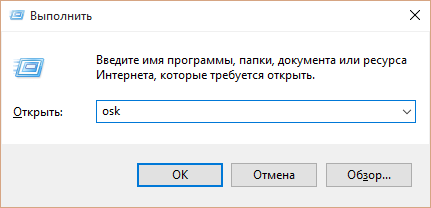
This method has the same minus as the one described above - the need to enter a request from the keyboard, which is difficult if it is faulty.
Through the "Control Panel"
Ease of Access Center in Control Panel allows you to enable the onscreen keyboard. To do this, right-click on the Start button and select Control Panel from the pop-up menu. Further, in the upper right corner of the window that opens, you must switch the view mode from "Category" to "Small icons" or "Large icons". After that, the "Ease of Access Center" icon will become available - click on it and select "Enable On-Screen Keyboard". 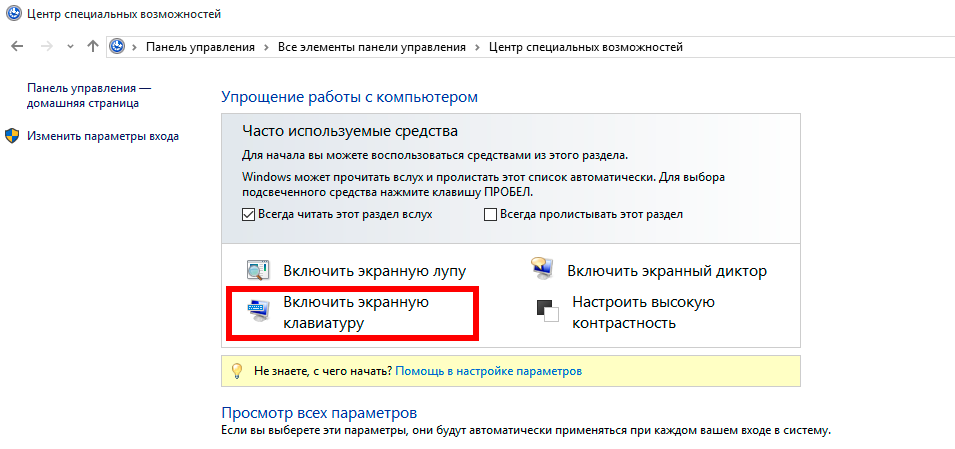
Via the quick task bar
In the lower right corner windows screen 10 where the clock and other icons are located quick access, you can hold the "hot button" to turn on the onscreen keyboard. To display it, right-click on the clock and check the box next to Show touch keyboard. After that, a new icon will be available on the quick taskbar - just left-click on it to launch a virtual keyboard, made in the touch style. 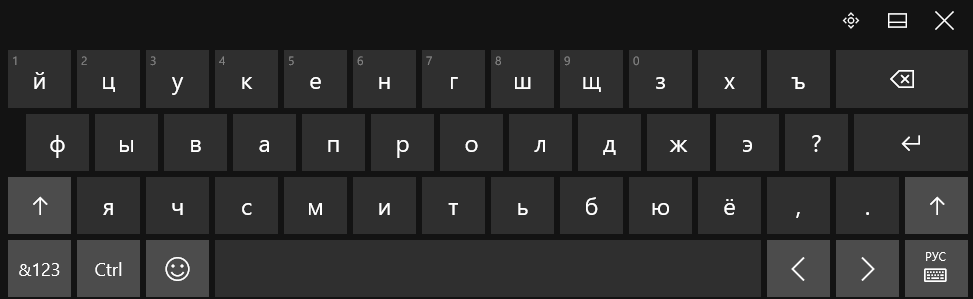
Through "Parameters"
The computer settings menu lets you launch the onscreen keyboard quite easily. To do this, click on "Start" with the left mouse button and go to "Settings". Next, you need to select the "Accessibility" item and on the left side of the screen go to the "Keyboard" tab. After that, it remains to click on the corresponding button to turn on the virtual keyboard. 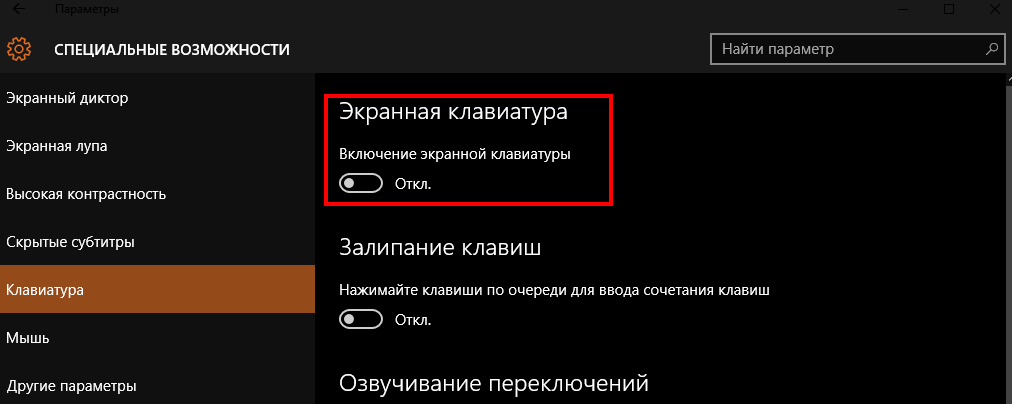
On-screen keyboard won't turn on in Windows 10
If the on-screen keyboard on your computer does not turn on with any of the listed images, then most likely the corresponding service responsible for it is disabled. By disabling, the computer administrator could accidentally or intentionally turn off one of them, which is responsible for the virtual keyboard. Starting this service again is quite simple:
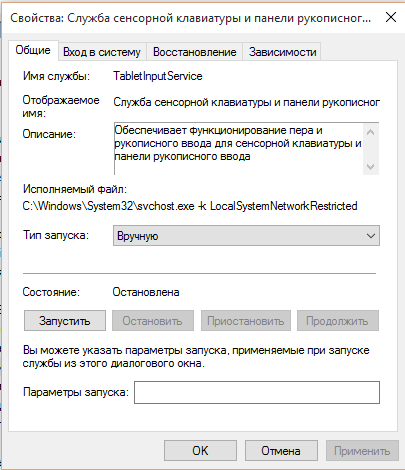
After the corresponding service is started, it remains to launch the on-screen keyboard using one of the methods described above.
When the on-screen keyboard constantly starts up on its own without a corresponding user command, this indicates incorrect settings in special windows capabilities 10. To stop this, you must do the following:
After completing the above steps, the on-screen keyboard will stop spontaneously starting on the computer under windows management 10.


