In Windows there are some things that can be done only using the command line, due to the fact that they simply do not have an option with graphical interface... Some others, despite the existing graphic version, it can be easier to run from the command line.
Of course, I cannot list all these commands, but I will try to tell you about the use of some of them that I use myself.
Ipconfig is a quick way to find out your IP address on the Internet or local network
You can find out your IP from the control panel or by going to the corresponding website on the Internet. But it can be faster to go to command line and enter the command ipconfig... With different options for connecting to the network, you can get various information using this command.
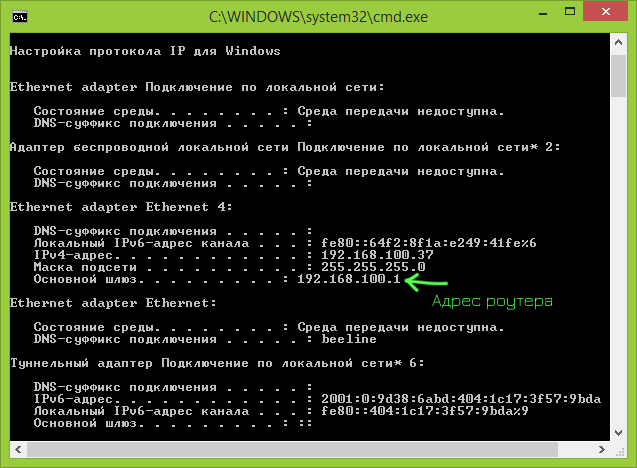
After entering it, you will see a list of all network connections used by your computer:
- If your computer is connected to the Internet via Wi-Fi router, then the main gateway in the parameters of the connection used to communicate with the router (wireless or Ethernet) is the address at which you can go to the router settings.
- If your computer is on a local network (if it is connected to a router, then it is also on a local network), then you can find out your IP address on this network at the appropriate point.
- If your computer uses a PPTP, L2TP or PPPoE connection, then you can see your IP address on the Internet in the parameters of this connection (however, it is better to use any site to determine your IP on the Internet, since in some configurations the IP address displayed on running ipconfig may not match it).
ipconfig / flushdns - flush DNS cache
If you have changed your address DNS servers in the connection settings (for example, due to problems opening a site), or you constantly see an error like ERR_DNS_FAIL or ERR_NAME_RESOLUTION_FAILED, then this command may come in handy. The fact is that when changing the DNS address, Windows may not use the new addresses, but continue to use the ones stored in the cache. Command ipconfig / flushdns will clear the name cache on Windows.
Ping and tracert are a quick way to identify network problems
If you're having trouble logging into a site, the same router settings, or other network or internet problems, the ping and tracert commands can come in handy.
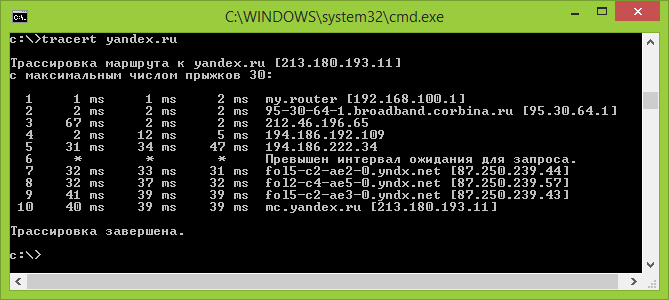
If you enter the command pingyandex.ru, Windows will start sending packets to Yandex, when they receive them, the remote server will notify your computer about it. Thus, you can see if the packets arrive, what is the percentage of lost packets, and at what speed the transmission is happening. Often this command comes in handy when working with a router, if, for example, you cannot enter its settings.
Command tracert displays the path of transmitted packets to the destination address. Using it, for example, you can determine which node is experiencing transmission delays.
netstat –an - Displays all network connections and ports
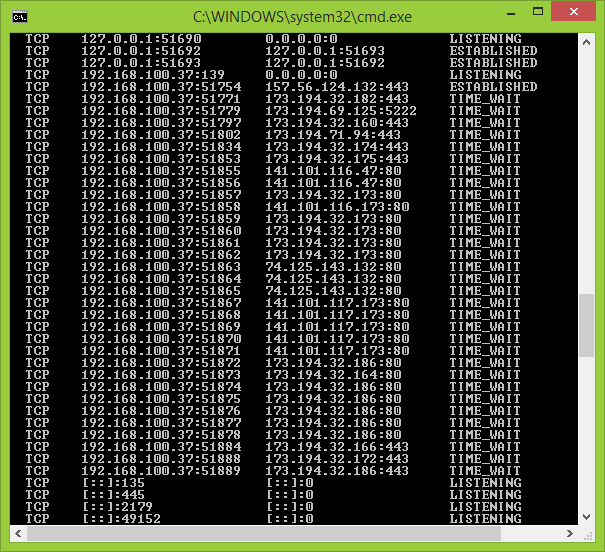
The netstat command is useful and allows you to see a wide variety of network statistics (when using different startup parameters). One of the most interesting use cases is to run a command with the –an switch, which opens a list of all open network connections on the computer, ports, and remote IP addresses from which connections are made.
telnet to connect to Telnet servers
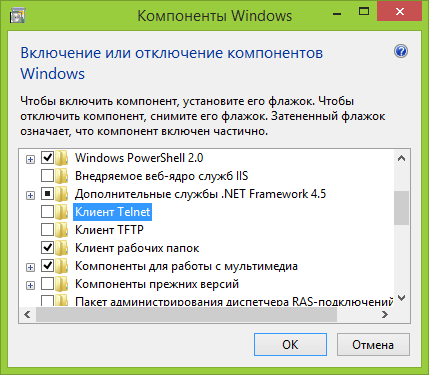
By default, the Telnet client is not installed on Windows, but it can be installed from Programs and Features in Control Panel. After that, you can use the telnet command to connect to the servers without using any third party software.
These are far from all commands of this kind that you can use in Windows and not all options for their use; there is the possibility of outputting the result of their work to files, launching it not from the command line, but from the Run dialog box and others. So if you are wondering how to use Windows commands effectively, but general information, presented here for novice users, is not enough, I recommend searching the Internet, there is.
I hope this work will be useful. Methods for configuring the IP address, commands for testing and correcting network settings will be described below. All the material is presented in an accessible form with attached screenshots explaining the setup process.
IP configuration
In this article I will give screenshots of how to set up an Internet connection under Windows XP. To open a window with a list of network interfaces, in the "Start" menu, select "Connection - show all connections"
A folder with a list of network interfaces will open.
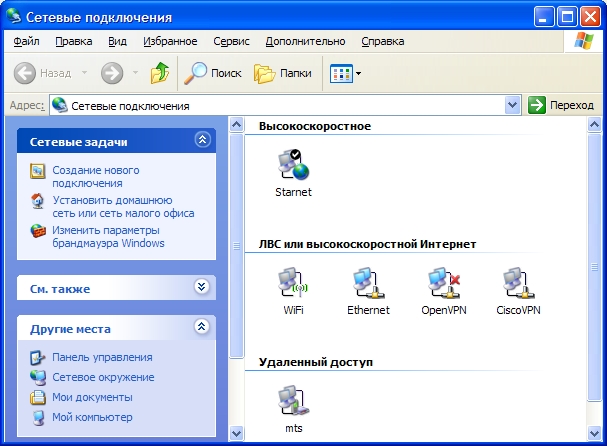
As you can see, I've opened up enough big list network interfaces. Do I have that many network cards? Of course not. This list contains both interfaces that correspond to real network cards, dial-up connections, and virtual network interfaces. Let's go over the connections that you see in the screenshot.
The top, high-speed connection, is the connection for connecting pPPoE type to the Starnet network. This type of connection may work after after you have established a connection to the local network and are used by providers as one of the authorization mechanisms to access the Internet. Usually, clear instructions for setting up such connections are located in the local networks of the respective providers.
The lowest icon is the Internet connection via a mobile phone (via GPRS). I sometimes use it when there is no normal Internet connection, but I urgently need to look at something. The settings for such connections are a separate topic, to which I promise to return later.
The two icons containing VPNs in their name are virtual interfaces. One of them was created by one provider when connecting, the other (OpenVPN) I created myself for tunneling traffic, but this is another big topic related to bypassing the restrictions set by a particular provider, it is impossible to describe all the principles at once
Yes, I'll tell you right away - all these icons can be renamed, which I did so as not to get confused in them (and I advise you). Windows likes to refer to them as "Local Area Connection", "Local Area Connection (2)" and so on.
So, the most important icon, which I called "Ethernet", and originally bore the proud name "Local Area Connection". It is he who is responsible for connecting through network cableleading to my computer.
Before I move on to the description of the connection settings, I will say that by right-clicking on the network connection icons, we get to context menu, which has options to enable / disable, as well as a property item for editing settings. I recommend making changes to the settings after turning off the network connection and then turning it back on.
So, the main menu of settings for connecting to a local network. Scroll down the list of components and find the Internet Protocol (TCP / IP). Yes, by the way, it is recommended to put both checkboxes, as shown in the figure
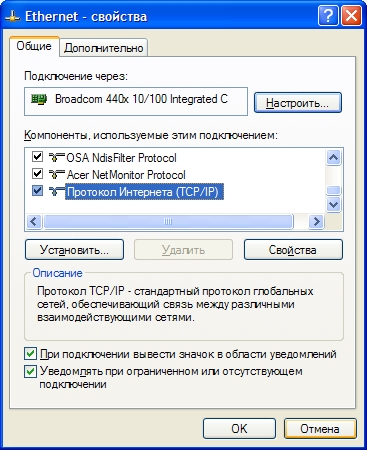
Click the Properties button. You will be taken to the network settings window.
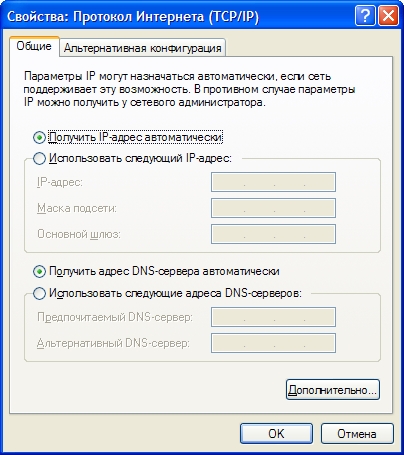
I have a default setting - get an address automatically (from a DHCP server). In addition, I also get DNS servers automatically, although sometimes it makes sense to enter them manually to use alternative DNS servers, and not those offered by the provider.
It is unlikely that you will need "additional settings" (the button below), but the alternative configuration is an interesting thing. If you often use your laptop in two networks, one of which has a DHCP server, and the other you need to register the address manually, then it makes sense to register this address in the alternative configuration. Not finding a DHCP server for some time, the system itself will use alternative settings.
By the way. Change network settings you can also command line.
However, this information is often not enough to understand what address is assigned to your network card, as well as to diagnose connection problems. Here is a list of commands that you can use.
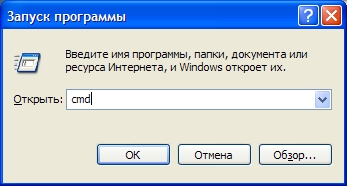
First you need to open a command line. It is done like this: press the start button, select the "execute" item.

Alternative way - you need to press the Win key (between Ctrl and Alt) and R simultaneously, this method also works on Vista
A window appears in which you need to enter cmd and click OK
The same command line appears
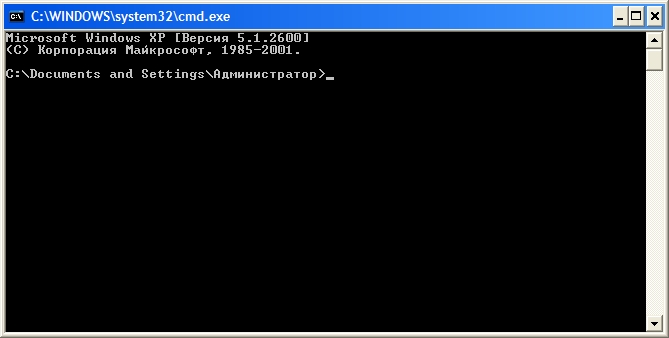
In it you can type and "enter" commands by pressing Enter. The results can be copied - if you press the right button you can select the desired piece, then you need to press the right mouse button again.
Ping
The first team to get to know is pingchecking if the given address is available. Enter the command ping 127.0.0.1... You should get something like this:
C: \\ Documents and Settings \\ Admin\u003e ping 127.0.0.1
Exchange of packets from 127.0.0.1 to 32 bytes:
<1мс TTL=128
Reply from 127.0.0.1: number of bytes \u003d 32 time<1мс TTL=128
Reply from 127.0.0.1: number of bytes \u003d 32 time<1мс TTL=128
Reply from 127.0.0.1: number of bytes \u003d 32 time<1мс TTL=128
Ping statistics for 127.0.0.1:
Minimum \u003d 0ms, Maximum \u003d 0ms, Average \u003d 0ms
C: \\ Documents and Settings \\ Administrator\u003e
As we can see, 4 packets were sent to the address 127.0.0.1, and they all reached the goal. What was this address and why was I sure that the packets would arrive? The answer is simple - the packets were not sent anywhere, but remained on your computer. This address is specific and is used for loopback packets that do not go anywhere outside. Great, we can now "ping" the address of this site: 212.193.236.38
C: \\ Documents and Settings \\ Administrator\u003e ping 212.193.236.38
Exchange of packets from 212.193.236.38 to 32 bytes:
Reply from 212.193.236.38: bytes \u003d 32 time \u003d 3ms TTL \u003d 55
Reply from 212.193.236.38: bytes \u003d 32 time \u003d 3ms TTL \u003d 55
Reply from 212.193.236.38: bytes \u003d 32 time \u003d 3ms TTL \u003d 55
Ping statistics for 212.193.236.38:
Packets: sent \u003d 4, received \u003d 4, lost \u003d 0 (0% loss),
Approximate round-trip time in ms:
Minimum \u003d 3ms, Maximum \u003d 3ms, Average \u003d 3ms
C: \\ Documents and Settings \\ Administrator\u003e
You can only notice one difference - the packets did not reach instantly, but in 3 milliseconds. I hope you also did not have any delay in the delivery of packages, and most importantly, you did not see a line like
Timed out request.
The appearance of such lines means that some of the packets are lost. This indicates a problem on the line or not on the server you are accessing.
ipconfig
The next important command is ipconfig... Enter it. I got it like this:
Ethernet - Ethernet adapter:
C: \\ Documents and Settings \\ Administrator\u003e
In this case, the address is 192.168.17.139. You can also ping this address (you ping yours) - the packets should arrive instantly. The default gateway is the address to which the computer sends packets without finding a suitable address on its network. So, in my case, all packets, except for packets on 192.168.17. * Will be sent to 192.168.17.240, and that computer should already decide what to do with them and where to forward them next. Note: the local network, that is, those addresses, packets to which are not sent to the gateway, are determined using a mask - a zero in the last place and 255 on all previous ones just means that the last number in the IP address can be arbitrary.
One of the standard actions when looking for connection problems is to ping your gateway. If the packets do not reach it, then, apparently, the problem is somewhere nearby, for example, the power cord is damaged or badly plugged in. It is also worth knowing where the computer with your main gateway is physically located - at the provider, somewhere in the house, or maybe it can be in your apartment. Note: some computers are configured not to respond to ping requests. Therefore, the absence of ping is not a 100% guarantee that there is no connection with the address.
More detailed information can be obtained by command ipconfig / all... I managed:
C: \\ Documents and Settings \\ Administrator\u003e ipconfig / all
Configuring IP for Windows
Computer name. ... ... ... ... ... ... ... ... : sander
Primary DNS suffix. ... ... ... ... ... : MSHOME
Node type. ... ... ... ... ... ... ... ... ... ... ... ... : mixed
IP routing is enabled. ... ... ... : no
WINS proxy is enabled. ... ... ... ... ... ... : no
DNS suffix lookup order. : MSHOME
srcc.msu.ru
Ethernet - Ethernet adapter:
DNS suffix for this connection. ... : srcc.msu.ru
Description. ... ... ... ... ... ... ... ... ... ... ... : Broadcom 440x 10/100 Integrated Controller
Physical adress. ... ... ... ... ... ... ... ... : 00-16-D4-63-03-65
Dhcp is enabled. ... ... ... ... ... ... ... ... ... ... : Yes
Auto tuning is enabled. ... ... ... ... : Yes
IP address. ... ... ... ... ... ... ... ... ... ... ... : 192.168.17.139
Subnet mask. ... ... ... ... ... ... ... ... ... : 255.255.255.0
Main gate. ... ... ... ... ... ... ... ... ... : 192.168.17.240
DHCP server. ... ... ... ... ... ... ... ... ... ... : 192.168.17.240
DNS servers. ... ... ... ... ... ... ... ... ... ... : 212.192.244.2
212.192.244.3
Rent received. ... ... ... ... ... ... ... ... : February 2, 2009 11:00:28
The lease expires. ... ... ... ... ... ... ... ... : February 9, 2009 11:00:28
C: \\ Documents and Settings \\ Administrator\u003e
The most useful information I have highlighted in bold. The DHCP server allocated me a dynamic address based on my MAC address or physical address. My DNS servers are 212.192.244.2 and 212.192.244.3.
Other commands
Command tracert allows you to trace the path of packets from your computer to the target. Try, for example, trace the path to this site: tracert it.sander.su... The lines in the trace output are points through which the packet passes along its path. The first point will be your gateway. Using the tracert command allows you to find the source of communication problems with an address. Packets sent by the tracert command have a TTL - time to live - positive integer. Each router along the path decreases this indicator by 1, if the TTL drops to zero, then the trace ends. By default, the initial TTL is 30, you can set a different value using the option -h.
You can view the routing table with the command route print, however, I will not dwell on it in detail - this is a topic for a separate article.
Some windows functions hidden from the average PC user. These are commands that open up expanded access to the capabilities of the OS. In most cases, the computer can do without them, however, there are situations when the entered command can solve the problem. The list of such commands is quite impressive, so we will not list everything. Let's take a look at the basic commands anyone can use, regardless of experience.
Using Windows commands
Ipconfig
There are several ways to find out the IP address of your computer. For example, using the control panel. This is done like this:
- There is an icon next to the clock that shows the computer's connection to the network.
- Hover over it, and right-click.
- The network management section opens and general access... Here you need to select the section to change the adapter parameters.
- We click on it with the left mouse button and we get access to the point of access to the Internet. Here we select the provider that provides access to the network.
- Open the information section and go to the tab where you can. This is usually the fourth line from the top.
You can get the information of interest much faster if you use strings. To do this, go to the launch menu and in search bar enter cmd. This will open the command line where you need to enter the value Ipconfig. The window that opens will provide information about the current state of the computer, including the network access point. note that additional command ipconfig all will provide comprehensive information about the settings of network adapters.
Fig 1. Using the Ipconfig commandIpconfig / flushdns
If, when entering the site, an error occurs or incomprehensible characters appear, then the network connection has failed. Usually, such problems are caused by malfunctions of the provider, but perhaps the problem lies in the computer. The computer stores data about the sites visited in memory, this is called caching. When the storage is full, the OS does not see the new address and continues to use the old data. The result is a conflict at work. Clearing the cache using the Ipconfig / flushdns command will help solve the problem.
Important! A DNS connection must be established to work with the command. By the way, network connection errors can be caused when the user has changed the DNS client setting.
To reset network connections using the command line, you need to perform the following sequence of actions:
- Open the command line (start menu + cmd).
- Enter Ipconfig / flushdns.
- After pressing the Enter key, the cache will be flushed.
Please note that if the desired result does not happen, you need to enable the DNS client. To do this, go to the computer control panel and select the administration section. Here we select "Services" and activate the client.
Ping and Tracert Commands
These commands are used primarily by gamers. They are used to check the functionality of the network connection. For those who do not know, ping is the time it takes for a signal to reach the server and return back. If the time interval is too long, then the channel is overloaded. You can find out the bandwidth of a channel using the ping command. It is entered on the command line and shows the number of delivered or lost packets of information. If the server is working, packages are delivered on time and without loss, the problem with high ping lies in the browser or computer OS. Ping command parameters should be minimal.
Fig 2. Using the Ping commandThe Tracert Windows command performs similar functions. She traces the path of information transmission. The Tracert command on the command line will allow you to calculate the channel where the data transfer loss occurs.
Fig 3. Using the Tracert commandNetstat
Network Commands Windows 7 Netstat are used to check network connections and displaying statistics. This includes:
- Ports available for connection.
- Routing and statistics for each protocol.
- File name and process number.
- Connection sequence and available port for data transmission (commands for Windows XP).
Important! To access the information of interest, you will need to enter additional keys. They are designated with Latin letters: a, b, e, f, r, s, t, an. The last key displays everything on the monitor open ports to connect.
Telnet
Windows 7 Telnet commands, although installed in the computer OS, are not activated by default. Surely most users are not even aware of its existence. It is a text-based protocol that allows remote access to a computer. This utility provides interesting features when working with hardware. It should be noted right away that this is not encrypted, and therefore far from secure connection... Here's how to use Telnet.
First you need to enable the service. We clarify that in Microsoft products from "seven" and older, this feature is disabled by default. To activate access, you need to clear the command line and enter enable and disable components in the startup menu. The list will contain the desired client, which must be ticked off. Then press the OK action key.
Fig 5. Using the Telnet clientAfter the service is started, go to the command line and enter Telnet. You can get acquainted with the capabilities of the application using the additional Help key. For getting remote access, you need to enter the server name and port number for the connection.
WATCH THE VIDEO
Please note that this is not a complete list of hidden OS features. There are other commands for performing certain actions or checking the status of the PC.


