Wireless wi-fi networks are widespread not only in offices and Internet clubs, but also in ordinary city apartments. With this connection, you can access the Internet through personal computers, tablets and smartphones, yes, in general, using any device equipped with a wi-fi module. Despite the abundance of such devices, the largest number of such wireless connections falls on laptops. About how to connect a laptop to wi-fi and what problems may arise and will be the topic of our publication.
Create Access Point
The process of creating a wireless Internet access point consists of several steps:
- Wi-fi setup and subsequent connection of the laptop to the intended access point. And here we will dwell in more detail.
Router Connection
First of all, connect your cable RJ 45 connector, through which the provider connects the equipment to the network, to the wan connector of the router. As a rule, such a connector is located separately from the others and painted in a different color. Use the instructions for the router that comes with the device. Now you should connect the device’s adapter with a 220V outlet and a laptop, after which you need to turn on the router itself.
Configure a router.
It makes no sense to describe the setup process, each manufacturer has a setup menu and the principle of operation is different. Best of all, if professionals deal with these issues.
Connecting a laptop to a wireless network
In this section, you will learn how to configure wifi on the laptop on which you decide to install Windows 7, as well as how to connect it to a home network that has an appropriate Internet connection.
Turning on the laptop and waiting for the OS and all necessary services to fully load, you should pay attention to the taskbar. If the laptop has a wi-fi connection, a special icon is displayed in the corner of the screen. By the way the icon looks, the laptop is connected to the network or not. 
If you need to check if there are available connections, left-click on the manipulator (mouse) on the icon, and then select the network you need. 
You may need authentication, i.e. introducing a security key. After entering the password correctly, your device will be connected to the Internet.
In some cases, when you turn on the laptop, the wi-fi connection icon is not displayed. This indicates that the wi-fi module on the laptop is not working or is turned off. On some laptop models, you can turn it on by simply pressing the appropriate button on the device’s case, and in some cases, the module must be turned on programmatically.
To enable the wi-fi module programmatically, go to the Control Panel, where you need to find the Network and the Internet and Network Connections. Next, we see the wireless network connection icon, on which we right-click on the manipulator and select “enable”. 
After these manipulations, the wi-fi connection icon in the taskbar should appear. If this does not happen, then you need to check the installation of drivers on the wi-fi module. You can do this by installing drivers from the disk that comes with the laptop or by downloading drivers from the Internet by contacting the developer's site.
After installing or updating drivers, the module should turn on, as evidenced by the appearance of its icon in the tray.
Now you should select the Network and Sharing Center category, for which you use the control panel and configure automatic receipt of IP addresses. 
Then you need to find and select the following item in the menu: Changes to the adapter parameter.
Select the desired network, then move the cursor to Properties and confirm the selection with the mouse. In the newly opened window, select Internet Protocol Version 4 (TCP / IPv4) and click Properties.
After this procedure, the following category opens, where you already select the item to automatically obtain the IP address and automatically obtain the DNS server address. We confirm our actions, as before, with the help of “Ok”, which is located at the bottom of the window. 
Now it remains to connect to the wireless network, as described earlier and check the Internet connection.
Configuring wifi on a laptop running Windows XP
The Windows 7 operating system is reasonably well optimized for maximum ease of communication setup. In Windows XP, the setup process and the execution of other tasks is almost the same.
- Turn on the wi-fi module in your laptop.
- When the icon appears in the tray, double-click on it with the left mouse button. A window will appear in which you should click Search for wireless networks.
- As a rule, then a list of available points appears to which you could connect.
- If it was not possible to connect in this way, then you should enable the wireless network connection through Start - Control Panel - Network Connections.
- The next step is to view the available wireless networks.
- As in the seven, you should select the line Change the order of preference for networks.
- In the newly appeared window, select Network by access point and check the box next to "Automatically connect to the network."
- The next thing to do is re-enter the Wireless Networks and click Refresh List.
- Then specify the necessary network, click Connect and enter the access key.
Key connectivity issues
In truth, we have already considered the main problems with connecting a laptop. So why the laptop does not see wifi, despite all the operations. There are many reasons, and the first, which few people pay attention to, is a weak transmitting signal. That is why the first part of the article mentioned the location of the router.
Often the problem with wireless access is due to a failed wi-fi module. Here, any “dancing with a tambourine" is useless. Only a service center or the use of an external wi-fi module can help.
One of the most common problems that are possible when connecting a laptop to a wireless network is the incorrect configuration of the router.
Setting up an access point yourself and connecting your equipment to it requires certain knowledge. The best way out would be to call a specialist at your provider’s support service or contact.
In one of the previous articles, we examined a very topical issue. Here we will present the opposite situation: how to connect a wired Internet, if there is a wifi router.
How to connect wired internet from a router?
And first of all, consider how. The location of the router depends on how often you plan to use it: if you just need a Wi Fi access point (that is, you will not connect anything to it via LAN), then it is advisable to fix the router somewhere in the upper middle of the apartment.
If you are going to connect wired Internet from a router to a computer or laptop, you will have to pull the network cable into the room where the computer is installed.
Now consider directly the Wi-Fi router connection. For this example, a TP-Link router is used.
So, to connect the Internet (wired) via a router, turn the device towards you with the side where the LAN ports are.

There are five LAN connectors on this router: four yellow ports and one blue connector. Yellow ports are needed to connect equipment (such as computers, NAS servers, etc.), and a blue port is needed to connect wired Internet - it is called “Internet” or “WAN”.

Take the provider's cable and connect it to the blue WAN port: the light on the front panel of the wifi router should light up.
This means that the wired Internet from the provider is successfully sent to the router.
It is advisable to check the network settings on the computer - if it will be used in the future. To do this, go to the "Start" menu, go to the "Control Panel" tab and click on the "Network and Access Control Center" icon
A window will open where in the upper left corner there will be a tab “Change adapter settings”: click on it, select your LAN connection and go to the properties of this connection.

In the next window, you should find the tab “Internet Protocol Version 4 (TCP / IPv4)” in the settings list, go in there and make sure that the checkboxes of the “Get IP address automatically” tab are checked

Now let's move on to setting up a wifi router to connect wired Internet.
How to connect cable Internet through a router: router settings
Launch an Internet browser and enter the IP address of your router in the address bar (depending on the model, the IP addresses may vary, but mostly it is 192.168.0.1, less often 192.168.1.1).
If everything is done correctly, an authorization window will appear.

Now you need to enter a username and password to enter the router settings (in standard configurations this is the word “admin”, which is entered in both fields).

Go to the tab "Quick Settings" and click on the button "Next"

Here are some options for connecting to the Internet:

Let's get acquainted with this item in more detail:
- - Auto-detection - as the name implies, this connection automatically configures your router and is often used when there are no settings from the provider.
- - PPPoE - when you select this item, an additional window will open where you should enter the password and login provided by your Internet provider.

PPTP / Russia / PPTP - almost identical to the previous connection option, except for specifying the type of IP address

- - Dynamic IP address - each time you connect to the Internet, the client receives a new ip address from the range specified by the provider.
- - Static IP address - a permanent address used to connect to the Internet.
There is wired internet, how to connect wifi?
Now you need to set up a Wi Fi connection. To do this, go to the next tab and in the “Wireless Mode” field, set the marker to “Enable”.
In the “Wireless Network Name” field, enter the name that you like best, check the box “WPA, Personal WPA2” (this is the choice to protect your Wi-Fi connection) and enter.

The modern man is faced with the need to connect to wi-fi everywhere: wireless networks are much more practical and convenient than their cable "brothers."
That's just such WiFi-privileges basically "use" all kinds of mobile gadgets: phones, tablets, smartphones and most modern laptops. Accordingly, the question arises: what is the “classic” personal computer worse? After all, working on a desktop computer is much more convenient, and cable Internet connection is often a lot of trouble.
And in this article we will discuss how to connect a stationary computer to wifi, and what needs to be done to make the computer "catch" invisible wi-fi.
By the way, the age of the device is not directly related to the creation of a wireless network, and you can even connect WiFi to a relatively old computer.
Can I connect a regular computer to wifi?
Some difficulties with connecting wi-fi on a personal computer are by no means connected with the “prejudices” of the developers or the unsuccessful complete deprivation of the fate of this device.
The fact is that mobile devices and modern laptops are initially equipped with a built-in Wi-Fi adapter for connecting to a wireless network (which is not available on a desktop computer). However, such devices are mostly designed for short-term access to the network, and have a rather meager set of functional capabilities.
While a stationary computer is designed for continuous operation with both serious offline software and with any resources of the global information network. Accordingly, the connection with all peripheral devices and external networks (Internet, power, etc.) is carried out here in a more reliable cable way.
A cable Internet connection for a desktop computer is more stable than a wireless Wi-Fi connection. So, with a WiFi connection, the reliability and speed of the network directly depends on the number of active connections, channel load, room architecture and many other third-party factors.
Therefore, it is not worth deciding to connect a home computer to wifi solely for aesthetic reasons. The "standard" cable connection is more reliable, more efficient ( not), and much less damage to the health of the Internet user.
However, if a hard connection to an Internet source is unavailable for some reason, then you can connect wi-fi to your home computer in a matter of minutes.
How to connect a home computer to wifi?
To connect wifi to a stationary PC, first of all, you need to purchase a special removable Wi-Fi adapter - a miniature antenna that will “catch” the Internet signal transmitted by the router and return the data processed by the user to the router.
The most popular and inexpensive solution here is to choose a removable USB adapter for your computer.

In order not to get a "pig in a poke", it is better to buy a device from well-known and time-tested manufacturers: TP-Link, D-Link, etc.
If you purchased the adapter from an authorized distributor, then a disk with a special program for installing drivers is supplied with the device.
How to install wi-fi on a computer with Windows 7?
1. Plug your adapter into any USB port on your computer.
2. Insert the disk into the drive, run the auto-tuning utility, and at the request of the program, click the "Next" button.
3. After installing the driver in the "Network Control Center" folder for Windows 7 (or "Network Connections" for Windows XP) you will see a new shortcut (in addition to the usual "Local Area Connection"). The name of the label will contain the brand of the manufacturer of your adapter.

4. Now you can connect your desktop computer to wifi. To do this, right-click the shortcut once -\u003e "Connection" -\u003e Select the name of your Wi-Fi network and enter the password.
How to configure wi-fi if there is no installation disk?
In addition to the “classic” acquisition of a brand-new licensed adapter, there are times when the user needed the Wi-Fi on the computer “here and now”, and he borrowed from friends / purchased an old used WiFi adapter.
The driver disk for such an adapter, of course, has long been lost.
In this situation, you need to download the archive with the driver from the Internet.
“But there is no Internet!” You say, “What should I do?”
Here to connect a desktop computer to wifi:
1.
Connect the configured computer to the router using a cable (if possible).
Go to the official website of the manufacturer of this adapter (or the profile resource ddriver.ru), find the driver you need by the name of the USB-Wi-Fi adapter and download the software to your computer.
If cable connection to the router is not possible, download the driver you need to any computer connected to the Internet, and using a removable media (flash drive) copy the archive to your wired computer.
2. Next, right-click once on the “My Computer” shortcut, then “Management” and select “Device Manager” here. In the “Network Adapters” section, find the name of our USB adapter, right-click on it and select the menu item “Update Driver.” Next, specify the folder into which the archive with the necessary drivers was copied, and click “OK”.
3. After installation is complete, you can connect your desktop computer to wifi. To do this, in Network Connections:
Select a new shortcut;
Right click on it;
Select the menu item "Connection";
Select the name of your Wi-Fi network (which you specified in the SSID when configuring the router);
Enter your password and you can use the Internet.
If you need to connect a laptop to a local network and the Internet, then this is best done using a wireless WiFi network. Since working with a laptop that is connected to the network using a network cable is not so convenient. The laptop will be tied to one point, which will negate all its advantages compared to a conventional desktop computer.
In this article we will talk about how to connect WiFi on a laptop. We will consider not only the process of connecting to a WiFi network, but also a number of problems that you may encounter.
To begin with, it should be noted that to connect to a WiFi network on a laptop, you do not need any additional equipment. Any laptop has a built-in WiFi model, which is used to connect to a wireless network. You don’t have to buy anything and connect to a laptop.
On the laptop itself, all actions with a Wi-Fi network are performed using a special icon on the taskbar (lower right corner of the screen, next to the system clock). When the laptop is not connected to the WiFi network, this icon looks like in the screenshot (below).
If the laptop is connected to Wi-Fi, then the icon will look different (see screenshot below).

By the way this icon looks, you can quickly determine if the laptop is connected to WiFi or not. Also with its help you can connect and disconnect from WiFi.
For example, if you need to connect to WiFi, then you must click on this icon with the left mouse button. After that, a small window with a list of WiFi networks that are available at this point will appear in the lower right corner of the screen.

In order to connect to one of these Wi-Fi networks, you need to select the desired network in the list and click on the “Connect” button that appears.

After that, the laptop will start connecting to your chosen Wi-Fi network. If this network is not password protected, the connection will occur automatically. If a password is required for the connection, a window for entering the password appears on the screen.

After entering the password, click on the “OK” button and the laptop will connect to your chosen Wi-Fi network. This completes the process of connecting WiFi on a laptop, then we will consider the problems that you may have.
There is no WiFi network icon on the laptop.
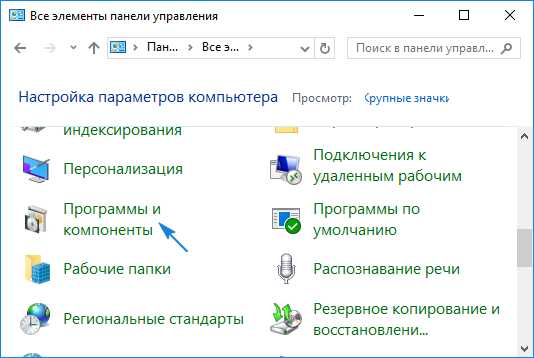
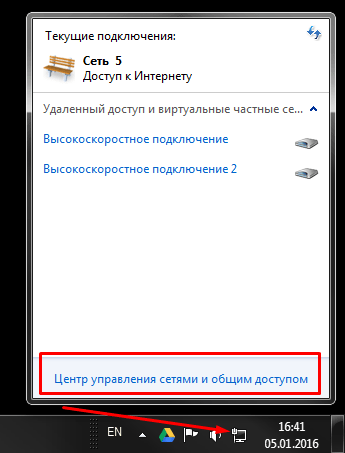
In some cases, the laptop may not have a WiFi network icon. This problem most often occurs due to the fact that the WiFi model is disabled on the laptop. In order to enable it, open the Control Panel and go to the "View network status and tasks" settings section.


After that, a window opens with a list of network connections. Here you need to find “Wireless Network Connection”, right-click on it and select “Enable”.

After “Wireless Network Connection” is turned on, the Wi-Fi network icon will appear on the taskbar and you can connect, as described above.
The WiFi icon is marked with a red cross, and the search for WiFi networks does not work.
Another common problem is the red cross on the WiFi network icon (see screenshot below). Moreover, if you click on the icon, the list of available WiFi networks is not displayed.

Most often, this problem occurs due to the disconnection of WiFi in the Windows Mobility Center. In order to solve this problem, you need to right-click on the battery icon in the taskbar and select "Windows Mobility Center".

After that, the "Windows Mobility Center" window will open. Here you need to click on the button "Enable Wireless". After that, WiFi will work in normal mode.

If it says in the Windows Mobility Center that wireless is turned on and you can’t click on the Enable button, then you may have disabled Wi-Fi using the hardware button on your laptop. Examine your laptop and find the button to turn on the Wi-Fi network. By clicking on this button, you can turn on WiFi.
Now there are a huge number of different Wi-Fi routers from different manufacturers on sale. And this is good, there is plenty to choose from. But immediately after buying a router, we need to install, connect and configure it. And if the connection process practically does not differ depending on the model, then the configuration process itself and the page with the router settings can be different even from one manufacturer.
It is very difficult to give detailed and step-by-step instructions for setting up different models within the framework of one article. But I'll try. In this article, I will describe in detail and show how to install and configure a Wi-Fi router. Regardless of which manufacturer and model you have. This universal instruction is suitable for configuring a new router, as well as for reconfiguration. You can do everything yourself. And it’s not at all necessary to pay specialists for tuning.
Enter the settings of the router. How to enter the web-interface?
Each router has its own web interface. (site with settings, control panel), which can be accessed through the browser by going to the appropriate address.
Important! To go into the settings of the router and configure it, your device (PC, laptop, smartphone, tablet) must be connected to the router via cable, or via Wi-Fi network. At the same time, there may not be access to the Internet on the computer. To access the control panel, the Internet is not needed!
If you have a high-speed connection on your computer (maybe with the name of your provider), then after connecting through the router you do not need to run it!
To enter the settings we need find out the address our router and factory username and password for authorization. This information is on the case of the device itself. It looks something like this:

On a computer or mobile device that is connected to a router, open a browser (Opera, Chrome, Yandex.Browser, etc.) and go to the address indicated on the case. Or try 192.168.1.1 and 192.168.0.1.
Important! We enter the address in the address bar, and not in the search bar. Many are confused, and instead of the settings page they get to the search results page of some search engine.

On the authorization page, you must specify the username and password. Factory specified on the device. Most often it is admin and admin. On some models, the default settings are not protected, and immediately after entering the control panel, you need to set a login and password.
Articles that may come in handy at this stage:
If the settings page opens, then we can continue. If not, then see the article with solutions to this problem at the link above.
How to set up a Wi-Fi router?
In order to use the Internet through a router, you need at least:
- Set up your internet connection.
- Set up a Wi-Fi network.
In most cases, this is enough. I also recommend changing the password that protects the router’s web interface. There are also settings for IPTV, USB-drives, parental control, etc., but not everyone needs them.
In the control panel of almost every router there is a so-called "Quick Setup Wizard", aka "Quick Setup". On some devices, it is open immediately after entering the control panel. With it, you can step-by-step configure a Wi-Fi router. Internet connection, wireless network, etc. For an example of how it looks like with TP-Link:

You can try, it is very convenient.
Internet setting. The most important step
The main thing is correctly configure the router to connect to the provider. If he can’t connect to the Internet, then on all devices there will be a connection “Without access to the Internet”. Many users who try to configure everything with their own hands, most often encounter problems at this stage.
Each ISP uses a specific type of connection. Dynamic IP (DHCP), Static IP, PPPoE, L2TP, PPTP. This type of connection must be specified in the control panel of the router, and set certain parameters that the Internet provider gives.
Important! You must know exactly what type of connection your provider has. Also, all the necessary data to connect (Username: Password)if necessary. As a rule, this information is indicated in the contract that you received when connecting to the Internet.
Some providers bind by MAC address. It is also desirable to clarify.
If your ISP uses a Dynamic IP (DHCP) connection, then the Internet should work immediately after the connection, since on routers this type of connection is set by default.
If the Internet through the router is already working (and you did not start any connections on the computer), then you can skip this section and immediately proceed to the Wi-Fi setup.
When the connection type is PPPoE, L2TP, PPTP, or Static IP (which is very rare), then you need to set the necessary parameters. Usually, this is the username and password that the provider gave you. In the control panel, the section with these settings is most often called: "WAN", "Internet", "Internet".
For example, how to configure PPPoE connection on an ASUS router:

Other examples:
Goal: so that the Internet through the router works on all devices. By cable and Wi-Fi. If this does not happen, then it makes no sense to continue the setup.
You can always call the provider and specify what parameters and where to specify. They help many over the phone.
Articles that may come in handy:
I hope you have succeeded.
Change Wi-Fi network settings
I highly recommend changing your Wi-Fi network name and password. It is also advisable to expose your region. Everything is simple there. You can do this in the section with wireless settings. It can be called in different ways: "Wi-Fi", "Wireless Network", "Wireless", "Wireless Mode". If you have a dual-band router, then the settings need to be set separately for the network at 2.4 GHz and 5 GHz.
- In the "Network Name" (SSID) field, enter a new name. English letters.
- In the field "Password" (wireless key) invent and write down a password. Minimum 8 characters. Type of protection - WPA2 - Personal.
- Well, there should be a field "Region". Change it to yours. IPTV on ASUS routers.
If something doesn’t work out during the setup process, you can always reset it to the factory settings and try to set everything up again. On the case, find the "Reset", or "Reset" button, press it and hold for about 10 seconds. By the indicators you will understand when the reset occurred.
You can leave questions in the comments. Only I have a small request, describe the problem in detail. Write the model of the router. And it’s very difficult to understand and advise something when I did not understand the question itself. Good luck!