In this article, we will configure a local area network between two or more computers with Windows 7 (Windows 8) installed, which are connected via a Wi-Fi router. In fact, setting up a LAN in Windows 7, Windows 8, and Windows 10 is practically no different. In Windows XP, perhaps there are some nuances, there are always some problems when setting up the network between the seven and XP. But, about this in a separate article, and it’s time to switch from Windows XP, it is outdated.
It is clear that in order to configure the local network and file sharing, computers need to somehow be connected to each other. This can be done using a network cable, I will introduce a direct connection of two computers. But, it’s much more interesting to connect all computers through a router, which is now installed in almost every home and office. When connected via a router, it is already possible to configure a local network not only between two computers. All computers, and even mobile devices that are connected to the same router, can be connected to a local network
For example, stationary computers can be connected to a router via a network cable, and laptops via a Wi-Fi network. This is already more convenient for you, and how you get it. It doesn’t matter if the computer is connected to a router via Wi-Fi or a cable, the local network will work. Yes and it doesn’t matter what operating system you have installed, but I will show on the example of Windows 7.
And I will configure and show the network through a router, to which I have a laptop connected via Wi-Fi, and a desktop computer. Both work on Windows 7. Between these two computers, we are now setting up a local network. And also, we will open shared access to folders and files. What is a local area network between computers for? Mainly for file sharing. If you often need to transfer some files from one computer to another, then in order not to run with a flash drive, this can be done over the network. Well, you can play games on the network.
If your network still has a TV with Smart TV, then you can configure access to movies on the computer from the TV. More details in the article.
Instructions for setting up a local network in Windows 7
Let me remind you that the computers you want to network must be connected to the same router, or connected directly by cable. Also, all the actions that I will show in this section must be performed on both computers.
An important point! If you want to configure the network via a Wi-Fi router, to which some third-party devices are connected (for example, your neighbor), then after configuration, he will be able to access the folders on your computer to which you will set up shared access. Install a good one to protect your network. If you still need to connect third-party devices to your router, but you want to configure a home network, then you can create a “guest network” for guests, as we did on Zyxel’s router.
Another point. If you configure the network when connecting computers directly, without a router, then you will still need to set static IP addresses in the connection properties on the local network. If you have a connection through a router, then you do not need to do anything else, continue to follow the instructions.
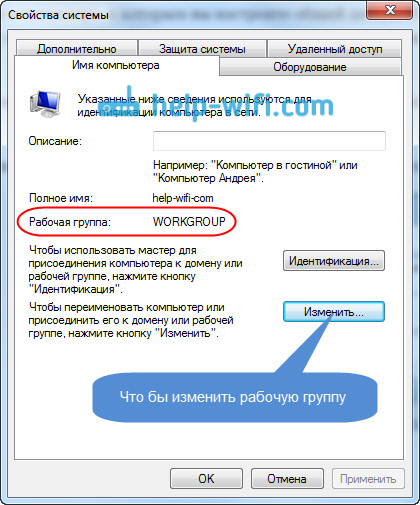
1 First of all, we need to check that all computers work in one working group. This must be checked on all computers that will be connected to the local network.
We do this: press the key combination Win + r, and in the window that appears, specify the command sysdm.cpl. Push Ok.
Opposite Working groupmost likely will be written WORKGROUP. You can leave her. The main thing is that on other computers the working group would also be WORKGROUP.

If you go to change it, for example on MSHOME, then click Edit, and specify a new group. Save the changes and restart the computer.
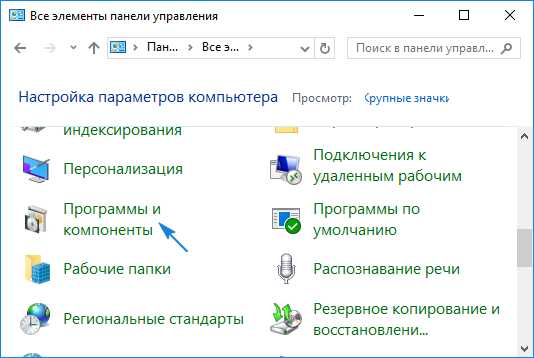
2 The second step is to change the sharing settings. These settings are also performed on all computers on the network. Now I will show what needs to be included.
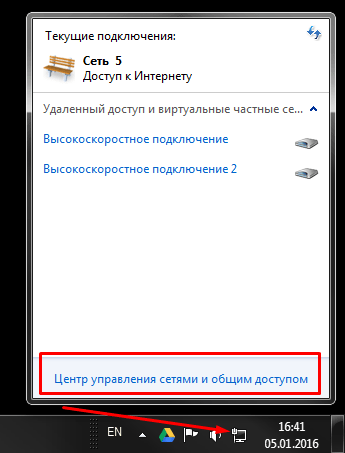
Right-click on the Internet connection icon in the notification panel, and open Network and Sharing Center. In a new window, select Change advanced sharing options.

There will be two profiles. Home or work, and General. Change the one that says current profile. You can make these settings for both profiles.
First of all, put the switch near Enable Network Discovery. Also turn on File and Printer Sharing, and turn on folder sharing. See the screenshot below.

Scroll through the settings page, find and open the tab All networks, or General, and be sure to disable sharing with password protection.

After these steps, it is advisable to restart the computer. This is actually all the settings, the local network should already work. To check, you need to go to Explorer (My computer) on one of the computers, and open the tab on the left Network. All computers on the network will be displayed there. In the screenshot, you can see my computer, and another one from the network.

We can already go to the computer in our home network, there will be access to shared folders.

If you do not have computers on the network, or do not have access to a computer, then see the solutions at the end of this article.
Configure file and folder sharing
As I wrote above, access to shared folders already exists. But, we may need to open shared access to some other folder, which is located, for example, on the local drive D. This can be done without any problems. After we open the shared access to the folder, all computers from the local network will be able to view the files located in it, modify them, and add new files to this folder (True, it depends on what permissions we enable).
For example, I want to open access to the Pictures folder. To do this, right-click on it, and select Properties. Go to the tab Access, and click on the button Advanced setup. Check the box next to Share this folder, and click on the button Permissions.

In the window that opens after clicking on the button Permissions, we need to set permissions for this folder. So that network users can only view files, leave a checkmark just opposite Read. Well, for full access to the folder, with the ability to modify files, set all three checkmarks.

Click To apply and Ok. In the window Advanced Sharingalso press the buttons To apply and Ok.
In the folder properties, go to the tab Security, and click on the button Edit. Another window will open in which we click on the button Add. We write in the field "All" and click Ok.

Select a group All, and from the bottom we tick off the access points we need for this folder.

Everything, after these actions, there will be a general access to this folder from all computers in a network. It starts working without rebooting, checked. Open this folder from another computer:

Everything was done in a confusing way until you figure it out ... It was possible to somehow make these settings more simple, and more understandable. But, everything works. It turns out that I have access to a folder that is on another computer. And this is all over the air, since I have both computers connected to the router via Wi-Fi.
By the way, this folder will also be available from smartphones and tablets that are connected to this Wi-Fi router. To view network folders on Android, I advise you to install ES Explorer, or use standard explorer. Everything is working:

Now we will consider possible problems and errors that you can often encounter during the configuration process.
Possible problems and errors when setting up your home LAN
If during the setup process any errors or problems appear, then first of all disable antivirus, and other programs that may block the connection. If the problem is in the antivirus, then you will need to add your connection to the exceptions.
- On the Network tab, computers from the local network do not appear. In this case, on all computers we check the workgroup, and the sharing settings. Open the tab in Explorer Network, right-click on an empty area, and select Refresh. Another important point, very often antiviruses, and firewalls block access to the local network. Try to temporarily disable your antivirus. Also, you need to make sure that there is a connection to the router.
- No access to shared folder. Another problem, when we seemed to set everything up, we shared it, but when I try to open a folder on a computer on the network, a message appears that we don’t have access, we don’t have rights to access this folder, we couldn’t open the network folder, etc. Or, you are prompted for a username and password.
Be sure to check the sharing settings in the properties of this folder. There are many settings, everything is confusing, maybe they missed something. Well, again, turn off the antivirus, it can block. - The computer that is connected via Wi-Fi, other computers on the local network do not see. Or vice versa. If your network is built from computers and laptops that are connected both wirelessly and via cable, then there may be problems with a particular connection. For example, laptops that are connected via Wi-Fi may not appear on the local network.
In that case, pay attention to which profile you turned on network discovery for. (settings at the beginning of the article). Also, it is advisable to assign the status of a home network to connect to your Wi-Fi network. Well, be sure to try disabling the antivirus.
I think everything worked out for you. If something could not be configured, then ask in the comments. Also, do not forget to share your tips on this topic.
This article will help you quickly answer your questions. You can also study the material in full to get a complete understanding of network configuration in Windows 7.
Introduction
Purchasing an operating system Windows 7, the user must be prepared for the fact that sooner or later he will face the task of tuning the network in the operating system. For some, this task is not a big deal. Typically, installing and configuring a network in Windows 7 is the next step immediately after installing Windows 7 ( if you have not installed Windows 7 and are not quite sure of the necessary steps, then you should familiarize yourself with this section: installing Windows 7).
The network setup step is necessary for the following installation steps:
- downloads from the Internet of current distributions of antivirus programs;
- download the latest versions of a video player, web browser;
- if necessary, downloading from the network drivers for some devices on your computer (if they have not been downloaded and installed automatically, or if there are no installation disks);
- use of the XBOX prefix;
- document exchange and quick access to shared resources of several computers or laptops. In this case, to use the Internet, you must configure a wired or wireless network. As a rule, a single computer or laptop serves as a kind of Internet distributor for all other pieces of computer equipment..
The same is true for MAC addresses and subnet masks. All these settings have remained the same; they have long been familiar to users. Some changes were made only to the interface of the Control Panel and its items, with the help of which the network parameters are accessed. Everything else is without significant changes. This is another undoubted advantage of Windows 7. Users who previously used Windows XP, quite easily able to understand the new operating system. Typically, setting up a local network in popular operating systems such as Windows Vista, Windows 7, Windows Server 2008/2008 R2, begins with a component for configuring network properties such as "".
This property configuration tool allows the user to choose a network location, share printers and files, and view a network map. You can also monitor the status of all your network connections. It is very convenient and practical.
How and where to open the Network and Sharing Center component.
Before using the full functionality for creating network parameters, you need to find and open it. One of the following actions of your choice will help to open the active window “ Network and Sharing Center»:
As you can see, if you are careful and read everything, then with the search for the component "Network and Sharing Center", there should not be any problems. It should be noted that to expand the range of IP addresses used in Windows 7, in addition to the previously existing IPv4 protocol, a new one was added - IPv6. True, the providers have not yet used it, and when this will happen at the moment is unknown. Most likely, the creators of Windows 7 were ahead of the curve.  Figure 1. The illustration shows the "Network and Sharing Center" window.
What does the network location of the computer mean.
Understand what “ Network location», You need to even before you start working with this important component. For all computers, this parameter is set automatically the first time you connect to the selected network. This also applies to the firewall and security settings selected for the network connection. All of them are also configured automatically during the first connection of a computer or laptop to the network.
The Windows 7 operating system supports several active profiles at the same time. This allows you to use multiple network adapters that can be connected to different networks with the greatest security.
By the way, Windows Vista uses the most stringent firewall profile for all network connections. Perhaps that is why Vista is not as popular as Windows 7.
There are four main types of network location.:
| The first type is a home network. Already from the name itself it becomes clear that this network location is intended for a computer that is used at home. It is also used in networks in which all users know each other well. Such computers can not only create, but also join home groups. Typically, for the convenience of users using home networks, network discovery is automatically enabled. Home networks provide all computers with high-quality network access. | |
| The second type is the network of an enterprise or organization. This type of network location also allows you to search for a network automatically. The difference from a home network is that it is not possible to connect or create a computer to a home group on an enterprise network. The network is intended solely for professional activities in the enterprise, organization or office. This type is called abbreviated (SOHO), that is, it is used in a small office network. | |
| The third type is a public network. Cafes, airports, train stations and other public places - this is where computers use the third-type network location. By default, the ability to join home groups is disabled in this location. Network discovery is also disabled. Without exaggeration, we can say that this is the most strict arrangement. | |
| The fourth type is a domain network. The domain type of network location is almost no different from the production network. Except for the point that in the domain type, the configuration of network discovery and the Windows firewall are determined by Group Policy. This also applies to the network card. In order for the existing network to automatically receive the type of network location “Domain”, the computer just needs to be joined to the Active Directory domain. Only in this case the network can become a domain. |
 Figure 2. Selecting the network location of the computer.
Network map.
In order to see the location of all devices included in a specific local network, a network map is used. This is a graphical representation of the devices included in the network and the diagram by which they are connected to each other.
The network map can be seen all in the same window "Network and Sharing Center." True, only the local part of the network card is displayed here. Its layout directly depends on the available network connections. In the upper left corner you can see the display of the computer on which the map is being created. On the left you can see the display of other computers in the subnet.
 Figure 3. An example of a network map.
You can view the network map at any time. True, only for locations such as Home Network and Enterprise Network. If the user becomes curious to view maps for the “Domain Network” or “Public Network” locations, he will see a message that the network message has been disabled by default by the administrator. The network administrator can enable mapping using Group Policy.
In Windows 7, not one, but two components are responsible for the operation of a network card. it Link layer (Link Layer Topology Discover Mapper - LLTD Mapper). It is this important component that requests devices on the network for inclusion in the card.
Network connections.
In the window " Network connections»You can see the entire set of data that the user needs to connect the computer to the Internet, local network or any other computer from the home network.
This data is available for viewing only after installing all the necessary drivers for each network adapter on Windows 7 and after automatically configuring all network connections on a specific local computer or laptop.
There are several simple and affordable ways with which you can easily and quickly open the " Network connections»:
- Open the window " Network and Sharing Center"And follow the link" Change adapter settings"(See figure 4);
 Network and Sharing Center"." Href \u003d "/ upload / nastroika-windows-7 / windows-7-nastroika-seti-img-7.png"\u003e
Figure 4. Open the “ Network connections" across " Network and Sharing Center».
Network and Sharing Center"." Href \u003d "/ upload / nastroika-windows-7 / windows-7-nastroika-seti-img-7.png"\u003e
Figure 4. Open the “ Network connections" across " Network and Sharing Center».
- Press the "Start" button and, when the menu opens, in the search field, enter "View network connections." In the results found, select the application “View network connections” ( very convenient way);
- You can also use the classic key combination Win + r. As a result, the Run dialog opens. In the "Open" field, which is located in the "Run" dialog box, you must enter the following command: ncpa.cpl or control netconnection. Having done this, you need to click the "OK" button.
 Figure 5. The Network Connections window
Window " Network and Sharing Center»Similar to the Windows XP window. All detailed information about the network connection can be obtained by selecting the “Properties” option for a specific network adapter (see Figure 6). In Windows 7, to configure a network connection, in the Properties window, you need to select Internet Protocol Version 4. In the same window, you can also make the necessary settings for gateways, subnet masks, DNS servers, IP addresses, etc. All this information can be obtained from the provider that provides the Internet access service.
 Figure 6. Details of the network connection.
Renaming a network adapter.
Windows 7 developers made sure that the default operating system itself assigns all network connections the names "Local Area Connection" or another option - "Connect to a wireless network." If the user has more than one network connection on the computer, the system also assigns the number to the connection. There are three ways to rename the name of any of the connections you created.
- The first way. Select a network connection and click on the “Rename Connection” button located on the toolbar. After entering a new name, press the key Enter;
- The second way. With the key F2: press, enter a new name and save using the same key Enter;
- The third way. To rename the selected network connection from the list, right-click on it, select the Rename command from the pop-up menu, rename and save the changes using the familiar key Enter;
Network status.
In addition to the ability to rename the connection, in this window you can also find out about the status of the network. Using this window, which is also called "Network Status", at any time you can not only view any data on the connection network, but also find out details such as MAC address, IP address and many other useful and interesting information.
There are providers that provide users with Internet access using the MAC address of a network card. If for some reason there was a change in the network card or replacement of the entire computer, then the MAC address will also change and Internet access will cease. For a new Internet connection, you must install the necessary physical address (MAC address).
How to see the MAC address of a network card in windows 7?
To view the current MAC address, as well as complete information about the connection, you need to right-click on the connection to the local network, and then select the “Status” item in the context menu that opens (see Figure 7). Figure 8. How to change the MAC address of a network card (network adapter).
Network Diagnostics.
If a situation arises when unexpected errors or malfunctions occurred in the operation of your network connection, then you can eliminate them using the connection diagnostics. The diagnostic tool can be found in the Network Connections window.
Select the window " Troubleshooting”, Which, analyzing the connection status, offers a choice of possible malfunctions and troubleshooting methods. To start the diagnosis, you need to right-click on the network connection and select the "Diagnostics" command in the context menu.
 Figure 9. Opening the LAN connection troubleshooting wizard.
The second way to start checking the network connection settings is to select the desired network and click on the “Connection Diagnostics” button. The button can be seen on the toolbar.
In the dialog box that opens, to diagnose the connection, just follow the steps of the wizard to troubleshoot errors and problems. Nothing complicated.
Disconnecting a network device (network adapter).
Sometimes there are situations when network connection problems are solved not with the help of the troubleshooting wizard, but simply disconnecting the network adapter from the computer. This can easily be done by doing one of the following:
- Select a network connection and click on the “Disconnect network device” button located on the toolbar;
- Right-click on the network connection and select the "Disconnect" command in the context menu that appears;
Conclusion
The article details ways to configure, connect, and diagnose network connections.
If you have any doubts about your own options for configuring and connecting the network, it is best to seek help from specialists, or carefully read the article again.
The local network makes it possible to move files between computers, launch and use games and programs together, and distribute the Internet. Connecting computers to a shared network helps protect owners from viruses entering systems. There are several ways to combine PCs with various operating systems into a single local network.
Computer Hardware Association
In hardware integration, technical devices are used that allow several PCs to access the shared network.
Through cable
The easiest connection option. To combine, you will need a special cable, cross-over. Both ends of the cable plug into computers. One of the devices transfers the Internet connection to another, which unites them into a network.
The main disadvantages of the method:
- You can combine only 2 devices;
- There is a limit on the length of the cable;
- Additional cable interferes, may become tangled.
Through the router
Using a router with a local network, you can combine any number of computers and laptops. A router is connected to one of the devices, it will distribute the network to other PCs. It is important that these devices support Wi-Fi connectivity. In this case, the IP address and access settings between the PCs are set automatically.
The only thing that is required of the user is to enter the same names for computers in the connection center.
If important files are stored in the device’s memory that other network users should not have access to, just right-click on the folder and go to access settings.
LAN setup
Turning on devices, connecting a cable or router to them are not the only steps required to create a local network. When combining, it is important to configure computers correctly.
When connected via cable
The tuning-out algorithm below must be performed on both computers to which the cable is connected.
Setting up a workgroup and PC name
This action allows you to set the same name for devices connected by cable. To do this, you must:
- Press the key combination Win + R;
- 2. In the input field enter the universal command sysdm.cpl (suitable for any versionWindows);
- Click the “Change” button;
- Enter a name for the computers in the workgroup (required Latin);
- Save.
The same name is entered on the second device. 
Setting IP, gateways and masks, DNS
On modern operating systems, Windows 8-10, this procedure consists in simple installation of checkboxes in the network control center.

Owners of PCs with older versions of systems need to go through the algorithm:

After that, the computers will merge into a single network.
Opening access to files, folders, printer
As mentioned above, on Windows 8-10, the procedure for sharing access and network settings is reduced to selecting parameters in the connection center. Additionally, you can set shared passwords for the PC.

On other versions of Windows:
- Start button;
- Control Panel;
- Folders settings;
- Click on the item to use the shared wizard;
- Save and close;
- Go to the “My Computer” window;
- Find the name of the PC, right-click and click "Change";
- In the setting, click the checkmark opposite the ratio of the device with the workgroup;
- Go to the access tab, confirm the permission for devices.
Internet access on a second PC
If the donor computer is connected to the Internet, the second device can also be connected to the network. To do this, you need to set the same connection settings as on the donor.
When connected via a router
In this case, the user needs fewer steps to configure connections on computers. Wi-Fi connection is less demanding on settings, it is installed automatically.
Checking communication with computers
You must restart the router using the button on the rear panel. Thus, the configuration of the router itself will be correct, such as it was set by the manufacturers. The router automatically assigns addresses to computers located in its network zone.
You can check if all computers are connected to the router via Wi-Fi in the following way:
- Open a browser, enter 192.168.1.1 in the address bar;
- Enter the DHCP tab;
- Find the IP address of the PC that will be connected to the local network;
- Run the command line, enter “ping IP of another PC”;
- Wait for the check to complete.
Today we’ll look at how to configure a home local network on devices running Windows 7. A home local area network is a combination of several devices, usually computers, laptops and printers, with the goal of seamless data exchange, organization of a gaming zone, and access to the Internet. and shared devices (printers). The creation of a home network in recent years is an integral part of the pastime of users on the Internet who have more than one device that allows you to use a computer network (laptop, smartphone, computer, TV). Such procedures are easy to perform, even if a person is not a master of computer equipment.
Types of Home Networks
Depending on the interface used to create a local network, they are divided into wireless and wired.
Wired network
When formatting a wired home network, a cable is used as a data transfer interface without any intermediaries - computers are connected by a twisted pair cable. Due to the many shortcomings and limitations of such a local network (the inability to organize general access to the Internet without an additional network card, you can connect only two devices), this method of forming a connection is practically not used.
More common is the use of a switch (switch) as an intermediary. The advantage of a local network is the ability to connect more than two computers and the organization of shared access to network devices and the global web. But setting and specifying IP addresses in Windows 7 is done manually, which is not very convenient, especially if there are a significant number of devices.
Wireless network
The most popular method of forming a home network is to use a router (router) as a connecting device. An advantage over other options is support for wireless data transfer interfaces (over the air, support for a significant number of computers, ease of setup).
Configuration process
First of all, it is necessary to connect two or more devices, for example, using a twisted pair cable (for this example, and consider the configuration of the local network).
- We go into the settings of the local home network on all computers with Windows. This is done through the "Control Panel" or the search bar "Start".
- Open the “Control Panel” and call the option responsible for configuring the network connection, as in the screenshot.
- Enter the "center" in the search box "Start" and select the same option in the search result.

- After that, the window below will be displayed.

- To configure the home network, click on “Change adapter settings” located in the left frame of the window that opens.

- We double-click on the desired connection (often it is the only one and designated as unidentified).
- In the opened dialog box “Connection Status ...” click on the “Properties” button to configure the network connection.

- Double-click on the protocol (TCP / IPv4) or select the item name and click on “Properties” in order to proceed to manually configure the network connection.

- We translate the first trigger switch to "Use the next IP".
- Enter the IP address of the computer and the subnet mask, as in the screenshot.

- We leave the remaining fields untouched, since they are not needed for connection during the formation of the home local network, and click OK.
- For the first time, you will have to specify the type of network location on which the firewall and connection security settings recommended by Windows 7 by default depend.

In total, Microsoft offers three types of network hosting:
Home network - used to create a local network, which includes devices you know that you can trust. For such a connection, the network discovery function is activated, which allows you to see other devices, connect to them and use files that are open for general use with the specified privileges.
Working - applicable for a small office, office, computer class or club. As with the homegroup, between computers with Windows actively detect, share files and devices.
Public - used in public places. The settings of such a web hide the computers connected to it in order to increase security and reduce the likelihood of becoming a victim of hackers.
- We check whether all devices are elements of the home network, have different names and IP addresses.
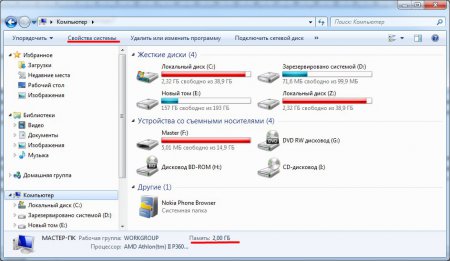
- Computer names are checked and, if necessary, changed by going to the Windows configuration menu. We call the context menu “My Computer” and select “Properties” or click on the item “System” located in the “Control Panel”.
- In the “Computer” field we check the names, below, in the “Workgroup”, we look at belonging to one local network. Remember that the names of devices with Windows 7 should not match, but be sure to connect to the same network.

Today we’ll deal with the question how to set up internet on a computer or laptop. As a rule, the Internet is configured by the employee of the provider at the moment when you conclude an agreement with him for the provision of services - after all, the correct access to the World Wide Web is an indicator of the performance of this service. However, subsequently, when reinstalling Windows or purchasing new computer Internet settings can fly off, and here we will already have a dilemma - call tech support or do it yourself. In fact, this task is not at all complicated, therefore, having read this article to the end, you can save money more than once.
The most common type of connection is cable - a wire with a special LAN connector at the end is inserted into your apartment, which is inserted into the network card in the PC case. However, depending on the provider, there are several types of network connectivity. How to properly configure the Internet and in what way the connection to the World Wide Web occurs, should be indicated in the papers of the contract that you were given during the initial Internet setup by the employee. There are several of them - automatic IP, static IP, PPPoE, L2TP, with filtering by MAC address. Let's consider them in order.
Internet setting up automatically
I called this type automatic, because if the provider connects you by this type, then you are lucky - you won’t have to configure anything at all. With it, the computer receives the IP address on the network “by itself” - that is, we simply plug in the Ethernet cable and use the Internet. If it doesn’t work, then make sure that all configurations are reset to zero - go to “Start\u003e Control Panel\u003e Network and Internet\u003e Network and Sharing Center\u003e Manage network connections\u003e Change adapter settings", right-click on " Local Area Connection "and go to" Properties\u003e Internet Protocol version TCP / IP v.4. " Here all the values \u200b\u200bshould be on the "Automatic", as in the picture
Internet connection on a computer with authorization
In this fairly common type, or rather types, because there are two of them, you will have to sweat a little and use your pens to create a connection and enter your login and password to configure your Internet connection. If every time you enter the Internet, click on the desktop icon, a connection window opens in which you click on the button - this is your case.

PPPoE
PPPoE - connection to the provider’s servers is only by login and password. If you suddenly reinstalled Windows, then to restore the ability to go out, do the following:
- Go to "Start\u003e Control Panel"

- further in the "Network and Internet"

- and in the "Network and Sharing Center"

- Here somewhere on the page (in the left column for Windows 7 or in the main window in Windows 8 and 10) we see the menu item “Establish a connection or network” - click on it

- Here we select "Internet Connection" and click "Next"

- Select "High Speed \u200b\u200b(PPPoE)" and move on.

- Enter the username and password that the provider issued - they are usually indicated in the contract.

- After that, we return to the "Network Control Center" and find the link "Change adapter settings" in the menu - go through it.

- We find "High-speed connection" - now it is in the "Disconnected" state.

- Double click on it, a window for authorization will open. Click the "Connect" button and enjoy! For convenience, this “High-speed connection” can be dragged onto the “Desktop” with a mouse, creating an icon with a quick link.

L2TP
L2TP is another form of Internet authorization. To activate it, we do the same thing as in the previous method, up to step 4, inclusive.

Connecting a laptop to the Internet with a static IP
The next type will not ask you to enter a login and password and click on the icons for the connection each time, but it does require manual entry of IP address settings to connect to the provider's equipment. For settings, we go through the “Start\u003e Control Panel\u003e Network and Internet\u003e Network and Sharing Center\u003e Manage network connections\u003e Change adapter settings", right-click on "Local Area Connection" and go to "Properties\u003e Protocol Internet version TCP / IP v.4. "
And we enter in the IP address and DNS server fields the values \u200b\u200bthat the provider provided.

MAC address filtering
And finally, for any of the above types, the provider can apply filtering by MAC address. This means that you can connect the Internet only to the computer that is registered with the provider. Insert the cable into another - and the Internet will be lost. This Byak usually appears at the moment when you bought a new computer (or network card), brought it home, but the Internet does not plow. Honestly, I don’t understand why some of our “friends” do this, but if that’s the case, then you can activate access to the network only by calling the support team and saying that you bought a new PC.
That’s all for today - I’m sure that you now know exactly how to connect the Internet to your computer and you can 100% do it yourself!