In this article you can familiarize yourself with the step-by-step installation instructions for rolling furniture furniture guides. You can easily make from markup to adjustment.
Roller guides facilitate the movement of sliding shelves. Roller guides - the mechanism is simple and inexpensive to manufacture, however, the disadvantage of this system is the noise and calculation for a small box weight. Otherwise, they begin to creak with time, the rollers break, the guides bend. An alternative to roller guides are full slide guides.
Full runners
Step-by-step instructions for mounting roller guides
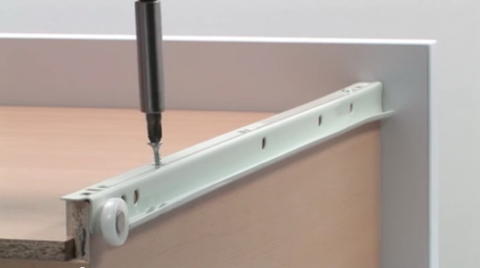
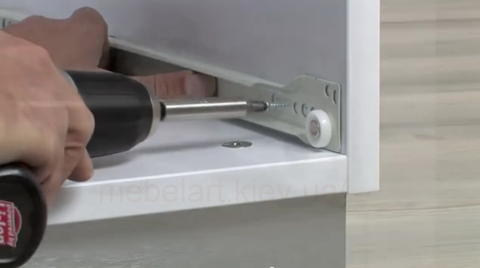
Begin mounting the roller guides with fastening the two guides to the bottom of the drawer. At the same time, the roller itself should not be located at the facade, but at the back wall of the box, the other end of the bar should rest against the facade. Attaching the bar with screws is more convenient to the bottom of the box, and not to the sidewalls, despite the fact that the holes are provided in the side parts of the guides, since the second roller will move along the side. Make sure that the caps of the screws do not protrude above the surface of the plank, as this will interfere with the progress of the box. The system has two types of holes: round and oblong. For novice pickers, we recommend using oblong holes, which allow small adjustments of position.
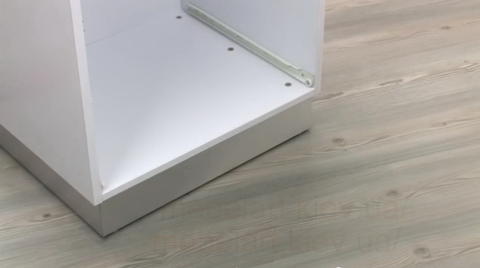
Attaching another pair of guides to the cabinet or cabinet can be done in two ways:
1. Make careful measurements, mark the place for drilling holes for screws, drill holes, put a guide and fix it in at least three places.
2. Mark the location of the guide in pencil, attach it to the mark and immediately fix it with self-tapping screws.
The important point - now the video should be from the front.
| 1. Screw the guide screws to the bottom of the drawer. Roller from the back wall. |
| 2. Planck fixed at least three points. |
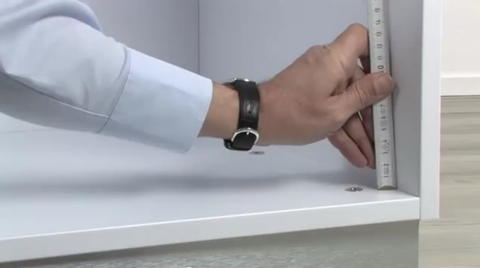
| 3. We measure the location of the second pairs of guides. The distance from the edge should be 2 mm. |
| 4. We measure the height of the location of the guide. If you plan to fill the box with heavy objects, add to the height positioning guide a few millimeters to to compensate for a small deflection of the bottom of the box. |
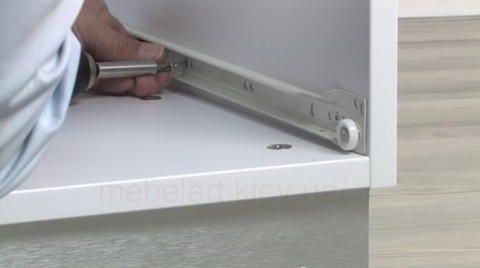
| 5. Fix the guides with screws. |
| 6. Screws are screwed in at three points. |
| 7. The roller is located on the front side. |
| 8. Insert the box. | |
The facade should not be skewed, it is tight adjoins to the case of the case. If there is a small bias or slot, you have the ability to adjust the box using the above-mentioned oblong holes for self-tapping screws. To do this, loosen the screw with a screwdriver and slightly change the position of the guide. Tighten screw and again check the facade and progress of the box. |
For one drawer you need two pairs of guides. One guides fasten on a box, and others on furniture racks. Consider the option of cabinets with drawers.
In order to design, and then install the boxes, you need to know the following parameters:
- height of the facades of the boxes
- box size - width, depth, height
- dimensions for mounting rails on racks
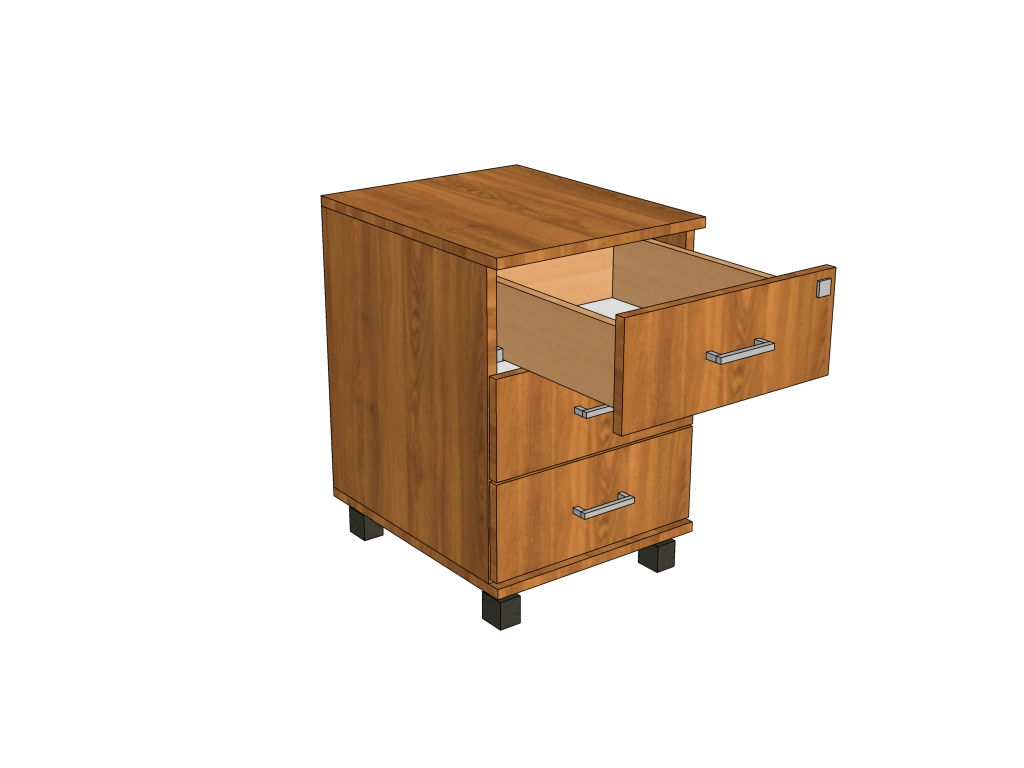
For example, you need to make a cabinet for three boxes. The size of the cabinet: width - 420 mm, height without legs - 560 mm, depth - 505 mm.
The lid of the dresser will hang over the facades, the facades will be overhead. The parameters of the roller guides will be used to calculate the boxes.
The first thing you need to decide - the height of the facades. Draw a curbstone, side view. First, we put down the required clearances: between the lid of the dresser and all other facades - 3 mm, indentation from the bottom of the drawer - 4 mm.
Calculate the height of the facades:
- Plus all the gaps and indents: 3 + 3 + 3 + 4 = 13
- From the working height of the dresser subtract the amount received: 523 -13 = 510
- We divide the result by the number of facades: 510: 3 = 170
The height of one facade is 170 mm. The width of the facade is less than the total width of the product by 6 mm: 420 - 6 = 414 mm.

The thickness of one pair of roller guides is 12.5 mm. The total thickness of two pairs of roller guides is 12.5 + 12.5 = 25mm. Add another millimeter in order to eliminate the hitting of the heads of the screws for the guides, the total clearance is - 26mm.
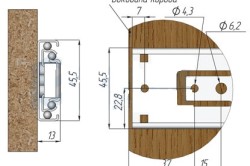
Now you need to mark the lines of fastening guides to the dresser racks. The markup should always start from the top edge of the part. And even if you make a little mistake, it will not be noticeable below. For marking, you can use the following rule: the line to which the guideline will be screwed must be 35 mm above the bottom of the facade.
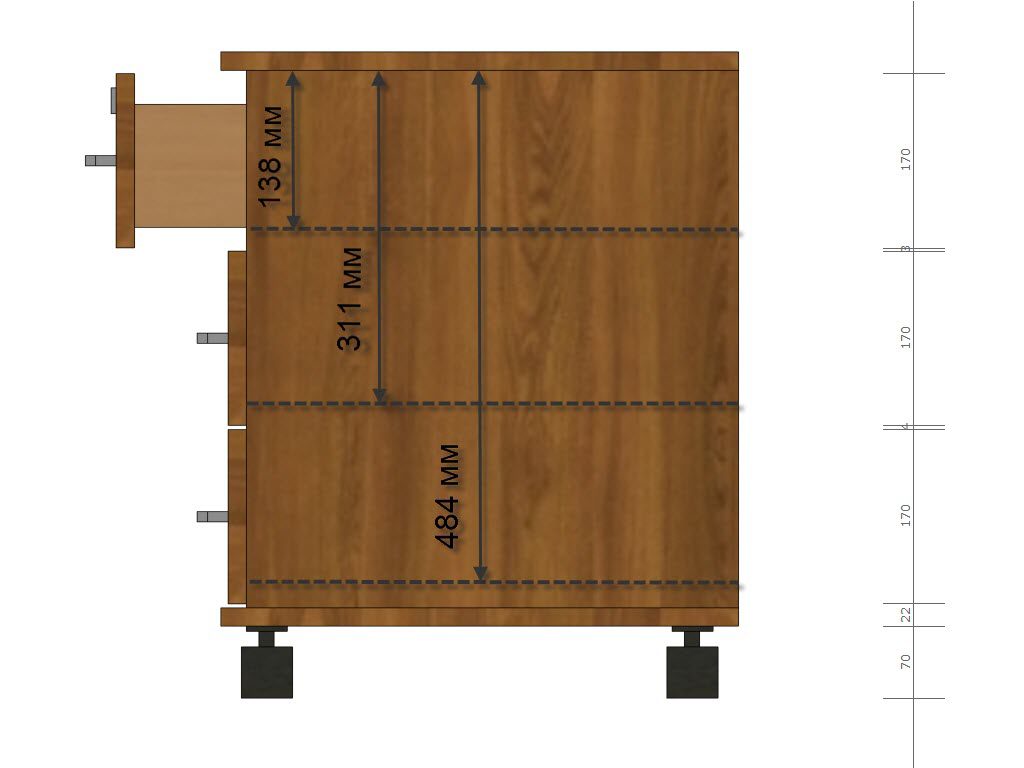
In this cabinet there are 3 drawers, there should be 3 lines.
1st line. 3 (indent from the top) + 170 (elevation height) - 35 = 138 mm
2nd line. 3 + 170 + 3 (gap between the facades) + 170 - 35 = 311 mm
3rd line. 3 + 170 + 3 + 170 + 3 + 170 - 35 = 484 mm
Before starting the design it is necessary to determine the type of guides to be used. I will tell you how to design a box with roller guides and with overlaid facades.
Here are the roller guides:
For one drawer you need two pairs of guides. One guides fasten on a box, and others on furniture racks.
In order to design, and then install the boxes, you need to know the following parameters:
- the height of the facades of the boxes;
- the size of the boxes - width, depth, height;
- Dimensions for mounting rails on racks.
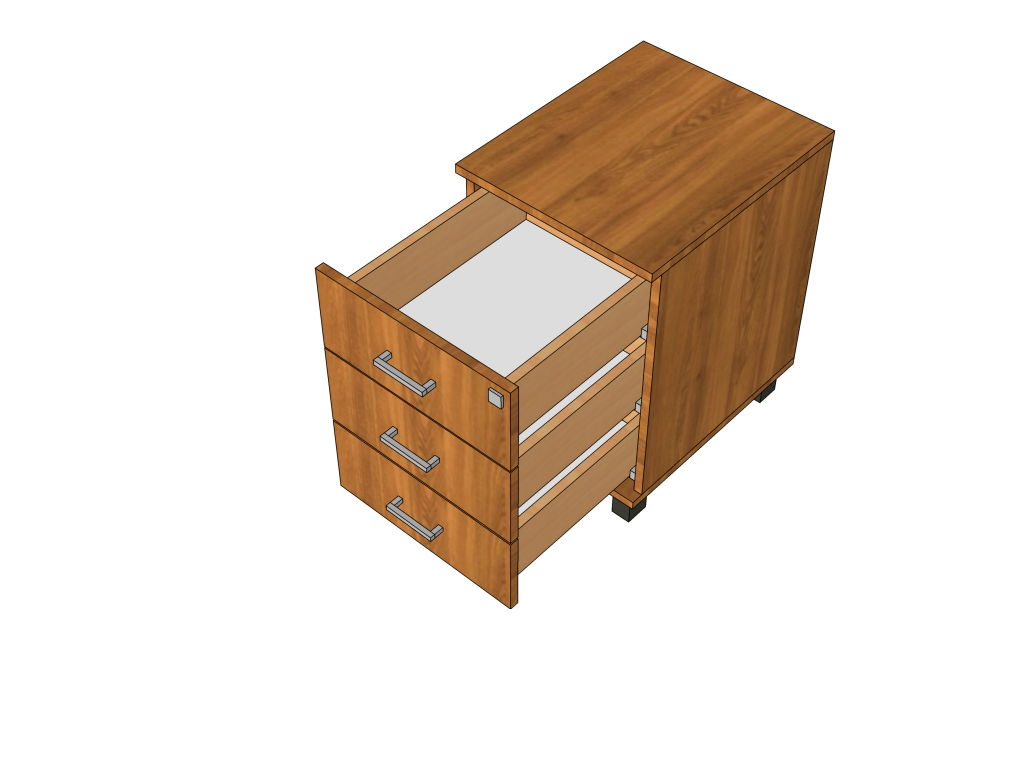
For example, you need to make a dresser for four drawers. Dresser sizes: width - 800 mm, height without legs - 800 mm, depth –440 mm.
The lid of the dresser will hang over the facades, there will be overhead. The parameters of the roller guides will be used to calculate the boxes.
The first thing you need to decide - the height of the facades. Draw a diagram of the dresser, side view. First we put down the required clearances: between the dresser cover and the upper facade - 4 mm; between the facades - 2-3mm, indentation from the bottom of the cabinet –2 mm.
Calculate the height of the facades:
1) we add all the gaps and indents: 4 + 2 + 2 + 2 + 2 = 12;
2) I take away the amount received from the working height of the dresser: 784 -12 = 772;
3) I divide the result by the number of facades: 772: 4 = 193
The height of one facade is 193 mm. The width of the facade is less than the total width of the product by 4mm: 800 - 4 = 796mm.
The box consists of two sides, anterior, posterior wall and bottom.
Front and rear walls are inserted between the sides. For wide drawers, you can add one more detail: the tie plate of the drawer. It will prevent sagging box bottom. The tie plate is attached between the front and rear walls. The bottom is made of the bottom of fiberboard. The bottom needs to be fixed to all walls and to a coupling level.
Determine the size of the details of the box.
To determine the height of the walls of the box, I use the rule - the height of the box is at least 50mm less than the height of the front of the box. In my case, 193-50 = 143mm. Round up to 140mm.
The length of the side walls is equal to the length of the guides. The depth of the dresser is 440mm, roller guides with a length of 400mm will be used, which means that the length of the side walls is - 400mm.
First, determine the width of the opening of the dresser - from the total width subtract the thickness of the two racks of 16mm: 800 - (16 * 2) = 768.
There should be a gap between the side wall of the drawer and the dresser's stand equal to the thickness of the guide.
The thickness of one pair of roller guides is 12.5 mm.
The total thickness of two pairs of roller guides is 12.5 + 12.5 = 25mm. Add another millimeter in order to eliminate the hitting of the heads of the screws for the guides, the total clearance is - 26mm.
In order to know the width of the front wall of the box, the thickness of the guides and the thickness of the side walls of the box should be removed from the width of the opening. The thickness of the guides is already known - 26mm, and the thickness of the side walls of the box is 16 + 16 = 32mm.
The width of the front (rear) wall is: 768 - (26 + 32) = 710mm.
It turned out the details of these sizes:
side wall 400 x 140 - 2 pieces;
front (rear) wall 710 x 140 - 2 pieces;
the bottom is 737 x 395.
Now you need to mark the lines of fastening guides to the dresser racks. The markup should always start from the top edge of the part. And even if you make a little mistake, it will not be noticeable below. For marking I use the following rule: the line on which the guide will be screwed must be 35 mm above the bottom of the facade.
I have four boxes, there should be four lines. I think:
1st line. 4 (indent from the top) + 193 (elevation height) - 35 = 162mm
2nd line. 4 + 193 + 2 (gap between the facades) + 193 - 35 = 357mm
3rd line. 4 + 193 + 2 + 193 + 2 + 193 - 35 = 552mm
4th line. 4 + 193 + 2 + 193 + 2 + 193 + 2 + 193 - 35 = 747mm
At assembly of furniture of factory production the question of installation of guides to drawers is not at all worth it. Marking for proper installation is usually done (moreover, very precisely), and installation instructions are attached. We take into account that all the accessories are available and you will not have to pick up any elements for fasteners. But in the repair of furniture or in its production it is necessary to independently calculate the position of the guides for the sliding elements of furniture.
Ball guides
When choosing guides, preference is increasingly given to the ball variant. And this is no accident: ball runners in many ways surpass all other designs of guides. They provide easy extension of the drawers, are fairly easy to mount and adjust, able to fix the sliding element in its normal position.
Buying them in the trade network has ceased to be a problem, so it remains to learn how to properly attach them to furniture. To ensure this process you will need:
- guides;
- screws;
- screwdriver;
- ruler;
- pencil;
- awl.
Item quality
When buying, pay attention to its length (it must be at least 70% of the length of the drawers) and completeness. It is better to immediately purchase the structure together with the screws, so that you do not get additional problems later. The ease of movement of parts of the structure, check the store.
Ball options consist of two parts. To disconnect them (and this is necessary for fasteners), press the rubber retainer and simply slide out the inside of the rail. She will be directly attached to the sliding element.
Features of fasteners to the box
The devices can be mounted on the boxes in two versions: along the lower edge of the side wall of the box or in their central part. Fastening of guides along the central axis of drawers is recommended to be used if the dimensions of the drawers themselves are large enough. In this case, the load on the structure will be less, which will ensure their durability. So the device is easier to mount, but more difficult to adjust them accurately. Take to simplify additionally a tool called level.
Only repeated measurements will help to do everything qualitatively. In this case, one cannot do without a construction level. In other cases, the ball guides should be fixed on the bottom edge. And here, too, there may be several installation options: flush with the front panel of the drawer or with a small indentation. It is easier to fix the ball structure in the first embodiment. So, additional markup will not be necessary, and calculations will not be necessary. The front panel of the box to be disconnected.
Take the guide in hand and run it to the side panel. Make holes in the attachment points of the awl. So it will be easier for you to wrap the screws strictly perpendicular to the panels. Hats will not stick out and interfere with work. Directly to the ball-box design, you can immediately fix it permanently. But on the side panels of the cabinets to do this is not recommended.
Markup and adjustment
Note that the ball guides have both horizontal and vertical holes. They are designed to adjust the position. Conventional round holes are required for final fixation. To mount the structure on the side panel of the cabinet, it is necessary to make a careful marking. Depart from the bottom panel of the cabinet about 3 mm and at this height draw a horizontal line with a pencil. Along this line, position the guide (the line should be strictly under the guide) and screw (not all the way) screws into all the holes having an oblong shape.
Now you can check their installation with a drawer: we combine the parts of the guide and check the movement. If done correctly, the box should move easily. When the drawer is completely closed, both latches should work. If all this is not, then the ball devices must be adjusted. Loosen the screws slightly and get rid of all the flaws. And only after that, finally all the screws must be screwed to the stop. At the last stage fasten the fixing screws. It remains only to install the panel plate on the drawer and fix it with screws.
At first, the latches will work too hard: you can only open the drawer with great effort.
You should not be afraid of it: over time the clamps will be developed, and everything will become much easier. If this does not suit you, then you can install the ball guides without clamps.
Ball designs without clamps is also not difficult to purchase. Well, if such could not be found, then the clamps themselves are easy to remove from the usual guides.
It is much more difficult to install ball devices on the drawers that were previously mounted roller. The fact is that the roller guides are usually a little wider, so the installation of other varieties may seem like an unsolvable problem. In reality, everything is not so difficult: it is enough to put a solid tire under each tire guide on each side in order to level the difference in thickness.
If the sliding elements are located one above the other, then you will not be able to do without calculations. There are even certain calculation formulas that express the relationship between the sizes of drawers and the place where a guide must be installed. It's easier to get a routing card, where all the calculations will be made.
Best practice
An interesting way of marking, which completely eliminates all the shortcomings of installation, is recommended by craftsmen. First, they advise to fasten the guides to the sliding elements and connect both parts. The Euro-screws, on which the furniture body is mounted, must be released to allow the side panels to move aside.
On the outer part of the guide (the part that should be adjacent to the side panel of the case), a layer of any coloring matter is applied. The drawer is neatly positioned. It is recommended to put a sheet of cardboard under it to provide the necessary clearance between the bottom of the box and the bottom panel of the case. After that, the screws are tightened to the stop. The dye will give an accurate imprint on the surface.
It is at this point that the ball guide should be screwed to the side panels. The method is simple to genius: more precisely, the guide can no longer be delivered. The only drawback is that the furniture body will have to be partially dismantled.
The back panel will definitely have to be separated, as it will impede the free movement of the side panels. Is it worth it to install a guide? The method, though accurate, is not the fastest.
- Types of guides
- Installation of roller elements
- Installation of ball guides
Home craftsmen often have to assemble the furniture with their own hands. This happens when buying ready-made interior items and in the independent production of side tables, cabinets, tables and the like. At the same time the correct fastening of guides on the most various drawers becomes the real stumbling block. Despite the seeming simplicity of this work, errors in the installation can lead to dire consequences. In the process of further use of the furniture can be serious difficulties. Therefore, it is important to immediately determine the type of guides themselves and the method of their installation.
Types of guides
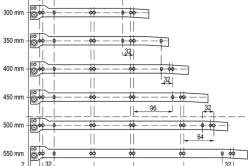
At the moment there are 2 main types of guides, which are installed on the drawer. These are roller and ball systems. There are also other designs: hidden, with closers, telescopic and so on. But do not install them with their own hands. Such installation is carried out in the factory.
Roller guides are usually 2 strips with perforations for fasteners. At the ends of the structures are fixed plastic wheels. Thanks to them, the drawers and nominated.
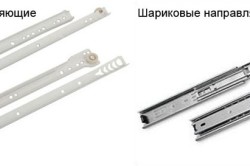
Figure 1. Types of guides.
Such systems have a number of significant drawbacks:
- When operating drawers make an unpleasant sound.
- The wheels are unreliable and quickly become unusable.
- With a strong jerk box may fall out of its intended nest.
But these guides have advantages. They are cheap and easy to install.
Ball systems are also called guides full extension. This is a telescopic design that allows you to pull out the box for the entire length of the strap. Inside the system are metal balls, which provide smooth and almost silent movement.
The main difference between roller and ball systems is that the first one is 2 independent profiles, and the second one is integral. In the 1st case, the 1 strap is attached directly to the wall of the drawer, and the 2nd - to the furniture. The rollers are disassembled only during installation. And assembled look like a one-piece design. It is this feature that ensures the reliability of fasteners: storage space does not fall out even with a strong jerk. The appearance of different guides is shown in Fig.1.
At the moment in the shops you can find guides of different sizes. This allows you to choose a finished design to the interior of any type and depth. As a rule, roller systems are put on boxes for which no serious load is expected. They can be found in underwear and clothing cabinets, kitchen modules (for example, for storage of cutlery), hallways. Ball designs put on linen boxes of beds, furniture designed for children's rooms.
Back to table of contents
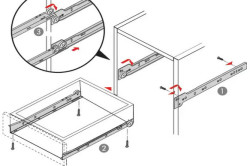
Installation of roller elements
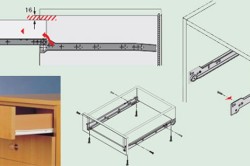
Figure 2. The scheme of fastening roller guides.
Whatever type of fixing box you choose, you will need the following tools:
- drill with a thin drill in wood;
- screwdriver with stroke limiter;
- a set of screwdrivers with various stings (flat and cross).
Also, do not forget to prepare instruments for measurement. You will need a measuring tape or a long ruler and a square.
All necessary marks can be made with a pencil or colored chalk. The installation of roller guides is shown in Fig. 2
The process of mounting guide systems on drawers takes place in 3 stages:
- Marking of furniture walls and storage space.
- Installing strips on the box.
- Installing strips on furniture.
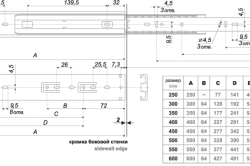
Figure 3. Diagram of the device of ball guides.
If you follow this sequence, you can avoid possible mistakes.
The guide can be installed anywhere. But usually they are mounted strictly in the middle of the wall (this makes it easier to determine the location of the structure on the furniture) or flush with the top or bottom of the drawer. But roller systems are most often installed on the bottom edge.
It is wiser not only to mark, but also drill, the places for screwing in the screws. This ensures that the screw does not split the wood. Determine the location of the mount must be immediately on the box and on the wall of furniture.
The craftsman should remember that the thickness of the guides of this type is 1.25 cm. Accordingly, the box width should be 2.5 cm narrower than the internal width of the furniture (both sides are taken into account). Otherwise, the retractable structure will not fit into the housing. For a freer stroke, 1-2 mm is added to this gap.
The length of the screws is selected based on the wall thickness.
The fastener head is obliged to firmly fix the guide, but not to rise above the bar. In this case, the sting should not pierce the wall through. At first guides fix on a box, and then on furniture. After that, the storage system is placed on its intended place.