Articles in the same category
In your attention, so that you will not be bored, and even very, very useful, and completely free))) - How to remove the background noise of the microphone? How to beautifully process your audio recordings? And make your voice as a central television announcer. And so, to your attention Adobe Audition.
How to remove background noise from a microphone
Articles on sound processing:
Sound, no one will argue with me, the most important element for perception and mastering of the material. Runet in our time while in this area almost does not think about this topic and the network is often presented material, sometimes well, just awful. Some absolutely do not think about this and their knowledge of sound is only in the purchase of a cheap microphone. They write a video with their comments, which sometimes, simply, to put it mildly, do not want to listen. And rudely speaking, I want to spit.
So this is the one who is just beginning. And especially those who have already gone to the expanses of the network with their products. Dedicated.
The simplest method, noise reduction. Even if you do not want to improve sound more deeply and make it beautiful and sonorous, this technique is enough.
He at least will suppress the noise of recording a poor-quality microphone.
For this we will use the best, in my understanding, program, the sound processing program Adobe Audition CC. How and where to get it for yourself. Most reliable way, go to the official Adobe site from the link https://www.adobe.com/creativecloud/catalog/desktop.html?promoid=KOVFF select from the list and rent. Or another, if you consider yourself acceptable.
Noise suppression
First, listen to the original record with natural noise, which we have to remove:
In the program Adobe Audition CC there is a very good loudspeaker, with which we will start working.
Noises like it never happened! That's so simple!
Apply. Write quality podcasts. Get rid of noise. Do a cleaner runet!
Hooray! You became the owner of a good and, probably, expensive studio microphone. Already you can not wait to try it out and please the audience with the new sound of your voice? Oh, if everything was so easy ... Microphones of this level usually have high sensitivity and catch almost all sounds in the room and, most likely, beyond.
In this tutorial, we'll show you how to remove low-frequency noise and make your voice more interesting to viewers.
Software
To implement our idea, you will need to install 2 programs: Adobe Audition and Virtual Audio Cable (both programs are paid, but ... μ). The first one is used to process audio tracks, the second one is used to output the processed result to the capture program. In our case, this will be OBS. The whole chain of interactions looks like this:
Let's start with the microphone and create the default values - put the averaged parameters with which you can later carry out various manipulations and adjust the capture for yourself. Our values:
- Sound Capture: 50%
- Capture Method: Cardioid
(The cardioid mode can also be the default, without any switches, so on most mid-professional and professional microphones.-Note sleepsomewhile)
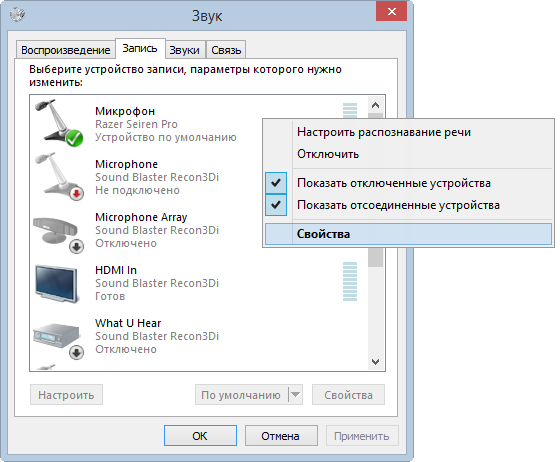
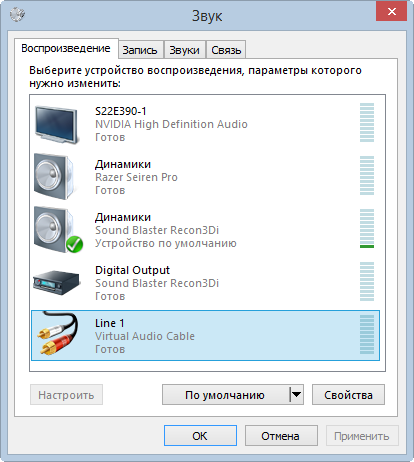
Download and install Virtual Audio Cable, then go to the audio settings (speaker icon) and there select Recorders.
Unity is power
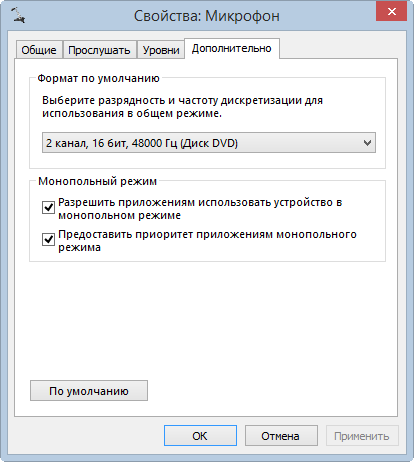
First, we need to configure the microphone for the audio format that is used in OBS. The default is 44100Hz, for better sound you can use 48000Hz.
- In the Recording tab, right-click on the microphone and select Properties.
- Go back and in the Record tab select Line 1, right-click and select Properties.
- In the window that opens, select Levels and set the volume to 50%.
- In the Advanced tab, set the default format (2 channels, 16 bits, 44100 or 2 channels, 16 bits, 48000).
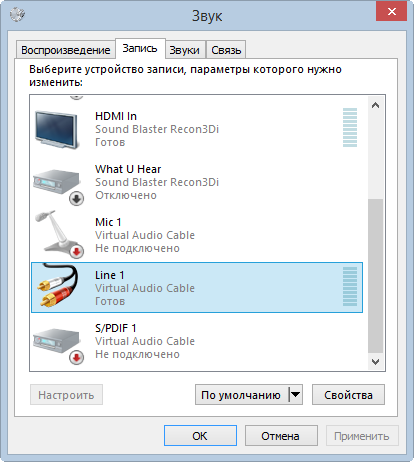
- Go back and in the Playback tab select Line 1, right-click and select Properties.
- In the window that opens, select Levels and set the volume to 50%.
- In the Advanced tab, set the default format (2 channels, 16 bits, 44100 or 2 channels, 16 bits, 48000).
All these settings have been made in order for Virtual Audio Cable to work properly.
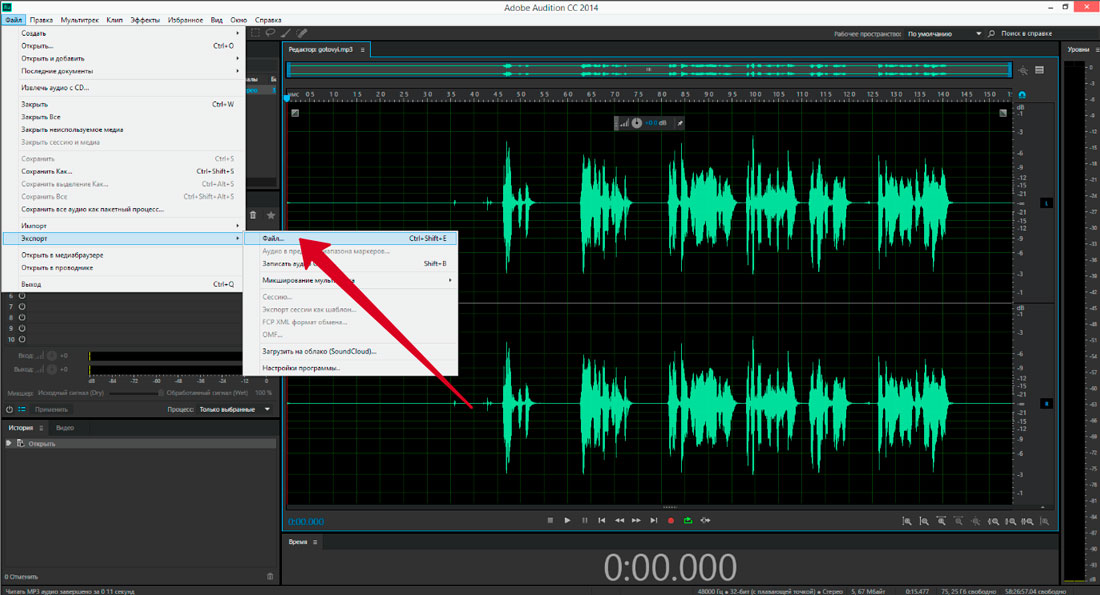
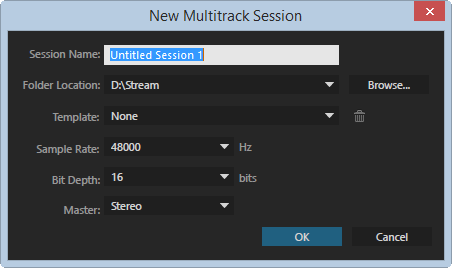
In spite of the fact that Adobe Audition has very wide functionality, we will use only some of it. Running the program for the first time you can enjoy a pristinely clean screen. Select File -\u003e New -\u003e Multitrack Session. In the opened window we leave the following settings:
Click OK, then go to Edit and at the very bottom of the Preferences, and there Audio Hardware ...
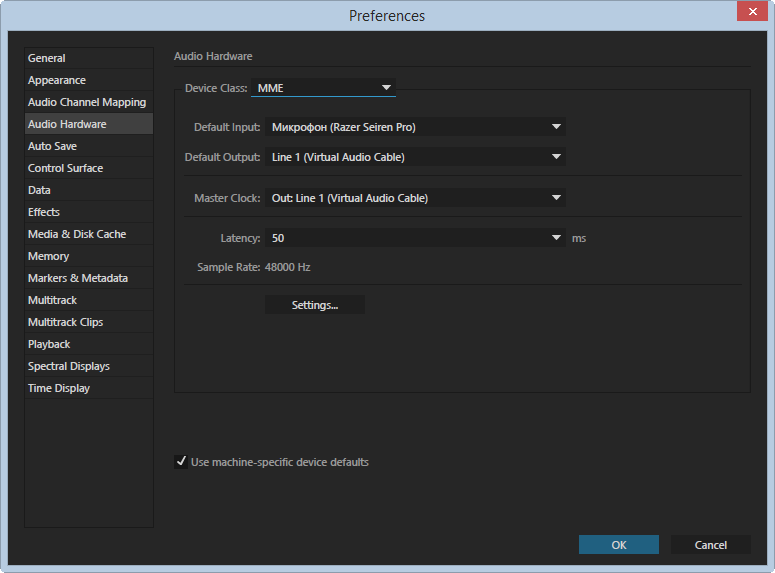
In the window that opens, select:
- Device Class - MME;
- Default Input - your microphone;
- Default Output - Line 1;
- Master Clock - Line 1;
- Lattency - 50 ms *.
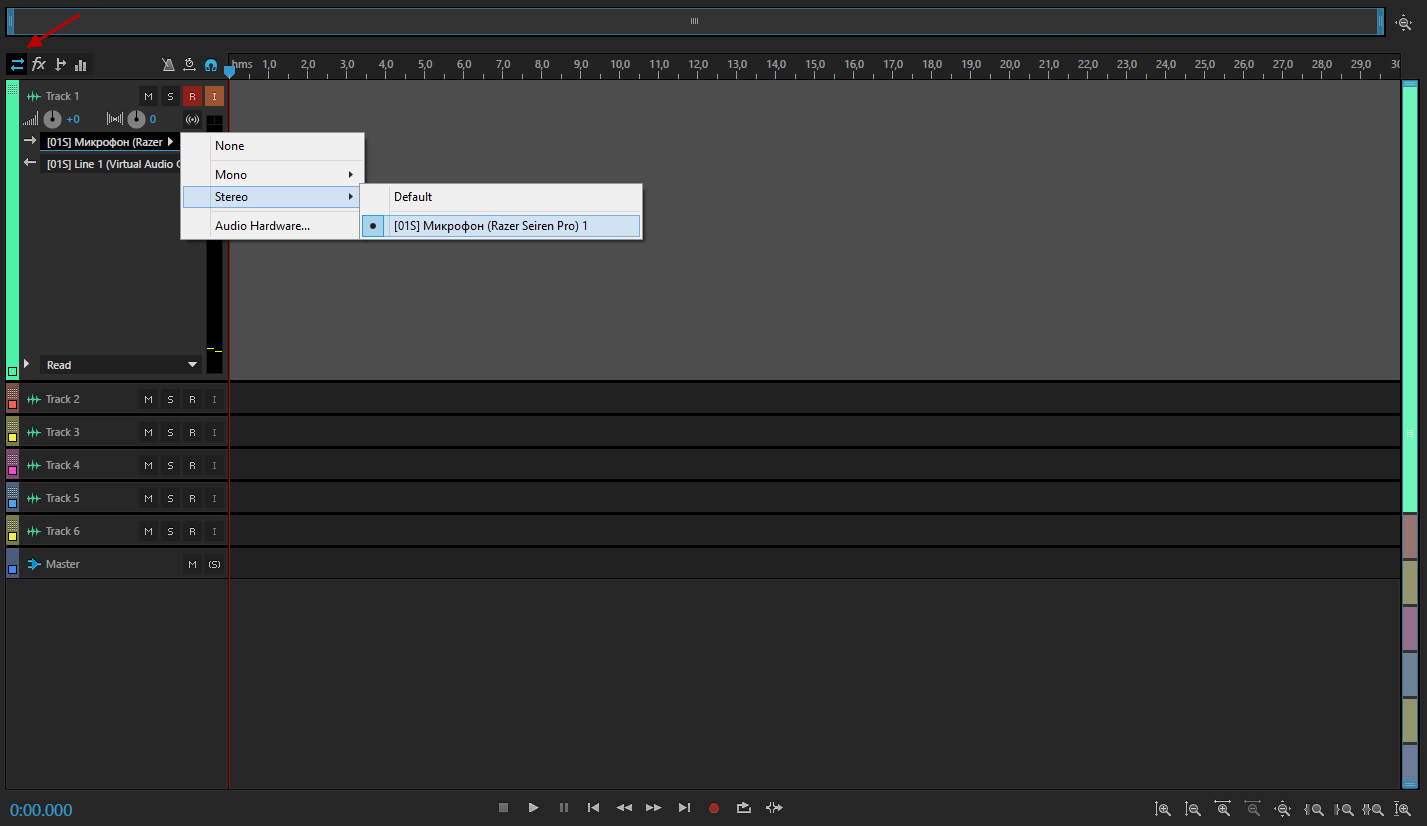
In the main editor window on Track 1, select the Input / Output icon and in the Input field select Stereo -\u003e our microphone, in the Output field, select Stereo -\u003e Line 1
* If the webcam and the sound are not synchronized on the translation, set the microphone offset in the OBS audio settings, for example -50 ms.
Removing unnecessary noise
It's time to add effects that will help to get rid of unnecessary noise and make our voice more pleasant. To do this, select the Effects icon, and add our first effect - Adaptive Noise Reduction. In most cases, you can leave the default values by adding only the High Quality Mode checkbox. Did you notice the letters M, S, R, I opposite Track 1? For all settings to work, you need to activate R (Record) and, if desired, I (Monitor Imput) to activate the visual display of the incoming signal in Adobe Audition. These settings are sufficient for streaming, but if you still want to achieve better sound, then we should continue.
N.B. Adaptive Noise Reduction removes noise, but reduces the amount of "pronounced" sound. This is due to the cutting out of the base noise frequencies. Consequently, in the voice there are fewer overtones, it becomes less pronounced, rich, and so on. BUT, this thing cuts noises. And some of this will be enough.
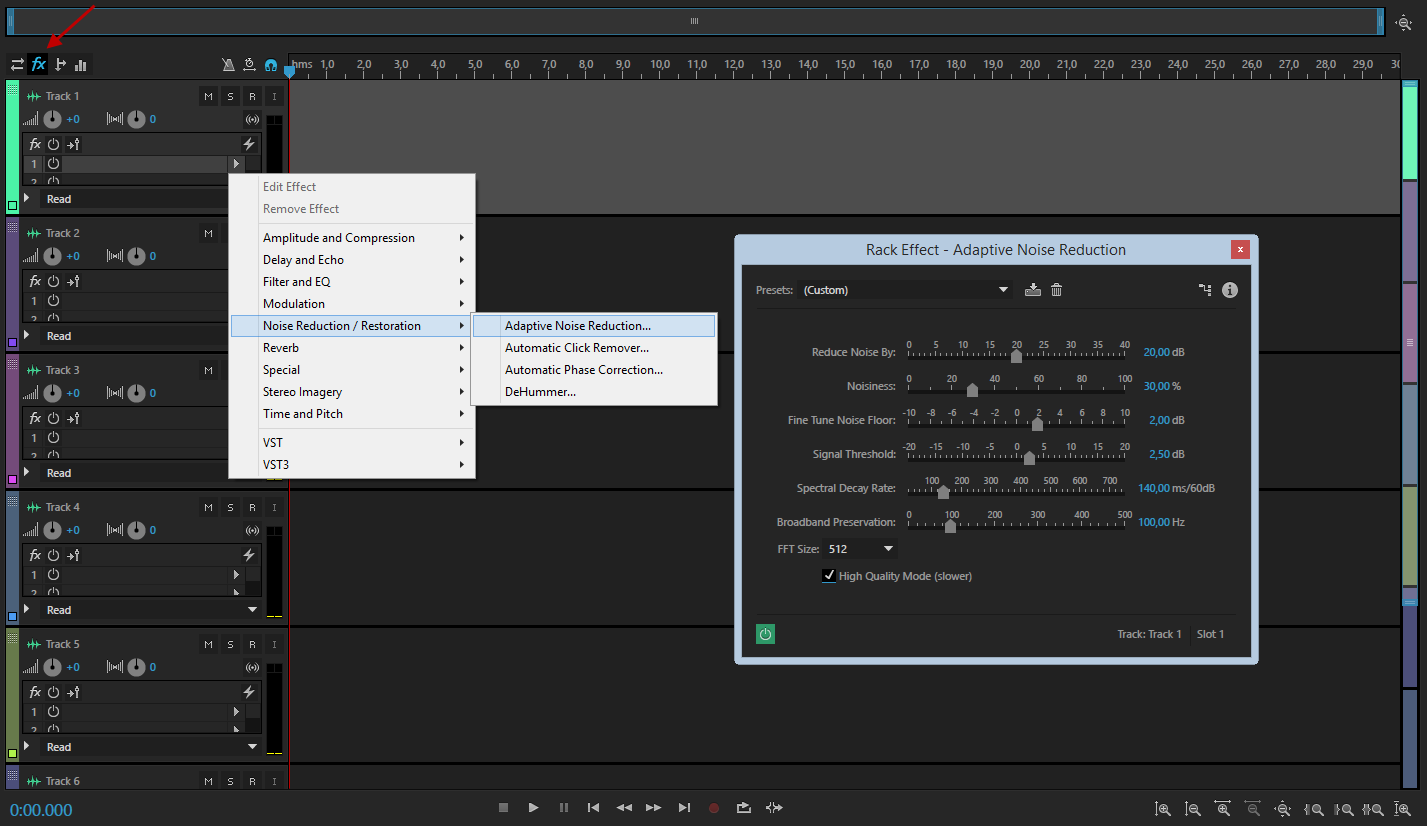
- Adaptive Noise Reduction - noise suppression;
- Hard Limiter - limits the volume of sound, suitable for those who like to scream during the broadcast, but does not want the ears of viewers to wither;
- Parametric Equalizer - adds a little bass to your voice;
- Multiband Compressor - the main processor of the voice, I would recommend here nothing to change, but play with the settings, too, is worth it;
- Dynamics Processing - allows more accurate adjustment of noise suppression, for example.
You can download the ready-made settings and independently play with Adobe Audition.
If you have any questions, we will be happy to answer them in the comments.
Instructions
Check the cable of your microphone and the jack connector. Very often noise is created by a damaged cable, in which the contacts are broken. Test the microphone with different cables to find the perfect one.
Make sure that there are no other microphones or devices around that can create high-frequency noise passing through the speakers. Wind or any air swings can also interfere with normal operation microphone. In such cases it is recommended to use windproof nozzles.
If you use a microphone for recording on your computer, check the volume settings of the recording in your sound card's configuration. Adjust the volume to the optimum level.
Speak or sing directly into the microphone, as close as possible to it. The less you amplify the microphone, the less noise it detects.
If you are recording audio on a computer, you can process your recording with special filters to remove noise, which are usually included in the delivery of any audio editor. In addition, during recording you can use the equalizer. For example, if you record a low deep voice, and in addition a microphone detects high-frequency noise, then in the equalizer settings it is necessary to remove the upper frequencies a little and add the lower ones.
A person comes home first to rest. And he absolutely does not want to listen to how neighbors swear or how someone on the tenth floor hammers the wall. To some of the noise our ear adapts quite quickly, we stop hearing them, but this does not mean that the noise does not get on our nerves. In addition, to some of the noise the ear does not want to get used to, and everything will build up to the exact opposite - the more the neighbor drills, the more it irritates the rest of the tenants. From extraneous noise it is necessary to get rid of.
You will need
- asbestos cloth
- cement
- putty
- silicone sealant
- acrylic sealant
- tools for apartment repair
Instructions
Put the doors and windows in order. Old wooden window frames replace with metal plastic ones, they pass sound much worse. Make the door as tight as possible. You can even make it double or in the form of a vestibule, so that there is a gap between the two doors. This will reduce the noise from the corridor.
Make soundproofing. This is especially important if you live in a panel or a monolithic house. Brick and wood are worse than sound, but they also do not guarantee complete silence. Listen to a few days, whence sounds predominate. Most often, noise passes through holes in walls and ceilings. Without these holes it is impossible to communicate, but
During a conversation in the Skype program, you can hear background sounds and other extraneous noises. That is, you, or your interlocutor, hear not only the conversation, but also any noise in the room of another subscriber. If this adds to the noise and noise, then the conversation generally turns into torture. Let's see how to remove background noise, and other sound interference in Skype.
First of all, to minimize the negative impact of extraneous noise, you must adhere to certain rules of conversation. At the same time, they must be respected by both interlocutors, otherwise the effectiveness of actions is sharply reduced. Adhere to the following recommendations:
- If possible, place the microphone away from the speakers;
- You are as close to the microphone as possible;
- Do not approach the microphone to various sources of noise;
- Make the sound of the speakers as quiet as possible: not louder than necessary in order to hear the interlocutor;
- If possible, eliminate all sources of noise;
- If possible, use not built-in headphones and speakers, but a dedicated plug-in headset.
Adjust Skype settings
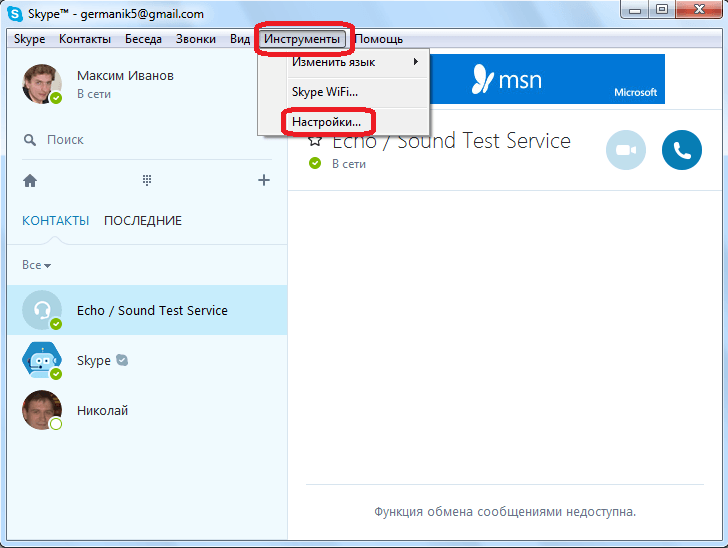
However, to minimize the effect of background noise, you can adjust the settings of the program itself. Successively go to the menu items in the Skype application - "Tools" and "Settings ...".
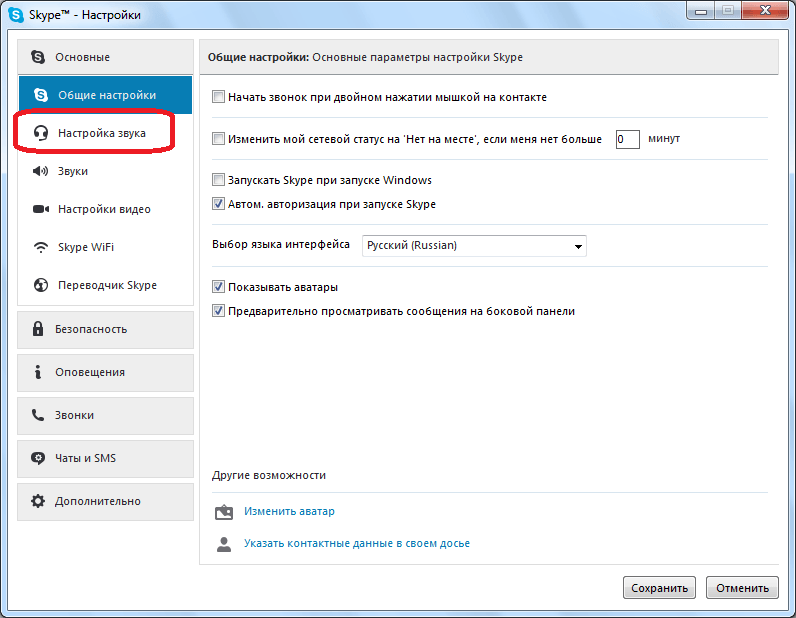
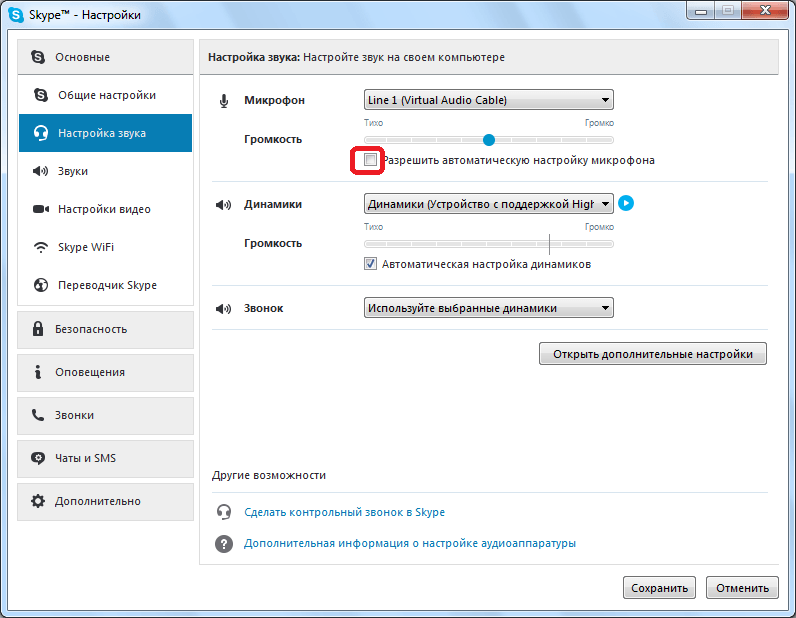
Here we will work with the settings in the "Microphone" block. The fact is that by default, Skype automatically sets the microphone volume. This means that when you start to speak more quietly, the volume of the microphone increases, when louder - decreases, when you stop - the volume of the microphone reaches a maximum, and therefore it starts to catch all the extraneous noises that fill your room. Therefore, remove the check mark from the "Enable automatic microphone setting" setting, and turn the volume control to the desired position for you. It is recommended to install it approximately in the center.
Reinstalling Drivers
If your interlocutors constantly complain of excessive noise, you should try to reinstall the driver of the recording device. In this case, you need to install only the driver of the microphone manufacturer. The matter is that sometimes, especially often at system updating, the driver of the manufacturer can be replaced by standard windows drivers, and this has a fairly negative effect on the operation of devices.
Original drivers can be installed from the installation disk device (if you have it left), or download from the official website of the manufacturer.
If you adhere to all the above recommendations, this is guaranteed to help reduce background noise. But, do not forget that the fault of sound distortion can be a problem on the side of another subscriber. In particular, it may have broken speakers, or there may be problems with the drivers of the computer's sound card.
With the problem of the presence of extraneous noise when recording sound through a microphone connected to a computer, users meet quite often. Annoying can also whistle, buzz and hiss during communication, for example, via Skype. How to avoid such trouble? There are several methods. They are both primitive and more complex, implying the use of software and hardware.
Why the microphone is noisy
Extraneous noise can be heard both when working with the built-in accessories, and when communicating or recording sound by using an expensive device. These are the features of membranes installed in microphones during their production. They perceive not only the speech of the user, but also the noise of the worker the system unit, the hum of the refrigerator, the hiss of the TV.
Another reason for the unsatisfactory performance of the microphone - low speed connection. If in the process of communication on the Internet through the Mail.ru Agent or Skype data is transferred slowly, not only noise will be heard, but it will reach the loss of communication.
The third reason is a malfunctioning device. If the device works correctly due to a breakdown is not possible, problems can not be avoided.
Errors software and incorrectly made settings by the user most often lead to the fact that the microphone is noisy. The reason for the troubles here is clear - the inability to work with "responsible for the purity of sound" software.
Noise reduction methods
All methods of overcoming the noise of a microphone can be divided conditionally into:
- Primitive;
- Hardware with the appropriate software.
The first step is to define a "weak" place. It is advisable to begin by checking the device for its operability. Such actions are something between conducting primitive operations and serious manipulations. For this:
- If you are sure that the microphone is physically connected to the PC correctly, click "Start";
- In the search field enter "sound recording";
- Press Enter.
After that, a window with an indicator and the "Start recording" button will appear. Further:
- We click on the corresponding button;
- We say a couple of phrases;
- We keep sound file, listen to it.
If everything that was said is heard, then the microphone is working.
Primitive methods
You can try and simple manipulations. It is advisable to turn off, for example, a noisy fan, a TV, a radio. If the microphone is not built into the PC, it's worth moving it away from the computer. When making a speech, you should stay close to the device.
Another option: it is advisable to try to put a ball of foam on the microphone. Such each of us can see when a TV journalist reporting news is shown on TV.
Slow connection
When talking on the network using IP-telephony tools, the problems of this plan are encountered because the connection is slow. You can try to increase the speed if you stop downloading any files, the work of other programs. If the speed is initially limited, the only way out is to change the provider.
Using the Software
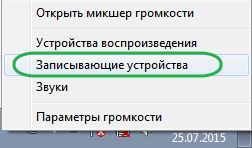
Starting the work with the software, right-click on the manipulator click on the speaker image in the bottom corner of the display, select "Recorders."
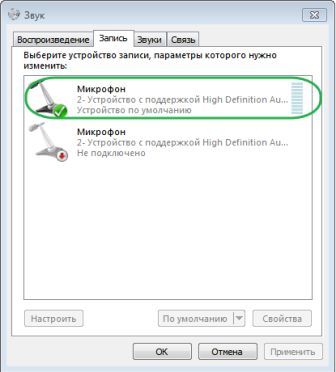
In the appeared window click on the name of the microphone, where there is a green checkbox, click on "Properties". Next: in the "Controller" section again, click "Properties", which will give an opportunity to see if everything is OK with the driver. If it is not, the driver will have to be installed.
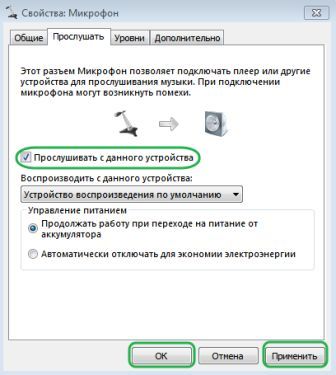
Next: go to the "Listen" tab, mark the corresponding item, alternately click "Apply" and "OK". Now we hear everything that we say in the microphone.
We go to the "Levels". There are two sliders, moving them, we try to completely get rid of noise. Usually the first slider is set to 100%, the second - to 10 dB.
Go to the "Advanced" section, increase the frequency, go back to the "Levels" section, try to "amplify the microphone". If after that the noise level is the same, we experiment further.
How to set up a microphone in Skype
If communication via Skype is difficult due to noise, you should check the settings. For this:
- Run the program;
- In the "Tools" menu, select "Settings", then - "Audio Settings";
- In the section "Microphone" one by one we select from the drop-down list all the devices.
When selecting the desired device, the user sees a strip in front of the "Volume" green. The same is done in the "Dynamics" section, we save the changes.
Setting up in the program Mail.ru Agent
After starting the software in the work we do the following:
- In the menu we find the item "Program settings";
- In the appeared window we go to the tab "Voice and video", select the item " Automatic configuration sound parameters ";
- In the list of devices, select the one you want;
- If the microphone is not very sensitive, put a tick near the "Amplifying the microphone."
P.S.
Methods for suppressing the noise of a microphone exist different. In the vast majority of cases, users achieve the desired effect. It should be remembered: if a primitive method is powerless, this does not mean that all other actions are useless. You just need to try to properly configure the software and hardware.