Skype is undoubtedly one of the most popular and really needed programs on the computer. With its help, people, being in different parts of the world, can keep in touch with each other, having access to the Internet.
But some of the users of the Skype program are experiencing problems with the microphone. This is manifested in the fact that the interlocutor simply does not hear you.
If this problem occurs, the first thing to do is to check the microphone for operability in the Skype program. You will learn how to do this in this article.
Microphone test process in Skype
Often on Skype you may not be heard due to the problem of an incorrectly set microphone in the settings. Therefore, in order to check your microphone for performance, as well as for its correct configuration in Skype, you need to do the following.
Open Skype and select "Tools" -> "Settings" in the top menu.
Login to Skype settings
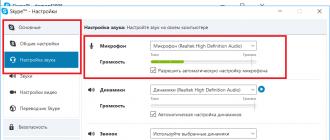
In the settings window that opens, in the "General Settings" tab, go to the "Sound Settings" section.

Microphone check in settings
Here we are interested in the first line "Microphone" and the second line below it "Volume".
Try to say something as loudly as possible. If at this moment a green activity indicator appears in the "Volume" line, then this means that the microphone on your computer or laptop is working and configured to work in Skype.
If, while making sounds, the green bar does not move in the “Volume” line under the “Microphone” line, this means that the wrong microphone is selected or the microphone simply does not work.
In this case, expand the list of microphones in the first row "Microphone" and try to select another one from this list.

Choosing a microphone in Skype
Next, say something out loud again and check if the activity appears in the form of a green bar in the "Volume" line. If yes, then click the "Save" button and try calling your friends to make sure that the microphone is working.
The second way to check if the microphone is working in Skype is to call the Echo/Sound Test Service contact. This is a test robot that any Skype user has.

Skype microphone test contact
All you have to do is call him and follow the instructions.
It is quite easy to check the performance of a microphone connected to a computer; this does not require any special equipment or deep knowledge. Even a beginner will cope with such a simple task, how to check the microphone on Skype by following the simplest instructions.
To do this, it is enough to have Skype installed and perform a few simple steps:
- Launch the Skype program and select "Echo/Sound Test Service" from the contact list.
- Make a test call (it's completely free) and you'll be prompted to read a short message and then listen to it.
- If the microphone is working, you will listen to your recorded message. If the recording does not start playing, then the microphone needs to be tested and adjusted.
First of all, check that the microphone is connected correctly and that you have connected it to the correct connector.
If everything is correct, let's proceed with the configuration:
- In the menu on the top panel of Skype, click "tools", select the "settings" tab, in which we click on the line "sound settings"
- Say a couple of words into the microphone, the “volume” bar should turn green and show the sound level.
- If this does not happen, try successively selecting drop-down lines in the line opposite the “microphone” icon and checking each one until the microphone works.
If the desired result does not appear, then either your microphone is faulty, or there are no drivers for it (which is rare), or the operating system of your computer does not want to work with the microphone. To fix this problem, open the Control Panel from the Start menu and select Sounds and Audio Devices. Then, in the "Audio" tab, find "Sound Recording" and check the volume of the microphone by raising the volume lever to the maximum, and click "OK".
Try setting up in Skype again. If the microphone is OK, there is one step left: make a test call and make sure the microphone is working. You can make as many such calls as you want, they are completely free. When you click on the line "Make a test call in Skype" a window will open.
The test was successful, and now you know how to independently test and configure the microphone in Skype.
With the help of a microphone, we communicate in Skype, and the interlocutor hears us. If even at a normal Internet connection speed you have problems with sound, then you should first turn to the operation of this device. Let's take a closer look at how to check the microphone on Skype, and what to do if it fails.
Checking with standard Windows tools
Firstly, I note that the microphone can be, as on most laptop models, as well as an external one that you need to purchase and connect to a computer. Usually the settings are set automatically. If the microphone does not work well in Skype, then you can check it through the standard system tools, especially since the Windows developers have provided for this:
- We open.
- Go to the section "Equipment ...", category Sound.
- Click on the Recording tab.
- Here you can see all the microphones connected to the computer.
- After you click on the device you want to check, the Properties button will become active, click on it.
- Go to the Listen tab.
- Check the box next to the offer to play sound from this device.
After that, you will need to say something into the microphone. If everything is fine, then you will hear your voice. Now let's pay attention to how the microphone check is done in Skype, because problems can be directly in the program.
Checking via Skype
Skype has two ways to test your device. Consider the first of them, which is simpler and takes less time. First, select any contact. Next, we do the following:

Advice. Pay attention to which device Skype uses by default. If you have several microphones connected to your computer, then select the one you need and save the changes.
Before you learn how to fix the microphone on Skype, try using another method. To do this, you just need to call the service center created to check the sound. We will need to complete the following steps:
- Select Echo / Sound Test Service in the list of contacts.
- Click on the Call button.
- We listen to the message, after which it will be proposed to make a short recording.
- We speak a few words (the duration of the audio message is 10 seconds).
- The recorded message will be played automatically.
Note! In order to use the service, you will need active access to the Internet. Otherwise, this method cannot be used.
Now let's pay a little attention to how to set up a microphone in Skype. If problems with the operation of the device are noted only in the program, then first we will try to fix the parameters. To do this, go to "Tools" - "Settings", and go to the Sound Settings tab. A window will appear in front of you in which you will see the device used by the program by default, as well as its volume.
You can change the settings as you wish. After the settings have been changed, make a test call to make sure the microphone is working properly.
Some users have a question why the microphone on Skype is phoning. This may be due not only to the operation of the program, but also directly to the device. Try to quieten the speakers. In addition, acoustic devices should not be placed near the microphone. If, after changing the settings, the test did not show positive results, then it is quite possible that the microphone itself is out of order.
During the installation of Skype, many users skip the hardware setup step and try to finish it as soon as possible. This is the main reason why your interlocutor listens to silence during a call: the necessary parameters are not configured. Therefore, we will consider how to set up a microphone on Skype if you are not heard.
Microphone test
First, check if the recording device is connected to the computer. In laptops, the microphone is built into the case, but on stationary PCs it is connected to an external connector (either a separate device or together with a webcam).
Now check if your microphone is muted in Skype itself. Call the Sound Test Service and look at the corresponding button. If the icon is crossed out with a line, click on it. 
Next, check the performance of the device. To do this, connect the microphone to another device and try to use it for its intended purpose. If everything is in order, then the problem lies in the settings of Skype or Windows.
Setting up Skype
In most cases, the microphone does not work precisely because of incorrect settings in Skype. To change them, do the following:

Setup in Windows
Now let's deal with the sound settings in Windows. Perhaps the problem lies with them. For this:

If the sound appears, but you can’t hear you well, follow these recommendations:

This concludes all recommendations. Now we know how to set up a microphone in Skype if the interlocutor does not hear. If none of the methods helped you, update the sound card driver and repeat all the above instructions in chronological order. Good luck!
In order to make Skype calls and communicate normally with the interlocutor, you first need to have a working microphone. Often, new users ask themselves the question "How to check the microphone on Skype?". This question usually arises when there are problems during communication or during the installation of Skype.
Checking the sound in the program
As soon as you have installed Skype on your computer or downloaded it to your Android, iPhone, tablet, the first thing you should do is check if all the equipment is working properly. The sound in the Skype program is a fundamental factor, so you need to check it on a par with how the video camera works.
How to check with Skype
To understand if your sound device works, the first thing to do is to check the settings of the program itself. It is in it that you should see if the webcam, microphone, speakers are working. You can also adjust the sound in it.
Make a call
In order not only to find out if the microphone is working or not, but also to hear the sound that your subscriber will then hear, you should find Echo / Sound Test Service in the contact list (Fig. 1), which is online 24 hours a day, 7 days a week. This subscriber automatically appears in the contact list when you install Skype.
The user must click on it and select the "Call" option in the form of a blue tube (Fig. 2). Next, you need to follow the instructions of the robot and, after the beep, say a couple of words. This is a kind of test that will show you if everything is fine with the equipment. If you then hear yourself, then the microphone is working normally and you have nothing to worry about.
If there are difficulties
Worse, if you didn't hear your own voice when you called the Echo / Sound Test Service. Then the hitch may be in the program settings themselves.
You should do the following:
- go to the "Tools" menu and select the "Settings" option (Fig. 3);
- in the window that opens, select the item "Sound settings" (Fig. 4);
- make sure that the program contains exactly the device that is connected or built-in on your computer (Fig. 5);
- check whether the slider in the “Volume” column is set to “Loud” (Fig. 6).
If suddenly the interlocutor begins to hear you poorly, your voice is too quiet, the interlocutor has to use headphones, then we again do all these manipulations and check if the slider is at the “Quiet” mark.
Check connection
Do not lose sight of the fact that the user could simply have connected the microphone incorrectly on a laptop or desktop computer if it was not originally built into the system.
The microphone should be plugged into the little pink jack. If the camera and microphone are together, then often an inexperienced user makes the mistake of plugging in only the camera, forgetting that the microphone plug must also be inserted into the socket.
The microphone jack is located on the back of the system unit if it is a desktop computer, or on the right front of the laptop. In phones, androids, iPhones, the sound device is already built in.
What could be the reason
If no actions lead to the interlocutor beginning to hear you, then there may be several options for why this happens.