This morning I received a letter from a friend in which she was interested in programs with which you can record video reviews from your computer. This topic is often flashed on the Internet, but as always I will answer the question only on the basis of my experience.
This article will discuss several popular programs for recording the desktop screen and one with the ability to record reviews directly from the games.
SMRecorder is the first program I noticed.
I liked it for its simplicity. Easily captures video from the monitor, with almost no distortion records audio, both from speakers and from a microphone. The great advantage is that the program converts video into several formats at once (avi and mp4) after recording. This saves a tremendous amount of time.
The application is perfect for people who need to record simple videos without editing. Another important advantage was the size of the recorded video. The resolution and the number of frames per second can be adjusted, which will allow you to determine the weight of your videos in advance without any problems.
Fraps is one of the best applications for recording video from games.
I did not use it much, but I am sure that this program will be useful for avid gamers when recording various game walkthroughs, demonstrations of their chips and much more.
Probably her only drawback I encountered was the amount of video being recorded. In this program, you need to approach this issue carefully - it is very very voracious. It can “eat all the memory from a hard disk” in 10 minutes, so select quality parameters with special care. In all other respects, I liked the program.
UVScreenCamera is a handy program for recording video from a computer screen.
The UVScreenCamera application will appeal to anyone who often intends to record demo and training videos. An abundance of settings can please most users.
A large selection of video formats will save time, the weight of the video is also regulated without any problems, but the best thing about this program is the built-in editor. Immediately after recording, you can make a huge number of changes in the editor, remove bad frames, insert texts, footnotes, callouts, add music, voice comments and much more.
Video review with practical example
In the video below you can watch a brief overview of the UVScreenCamera program and, after watching, immediately start recording your own video clips.
If the article you like, I welcome your comments, thoughts and additions.
Many advanced gamers post entries to the network with the passage of computer games. So they brag about their successes to friends and train beginners. On these videos you can show all your skills. Although these videos are no longer counted on YouTube, not all fans of virtual adventures know how to record the passage of the game on video. To do this, you first need to find the appropriate software. The simplest program for recording video from the screen is “Screen Camera”. With it, you can record the passage of the game on video in all colors. How to do this is described in detail below.
Step 1. Download the program to your computer.
To record the passage of the game on video you need to download the program "Screen Camera". The distribution package weighs 55 Mb, so the download will take you only a few minutes. When the download is complete, install the program and open it.
Step 2. Record the passage of the game.
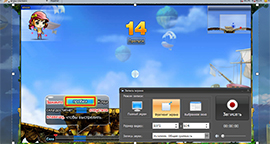
In the open program, select the mode "Screen Recording". In the window that opens, select one of three screen recording modes: "Full Screen", "Screen fragment" or "Selected window".
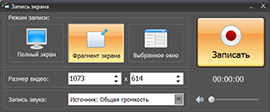
You can move the recording area to change its location and size. In addition, you can edit the resolution of the video and turn on sound recording from the microphone. When everything is set up, click "Record".
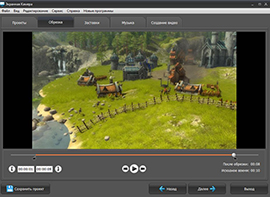
Step 3. Edit the footage.
When you want to finish recording, stop shooting with a hot key. In the opened player, you can view and evaluate the footage. If you think that the video needs to be processed, use the built-in editor of the "Screen Camera". Save the recording project on your computer and open the tab. "Editing". You can cut the video right in the program, make it beautiful screensavers, add music.
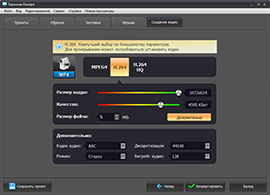
Step 4. Save the finished video.
Now you can save the finished video in the desired video format. To do this, use the option "Creating a Video". To record the passage of the game on video, select the menu item "Create Screen Video". To burn your adventures to DVD, select "Burn Video to DVD". The program "On-Screen Camera" allows you to immediately publish your video on YouTube or on another well-known resource. For this, you need to choose "Publish to the Internet". And millions of other users will be able to see your video.
To view the hidden text, we considered the possibility of a free edition of the program. Fraps Especially in the framework of the FPS calculation in games. In addition to testing the performance of video cards in computer games and 3D-progammah, this program can also take screenshots and screencasts in 3D. Fraps is one of the few programs for Windows, which, unlike ordinary screenshoters, photographs the image on the monitor screen as part of the operating system and ordinary programs, can take pictures of what is happening on the screen in 3D. Often, gamers record their playthroughs using this particular program, because in the process of capturing video, Fraps consumes a minimum of system resources. Capturing video in a 3D environment can be accompanied by voice recording from a microphone and sounds in the Windows system. Below we consider in detail how these processes occur - the creation of screenshots and screencasts of games - using the Fraps program.
How to record the passage of the game on video using Fraps
1. Paid and free versions of Fraps
To calculate the FPS, we used the free version of the Fraps program, which .
For in terms of testing the performance of video cards, the possibilities of the free version of the program are not limited. With the video of the passage of games in the free version, you can only play, check the quality of the video and the overall performance of the program. For free, Fraps records only the test first 30 seconds of the video and imposes its watermark. With screenshots, the situation is simpler: the restrictions apply only to the output image format, and this is a heavy type of BMP files. However, there is nothing difficult in opening a screenshot in any of the graphic editors (and at least in the standard Windows Paint painter) and saving this screenshot in the correct format, for example, in JPG or PNG. In the paid version of Fraps, the required format from among the possible ones, and these are BMP, JPG, PNG and TGA, we get right away.
You can purchase the paid version of Fraps by clicking on the link in the program window, in the first tab. "General".
The cost of a single-user program license at the time of this writing is $37 .
- Note: Friends, in the FPS counting article mentioned above, we looked at all the program behavior settings in its first General tab. There, in principle, there is nothing to explain for connoisseurs of the English language. But those who are from English to "you" can look at paragraph 2 of the article Please or to view hidden text . Below we will focus only on the last two tabs of the Fraps program, where the settings for capturing video and taking screenshots in games are placed.
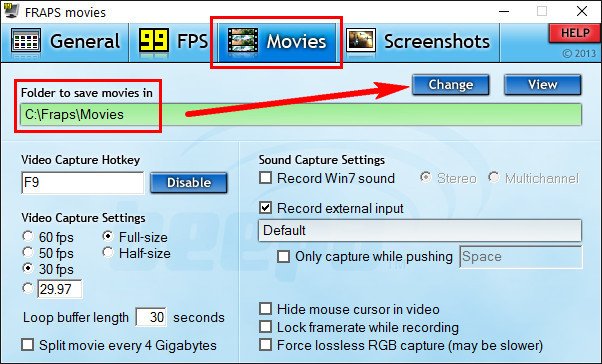
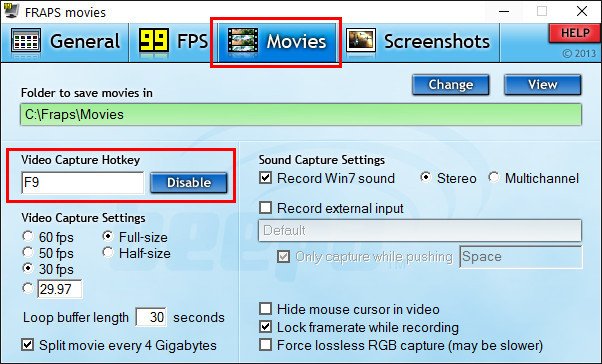
All settings for the upcoming video and audio capture are carried out in the program tab. "Movies". At the top of the program window we will see the path to save the video on the output - “Folder to save movies in”. This path can be changed by pressing the blue button. "Change".
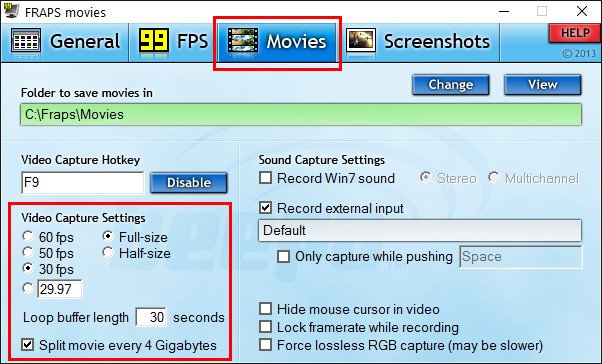
Block options "Video Capture Settings" is designed to set video quality parameters. Here, for the future screencast, if necessary, we can change the preset number of frames per second to 30 FPS. Choosing a larger value - 50 or 60 FPS, we get, respectively, the best video quality. However, it is worth considering that the size of the video file will then be more weighty. To save disk space will help setting the parameter "Half-size", twice reducing the frame size of the video. The optimal parameters for video capture will be the preset ones - 30 FPS and full-size full-frame size.
The parameter is not pre-installed in the program. "Split movie every 4 gigabytes" It’s better to use this option to split the video into separate video files, each weighing 4 GB. Divided into parts of the video will be easier to convert, upload to cloud storage, carry out editing with it, etc.
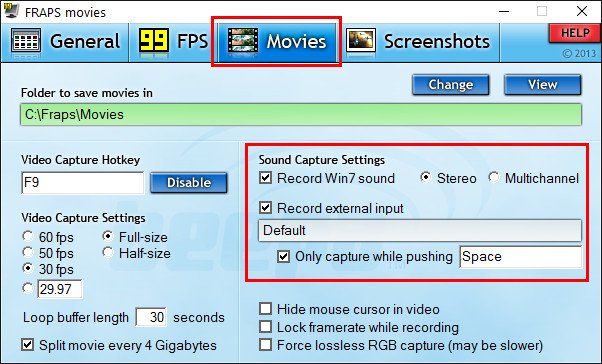
In the option block "Sound Capture Settings" we are offered sound capture options. To activate recording only system sounds (game sounds or a media player operating in the system), you need to set the option "Record Win7 sound"(Win8.1 or Win10 depending on the version of Windows). Stereo preset is "Stereo" - if necessary, you can change to multichannel - "Multichannel". The latter is useful in further viewing the video on a media device with a 5.1 audio system connected.
To capture voice from a microphone, set the active option. "Record external input". However, if the comments to the video will not be a continuous stream, it is better to additionally set the active option "Only capture while pushing". In this case, voice recording will be activated only when you press and hold the spacebar (Space key) on the keyboard. In this case, video segments without comments will not be accompanied by the noise and crack of the microphone. The space as a key to activate the recording of sound from a microphone can be reassigned to another key.
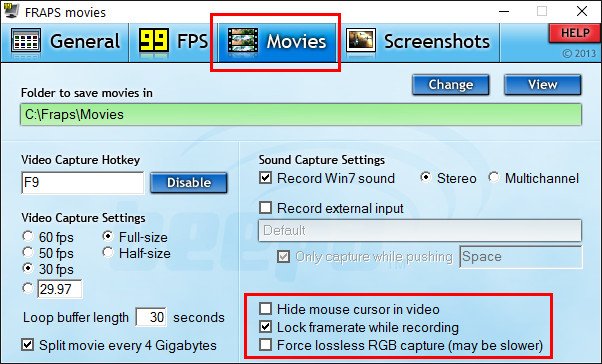
In the lower right corner of the “Movies” tab there are several more options for setting up video capture:
- "Hide mouse cursor in video" - Hiding the mouse cursor on the video;
- "Lock framerate while recording" - fixing the FPS counter during video capture;
- "Force lossless RGB capture" - this is a video recording without loss of quality, with preservation of the original color. This option must be pre-tested for video capture in each individual game. Activating this option may reduce the video recording speed.
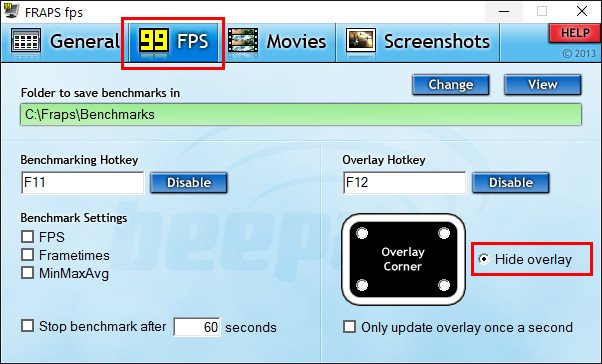
Another important nuance: if Fraps is running on the system, the FPS counter will be displayed in full screen mode. He, accordingly, will be present on the video recording of the passing game. You can disable the FPS counter in the tab “99 FPS”. It is necessary to tick the option "Hide overlay".
Here, in fact, all the settings. We can proceed directly to the process of capturing video. By default, the F9 hot key (“Video Capture Hotkey”) is assigned in the program to start recording video; you can replace it with another if necessary.
We do not close the Fraps program, we start the game and at the right moment press the hot key to capture video and sound. Video recording stops when you press the same F9 key (or the one to which it was replaced), as well as when you exit the game.
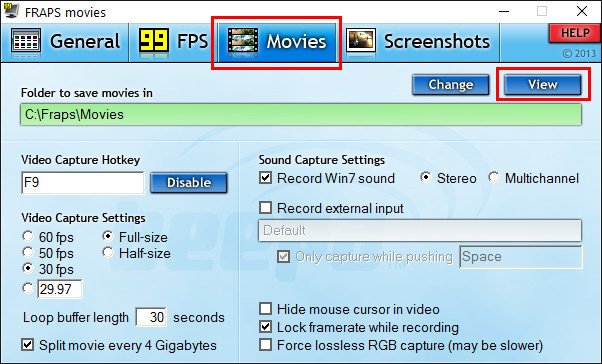
You can get quick access to the save folder with the passage of the game by clicking the blue button on the Movies tab "View".
3. Output video format
Fraps saves only video files in output. Avi. The video is not compressed with the aim of preserving the original quality, and with the aim of engaging a minimum of system resources in the capture process. Accordingly, the output video files with a long passage of games will be weighty. This point should be taken into account and, perhaps, initially set the way to save video files on a non-system partition of a computer disk.
4. Creating game screenshots
Settings for creating screenshots in games are located in the corresponding tab of the program. "Screenshots". Here, just like in the video capture settings tab, we can change the preset path for saving images ( "Folder to save screenshots in") by pressing the blue button "Change".
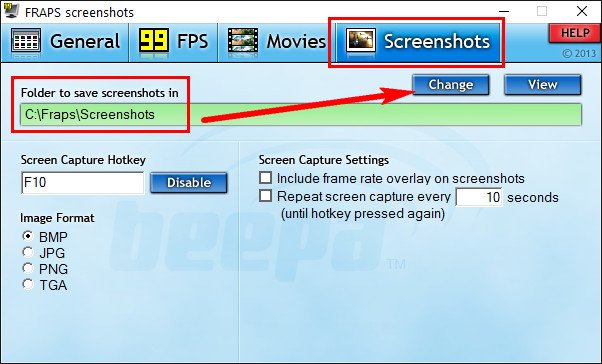
In the lower left corner of the paid version of the Fraps program, we can choose the image format at the output. Recall that in the free version, saving is only possible in the BMP format. To the right, in the column "Screen Capture Settings" we can set these two options:
- "Include frame rate overlay on screenshots" - FPS counter display on screenshots (without a tick on this option, the default counter on the pictures is not visible);
- "Repeat screen capture every __ seconds" - automatic creation of screenshots after a specified period of time in seconds.
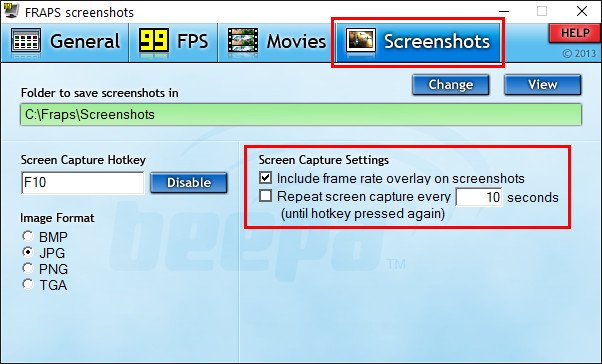
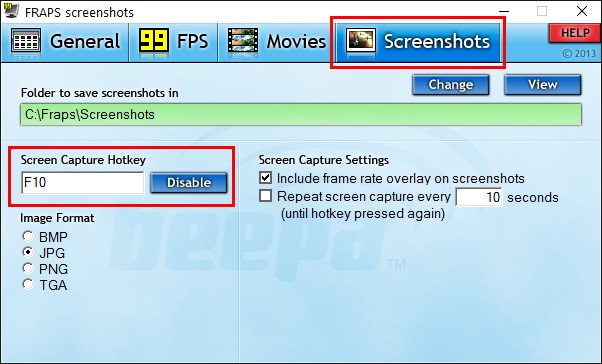
Both the creation of a screenshot and the launch of the process of automatically creating screenshots after a specified period of time is carried out by the same hot key indicated in the "Screen Capture Hotkey" column. The default is F10, this key can be changed. It is also necessary to press it to stop the automatic creation of a series of screenshots.
As in the case of video, you can get quick access to the folder along the way of saving screenshots in the program window by clicking the blue “View” button.
![]()
Please or to view hidden text First, the Fraps program is downloaded and installed. It should be noted that the free version, downloaded from the official developer site, allows you to record only 30 seconds of video. The video will display the Fraps icon. Therefore, those who wish to record a long video can purchase the full version.
The default settings in the program should be suitable for the vast majority of people. However, something still needs to be considered. Select the "Movies" tab to customize the video recording. Here you can select a folder to record video. Note that the directory must be specified where there is really a lot of space. To do this, click the "Change" button and specify a new path to save.
Now pay attention to the hot key for video recording. The default button is F9, you can put something your own, named in "Video Capture Hotkey". By pressing this key in the game, video recording will begin.
Adjust frame rate per second. Here this item is designated as FPS (Frame per second). If the computer is not very powerful, then it is not necessary to install too large FPS. With this setting, you must decide on the spot, given the characteristics of the PC, but usually 30 FPS is enough for a normal game. The main thing is that the settings of this parameter do not slow down the PC and the quality of the recorded video does not suffer.
Decide whether you want to record sound along with the video. If any third-party audio track is used, then you can safely uncheck the “Record sound” option, the file size will be significantly reduced. However, everyone usually leaves a sound recording.