Hello everyone, today I will tell you how to remove a wifi network in Windows 10, Windows 8.1 and 7. For what it may be necessary, for several reasons, firstly there are a lot of junk connections that you no longer need, secondly for reasons security. Below we will analyze everything in more detail, so that even the most novice user will be able to figure this out without spending much time on it.
I have previously told and this article complements it in terms of understanding what and where is located. Just an example of why this property should be cleaned, suppose you came to a crowded place, saw the left free WiFi. They connected to it, even put a daw, connect with a machine, but the same, but only then they discovered that they were breaking you and trying to hack you or you were catching a virus, it doesn't matter. You naturally switch off immediately, remove viruses and all that and quietly forget about this case, time passes and you get to this place again, and since you have a tail from this connection, it will connect again without you, which is not good, for this and it is worth all to delete. There are at least two built-in methods without third-party programs that will remove the wifi network in Windows 10 and other editions.
how to remove wifi connection through graphical interface
Delete wifi network in Windows 7
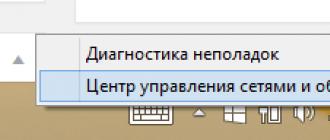
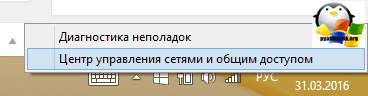
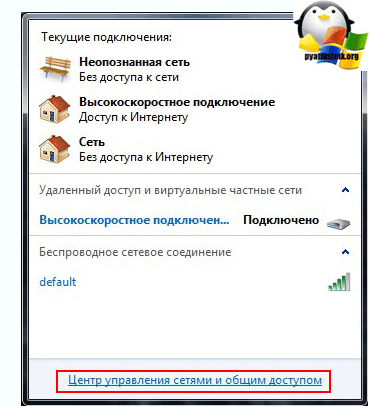
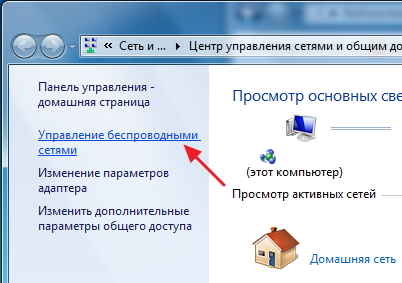
This method is most suitable for beginners who do not like the command line and are accustomed to the graphical interface. We find the network icon in the lower right corner and click on it with the right mouse click, where next you need to select the Network and Sharing Center.
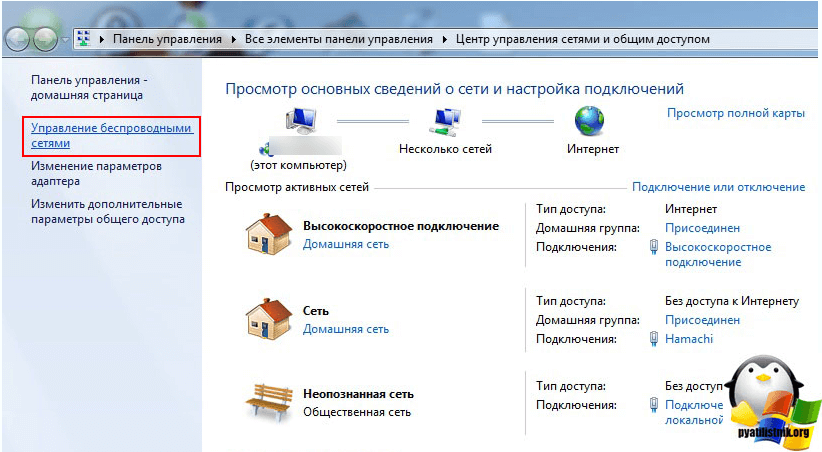
You will open the Network and Sharing Center where you need to go to Wireless Network Management.
Or, you can immediately access the Wireless Network Management via the WIFI icon, left-click on it, I specifically showed you both ways so that you know that there are several ways.
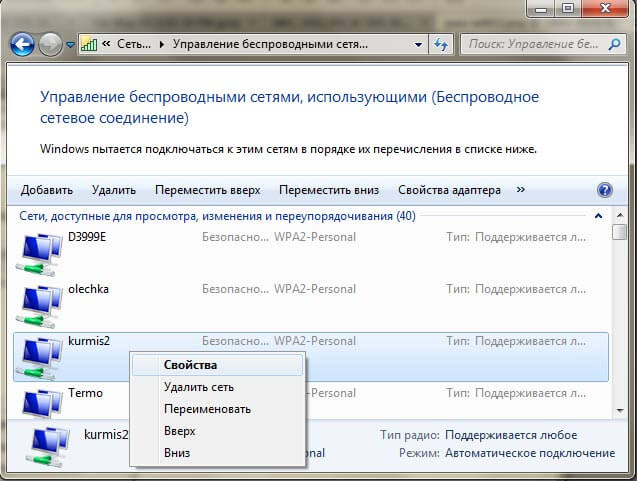
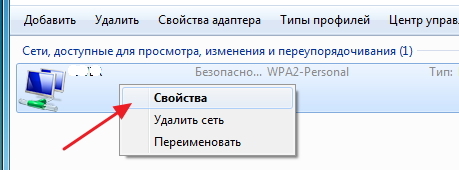
As a result, you will see a window of profiles of wireless networks, which can be deleted by right-clicking on them. These profiles of wireless networks store the SSID; this is the name of the Wifi network and their passwords are also called authentication keys.
Remove wifi network in Windows 8.1
In Windows 8.1, there is no longer a Wireless Network Management snap-in and the term delete is already replaced with forgetting, apparently localization difficulties. Why there is no standard and convenient Wireless Management window, everything is simple in Windows 8.1 the first METRO test interface for mobile devices arrived and even then Microsoft dreamed to shovel the interface closer to the mobile version and gradually began to do this by transferring some things to the metro interface in Windowx 10 they are engaged in this even more thorough, but today is not about that. The eight still remember the profiles of wireless networks along with the SSID and passwords.
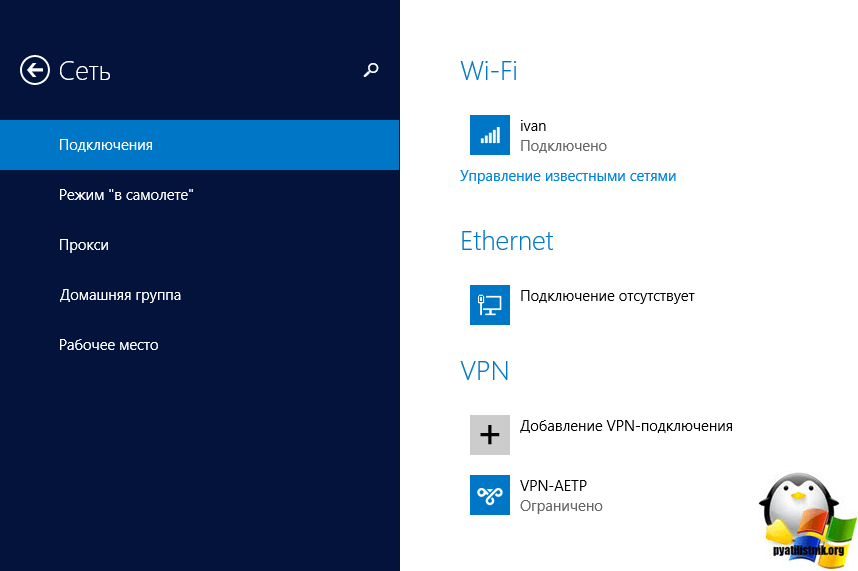
And so in order to remove a wireless network in Windows 8, open a window with a list of available by clicking on the WiFi icon in the lower right corner and you will have a sidebar in which you have to select the desired network and click on it with the right click, from the context menu click Forget this network. Now it is called forget, in the place we are used to delete, well, God bless them.

In this case, you wake up, only available networks, but you can look at the list of saved profiles of wireless networks like this. Press the key combination WIN + I and you will see the All parameters panel, for more details about the combinations read the Windows 8.1 hotkeys. We press change of parameters of the computer.

Now, to remove the wireless network, select the network item, at the Wi-Fi point, click Manage known networks
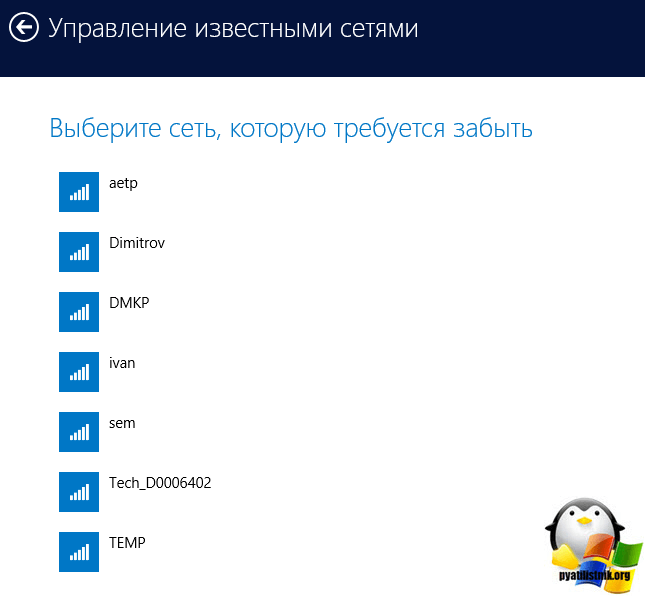
In the Manage known networks window you will find all Wi-Fi networks you know.
In Windows 8 (as in previous versions of Windows), if you successfully connect to a wireless Wi-Fi network, the system automatically creates a separate Wi-Fi network profile for this connection. This profile contains all the information needed to establish a wireless connection: network name (SSID), authentication method, network password (password key) and other information. In the future, if this Wi-Fi network is in sight, this profile is used to automatically connect to it.
In Windows 7, there was a special control panel item that allows you to manage Manage Wireless Network profiles: delete profiles, change their settings or priority. In Windows 8, Microsoft for some reason decided to remove this functionality, so in Windows 8, you can manage Wi-Fi network profiles using third-party utilities (these are not our methods!) Or using the command line.
So, wireless networks in Windows 8 can be controlled using the command line, the netsh command will help us with this.
The list of wireless network profiles can be displayed using the command:
netsh wlan show profiles
The command returns the list of saved profiles of wireless Wi-Fi networks. In this example, there is one Wi-Fi profile with the name michael.
View saved passwords for Wi-Fi networks in Windows 8
It’s no secret that the system saves the network key for the user's convenience (a password for connecting to the network).
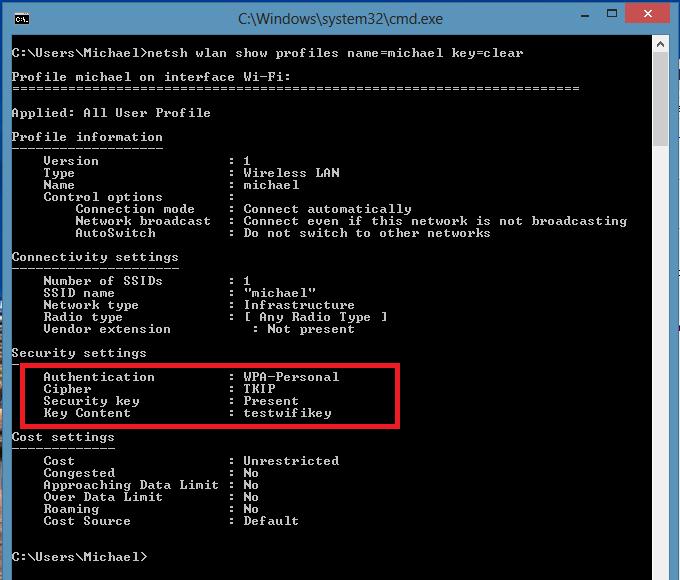
You can view the saved password for accessing a Wi-Fi network (WPA, WEP, etc.) directly from the command line using the netsh command, specifying the desired profile:
netsh wlan show profiles name = michael key = clear
The password (key) of the Wi-Fi network can be seen in the Security settings -\u003e Key Content section. In this case, the password for connecting to a Wi-Fi access point: testwifikey.
Delete a Wi-FI connection profile in Windows 8
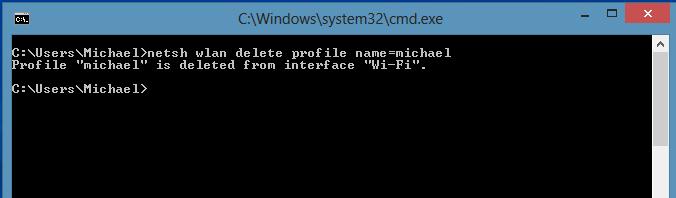
To delete a saved wireless connection profile in Windows 8, use the command:
netsh wlan delete profile name =
This command will destroy all saved profiles for all WLAN interfaces.
If you need to delete a wi-fi network profile for a specific WLAN interface, use the following command:
netsh wlan delete profile name = interface =
Note. Wireless network profiles in Windows 8 are stored as XML files in the C: \\ ProgramData \\ Microsoft \\ Wlansvc \\ Profiles \\ Interfaces \\ (GUID_interface) \\ (GUID_Profile) .xml directory
Each Wi-Fi adapter has its own interface GUID (GUID_interface), and all saved profiles for this interface are stored in an xml file with (GUID_Profile) as a name. To delete information about a specific wireless profile, simply delete the corresponding xml file.
How to connect to a wireless network using the command line in Windows 8
You can connect to the wireless network via the command line in Windows 8 if the system already has the necessary profile. To connect, use the command:
netsh wlan connect name =
In case you need to connect to the network saved in the profile from the command line (how to get the list of all profiles in the system described above) with the name wlr3l $$$, run the following command:
netsh wlan connect name = "wlr3d $"
It is also possible to specify a specific interface with which you need to establish a Wi-Fi connection. In this case, the command will look like this:
netsh wlan connectmso-ansi-language: EN-US "lang =" EN-US "\u003e 1p $" interface = "Wireless Network Connection 2"
Disconnect from WiFi network
To disconnect from the wireless network, use the command:
netsh wlan disconnect
Or specify a specific interface:
netsh wlan disconnect interface = "Wireless Network Connection 2"
How to change the priority of wireless networks in Windows 8
If there are several Wi ‑ Fi networks in the coverage area, the priority of wireless connections is determined as follows: the last connection becomes the highest priority if the “automatically connect” option is active. If this network is unavailable, Windows 8 tries to connect to the Wi-Fi network that was prioritized last time, and if it is successfully connected, the priority of this network is increased.
Note. In Windows 8, if there are several connections to the network by default, the system tries to connect first via Ethernet, if this is not possible — it tries to establish a Wi-Fi connection, and if both of these options are not available, Windows 8 will connect to the mobile network.
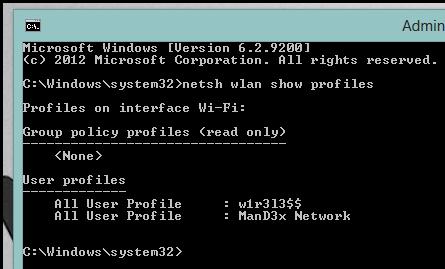
The current priority for wireless networks can be displayed using an already familiar command:
netsh wlan show profiles
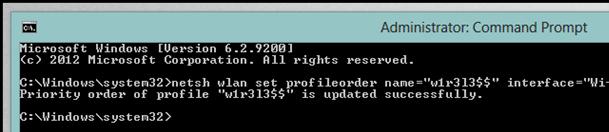
The higher the profile is in the list - the higher the priority of this connection. To change the priority of one of the Wi-Fi networks, use the command:
netsh wlan set profileorder name = ”wlr3n $" interface = ”Wireless Network Connection 2” priority = 1
This command raises to the maximum (1) the priority of the wireless network wlr3000 $$ for the interface of Wireless Network Connection 2.
And if you again list all the network profiles, you will see that the priority of the wlr3,13 $$ network has been raised (it is above all in the list).
Transferring Wi-Fi network profiles between Windows 8 computers
To transfer an existing Wi-Fi profile from one computer to another, you need to export it to an XML file and then upload it to another computer.
And again, the netsh utility comes to our rescue, allowing us to export and import wireless network settings (profiles) into an XML file:
Unload Wi-Fi profile settings:
netsh wlan export profile name = "wlr3 $ $" folder = c: \\ wifi
As a result, an xml file should appear in the c: \\ wifi directory, which must be copied to another computer and imported by the command:
netsh wlan add profile filename = ”c: \\ wifi \\ WiFi_profile_name.xml”
With the help of these commands, including, you can back up all Wi-Fi profiles on your computer.
Restricting access to Wi-Fi networks
You can restrict access to Wi-Fi networks using Windows group policies. An example of the implementation of this limitation is described in the article: Blocking wireless networks in Windows 7.
Windows 8 Access Point
From a Windows 8-based computer with a Wi-fi adapter, you can organize an access point using the same netsh command. The procedure is described in more detail here: How to create a Wi-Fi access point on Windows 8.
This documentation has been moved to the archive and is not supported.
The Cable Guy: Connecting to Wireless Networks in Windows 7
There are several ways to connect to wireless networks in Windows 7, and each has its own advantages and disadvantages.
The Cable Guy
Now wireless is used everywhere. The ability to connect to the network and the Internet everywhere has become vital. Windows 7 provides a simplified user interface for working with IEEE 802.11 wireless local area networks.
In Windows 7, there are many ways to create and configure a wireless network connection, which are called wireless network profiles:
- The network connection icon in the notification area is the main way users connect to available wireless networks.
- The "Set up a connection or network" dialog box is a way for users to manually create wireless network profiles.
- The Manage Wireless Networks dialog box is another way to manually configure wireless networks and specify their exact parameters.
- Group Policies — Network administrators can use Group Policy settings in an Active Directory Domain Services (AD DS) environment to centrally configure and automatically deploy wireless network settings on computers that are members of a domain. (See the article, in the heading "The Cableman" for April 2007)
- Command line - network administrators can use the netsh wlan context of the Netsh.exe utility to manually configure wireless networks and their settings. There are Netsh commands to export existing wireless network profiles to an XML file and then import the wireless network profile from this file to another computer. (See section.)
The following sections detail how to connect to a wireless network, use the network connections icon in the notification area and the "Set up a connection or network" dialog box in Windows 7, how to manage wireless networks, and how to connect to non-broadcast wireless networks.
Using the network connection icon in the notification area
To connect to an available wireless network, click the network connections icon in the notification area of the desktop. In the panel that opens, a list of detected wireless networks will be presented, and on computers, domain members, the names of wireless networks configured by means of group policy ( rice one)
Fig. one List of available networks
From this panel, you can connect to the wireless network from the list by double-clicking, or selecting a network, and then clicking the Connect icon, or right-clicking the network name and choosing Connect.
To view information about wireless networks in the list, hover the mouse over the network name. You will see the wireless network name, signal strength, security type, communication type (802.11b / g / n) and network identifier (SSID). The status of the connected network and its properties or a network configured using group policy can be seen by selecting the command to display the properties of the wireless network ( rice 2).
To update the list of wireless networks, click the up or down arrow in the upper right corner of the panel. To disconnect from the wireless network, right-click the network icon and select Disconnect.
Fig. 2 Dialog box of wireless network connection status.
Dialog box "Setting up a connection or network"
Open this dialog box in Windows 7 ( fig.3) by selecting the “Set Up a New Connection or Network” link in the “Network and Sharing Center” window.
Fig. 3 Dialog box for setting up a connection or network.
To manually create a wireless network profile, select Manually connect to a wireless network, and then click Next. You should see what is shown on figure 4.
Fig. four The page for entering information about the added wireless network.
Enter information about the added wireless network:
Network name - enter the name of the wireless network;
Security type — select the method used to authenticate your wireless network connection from the following:
- No authentication (Open) (No authentication (Open)) - an open authentication system without encryption;
- WEP is an open authentication system using the Wired Equivalent Privacy Protocol (WEP);
- WPA2 — Wi-Fi Protected Access 2 (WPA2) personal access with a shared key (also known as the key phrase);
- WPA - Wi-Fi Protected Access (WPA) private key access private key;
- WPA2 — Enterprise Access over WPA2 with IEEE 802.1X authentication;
- WPA — Enterprise Access over WPA with IEEE 802.1X authentication;
- 802.1x - IEEE 802.1X authentication with WEP (also known as dynamic WEP).
The choice depends on the capabilities of the wireless network adapter known by Windows. If any type of authentication is not displayed in the list, you need to check whether the wireless adapter supports this type and whether the latest version of the driver is installed with Windows 7.
Authentication using a shared key is not listed. Microsoft strongly discourages its use because it provides a low level of wireless security. To set up authentication using a shared key, select “Without authentication” (Open) in this panel, and then select “Shared” on the “Security” tab in the wireless network properties (as described later in this article). article).
Encryption type — select the method used to encrypt data during transmission over the wireless network. The choice depends on the type of security chosen.
- If you select the security type “Without Authentication” (Open), nothing will be selected;
- if you select WEP security type, WEP encryption type will be selected;
- when you select 802.1x security type, WEP encryption type will be selected;
- when selecting the security type “WPA2-Private”, “WPA2-Enterprise”, “WPA-Private” or “WPA-Enterprise”, you can select the encryption type - AES or TKIP.
As before, the list of encryption options depends on the capabilities of the used wireless network adapter registered in Windows.
- Security Key — enter the WEP key (if the WEP security type is selected), the WPA shared key (if the WPA-private security type is selected) or the WPA2 shared key (if the WPA2 personal security type is selected). For the “WPA2-enterprise”, “WPA-enterprise” and “802.1x” security types, Windows 7 automatically detects the security key when performing 802.1X authentication.
- Hide characters - specify whether you want to view the values of the entered security key.
- Start this connection automatically - select whether Windows 7 will automatically connect to this wireless network. If you uncheck this box, you must manually connect to the wireless network from the list of available networks, displayed by clicking the network notification area icon.
- Connect, even if the network is not broadcasting (Connect even if the network is not broadcasting) - determine whether Windows should try to connect, even if the wireless network does not communicate its name. This will cause Windows to send a frame of the probe request to discover the wireless network. These test queries can be used by attackers to determine the name of the non-broadcast network. For more information on privacy issues in a non-broadcast network, see the article.
Fig. five Successfully added page.
You can select “Change connection settings” to access the properties of the wireless network, as described later in this article, or click the Close button.
Wireless Management Dialog Box
You can access the "Wireless Network Management" dialog box by clicking the appropriate link in the "Network and Sharing Center" window ( rice 6).
Fig. 6 Dialog box for managing wireless networks.
Note: If there is no “Wireless Network Management” link in the Network and Sharing Center, click the “Change adapter settings” link and make sure that your laptop or laptop has a wireless network adapter, that is, is it in the Network Connections folder as a wireless connection and is it enabled. If the wireless adapter is displayed in the Network Connections folder, make sure you have installed the latest driver that supports Windows 7.
In the "Manage Wireless Networks" dialog box, you can add a new wireless network, delete a wireless network, access the properties of a wireless network adapter, and select a profile type for new wireless networks (applies to all users or the current user).
To manually add a wireless network, click the Add button — the manual wireless connection wizard opens to help you create a profile of a regular wireless network or a computer-to-computer network rice 7).
Fig. 7 A page for selecting the option to add a network
To create a normal wireless network profile, select Manually create a network profile. To create a computer-to-computer wireless network profile, select Create an ad hoc network.
To view or change the properties of a wireless network in the list, double-click its name in the Manage wireless networks dialog box. Windows 7 displays the dialog shown in rice eight.
Fig. eight Wireless properties window.
On the Connection tab, you can view the wireless network name, SSID, network type (access point or computer-to-computer network), and accessibility. You can also configure the following properties:
- Connect automatically if the network is in range (Connect automatically when the network is in range)
- Connect to a more suitable network, if there is one (Connect to a more preferred network if available) —determines whether Windows 7 will automatically disconnect from this wireless network if a more suitable network appears within reach.
- Connect, even if the network does not broadcast its own name (SSID) (Connect even if the network is not broadcasting its name (SSID))
Clicking the “Copy this network profile to a USB flash drive” link will open the Network Settings Copy Wizard, which will write the profile to media. You can then use this device to automate the configuration of a wireless network profile on other computers. On on fig.9 The Security tab is shown.
Fig. 9 Security Tab of the Wireless Network Properties Dialog Box.
On the Security tab, you can specify the following types of security:
- No authentication (Open) (No authentication (Open)).
- Shared authentication or shared key (Shared or Shared key authentication) (The Security tab is the only place where you can set up a shared key, because its use is strongly discouraged.).
- WPA2-private.
- WPA is personal.
- WPA2-enterprise.
- WPA- enterprise.
- 802.1x standard.
Depending on the type of security selected, you can either configure the network security key or set and configure a network authentication method. If you select “WPA-Enterprise”, “WPA2-Enterprise”, or “802.1x” as the security type, you need to perform the following configuration (as shown in the previous figure):
- Choose a network authentication method? select Select Extensible Authentication Protocol (EAP) as the network authentication method and click the Settings button to configure the EAP type.
- Remember my credentials for this connection every time I log on (I’m logged on) - indicates that when a user logs out, his credentials are not deleted from the registry. If you uncheck the box, then the next time the user logs in, he will be prompted to enter credentials (username and password).
If you specify the use of the security type “WPA-private” or “WPA2-personal”, or security without authentication (Open) or joint authentication with WEP encryption, you must configure the network security key, as shown in rice ten.
Fig. ten An example of setting up a network security key.
If you select the security type “WPA-Enterprise”, “WPA2-Enterprise” or “WPA2-Personal”, you can also configure advanced settings. On on rice eleven The Advanced settings dialog for the WPA2-Enterprise security type is shown.
Fig. eleven Tab to configure 802.1X.
On the 802.1X Settings tab (802.1X settings), you can specify the authentication mode (user or computer, computer, user, or anonymous user), save a set of user authentication credentials, and delete credentials all users.
Single sign-on (Single Sign-On - SSO) allows you to configure 802.1X authentication when a user logs on to the system and integrate 802.1X user login information in the Windows logon window. For more information about SSO options, refer to the article published under the heading “The Cable Guy” in April 2007. On rice 12 A tab for configuring 802.11 is shown.
Fig. 12 802.11 configuration tab.
In the “Quick Move” section, you can configure the pairwise master key (PMK) caching options and pre-authentication. For more information about fast move options, refer to the article published under the heading “The Cable Guy” in April 2007.
Note: If you select the security type “WPA-Enterprise” in the Advanced Settings 802.11 dialog box, there is no “Settings” tab.
The checkbox “Enable Federal Information Processing Standards (FIPS) compliance for this network) for this network allows you to specify whether AES encryption should be performed in FIPS 140-2 authentication mode. The FIPS 140-2 standard is a state computer security standard in the United States that defines the requirements for the development and implementation of cryptographic modules. Windows 7 is FIPS 140-2 certified. When FIPS 140-2 certification verification is enabled, Windows 7 performs encryption using AES programmatically, rather than relying on a wireless network adapter. This check box appears only when you select the authentication method “WPA2-Enterprise” or “WPA2-Personal” on the Security tab.
Non-broadcast wireless networks
Non-broadcast wireless networks do not broadcast their network name, or SSID. You can configure the access point of a non-broadcast wireless network to send a signal frame with an SSID of NULL to send. Non-broadcast wireless networks are also called hidden wireless networks.
In Windows 7, wireless networks can be configured as broadcast or non-broadcast. A computer running Windows 7 will try to connect to the wireless network in the order of the list of preferred networks, regardless of which of these two types they belong to. In addition, non-broadcast networks are the latest to appear in the list of available networks under the name Other Network. On rice 13 an example is given.
Fig. 13 Non-broadcast wireless network.
When connected to such a network, Windows 7 will prompt you for the wireless network name (SSID). On rice 14 an example is given.
Fig. 14. Enter the name of a non-broadcast wireless network.
Joseph Davies - Lead technical writer in the group of team of technical writers on the topic of Windows networks in Microsoft. He is the author and co-author of several books published by Microsoft Press, including Windows Server 2008 Networking and Network Access Protection (NAP), Understanding IPv6, Second Edition, and Windows Server 2008 TCP / IP Protocols and Services. ..
- Webpage
- To go to the list of articles heading "The Cable Guy", click.
January 30, 2016
How so? How could you forget the password from your wi-fi ?! Well, nothing happens. I will help you find out the forgotten password from your wireless network, especially since it will not be difficult even for a novice user. I hope you managed to connect at least one device to Wi-fi before you forgot your password. If not, it doesn't matter either. Then the second method from the article will help you (find out the forgotten wi-fi password using a router). Or the third is to remember the password using the WirelessKeyView program.
How to find out the forgotten password wi-fi from your computer
We go on the computer from which we have already connected to the desired wireless network in the "Network and Sharing Center". To do this, right-click on the wireless network icon in the tray and select "Network and Sharing Center".

In the next window, select the item "Wireless Network Management"
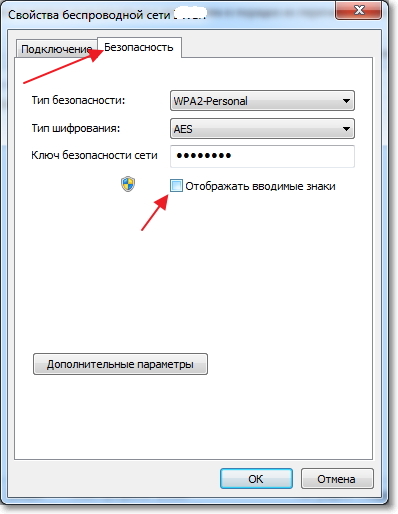
Go to the tab "Security" and put a tick in front of the "Display the input characters." In the "Security Key" you will see your Wi-fi password.
And what if the item "Wireless Management" is missing?
If you do not have the item "Manage wireless networks" (for example, in Windows 10) - it does not matter.
Similarly, go to the "Network and Sharing Center".
Click on your wireless network connection, then "Wireless Network Properties", then the "Security" tab. Put a tick "Display the input characters." In the "Security Key" you will see your Wi-fi password.
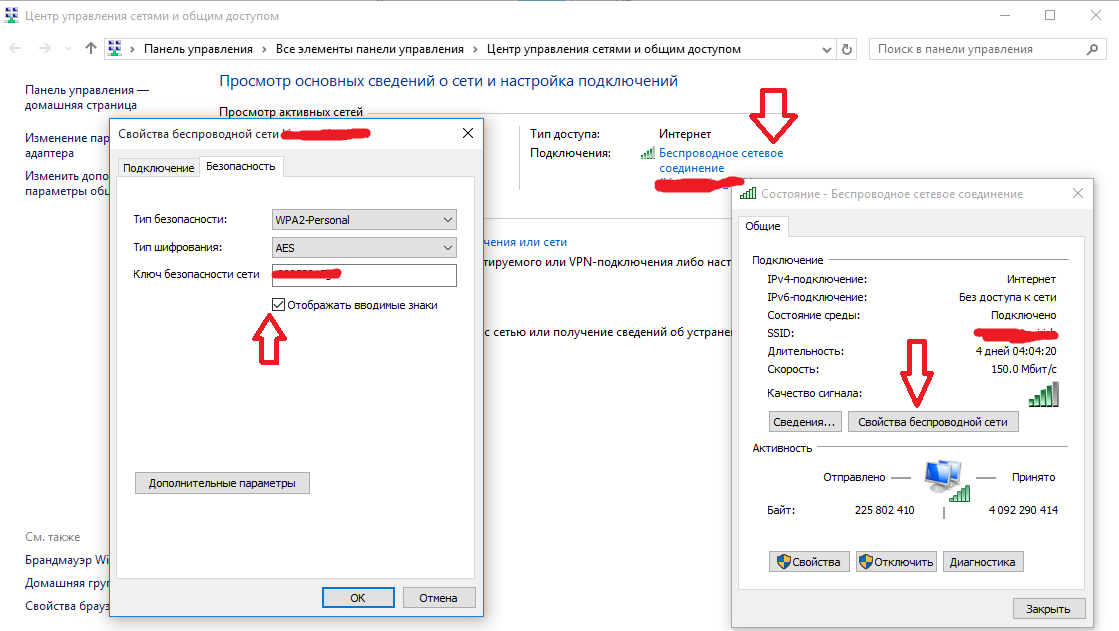
Attention! For this method to work, you must be connected to the desired wireless network.
If you do not have a device from which you have already connected to the desired wireless network, the following method will help you.
Find out the Wi-fi password from the router settings
So, we connect the computer cable to the router. Enter the address of the router in the address bar. Most often this is 192.168.1.1 or 192.168.0.1. You can usually find out the exact address and password to access the web panel of the router on a sticker on the bottom or on the back of the router (you do not have to use a computer - you can also access the interface of the router from a smartphone or tablet)
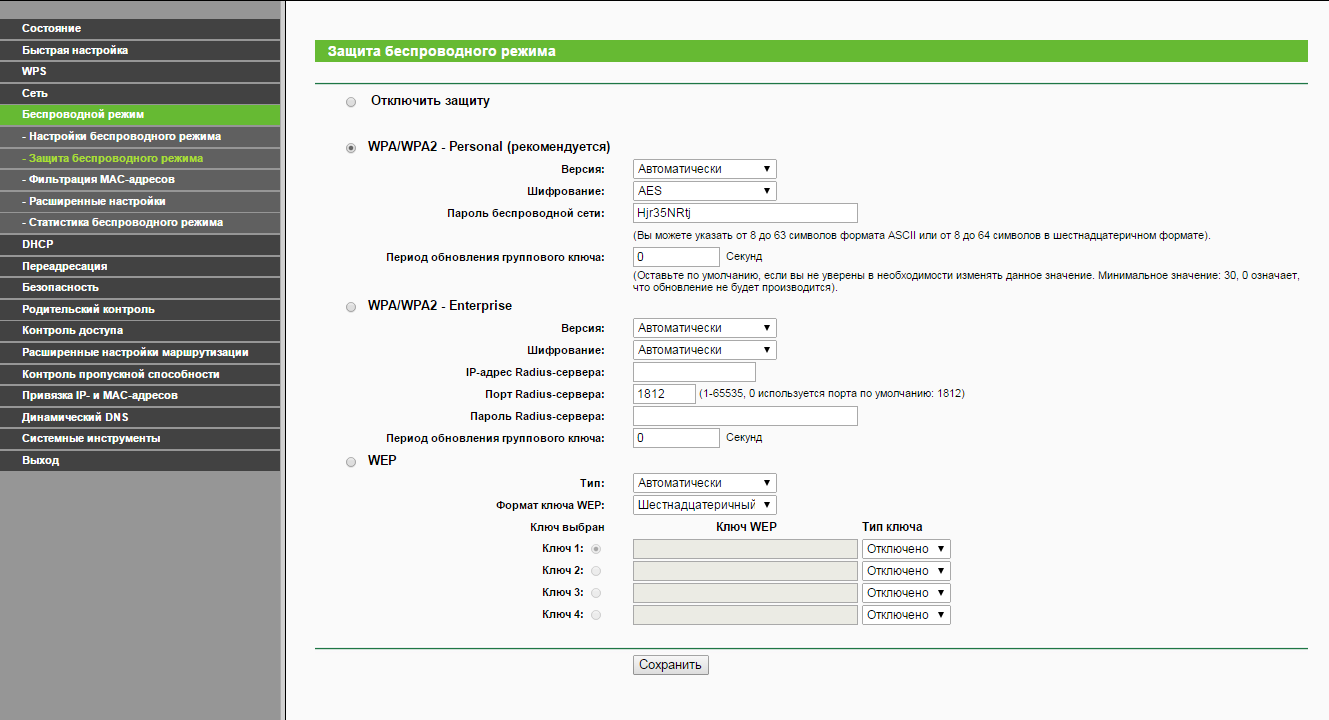
The web panels of routers are different, but in general the wireless mode settings are similar. For example, on the example of a router TP-Link TL-WR841N / ND.
Choose "Wireless Mode" - "Wireless Mode Protection" - "Wireless Network Password". In this box, you will see your password in clear view.
If none of the suggested methods came up to you, then there is one “magic” program that will definitely help you.
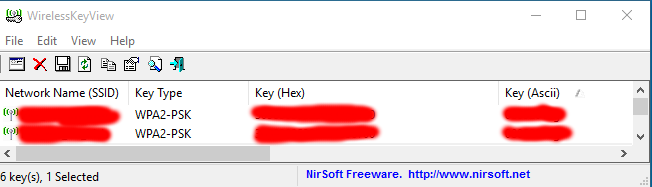
Learn Wi-fi password using WirelessKeyView
The program with which you can view ALL passwords stored on the device under Windows control is called. The program weighs less than 100 kb, does not require installation and works on almost any modern Windows. I personally tested it on Windows 10, 8.1, 7 and XP.
- Downloading WirelessKeyView from the official site
- Extract files from the archive, run WirelessKeyView.exe
- And we see all the passwords from all networks stored on the computer (the password from wi-fi will be in the Key column (Ascii)). The necessary passwords can be saved to a text file.
As you can see, the method is incredibly simple =)
I hope my article has helped you find out your forgotten Wi-fi password. Write down - and do not forget.
You can access the "Wireless Network Management" dialog box by clicking the corresponding link in the "Network and Sharing Center" window (Fig. 6).
Fig. 6 Wireless Network Management Dialog.
Note: If there is no “Wireless Network Management” link in the Network and Sharing Center, click the “Change adapter settings” link and make sure that your laptop or laptop has a wireless network adapter, that is, is it in the Network Connections folder as a wireless connection and is it enabled. If the wireless adapter is displayed in the Network Connections folder, make sure you have installed the latest driver that supports Windows 7.
In the "Manage Wireless Networks" dialog box, you can add a new wireless network, delete a wireless network, access the properties of a wireless network adapter, and select a profile type for new wireless networks (applies to all users or the current user).
To manually add a wireless network, click the Add button — the manual wireless connection wizard opens to help you create a profile of a regular wireless network or a computer-to-computer network. 7).
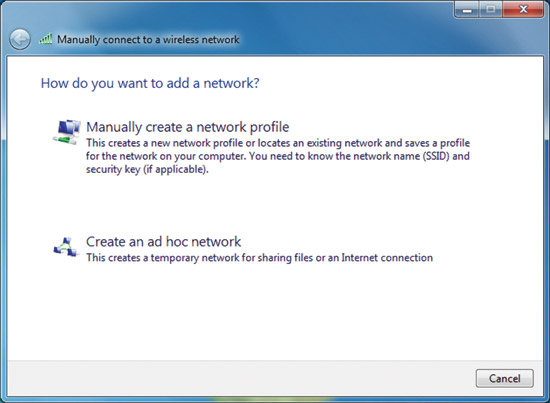
Fig. 7 Page for selecting the option to add a network.
To create a normal wireless network profile, select Manually create a network profile. To create a computer-to-computer wireless network profile, select Create an ad hoc network.
To view or change the properties of a wireless network in the list, double-click its name in the Manage wireless networks dialog box. Windows 7 displays the dialog box shown in Figure. eight.
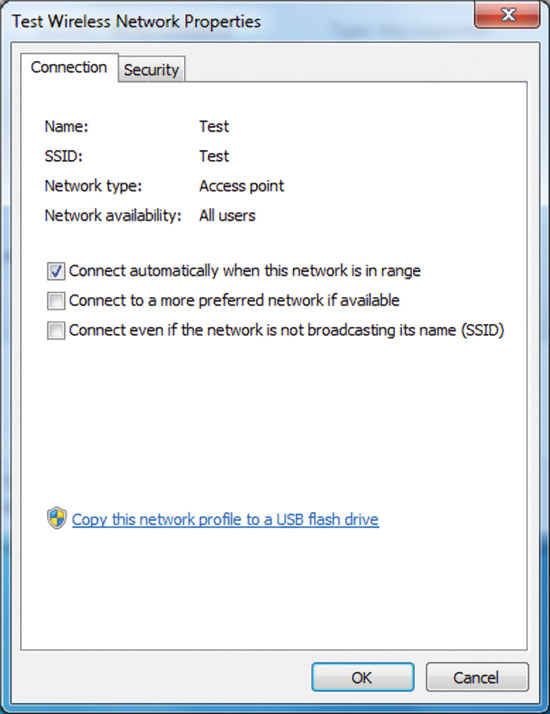
Fig. 8 Wireless properties window.
On the Connection tab, you can view the wireless network name, SSID, network type (access point or computer-to-computer network), and accessibility. You can also configure the following properties:
- Connect automatically if the network is in range (Connect automatically when the network is in range);
- Connect to a more suitable network if there is one (Connect to a more preferred network if available) —determines whether Windows 7 will automatically disconnect from this wireless network if a more suitable network appears within reach;
- Connect, even if the network does not broadcast its own name (SSID) (Connect even if the network is not broadcasting its name (SSID)).
Clicking the “Copy this network profile to a USB flash drive” link will open the Network Settings Copy Wizard, which will write the profile to media. You can then use this device to automate the configuration of a wireless network profile on other computers. Figure 9 shows the Security tab.
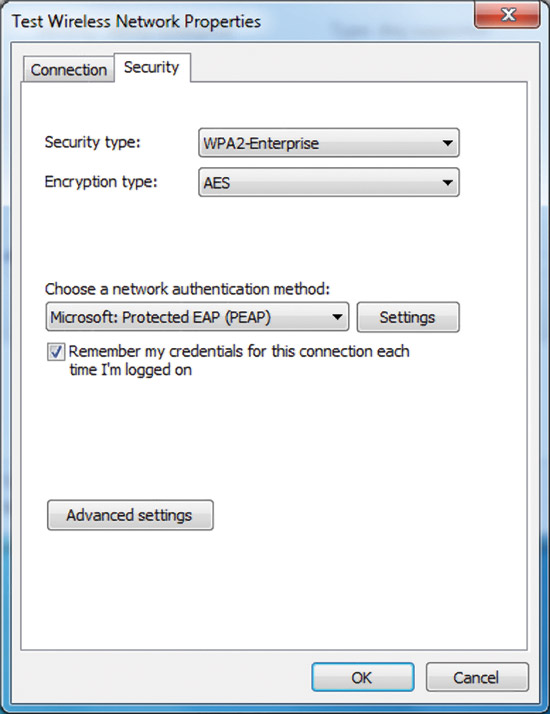
Fig. 9 Security tab of the wireless network properties dialog box.
On the Security tab, you can specify the following types of security:
- No authentication (Open) (No authentication (Open));
- Shared authentication or shared key (Shared or Shared key authentication) (Security tab - the only place where you can configure a shared key, because its use is not highly recommended);
- WPA2-private;
- WPA is personal;
- WPA2-Enterprise;
- WPA- enterprise;
- 802.1x standard.
Depending on the type of security selected, you can either configure the network security key or set and configure a network authentication method. If you select “WPA-Enterprise”, “WPA2-Enterprise”, or “802.1x” as the security type, you need to perform the following configuration (as shown in the previous figure):
- Choose a network authentication method? select Select Extensible Authentication Protocol (EAP) as the network authentication method and click the Settings button to configure the EAP type;
- Remember my credentials for this connection every time I log on (I’m logged on) - indicates that when a user logs out, his credentials are not deleted from the registry. If you uncheck the box, then the next time the user logs in, he will be prompted to enter credentials (username and password).
If you specify the use of the security type "WPA-private" or "WPA2-personal", or security without authentication (Open) or joint authentication with WEP encryption, you must configure the network security key, as shown in Figure 2. ten.
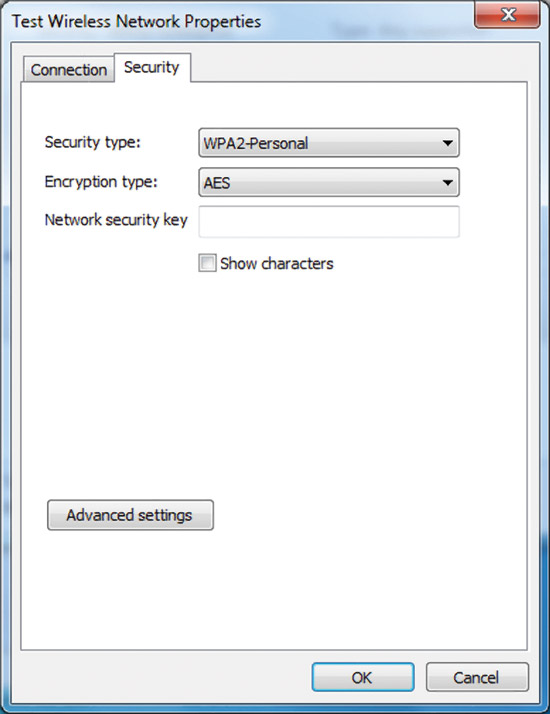
Fig. 10 An example of setting up a network security key.
If you select the security type “WPA-Enterprise”, “WPA2-Enterprise” or “WPA2-Personal”, you can also configure advanced settings. In fig. Figure 11 shows the Advanced settings dialog box for the WPA2-Enterprise security type.
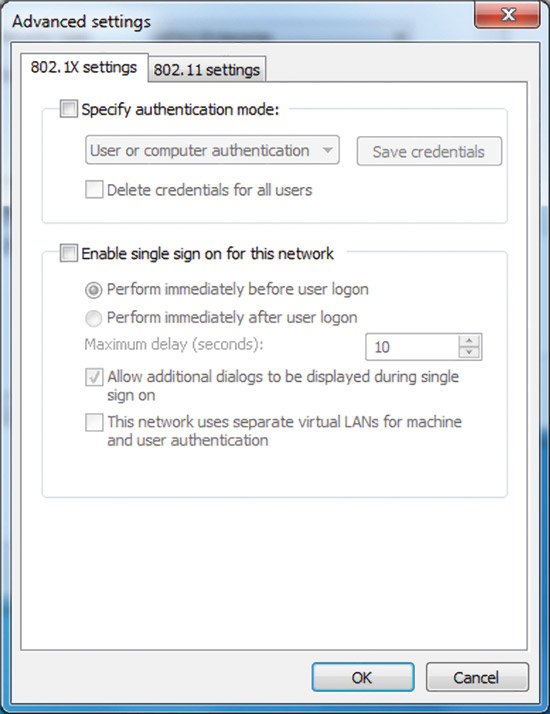
Fig. 11 Tab for configuring 802.1X.
On the 802.1X Settings tab (802.1X settings), you can specify the authentication mode (user or computer, computer, user, or anonymous user), save a set of user authentication credentials, and delete credentials all users.
Single sign-on (Single Sign-On - SSO) allows you to configure 802.1X authentication when a user logs on to the system and integrate 802.1X user login information in the Windows logon window. For more information about SSO settings, refer to the article Wireless Group Policy Settings for Windows Vista, published under the heading “The Cable Guy” in April 2007. Figure 12 shows the tab for configuring 802.11.
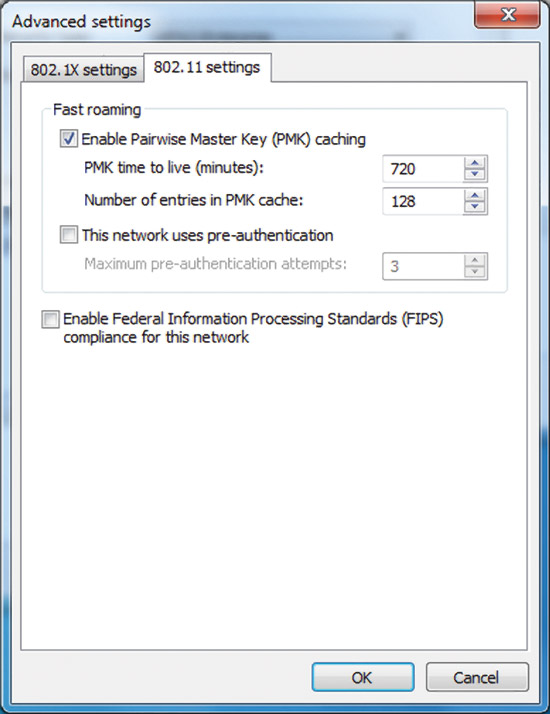
Fig. 12 802.11 Settings Tab.
In the “Quick Move” section, you can configure the pairwise master key (PMK) caching options and pre-authentication. For more information about fast move settings, refer to the article Wireless Group Policy Settings in Windows Vista, published under the heading “The Cable Guy” in April 2007.
Note: If you select the security type “WPA-Enterprise” in the Advanced Settings 802.11 dialog box, there is no “Settings” tab.
The checkbox “Enable Federal Information Processing Standards (FIPS) compliance for this network) for this network allows you to specify whether AES encryption should be performed in FIPS 140-2 authentication mode. The FIPS 140-2 standard is a state computer security standard in the United States that defines the requirements for the development and implementation of cryptographic modules. Windows 7 is FIPS 140-2 certified. When FIPS 140-2 certification verification is enabled, Windows 7 performs encryption using AES programmatically, rather than relying on a wireless network adapter. This check box appears only when you select the authentication method “WPA2-Enterprise” or “WPA2-Personal” on the Security tab.
Non-broadcast wireless networks
Non-broadcast wireless networks do not broadcast their network name, or SSID. You can configure the access point of a non-broadcast wireless network to send a signal frame with an SSID of NULL to send. Non-broadcast wireless networks are also called hidden wireless networks.
In Windows 7, wireless networks can be configured as broadcast or non-broadcast. A computer running Windows 7 will try to connect to the wireless network in the order of the preferred network, regardless of which of these two types they belong to. In addition, non-broadcast networks are the latest to appear in the list of available networks under the name Other Network. In fig. 13 is an example.
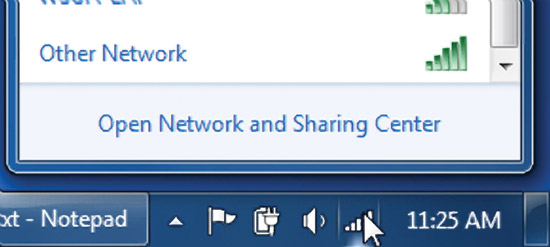
Fig. 13 Non-broadcast wireless network.
When connected to such a network, Windows 7 will prompt you for the wireless network name (SSID). In fig. 14 is an example.
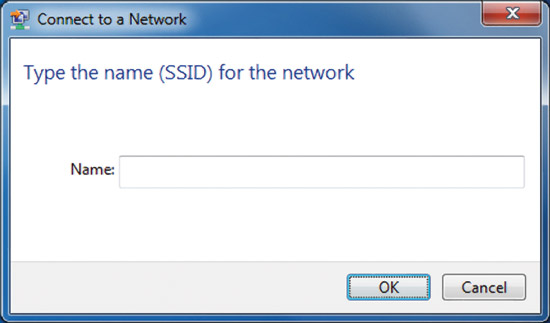
Fig. 14. Enter the name of a non-broadcast wireless network.
Joseph Davies is a lead technical writer on the Windows networking team at Microsoft. He is the author and co-author of several books published by Microsoft Press, including Windows Server 2008 Networking and Network Access Protection (NAP), Understanding IPv6, Second Edition, and Windows Server 2008 TCP / IP Protocols and Services. .