No matter how modern and powerful a computer is, you wouldn’t buy it, with time all sorts of problems will begin with it. One of these problems when the computer does not turn on. I believe that this problem is unpleasant and I would like to teach you to solve it. I'm sure if you have been using a computer for a long time, then you had such a problem when you press the power button on the system unit, but nothing happens or the light comes on, the cooler starts working, but it instantly turns off and the computer shows no signs of life. It may be an option that when you turn on the computer, it starts beeping and nothing else happens.
Today you will learn what causes such a malfunction and why the computer does not turn on. In general, we continue to expand our knowledge in computer repair.
Why the computer does not turn on?
The easiest way to determine the cause of the problem being described is to listen to the sounds of the speaker. If the computer does not work, it will squeak, that is, it will emit sound signals, which for me personally are not very pleasant. If you hear such signals, then not everything is so bad and you can find out why the computer does not turn on. But, if you do not hear any such sounds, do not be discouraged. Perhaps the squeaker itself is not connected to the motherboard.If there is a special speaker or squeaker in the system unit that came with the motherboard, and it remained to lie in the box, it must be connected. It is necessary to connect the speaker to the contacts on the motherboard. In order not to make a mess and not to connect or disconnect too much, you must read the instructions to the motherboard. There you will find the answer.
The sounds that the computer will make will depend on the BIOS manufacturer (Award, AMI, Phoenix Bios). If you don’t know what bios you have, then the instruction to the motherboard will help you again. If you throw away the instructions, then all the information can be found on the Internet. Even if the computer does not work, everything is in order with the phone. You drive in the name of your motherboard, which you can find out by examining the motherboard itself, and look for all the information you need.
But back to our topic of bios signals. The most common ones are:
- Award or Award - Phoenix BIOS
Long duplicate signals - not found or not working memory
- AMI Bios (American Megatrends, Inc)
2, 3 or 4 short beeps - a problem in the RAM
5 short signals - processor may not be working properly.
1 long, 3 short beeps - video card malfunction
- Phoenix bios
2 short beeps and 1 long beep - malfunctioning RAM.
These are the most common bios signals that you may have. In fact, they are much more. You can find out about them by reading on the Internet.
And so, we can conclude from the popularity of audio signals that there are also the most popular reasons why a computer does not turn on. These sources of problems include:
- Power Problems 220V
- Faulty power supply
- Run out of battery
- A lot of dust
- Malfunctions with components or loops
- Bad power button
- Faulty motherboard.
- Now let's talk about each problem and its solution separately.
- Problems with power in 220V.
It is also necessary to take into account the number of devices and devices that are connected through a surge protector or extension cords to one outlet. Perhaps you have heavily loaded the outlet and because of the protection of the computer does not turn on. To test this option, you need to disconnect all devices that are powered from one outlet and leave only the computer. Perhaps in this case it will work. If the network is too high or low voltage, the computer also will not turn on. Moreover, it is likely that it can burn. You can check the voltage with a special device or with an incandescent bulb, by eye. The main thing is not to confuse the lamp with energy-saving.
If the voltage goes down, then the light bulb will shine dimmer, well, and if it is higher than usual, respectively, it will burn brighter. Also, at high voltage, the bulb can light up and burn out immediately. But this test option is not particularly safe, so it is better to get a tester.
There are moments that the outlet is fully functional, but the computer still does not receive electricity. This is due to poor contact of the power cable. Disconnect the cable from the power supply and reconnect as tightly as possible.

It is foolish to remind, but still. Worth remembering the buttons next to the connector on the power supply. It must be enabled. Sometimes it’s ridiculous that everyone has already tried everything and the computer never turns on. It turns out that the button on the power supply was turned off.
But do not press any other switches. Perhaps your power supply will have an input voltage switch. It is usually red. Here you can not touch it at all !!! Its purpose is to switch the input voltage level of 127 and 220V. This is done in order to use the power supply in another country, which has a voltage of 127 V, as in the USA, for example.
Problems with the power supply.
If you are convinced that everything is in order with the power supply, then you need to start checking the next element - the power supply unit. After all, it is on him and food gets when you turn on the computer. In most cases, it is the faulty power supply that causes the "dead" computer.
The fact is that in our country, people gradually get used to saving on everything. And computer elements are no exception, especially if you look at how much they cost. People naturally prefer Chinese cheap copy of the power supply.
But such a position regarding the computer is generally unprofitable. Some users do not understand how important the power unit is in the system unit of a computer. And we are talking not only about the maximum permissible power, but also a quality manufacturer. It is very good if the power supply unit is covered with a copper basin without hooking anything. In this case, buy a new power supply, but already better and more reliable. And that's all, the problem with starting the computer will be solved. But there are cases when the power supply unit "dying" drags some elements of the system unit, or even the entire computer. In this case, you will have to buy a new computer. Agree, it’s scary to read about it! But I hope you don’t everything is bad.
To check the power supply, install a known-good element in your system unit and check whether it will work. If there is no such working power supply at hand, then we will check the performance of our part. But without a voltage tester, we can not do. Such a check will be possible only when the lights come on when the computer is turned on.
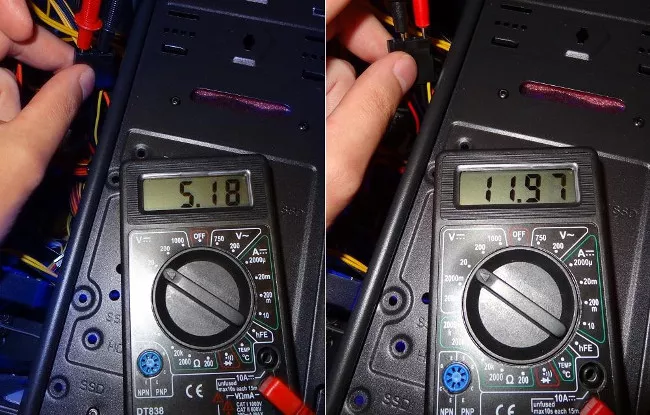
Testing with a tester is easy: we take any power connector and measure the voltage: between any black and red wires should be 5V, and between black and yellow 12V.
Some power supplies with long-term use get the effect of "sticking" the internal protection. Remove the cable and leave it for 10 minutes. After that, plug the cable back and start the computer.
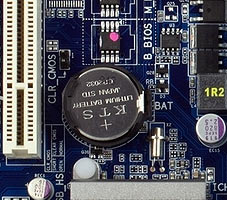
The battery charge is over.
On any motherboard there is a small 3V lithium battery. It supports volatile CMOS memory, which stores BIOS settings. On a computer that has been used for a long time, or he just lay without work for a long time, the battery will sit down and all settings will be lost. A dead battery is easy to recognize. Each time you turn on will stray time. Sometimes this causes an error at startup and the BIOS asks to enter it and re-save the settings. But there are times when, because of this dead battery, the computer does not turn on at all or turns on, but one time. Again, if you have a voltage tester, you can easily check if the battery is working. If you do not have a tester, it is better to replace the battery. It is inexpensive and sold in any computer store.
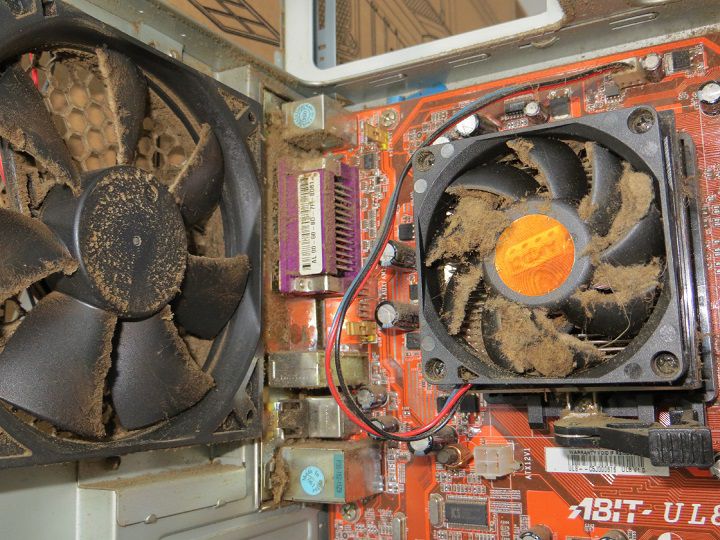
Comp dusted.
If inside the system unit there are already carpets of dust, then it is not surprising that the computer does not turn on. Do not forget that the system unit must be regularly cleaned and replaced with thermal paste on the processor. It is best to clean with a vacuum cleaner and brush.
Do not forget about the contacts of RAM and boards. They also need to be cleaned. Just before that, you need to completely disconnect the computer. Taking out the slots from the operative, using a normal float, it's an eraser, we clean the contacts. We try, they should shine. But do it very carefully. Often microscopic details are located above the contacts. They can not be touched.
To clean the contacts of the memory slots from dust, you can use a toothbrush, shaving brush or any other brush, as long as they are the right size.

At the very end, we clean the fan and check their performance. If the fan does not work, the computer can turn off immediately after turning it on. A large amount of dust in the system unit will affect computer overheating. Actually, because of this, the computer may not turn on, or it will constantly reboot.
The problem of components and loops.
If someone has reached this stage of verification, then it is worth working by the method of elimination, because you never know exactly what details of the system unit the problem lies with. We need to start checking with the details that are required to start the computer. All other elements must be disabled or completely removed from the system unit. In short, we leave the motherboard, the processor and the fan connected to it, the RAM, if there is no built-in video card, then we leave it as well. Also it is necessary to connect the keyboard. If you have only one level of the operative, then insert it into another slot. If the computer with these elements is working properly, then we begin to connect the remaining elements in turn. Next you need to connect the hard drive. With this gradual connection of elements, you can find the problem area.
Most likely that the very detail of the system unit will be intact, but the cable or cable may be non-working.
The problem with the power button.
One of the reasons why the computer does not want to work may be hiding in the launch button of the system unit. Perhaps the button does not close the contacts well. It is clear that because of this and the computer will not turn on. Check its performance is very simple. To do this, you need to inspect the motherboard and find a place where the wire from the front panel of the system unit is connected. And there you can easily find the “Power” connector. We pull out the connector itself and close the two contacts with a screwdriver. If the computer still does not turn on, go to look for the problem further.
The problem with the motherboard.
If you did everything as described above and the computer did not start, then I have bad news for you - trouble with the motherboard. Chances are good that you will have to change it to a new one, but now it’s worth it if it’s not cheap. Yes, and the motherboard wants to change to a new one. Accordingly, it is necessary to change the processor, and after it the operative. In short, the entire system unit will be upgraded. But, if you change the motherboard from the same series as you had, it must be on it:
- same processor socket (socket)
- the required number of RAM slots, and the same type (DDR, DDR2, DDR3 ...)
- interface of the existing hard disk (IDE, SATA)
- a sufficient number of expansion slots for available cards (PCI, PCE-Express)
Do not exclude the repair of the motherboard, especially if it is under warranty. But in this case, you have to sit for a long time without a computer. From my own experience I know that under warranty no one is in a hurry to fix the motherboard.
If there is no guarantee, then you should give the motherboard for repair, if the repair work does not exceed 30% of its price.
After you have carried out an independent check of the elements of the system unit and did not find the problem, you yourself have nothing to do. You can only make it worse. We'll have to call the master to the house so that he can diagnose the patient. ”
Actually, this is all. I'm sure our article helped you, and you fixed your comp. Stay with us and learn a lot.
Computer users often complain that their system unit is not included, without telling in detail about the problem. Most often it turns out that we are talking about the impossibility of booting the operating system, and not about problems with turning on the computer. When the computer does not start due to operating system or BIOS errors, you need to look for a solution to a specific problem. However, there may be situations in which the computer really does not turn on - that is, it does not even start loading or immediately stops before the software starts. The reasons for which this situation may arise are not so many, and below we consider the main ones.
The computer does not respond to the power button
In most cases, the problem, due to which the computer does not turn on, is quite banal - the lack of electricity.
First you need to make sure that the system unit (or laptop) is connected to a power source. Inspect the wire from the outlet to the computer's power supply for mechanical damage, and also verify that the connector itself does not have any physical damage.
If everything is OK with the power cable, you need to start diagnosing the outlet to which the computer is connected. Plug in another electrical appliance and make sure it is in working condition.
All modern power supplies have an on / off button on the case that interrupts the power supply if necessary. It is important to make sure that the button is in the "on" position.
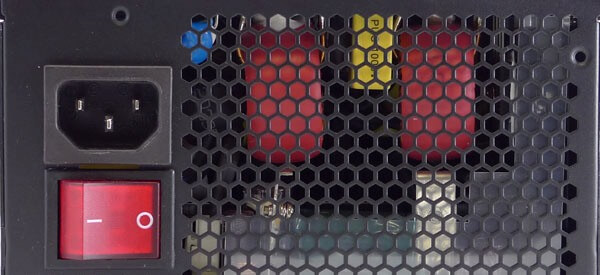
Important: On some power supplies there is also a button with a switch for various electrical networks (usually 220 Volts and 127 Volts). Such a switch is not performed in the form of a button, and to transfer it to another mode, you must use the tools. If your network has 220 volts and the switch is in the wrong mode, you must also translate it.
When and the source of electricity will be checked, you need to make sure that everything inside the computer is connected correctly. It is also important to check that otherwise the power button will not be able to perform the functions assigned to it.
Note: In many modern cases, the power button has an indication that confirms the correctness of its connection and indicates by its glow that the computer is connected to the mains, and there are no problems with this.
The computer turns on and off immediately
There is a situation when, after pressing the power button, the computer starts to turn on, but before the sound notification of checking for hardware errors (“squeaking” when turned on), it turns off. This problem occurs for the following reasons:
Please note that in some cases, the computer beeps with information about which of the elements there are problems. For example, if the CPU overheats quickly, the system unit will begin to “squeak”, and if there are problems with the video card, it may issue several long squeaks when trying to turn it on. Depending on the BIOS version, the information transmitted by the “squeaking” of the computer when it is turned on differs.
The computer turns on, but the monitor does not work
If the system unit turns on (coolers and indicators rotate in it indicate that it works), but the image is not displayed on the monitor, the first thing to do is to check the reliability of the cable connection from the screen to the system unit. You can also try switching the cable from a discrete video card to an integrated one in the central processor.
If the computer turns on, but the monitor does not work, and this problem is not related to the video card, you need to check the following:
More rarely, the computer does not turn on or the image is not displayed on the monitor due to an error when connecting a USB device. It is recommended to disconnect all USB devices from the computer when turning on.
Slow speed of work, errors in applications, periodic sudden reloads. All this fades away from the far worse problem - the inability to start the system at all. The situation when pressing the power button is not accompanied by any activity or leads to a short-term squeak of sensors, flashing of LEDs and subsequent shutdown. What to do then?
The computer does not turn on. Common Causes and Elimination
Faulty or not powerful power supply
This part of the system is traditionally considered to be one of the most vulnerable, because the majority of users during the assembly of the computer focus on the processor with a video card, and less important (in their opinion) components are taken cheaply. They do not see the difference between the power supply in 600W for $ 40 and for $ 100. That's just cheap power supplies usually do not meet the stated characteristics, being much weaker. In addition, they fail faster. If the system stops running after replacing one of the components with a more powerful version, then the reason may lie in the insufficient power of the PSU. If you suspect the unit is damaged, use a voltage tester. By connecting the black and red wires, you should get about 5V, black and yellow - about 12V. The deviation is allowed not higher than 7-8%.
Overheat
Raising the temperature of the system or its individual components to a critical level activates protective mechanisms that restart / shut down the computer. This is usually caused by one of two reasons:
- Faulty or insufficient cooling. With insufficient cooling, everything is clear - you need to replace it with a more powerful one. But the malfunction may be different. If you do not clean the system unit for a long time, an impressive layer of dust and dirt will accumulate on the fans, motherboards and radiators, which will prevent the heat from discharging. You should also change the thermal grease on the processor from time to time (if overheating is observed, and the cooling is working at full capacity with a cold radiator - this is the reason).
- Incorrect system and BIOS settings. This item applies to fans of squeezing out an additional 5-10% of performance from a computer using the so-called “overclocking”. Inexperienced users mindlessly increase the multiplier and voltage of elements, which is why they overheat. If the system refuses to boot, you can try to enter the BIOS and reset all values to standard.
Problems with the monitor or video card
Many people look at the black screen of the monitor, hear the sound of spinning coolers, but still believe that the system does not start due to software errors. And the problem may lie in the inability of the cable to hold the video signal to the monitor. The connectors can be bad or not connected there, the cable is damaged (accidentally come, bend), the video card is out of order. Not always on the monitor flashes a floating sign about the absence of a signal, and he himself can break, although this happens and not often. A simple user who does not have special equipment at his disposal is best diagnosed with the “at random” method - try connecting another cable, use the integrated video card to check, check the monitor settings (on some models, you have to manually specify the type of input signal).
Failure of the power / reset buttons
The wire may be disconnected or some contact may be damaged, which is why the switching command will not reach the motherboard. You should find a place on the board where the wire from the button is connected and carefully close the contacts, for example, with a screwdriver. If the system starts, the reason lies in the power buttons or the connecting wire.
Other
Serious problems can indicate a characteristic squeak when trying to turn on. This is a kind of “Morse code” for owners of personal computers, in which error codes are encrypted. For many manufacturers, these codes are different, so you should look for information on specific models or motherboard lines.
These were the most popular, but not the only reasons for the inability to turn on the computer. Also, the PC may not turn on due to mechanical damage to the circuits, leakage / evaporation of the electrolyte from the capacitors, malfunctions in the central nodes, and so on. With a diagnosis and repair in such situations, a simple user can not cope - you have to carry the system unit to the service center.
Have a great day!
If the life of the computer is solid, then you need to be prepared for the fact that sooner or later any component of its hardware can fail. In addition, external factors, such as power surges, static voltage, etc., can contribute to PC breakdown. Depending on the nature of the damage, the symptoms of a malfunction may appear differently. Some may clearly indicate the failure of a particular part, while others make one think about the reasons for its occurrence. In this topic, we consider possible causes and methods for detecting one of the very popular implicit computer crashes when it does not turn on from the power button.
First steps to identify possible causes
Act One. The most obvious action to find the reasons why the computer stopped turning on from the power button is to check the position of the switch on its power supply, located on the back of the system unit. In most cases, this reason is unlikely, because the PC system unit is usually installed in an enclosed space and access to its back wall is limited. Nevertheless, it must be eliminated before taking any further drastic measures.
The second action. It is necessary to check the availability of the power supply of the system unit by plugging into the outlet supplying it, another serviceable electrical appliance.
The third action. Check for good contact of the power cable with the power supply connector. To do this, disconnect the cable from the system unit and stick it in again.
note: for safety reasons, this procedure should be carried out with the power cord disconnected from the power outlet.
Test the power button on the performance
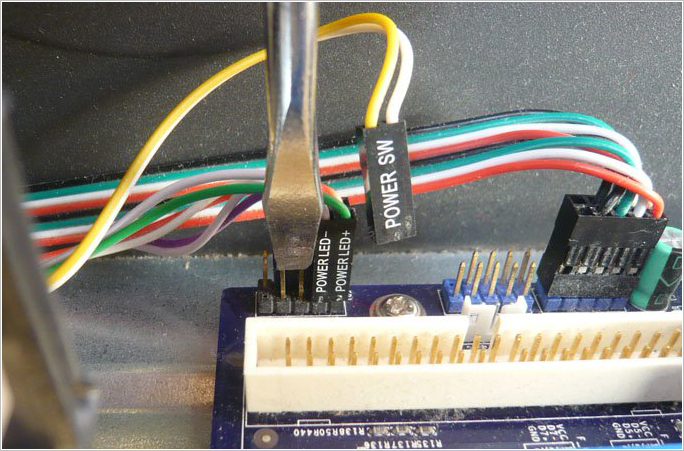
If the first steps to identify the possible causes of the results did not yield, then proceed to the health check of the power button itself. But how to check it? To do this, also turn off the power to the computer and open the system unit, unscrewing and removing its left side cover. Further down the motherboard we find a block of connectors from the front panel of the case. We are interested in the POWER SW connector. We disconnect it and with the help of a multimeter we check the operation of the button.
This is done simply by inserting the multimeter probes into the holes of the disconnected connector, and having previously set up the dialing mode on the device, press the power button on the computer. If at the moment of pressing the device makes a squeak, then the button works and the wires coming from it to the motherboard are intact.
note: in the mode of dialing, it is irrelevant to observe the pole positioning. That is, by conducting this procedure, it does not matter which probe and into which hole of the connector to insert.
If there is no such device available, then you can try to turn on the computer without the power button, using the most common household tool - a screwdriver. In this case, also disconnect the POWER SW connector and provide power to the system unit. Next, with the flat side of the screwdriver, we lock the two pins of the POWER SW connector on the motherboard itself, thereby simulating the closure of the power button contacts. If at the same time the motherboard and the computer as a whole were able to start, then the reason is precisely in the button, if the motherboard could not be turned on, then we continue to search for the causes of the malfunction.
Power supply check
The next step in identifying the possible reason why the computer does not turn on when you press the power button is to check the health of its power supply. The method described below is not 100% guarantor of checking its validity, but only allows to diagnose it superficially.
As before, we open the system unit, disconnect it beforehand, and disconnect the power supply connectors from all devices and from the motherboard. Next, take the ATX connector, it can be a 20-pin or 24-pin pin, it all depends on the model of the power supply, and we close the green and any black contact with a jumper on it.
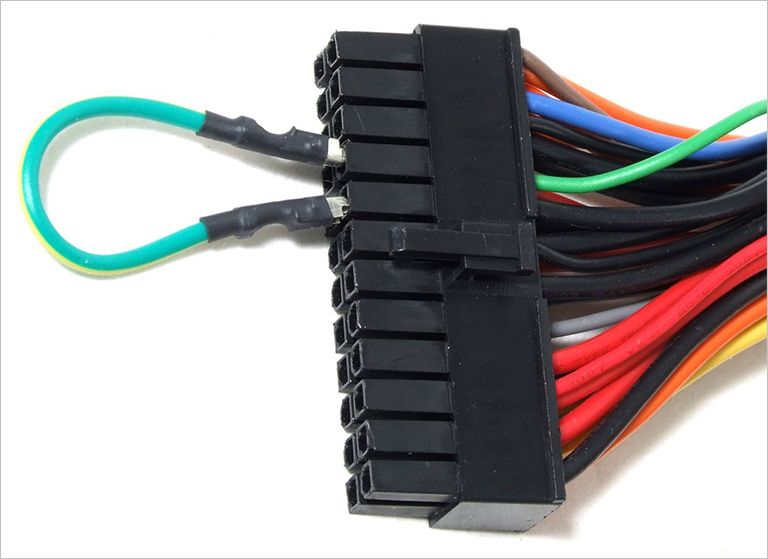
After we turn on the power supply to the network. If his fan is working, then with a greater degree of probability it can be argued that the BP is working. For a more detailed test of its health, you will need to check the output voltages - 5V and 12V.
First, let's check for the presence of 5V output voltages. At the same time on the multimeter we set the measurement mode of the direct voltage and insert the probes into the holes of the ATX - COM and 5V connector. When measuring do not forget to observe their polarity. To COM set the black probe device, to 5V red probe.
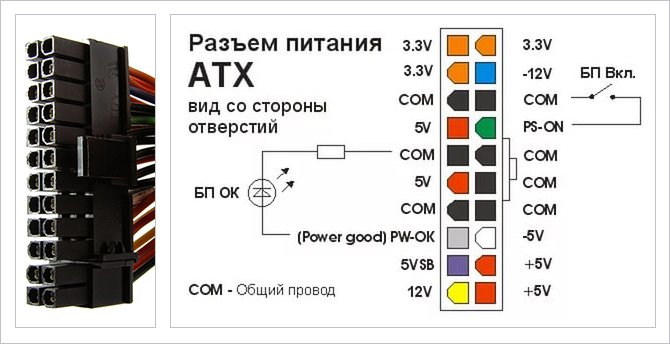
The next step is to check the presence of 5 V on the contact PS_ON. Again, take the gauges of the device and set the red probe on the contact PS_ON, black on COM.
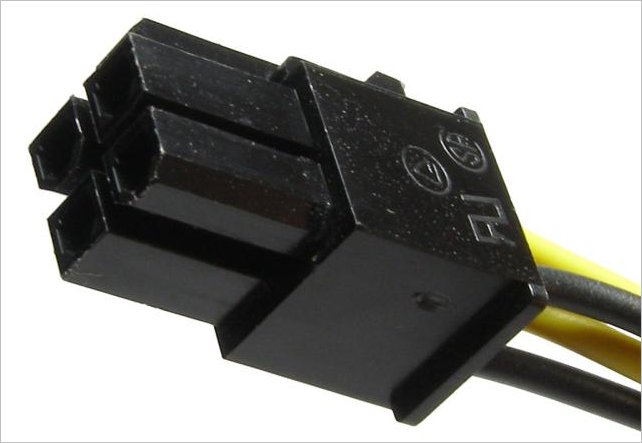
Well, by analogy, we will check if the power supply unit produces a voltage of 12V on the ATX connector and the 4-pin connector, which supplies the processor line. Again observing the polarity of the red probe, we insert the device into contact with the yellow wire, and the black one into contact with the black wire.
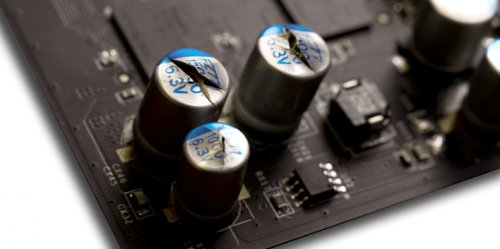
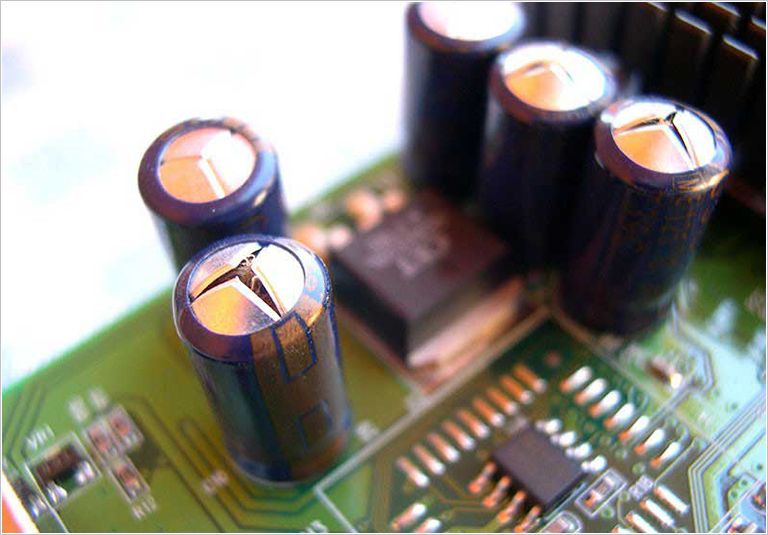
At the end of the surface diagnostics of the power supply unit, you can check whether there are no bloated capacitors on its board, which can also cause the power supply to fail, and as a result, the computer does not start from the power button. If there are any, then they should be replaced.
If all the measurements done did not reveal any irregularities in the operation of the power supply, then most likely it is in good condition. It remains only to rely on. If this does not help, you will need qualified assistance from specialists from any computer repair service centers.
If the computer does not respond to the power button, most often the cause will be associated with a breakdown of the power supply or the motherboard. How to find out why the computer does not turn on with the power button, as well as independently solve this problem, this article will be discussed.
Procedure:
- Check if there is mains voltage
- Make sure that the power cable is working and the switch on the power supply is in the ON position.
- Check the power supply for operation
- Check the motherboard for launch
Check the mains voltage
In the case when there is no multimeter at hand, the presence of voltage in the network can be checked by plugging a desk lamp into the outlet to which you connect your computer.
Cable check
You can check the cable with a multimeter. The voltage must be the same as the outlet to which you plug the cable. If you do not have a multimeter, replace the cable with a known working one. You can borrow a cable from the monitor. As a rule, they are the same.
Make sure the switch on the power supply is in the ON position.
Open the cover of your computer case and disconnect all the wires from the motherboard, hard drives, optical drives, etc.
On the power supply connector you need to close green and any the black contact.
If the power supply is connected to 220V and the wires are closed, then the fan inside the unit should start rotating. This still does not guarantee that the power supply is fully functional and will also launch successfully under load. But, if, when the contacts are closed, the fan inside the unit does not start, we can confidently say that power supply is faulty.
If the fan is still running, we will need to check something else. Open the power supply and see if there is swollen capacitors.
Often soldering swollen capacitors eliminates the problem, but not always. If you can handle a soldering iron, you can solder capacitors alone or ask someone who knows how to do it.
Motherboard check
Suppose that the power supply passed the start test by closing the contacts and no bloated capacitors were detected inside the unit. Ideally, if you have another obviously working unit at hand that you connected to the motherboard for testing, but when you press the power button, nothing happens.
This leads to the conclusion that the motherboard is faulty, but we cannot exclude the option that power button does not work.
Locate the bottom of the motherboard front panel connectorswhich are responsible for the power button and reset, as well as the indicator lights on the body. As a rule, contacts are signed:
- Power LED -power signal (LED)
- HDD LED -hard drive signal (LED)
- Power Switch -power button
- Reser Switsh -reset button
We are interested power button contactswhich, depending on the manufacturer of the board may be indicated PWR BIN, PWR SW, ON / OF, PW_ON, PWetc.
It is necessary to disconnect the wires from the contacts POWER SW and short circuitclip or jumper. This is equivalent to pressing the power button.
If the fans spin, then the problem is in the button, there may be a non-contact. But if short-circuiting the corresponding contacts, nothing happens, then your motherboard is faulty.
This diagnosis is completed and can not do without the help of a specialist. The only thing you can try to do is, but I do not remember that it would help in this situation.