Connect the network to the WAN interface, and connect the device to the computer using a network cable. The WAN LED on the chassis should
If you have difficulty connecting the router to the Internet, you should contact the technical support service of the Internet access provider, since the causes of the problems can be varied, including depending on the provider.
When owners of stationary computers have a laptop equipped with support for a wireless network, the challenge is to combine these two devices for simultaneous access to the Internet. Correctly setting router asus wl-520gc, you can solve the problem.
Hello! Today I decided to write a small article in which I will tell you what mistake is most often made when setting up routers on their own. Kaike problems appear later and how to fix it. Where do I get this information from?
Look now a little to the right, in the right column of the site. You see, there is a total number of comments that are left on this site. I do not know what number you see there now, but at the moment it is almost 9000 comments (8894, to be precise).
Almost all the comments are questions that I had to answer, advise something, give a link to the necessary article, etc. I am leading to these comments, this is a great source of unique information for both me and visitors to this site. These are unique cases, I would even say life problems :).
Also, most of these comments relate to the problems that arise during the setup and operation of routers, wireless adapters, Wi-Fi networks, etc. So I made some conclusions on these comments, and on articles that relate to this most popular by mistake.
Network without internet access
Yes, this is the most popular problem. I wrote about her in the article. By the way, the article is also no less popular :).
Why does this problem arise and why is it the most popular?
It usually occurs because of the exact fact that when you configure the router incorrectly specify the parameters provided by the provider.
Also, pay attention to the MAC address binding. If the provider does it, then do not forget to clone the MAC address in the settings of the router. Just clone from the computer to which the Internet was attached.
And yet, in the properties Wireless network connection, or LAN connection at Internet Protocol Version 4 (TCP / IPv4) need to set receive IP and DNS automatically.
This is the most common mistake and its solution.
And one more important point.
If you have a provider for whom a special connection was created on the computer before installing the router, and after installing the router the Internet works only on one computer, or it works while this computer is turned on, then something needs to be clarified.
You see, the router itself should establish a connection to the Internet, not a computer. On the computer, you need to delete the connection created earlier. And in the properties of the network adapter set to receive IP and DNS automatically.
We specify all the parameters that the provider provides only in the settings of the router. Connection on the computer, in the presence of a router - is not necessary.
I also wrote an article on this issue,.
Afterword
I don’t know how useful this article was for you, but I hope that I didn’t waste my time.
Before setting up the router, the main thing is to understand how it works and specify the correct settings that the provider gave you when connecting to the Internet. If you do not know which parameters to specify and what to choose, then just call the provider and ask.
Questions as always ask in the comments, we will understand. Good luck!
Here are two types of common errors: those that allow you to configure connections via modem, as well as those related to configuring a wireless network. In general, if everything is done correctly, but the Internet through the router still does not work - try to read how to properly configure the WiFi router.
The above information, however, cannot be considered exhaustive: the situations are different, and each will have to be dealt with separately.
Suppose there is an ADSL modem with one LAN connector, and there is a standard office router. These devices can be switched on in “cascade” (modem's LAN port — connected to the router's WAN port).
Connection diagram of the router and modem
If the Internet via a modem worked well without a router, then nothing needs to be configured in the modem. Most likely, the device is already operating in the “router” mode (that is, it has a built-in DHCP server). Consider how in this case to configure the second link (namely, a hardware Wi-Fi router).
Setting up a router for collaboration with a modem
Changing the local addresses of the router
First, a Wi-Fi router - no need to connect to an ADSL modem. Instead, you need to know in which mode the modem is working now. You do not need to enter the web interface of this device (just check the option to configure the network card of the PC connected to the modem).
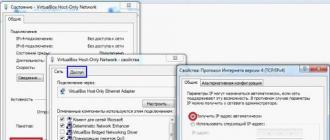
Most likely, the following will turn out to be: the network card of the computer is configured in the mode of automatic obtaining DNS and IP. An example is shown in the picture:
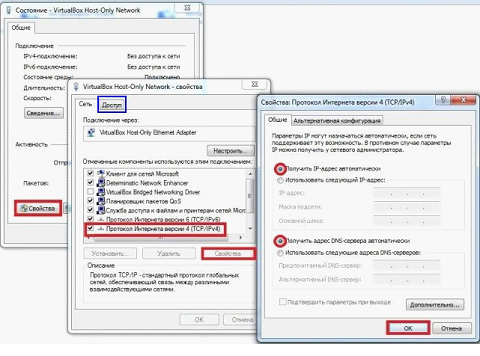
Setting up a PC network card
If so, switch to the Access tab. We are only interested in one line: “The main gateway”. Write the address of the main gateway on the list.
And now, before setting up the router, compare the recorded address with the address of the router configuration interface. Most often, they are the same. That - is unacceptable (at least for the "cascade" connection).
It is important to know that the router cannot work if the addresses on the network to which it is connected via the WAN port are in the address range of the internal network.
To fix the situation is quite simple. Without connecting the router to the modem, go to the interface settings of the first of these devices. The starting address of the local network is changed to something else:
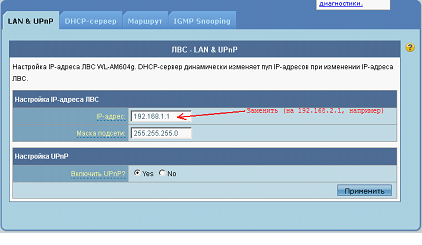
Setting up ASUS router
It is necessary to change any of the numbers, except the most recent. Here is an example of the same setup for D-Link routers:
Configuring the router D-Link
After configuring the router and saving the changes, turn off its power. And then - make a wired connection "cascade".
Configuring the WAN port in the router
If, after doing the above, the “wired” clients of the router do not receive the Internet, correctly configure the WANport (Internet connection in the router). You need to create a DHCP connection (auto-IP, IPoE):
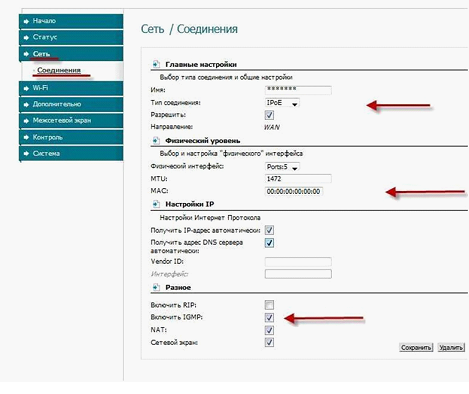
WAN configuration example in D-Link routers
We will understand what all these checkboxes mean:
- “Allow” connection is needed to enable the WAN port
- The connection is configured in the same way as a PC network card (“Get automatically” DNS and IP)
- "IGMP" we have included, in order to the local network - go IPTV streams
- "NAT" should be disabled in a limited number of cases (leave it on)
- “Firewall” in D-Link routers - usually also needs to be turned on (even then, in order to do port forwarding, this is the feature of the “proprietary” interface)
Additionally, let's say that in the modern D-Link interface, “Firewall” is something more than “Firewall” (the first includes the second, and many more).
We wish you a successful setup.
Wireless network problems and solutions
The main parameters of Wi-Fi
Usually, when setting up a wireless network, the router recommends setting the “N-Only” mode of the 802.11 protocol. We recommend to start with the standard “B / G / N” mode (i.e., mixed). But this may not be enough.
How to properly configure the router so that its Wi-Fi network is determined by any device? In addition to the regime, there is another trick. It refers to the choice of radio channel.
Most routers support working with 13 channels, some models - from the 14th. By setting the router to “auto-select” the numbers, we get the following: the device itself sets the channel number (the least noisy). The problem is that some subscriber devices initially work with a smaller number of channels (for example, with the 11th). Solve this problem by limiting the set of choices in the router itself.
To perform the latter, in the Wi-Fi network settings - change the region to “United States”:
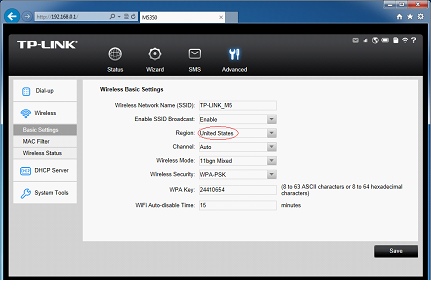
TP-Link router setup example
After that, the list of channels available to the router is “narrowed” to 11. Do not forget to save the settings.
Select encryption mode
By default, one of the settings can be made in the router: either, there is no encryption, or the WPA / WPA2 mode is used. The latter is not suitable for subscriber devices running Windows (and Android, as it turned out, too).
It is better to use one of the following modes: WPA or WPA2. The standard names of the first: WPA-personal, WPA-PSK. WPA2 encryption is more modern, but not supported in Windows XP below SP3.
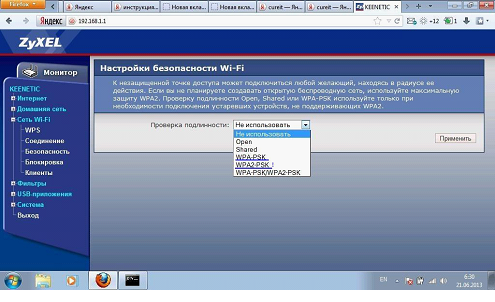
Setting up encryption in ZyXEL routers
Summarize what is said in this chapter. Going to the security settings of the wireless network, you must choose one of three:
- WPA2-PSK (recommended)
- WPA-PSK (if not all subscribers support WPA2)
- It is possible to start with “not using” encryption
Wi-Fi network protection is very important. Do not neglect this opportunity.
How to configure the Wi-Fi network in ASUS routers - shown here:
With the spread of broadband Internet access, wireless routers are becoming increasingly popular among home users, allowing them to organize Internet access in an apartment that is divided into several computers. In addition, given the capabilities of routers in the organization of wireless communication channels, their use eliminates the need to lay network cables throughout the apartment. Today we offer a variety of different models of wireless routers for home use. But how to make the right choice? Which router to prefer and, most importantly, how to configure it correctly? In this article we will look at the main features of modern routers and give step-by-step instructions on how to configure them.
Modern home computer is unthinkable without an Internet connection. Analog modems are irrevocably a thing of the past, and they have been replaced by high-speed Internet access technologies, and the tariffs for organizing unlimited access have become comparable to the monthly phone charge. Therefore, it is quite natural that after buying a home computer, users think about organizing access to the Internet.
When connecting to the Internet one home computer does not cause problems. This is, of course, a non-trivial task for novice users, since you need to create a new network connection and make the necessary settings for it, but if you're lucky, all this will be done by engineers who will connect the computer to the Internet.
However, over time, you may have a second computer, laptop, or PDA with a wireless adapter. Of course, you want to connect to the Internet and all these devices. To do this, you will already have to use a router that will act as a gateway between your local network in the apartment and the external Internet network.
Naturally, the question arises about the choice of the router and its functionality.
Immediately, we note that all modern routers, targeted at home users, combine many network devices and a router - only one of them, although the main thing. That is why some manufacturers, seeking to emphasize the orientation of their devices to home users, as well as their multifunctionality, for marketing reasons, call them home Internet centers. True, it only confuses the classification of such devices, the generally accepted name of them is broadband wireless routers.
Until recently, routers for home users did not have an integrated wireless access point. Now these devices are already obsolete and should not be guided by them.
Wireless Router Functionality
So, a modern broadband wireless router is a multifunctional device that combines:
- router;
- fast Ethernet switch (10/100 Mbps);
- wireless access point;
- firewall;
- NAT device.
The main task assigned to wireless routers is the unification of all computers in a home network into a single local network with the ability to exchange data between them and the organization of a high-speed, secure Internet connection to all home computers (Fig. 1).
Fig. 1. Using a wireless router to connect
home computers to the Internet
Currently, the most popular methods are connecting to the Internet via a telephone line using an ADSL modem and using a dedicated Ethernet line. Based on this, all wireless routers can be divided into two types:
- for connection via a dedicated Ethernet line;
- for dial-up connection.
In the latter case, the ADSL modem is also built into the router.
According to statistics, a method of connecting via a dedicated Ethernet line is becoming increasingly popular with providers. At the same time, the routers designed for this purpose can also be used to connect to the Internet via a telephone line, but for this you will have to purchase an additional ADSL modem.
In the future, we will consider only routers designed to connect to the Internet via a dedicated Ethernet line.
So, routers are network devices that are installed on the border of the internal local home network and the Internet, and therefore act as a network gateway. From a constructive point of view, routers should have at least two ports, one of which is connected to a local network (this port is called an internal LAN port), and the second is an external network, that is, the Internet (this port is called an external WAN port). Home routers have one WAN port and four internal LAN ports, which are combined into a switch (Figure 2). Both the WAN and LAN ports have a 10 / 100Base-TX interface, and you can connect a network Ethernet cable to them.
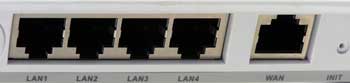
Fig. 2. LAN and WAN ports of the router
A wireless access point integrated into the router allows you to organize a wireless network segment, which for the router belongs to an internal network. In this sense, computers connected to the router wirelessly are no different from those connected to the LAN port.
The task of the firewall integrated into the router is to ensure the security of the internal network. To do this, firewalls must be able to mask the protected network, block known types of hacker attacks and information leaks from the internal network, monitor applications that gain access to the external network.
In order to implement these functions, firewalls analyze all traffic between the external and internal networks for their compliance with certain established criteria or rules that determine the conditions for the passage of traffic from one network to another. If the traffic meets the specified criteria, the firewall passes it through itself. Otherwise, that is, if the established criteria are not met, the traffic is blocked. Firewalls filter both incoming and outgoing traffic, as well as allow you to control access to specific network resources or applications.
According to their purpose, firewalls resemble the checkpoint of the protected object, where they check all the documents entering the territory of the object and all who leave it. If the pass is in order - access to the territory is allowed. Firewalls act in a similar way, only in the role of people passing through the checkpoint, are network packets, and the omission is that the headers of these packets correspond to a given set of rules.
All modern routers with built-in firewalls are NAT devices, that is, they support Network Address Translation (NAT). This protocol is not part of the firewall, but contributes to improving network security. Its main task is to solve the problem of the shortage of IP addresses, which is becoming increasingly important as the number of computers grows.
NAT defines how network address translation takes place. A NAT device translates IP addresses reserved for private use on local area networks into public IP addresses. The private IP addresses include the following IP ranges: 10.0.0.0-10.255.255.255, 172.16.0.0-172.31.255.255, 192.168.0.0-192.168.255.255. Private IP addresses cannot be used in the global network, so they can be freely used only for internal purposes.
In addition to the listed functionality, some models of wireless routers have a number of additional ones. For example, they can be equipped with USB 2.0 ports to which external devices can be connected with the possibility of organizing shared network access to them. So, when you connect printers to the USB router over USB 2.0, we also get a print server, and when you connect an external hard disk drive, you get a network storage device like NAS (Network Attached Storage). In addition, in the latter case, the software used in the routers allows you to even organize an FTP server.
There are models of routers that have not only USB ports, but also an embedded hard disk, and therefore can be used for network storage, as FTP servers for access both from the outside and the internal network, and even function as multimedia centers.
Router Setup
Despite the seeming similarity of functionality of broadband wireless routers, there are significant differences between them, which ultimately determine whether a particular router is suitable for your purposes or not. The fact is that different Internet providers use different types of Internet connection. If we are talking about connecting one computer (without using a router), then there are no problems, since user operating systems (for example, Windows XP / Vista) contain software tools that support all types of connections used by providers. If a router is used to connect your home network to the Internet, it is necessary that it fully support the type of connection used by the provider (we will look at the connection types in the section on configuring the WAN interface).
Almost all routers oriented to home users have built-in quick setup tools (setup wizard) or tools for auto-tuning — for example, Quick Setup, Smart Setup, NetFriend, etc. However, you should keep in mind that there can always be a provider that does not will support the auto-configure feature of a specific router. In addition, the presence of such functions does not mean that by pressing one “magic” button you immediately cope with all the problems and configure your router. After all, even in order to get to this "magic" button, you will have to perform some settings of the network interface in the computer.
For the reasons outlined above, we will not rely on the ability to automatically configure the router and consider the most universal way to manually configure it.
It is advisable to configure the router in the following sequence:
- Accessing the web-based interface of the router.
- Configure the LAN interface and the built-in DHCP server.
- Configuring the WAN interface with the organization of the Internet connection for all computers on the local network.
- Wireless setup (if there are wireless clients).
- Firewall configuration.
- Configure the NAT protocol (if required).
The first step in configuring the router is getting network access to its settings through a web interface (a web server is built into all routers).
Let's take a closer look at the steps of setting up a LAN interface and an integrated DHCP server, as well as setting up a WAN interface. We are not going to talk about setting up a wireless network, firewall, and the NAT protocol in this article — separate publications will be devoted to these issues.
Accessing the web-based interface of the router
To access the web-based interface of the router, you need to connect a computer (laptop) to the LAN port. The first thing you need to find out is the IP address of the router's LAN port, the default login and password. Any router, being a network device, has its own network address (IP address). In order to find out the router's LAN port IP address and password, you will have to scroll through the user manual. If the router has not been operated before, then its settings are the same as the default (factory) settings. In most cases, the IP address of the router's LAN port is 192.168.1.254 or 192.168.1.1 with a subnet mask of 255.255.255.0, and the password and login is admin. If the router has already been used and the default settings have been changed, but you do not know the LAN port IP address, login or password, then the first thing to do is to reset all settings (return to factory settings). To do this, all routers have a special in-depth reset button (Reset). If you press it (with the router power on) and hold it for a few seconds, the router will reboot and restore its factory settings.
In addition to the ability to quickly return to factory settings, most routers have a built-in DHCP server activated by default. This allows you to easily connect to the router, because the computer connected to the router's LAN port will automatically be assigned the IP address of the same subnet to which the router's LAN port belongs, and the default IP address of the gateway will be IP address. address of the LAN port of the router. But in order to take advantage of this opportunity, you need to make sure that the properties of the computer’s network connection used to connect to the LAN port of the router have the Obtain IP address automatically function set. It is activated by default for all network interfaces, and if after installing the operating system the network connections on the computer are not specifically configured, then most likely you will be able to access the settings of the router immediately after connecting to its LAN port of the computer.
Attention! If your computer has already been connected to the Internet, then most likely the network connection settings are used, which are different from the default settings. Before you change anything, write down all the settings.
If you cannot connect to the router in such a simple way, you will have to pre-configure the network interface of the computer connected to the router. The point of the configuration is to ensure that the network interface of the computer that connects to the router's LAN port and the router's LAN port have IP addresses belonging to the same subnet. Suppose the router's LAN port has an IP address of 192.168.1.1. Then the network interface of the connected computer must be assigned a static IP address 192.168.1.x (for example, 192.168.1.100) with a subnet mask of 255.255.255.0. In addition, as the IP address of the default gateway, you must specify the IP address of the router's LAN port (in our case, 192.168.1.1).
Naturally, the configuration of the computer network interface depends on the operating system used. We will show how to make a similar configuration using the example of the most popular Microsoft Windows XP SP2 operating system (English version) and Microsoft Windows Vista operating system (Russian version).
Setting up a PC network interface with Microsoft Windows XP SP2
If you are using Microsoft Windows XP SP2, to assign a static IP address to the computer’s network interface, click My Network Places (Network Neighborhood) Right-click and in the context menu that opens, select Properties (Properties). In the window that opens Network connection (Network connections) select icon Local Area Connection (Local Area Network) and, by right-clicking on it, go again to Properties. After that, a window should open Local Area Connection Properties (Properties of the network connection), allowing you to configure the network adapter (Fig. 3).
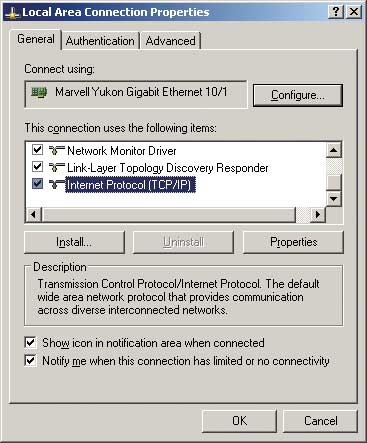
Fig. 3. Local Area Connection Properties dialog box
Tab General highlight the protocol Internet Protocol (TCP / IP) and press the button Properties. A window will open, allowing you to set the default IP address of the computer, the subnet mask and the gateway. Check the box in this dialog box. Use the following IP address: and enter the IP address and subnet mask into the corresponding text fields (Fig. 4).
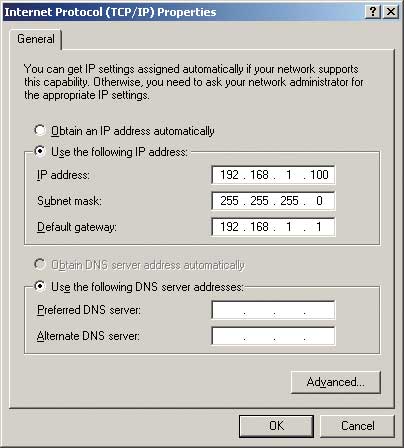
Fig. 4. Setting a static IP address, subnet mask
and gateway IP addresses
After the configuration of the computer’s network interface is complete, you can access the settings of the router itself. To do this, in the address field of a web browser, enter the IP address of the access point (192.168.1.1). If everything is done correctly, the access point (router) settings dialog box will open. You may need to enter your username and password (they are in the documentation).
Setting up a PC network interface with Microsoft Windows Vista
If you are using Microsoft Windows Vista, to assign a static IP address to the computer’s network interface, click Network Right-click and in the context menu that appears, select Properties. In the window that opens Network connections Network connections (Fig. 5), which displays all network adapters installed on the computer.
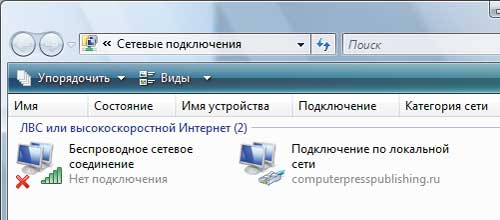
Fig. 5. The Network Connections window with a list of network adapters
In this window, select the network adapter (if there are several) with which the computer is connected to the LAN port of the router, right-click on it and select the item in the context menu that opens Properties (Fig. 6).
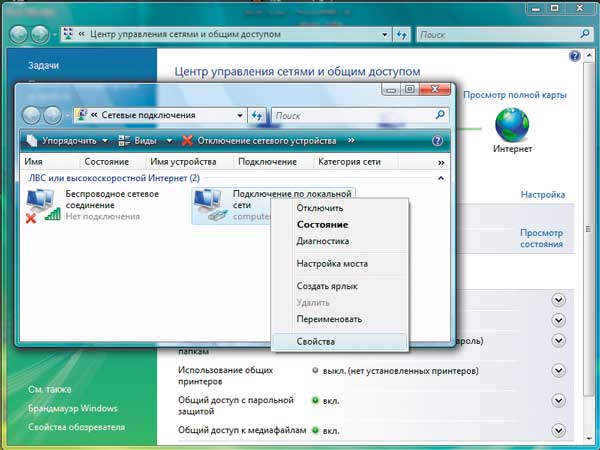
Fig. 6. Select the network adapter connected to the router
and click on it with the right mouse button
In the opened properties window of the selected network adapter (Fig. 7) in the tab Network need to highlight the item Internet Protocol Version 4 (TCP / IPv4) and push the button Properties. Next, a window opens allowing you to set the IP address of the computer, the subnet mask and the IP address of the default gateway. Check this box Use the following IP address: and enter the IP address, subnet mask and gateway IP address into the corresponding text fields (Fig. 8).
![]()
Fig. 7. Network adapter properties window
Fig. 8. Setting a static IP address, subnet mask
and gateway IP addresses
After the computer’s network interface has been configured, in the Network Management Center You can make additional settings for the newly created local network. Initially, this network is given the name default (Private Network) - fig. 9.
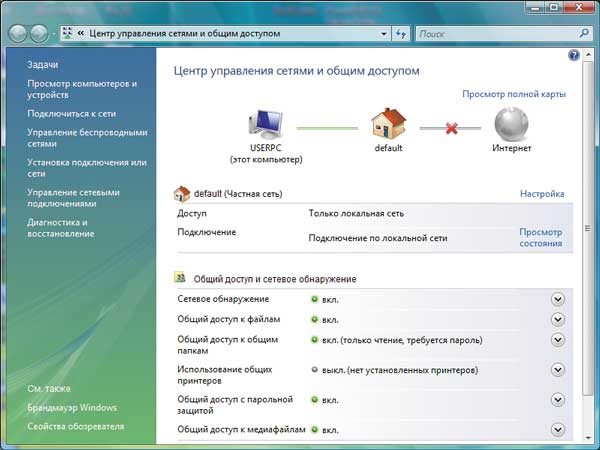
Fig. 9. Displaying properties of a newly created local network
If you select a link Customization opposite the name of the local network then in the window Network Location Setup (Fig. 10) you can specify the name of the created network connection (for example, home network), select the icon for this connection and the type of network location ( Public or Private). In the case of a home network, it is better to set the type of placement. Privatebecause it will allow your computer to detect other computers and devices on the local network and make it possible for them to detect your computer.
Fig. 10. Setting properties of the created network connection
After the network properties are set, in the Network Management Center You can view the complete network map by clicking on the link. View full map. Since in our case only one computer is connected to the router (gateway) and the Internet connection is not yet configured, the network map will look like the one shown in Figure. 11. If on this map you hover the mouse pointer over the icon with the image of a computer or a gateway, the pop-up prompt displays the IP and MAC addresses of the network adapter or LAN port of the router, respectively.
![]()
Fig. 11. Diagram of the created network
After setting up the connection of the computer to the LAN port of the router, you can access its settings. This is done in the same way as in the case of the Microsoft Windows XP SP2 operating system: the IP address of the access point (192.168.1.1) is entered in the address field of the web browser.
Configuring the LAN interface and built-in DHCP server
The first thing we recommend to do after gaining access to the settings of the router is to configure its LAN interface. It is considered good tone when connecting to the router of a new computer (both via wired and wireless interfaces) its network interface is configured automatically. To do this, you need to configure the DHCP server built into the router and set the default gateway IP address used for the connected PCs.
In addition, when configuring the LAN interface, you can change the default IP address and subnet mask of the router's LAN port. However, it makes sense to change these settings of the router only when there are good reasons for that. In most cases, changing the IP address and subnet mask of the LAN port of the router is not required, which means that the configuration of the LAN interface consists only in setting up the DHCP server and setting the IP address and subnet mask of the default gateway if it is not set automatically, which will be used for computers connected to the router.
The router's LAN interface is configured in the IP config section. Its name may be different, so you just need to find the section in which you configure the network interfaces (WAN and LAN) of the router. As a rule, there is a subsection in this section that allows you to configure the settings of the DHCP server (in our example, it is called the DHCP Server).
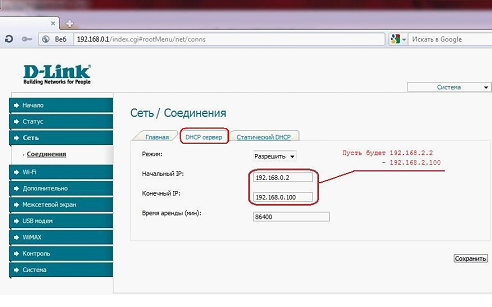
The DHCP server is configured in the following order:
- Allow the use of a DHCP server for computers connected to the router.
- Specify a pool of reserved IP addresses for allocation.
- Set the time interval during which the dynamic IP address assigned to the computer does not change.
- Specify the IP address of the default gateway that computers connected to the router will use.
- Assign IP addresses to DNS and WINS servers.
Different router models can have a different range of IP addresses reserved for a DHCP server. But do not think that the more it is, the better. It is unlikely that you will ever need to connect more than ten computers to a router at home, so for home routers, the range of IP addresses reserved for a DHCP server is completely uncritical. In any case, it includes more than 30 addresses, which is quite enough. If we are talking about using a router in the office, then it is desirable that this range be 253 IP addresses (no more within the same subnet, since one IP address is reserved by the router itself). For example, it can be addresses from 192.168.1.2 to 192.168.1.254. Naturally, all the IP addresses reserved for the DHCP server will belong to the same subnet as the LAN port of the router. And if you change the IP address of the router's LAN port, the pool reserved for allocating IP addresses will also change - thus, the router's LAN port IP address and all reserved addresses will always be on the same subnet.
Using a DHCP server on a router does not mean that computers connected to the router cannot set static addresses and configure the network interface manually. Just in this case, the address assigned to the network interface of the computer connected to the router will not be used by the DHCP server for dynamic allocation.
After allowing the use of a DHCP server on the router (usually this option is activated by default), all that remains is to set the IP address of the default gateway (Default Gateway), which you need to set the IP address of the router's LAN port (in our example, 192.168.1.1 ). Changing the remaining settings does not make sense.
An example of setting up a DHCP server is shown in Fig. 12 (ASUS WL-566gM wireless router is used as an example). After making all the changes, you must restart the router (otherwise, the changes will not take effect). Different buttons are used for this in different router models - for example, Finish or Apply and Restart, etc.
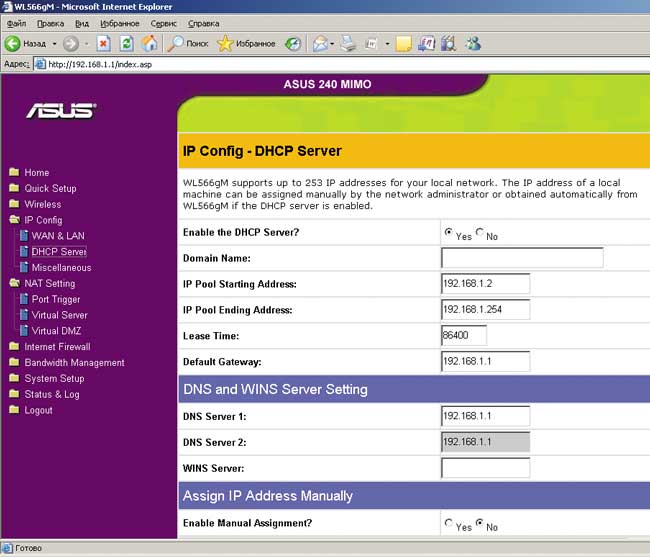
Fig. 12. Setting up a DHCP server in the ASUS WL-566gM router
After configuring the LAN interface and DHCP server in the router, you can return to the network interface settings of the computer connected to the router.
In the properties window of the network adapter that allows you to set the IP address of the computer, the subnet mask and the IP address of the default gateway, check the box Get an IP address automatically (Fig. 13). This example uses the operating system Windows Vista. For the Windows XP SP2 operating system, the settings are made in the same way.
Fig. 13. Configuring the network adapter for automatic
getting the IP address from the router's DHCP server
(when using Windows Vista)
When the changes take effect, the computer will briefly lose contact with the router, but then it will be restored and the settings of the router will become available again.
Naturally, the question arises: why did we spend so much time setting up a DHCP server on the router if we already had access to the settings of the router? The fact is that in order to gain access to the router, we had to configure the network interface of the connected computer. If there is only one computer, then it is possible not to configure a DHCP server, but if there are two or more computers, then to connect them to a local network based on the router you will have to perform a similar configuration of the network interfaces of all computers and not get confused in the IP addresses in order to do not assign multiple computers the same network address. It is much easier to once set up a DHCP server on the router, and on all computers connected to it, activate the function of automatically obtaining an IP address (it is activated by default). Then all computers connected to the router will be automatically assigned IP addresses. In addition, if you later have to reinstall the operating system on any computer, you will not need to remember all the settings of the network controller, since they will be made automatically when connected to the router.
In conclusion, we note that the DHCP server function extends to computers that connect to the LAN ports not only by means of network cables, but also via a wireless interface, that is, through a wireless access point integrated in the router.
WAN interface setup
The next step in configuring the router is to configure the WAN interface, which will provide access to the Internet. There are quite a few options for configuring the WAN interface, and in each case it is determined by the type of connection that the ISP uses. Consider all the popular connection types used by providers.
In Moscow, there are more than 300 home network providers involved in connecting end users to the Internet. Sometimes in one house Internet connection services can be provided by up to ten providers. Much to our regret, the settings they use on the websites of home networks are not indicated. Therefore, when choosing a provider (if there are several of them in your area), you should call the technical support service and find out about all the connection details.
In general, the choice of provider is not a trivial task. In this case, it is necessary to take into account not only tariffs, but also such factors as the quality of the communication channel, the type of communication, the availability of home network resources and much more. For example, in Moscow providers of home networks still work, in the contract which stipulates that the user is prohibited to use a router to connect several home computers to the Internet. Well, what do you say, how will he know? Elementary! The fact is that any router is also a NAT device, therefore, having analyzed network packets (and the structure of packets sent by a NAT device differs from packets sent by a regular network controller), the provider can easily determine whether you are using a router or not. As a rule, on the sites of such providers you can find a quote for connecting a second computer to the Internet. What can I say? It is better not to have business with such providers.
Another circumstance that must be taken into account when choosing a provider is the provision of access to the home network resources. It is made free of charge (which is important if you do not have an unlimited tariff) and at the full speed of the network interface (100 Mbps). House networks contain collections of films and music, game servers and servers with various software, file-sharing networks between users of the home network. In addition, many home networks combine their local resources, providing users with even more opportunities. Therefore, to neglect such an opportunity as the use of local resources of the home network, in any case should not be.
I would also like to draw the attention of readers to the fact that some unscrupulous providers are engaged in the banal deception of users. For example, instead of the promised 4 Mbit / s bandwidth, they can actually limit traffic to 2 Mbit / s. Often, the promised bandwidth is realized only in one direction - from the provider to the user, and traffic in the opposite direction is reduced.
However, there are many more examples of how providers "throw" users. Fortunately, there are many forums where all this is discussed. But back to the main topic of this article.
So, if we talk about the basic types of connection, we can note the following:
- allocation of a dynamic IP address;
- allocating a static IP address (usually with a MAC address binding);
- internet connection using PPPoE;
- internet connection using PPTP;
- internet connection using L2TP protocol.
Consider each of the connection types in more detail.
Allocation of a dynamic IP address
The easiest, from the user's point of view, way to connect to the Internet when using one computer is to allocate a dynamic IP address to the user. However, if you have a router, the connection procedure is somewhat more complicated.
When only one computer is connected to the Internet without using a router, the configuration of the computer’s network interface is not required, as with the default network controller settings, the computer immediately gains access to the Internet. Recall that by default the network interface is configured to automatically obtain an IP address, subnet mask, gateway IP address, DNS and WINS server IP addresses. In this case, the WAN port of the router is configured automatically using the provider's DHCP server. However, in some cases it may be necessary to manually set the IP addresses of the DNS server and gateway (although this is rare).
If you use a router to connect to the Internet, its WAN port is configured in the same way as the network controller of a computer that connects to the Internet without using a router. That is, you need to specify the Dynamic IP connection method in the settings of the router's WAN interface (all routers support this type of connection). The problem, however, is that most routers, unlike PC network controllers, cannot automatically obtain the IP addresses of the default gateway and DNS servers (primary and secondary). Therefore, these addresses are likely to have to register manually. An example of such a setting in the Gigabyte GN-B49G router is shown in Fig. 14.
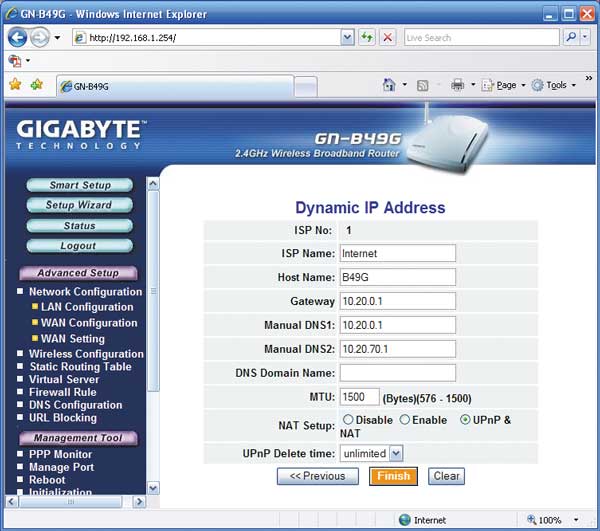
Fig. 14. Configuring the WAN interface of the router using connection type
with a dynamic IP address
Naturally, the question arises: where to get these same IP addresses of the gateway and DNS servers? Indeed, in the case of dynamic settings, providers are oriented towards connecting to the Internet using just one computer, which is able to receive all settings automatically. But most routers cannot automatically receive settings. In order to find out the IP addresses of the default gateway and DNS servers, you must first configure the Internet connection for one PC (without using a router). Next, you need to run the console command ipconfig / all. To do this, run the command console on the computer (in the Run (Run) type cmd) and type ipconfig / all. This command will display a list of all network controllers installed on the computer (if there are several of them) with their settings (network addresses) and MAC addresses (Fig. 15). In the same window, you can find the IP addresses of the gateway (Default Gateway) and the DNS server. It remains only to write these addresses, then to use them when setting up the router.
Fig. 15. Finding out the network settings of the controller
After all necessary IP addresses are registered in the router, all computers connected to the router via LAN ports and wirelessly will get access to the Internet. Moreover, the Internet connection is activated immediately after turning on the computer (if only the router was turned on). Note that if your provider, in addition to accessing the Internet, provides a connection to the home network resources, there are no problems with the simultaneous use of the Internet and home network resources (we will discuss these problems later).
Another problem associated with the use of a dynamic IP address is that very often this type of connection is combined with a MAC address binding. The MAC address is a unique identifier for a network device. There are no two identical MAC addresses - no matter what type of network equipment in question. Binding by MAC address means that the provider controls the MAC addresses of the network controllers of the computers from which you are connected to the Internet, that is, the MAC address filter is configured on the provider side. If, for example, the original Internet connection was configured on one computer and mapped to a MAC address, then trying to access the Internet from another computer (for example, you bought a new PC) is not successful. The problem, of course, is solved, but for this you need to inform the provider the MAC address of the new computer.
In the case of connecting several computers to the Internet using a router, the binding must be made to the MAC address of the router's WAN port. In principle, you can call the provider and ask for the new MAC address, but you can do it easier. Virtually all modern routers have a feature such as MAC address spoofing. That is, the WAN port can be assigned any MAC address. If the router is already established after setting up the Internet connection using a single computer, it is sufficient to assign the MAC address of the network controller used in the computer to configure the Internet connection to the WAN port of the router.
The MAC address of the network controller can be found out in the same window, where the IP addresses of the default gateway and the DNS server are specified (see Figure 15).
After opening the web-based interface of the router, you need to assign a new MAC address to the WAN port. Note that this function can be implemented in the router not in the settings section (IP config) of the LAN and WAN interfaces of the router, but in some other one. For example, in Gigabyte wireless routers, this function is located in the Change WAN MAC section (Fig. 16).
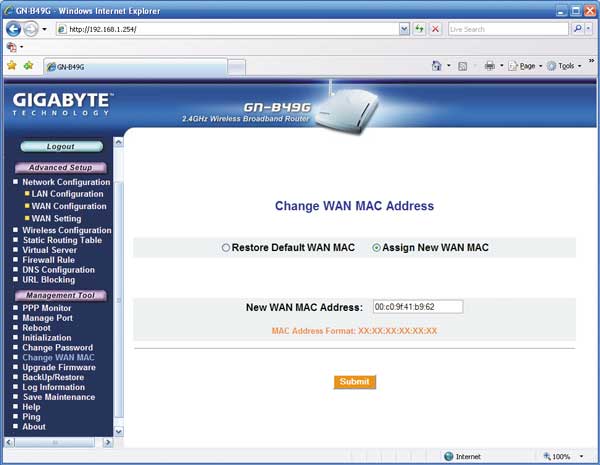
Fig. 16. Changing the MAC-address of the router's WAN port using a router as an example
Gigabyte GN-B49G
Well, the last problem that needs to be mentioned in connection with connecting to the Internet using a dynamic IP address is that the IP addresses of the default gateway and DNS server used by the provider can change from time to time. Therefore, if you have unexpectedly lost the Internet, do not rush to call technical support. It is possible that you just need to change the IP addresses of the gateway and DNS server on the router. Of course, periodic reconfiguration of the router is an extremely unpleasant task, but what to do — in some cases, this is the only possible way. Pleases at least the fact that the IP addresses of the gateway and the DNS server of the provider change quite rarely. In addition, some router models, like the PC network controller, are capable of automatically obtaining the IP addresses of the default gateway and DNS servers.
Static IP Allocation
The connection method with the allocation of a static IP address (Static IP), from the user's point of view, is also very simple, although the number of settings that have to be made is slightly more than in the case of a dynamic IP address. Actually, there is no difference between these connection methods, except that in the first case, the provider's DHCP server is used to configure the network interface and the setting is done automatically, and in the second, all settings must be registered manually.
After selecting the connection type in the settings of the router's WAN interface with the allocation of a static IP address, you must specify the IP address of the WAN port, the subnet mask, the IP address of the gateway and the primary and secondary DNS servers. All these data provide the provider when connecting to the Internet. An example of such a setting on the Gigabyte GN-B49G router is shown in Fig. 17

Fig. 17. Configuring the WAN interface of the router when using the connection type
with a static IP address
Almost always, when using a connection type with the allocation of a static IP address, a binding by MAC address is used. What additional settings need to be made in the router in this case, we have already described. It remains only to note that when using this type of connection, the user does not have problems with the simultaneous use of both the Internet and local resources of the home network.
Connect to the Internet using PPPoE protocol
PPP (Poin-to-Point Protocol) is also quite often used by home network providers. It is supported by all routers, which means that the incompatibility of the router with the connection type does not exist.
The use of PPPoE connection opens up for providers a wide range of possibilities for accounting for user access to the network. Thanks to this technology, the provider can easily restrict users' access to the Internet and keep records of their traffic. PPPoE technology starts a PPP session over an Ethernet network.
At the same time, user authentication via PAP and CHAP protocols, dynamic allocation of IP addresses to users, assignment of gateway and DNS server addresses, etc. are supported.
PPPoE is based on establishing a point-to-point connection on top of a common Ethernet environment. The PPPoE operation process is divided into two stages: first, the devices tell each other their addresses and establish the initial connection, and then the PPP session starts.
All customers are allocated private addresses and are invited to log in via PPPoE.
From the user's point of view, setting up a PPPoE connection cannot be called simple. Even if you configure the Internet connection on just one computer (without using a router), you will have to open a lot of dialog boxes. In principle, the process of setting up an Internet connection on a computer using PPPoE protocol resembles the process of setting up an Internet connection using an analog modem.
In addition, PPPoE has another disadvantage for the user. The fact is that for simultaneous access to the Internet and access to the local home network, it is necessary to make additional (and for novice users not trivial) settings. That is, with a normal Internet connection setup, simultaneous access to the Internet and to the home network resources is impossible. However, we will tell about these subtleties further, but for now we will consider setting up an Internet connection using PPPoE protocol when using one computer (without a router).
Configure PPPoE connection using a single computer
The sequence of settings and the appearance of dialog boxes depends on the operating system used, so we will consider two options for setting up the connection - for Microsoft Windows XP SP2 (English version) and Microsoft Windows Vista (Russian version).
For Microsoft Windows XP SP2 operating system
When using the operating system Microsoft Windows XP SP2 to create a new network connection, you must run New Connection Wizard Start\u003e Programs\u003e Accessories\u003e Communications\u003e New Connection Wizard (Fig. 18).
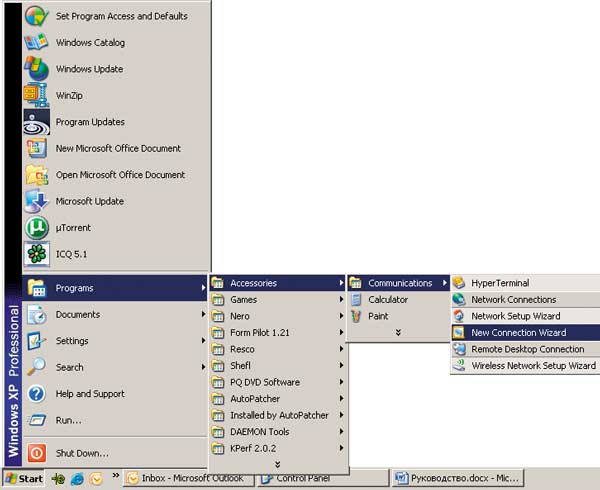
Fig. 18. Starting the Network Connection Wizard
New Connection Wizard (New Connection Wizard) click on the button Next and go to section New Connection Type (Type of network connection). In this window, mark the item Connect to the Internet (Connect to the Internet) - Pic. nineteen.
![]()
Fig. 19. Setting the network connection type
Getting ready (Preparation in progress) choose the way to create a network connection. Here it is necessary to note the item Set up my connection manually (Establish connection manually) - fig. 20.
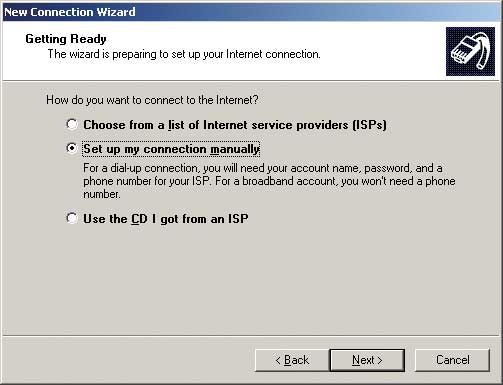
Fig. 20. Setting the method for setting up a network connection
Next, go to the section Internet connection (Internet connection) - fig. 21, which sets the type of equipment for connecting to the Internet, and select the item Connect using a username and password(Through a high-speed connection requesting a username and password).
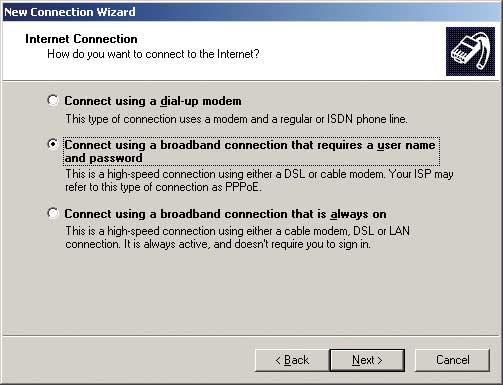
Fig. 21. Selecting the type of equipment for the Internet connection
In the next section called Connection name (Connection Name) is necessary to set the connection name (ISP Name). In principle, this name can be any, for example, the connection can be called the Internet (Fig. 22).
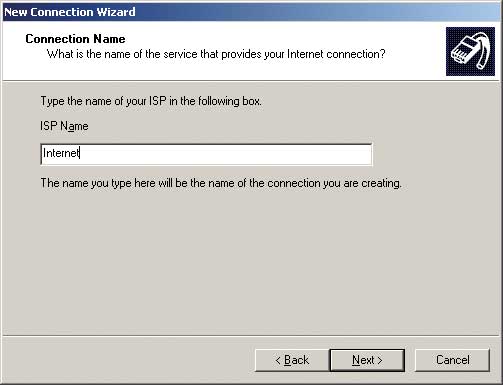
Fig. 22. Setting the name of the Internet connection
Further in the section Internet Account Information (Internet account details) you must enter the data received from the provider, that is, the user name (User Name) and password (Password). To avoid errors, the password is entered twice: in the Password (Password) and in the field Confirm Password (Confirmation) - fig. 23. If you are the only owner of the computer, that is, if there are no other users with other profiles, or you want this Internet connection to be available to all users of this computer, then you can check Use this account when you connect to the Internet from this computer. (Use the following username and password when connecting any user). If only one Internet connection is used on the computer (which is most likely), then we also note Make this the default Internet connection (Make this connection the default Internet connection).
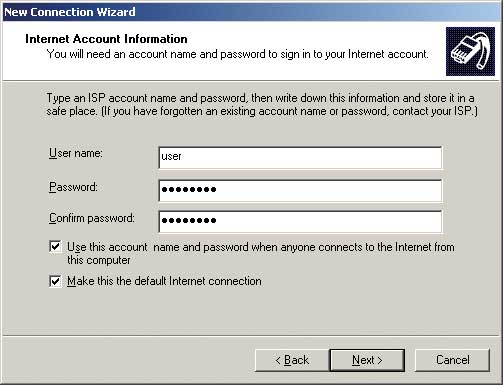
Fig. 23. Set username and password
At the final stage of creating an Internet connection, you can mark the item (Add connection shortcut to desktop) - fig. 24
Fig. 24. Adding the icon of the created Internet connection to the desktop
After completing the creation of a new connection using New Connection Wizards it is necessary to make additional settings so that you can use it to access the Internet. To do this, left-click on the icon of the created connection and in the Internet connection window that opens, enter the username and password again (Fig. 25). In order not to repeat this procedure every time you access the Internet, check the box next to (Save username and password) and check the box Anyone who use this computer (For any user).
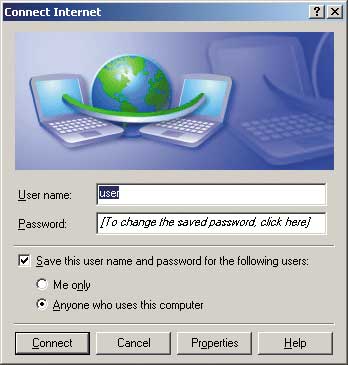
Fig. 25. Setting up an Internet connection
Microsoft Windows Vista operating system
If you are using Microsoft Windows Vista, to create an Internet connection using PPPoE, click the icon Network right-click and in the context menu that opens, select Properties. In the window that appears Network Management Center select the link on the left side by clicking on it with the left mouse button. After that, a window should open Connect to network (Fig. 26), in which you need to select the item Internet connection.
Fig. 26. Starting the Internet Connection Setup Wizard
In the next step, select the type of Internet connection - High speed with PPPoE (Fig. 27) and in the next window enter the user name and password received from the provider (Fig. 28). It remains only to press the button To plug, after which an attempt to connect to the Internet will be made. Actually, on this the creation of a new Internet connection is completed.
Fig. 27. Selecting the type of Internet connection
Fig. 28. Set username and password
Next in the window Network Management Center select the link on the left side Connect to networkby clicking on it with the left mouse button. After that, a window should open Connect to networkwhich displays the created internet connection. Having chosen the created connection to the Internet in this window, click on it with the right mouse button and in the opened context menu select the item Properties(fig. 29).
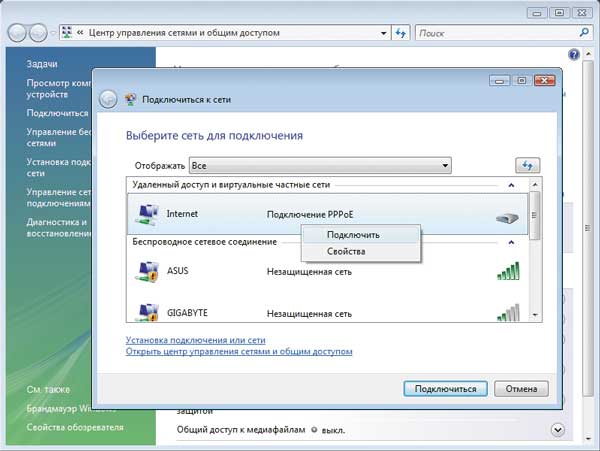
Fig. 29. Go to the Properties window of the created Internet connection.
On various window tabs Properties Internet connection created, you can check the correctness of the settings.
As we have already noted, from the user's point of view, the main problem of the PPPoE connection, in addition to the complex configuration, is that the Internet connection created does not provide simultaneous access to the Internet and to the resources of the local home network. To access the resources of the local network, another network connection is created. The process of its creation is quite simple and is no different from connecting with a dynamically allocated IP address using the provider's DHCP server (how this connection is configured has already been described in the corresponding section). As a result, the user has two connections: to the Internet and to local network resources, but they cannot be used at the same time, that is, you can access either the Internet or the provider’s home network. Of course, this is inconvenient, especially when several devices are connected to the Internet. This problem can be solved using a single Internet connection for simultaneous access to the Internet and to the resources of the local house network. To do this, you must create a so-called static routing table.
Before you start creating a static routing table, you need to find out the IP address of the default gateway that is used when connecting to the Internet. To do this, in the command console, run the ipconfig command, after which a list of all connections with their settings will be displayed. Selecting a connection to local resources, record the IP address of the default gateway (Default gateway).
The command syntax is as follows:
ROUTE –p ADD,
where destination - IP address of the host (server) in the local home network of the provider; netmask - network mask for the IP address of the host in the local home network of the provider; gateway - IP address of the default gateway.
Thanks to the key –P, routes will be remembered and restored after restarting the computer. However, if you make a mistake, you risk breaking the connection to the Internet and to the local network. If this happens, enter a route reset command route –f and restart the computer. After rebooting, you can try the ROUTE command again.
The specific IP addresses of the provider's local network servers can be obtained from the provider, for example, on its website.
As an example, we will give commands for adding static routes used in the Konkovo.Net network:
- ROUTE –p ADD 192.168.0.0 MASK 255.255.0.0
addressgateway> ; - ROUTE –p ADD 10.0.0.0 MASK 255.0.0.0
addressgateway> .
To check the added routing table, type the ROUTE PRINT command (Fig. 30).
Fig. 30. Verifying the static routing table
After creating such a table and restarting the computer, both Internet resources and local resources of the home network become available at the same time.
Configuring PPPoE Connection Using a Router
If PPPoE Internet access needs to be organized for several home computers using a router, then a PPPoE-enabled router is required. However, you should not worry about this: this protocol is supported by all modern routers, so no problems will arise.
After accessing the settings of the router, in the settings section of the WAN interface, select the PPPoE connection type and enter the username and password received from the provider. Actually, this is where the router configuration process ends. Further, all computers connected to the router via LAN ports will be able to use the Internet connection.
However, the problem of simultaneous use of the Internet and local resources of the home network with this method of connection remains. The fact is that most ordinary routers are designed to route IP packets from the user's home network to the Internet and back. That is, it is assumed that a router can have two interfaces simultaneously and route packets between two networks. If you need simultaneous access to the Internet and the provider’s home network, you need to route the packets between three networks: the user's home network, the provider's local network and the Internet. However, not every router is capable of this.
In the most common case, a normal router, when a PPPoE connection is established, stops routing packets between the user's home network (LAN) and the home network of the Internet provider. This happens because after establishing a PPPoE connection, the router has a PPP interface that is designed to route home network packets to the Internet. The router changes the default route, which directs all requests from the home network to the provider's home network, to the route that directs all requests from the home network to the Internet. Therefore, when using a PPPoE connection, in order to implement simultaneous access to the Internet and to the local resources of the provider, it is necessary that the router be able to support simultaneous operation of two connections on the WAN interface.
In addition, Internet providers often use segmented networks where different servers are located on different subnets. In order to have access to all the resources of the Internet provider, it is also necessary that the router allows you to create static routing tables. So if your provider uses the PPPoE connection type and you want to connect several home computers to the Internet, but so that the resources of the provider’s segmented home network remain available, then you need a router, which, firstly, supports simultaneous operation of two connections on WAN-interface, and secondly, allows you to prescribe a static routing table.
The routing table on the router is created even easier than on the computer. The only thing worth noting is that different router models allow you to create routing tables with different numbers of entries. However, you should not worry about this, since you are unlikely to have to add more than a dozen entries to this table, and all the routing tables are designed for at least 20 entries.
An example of the routing table created on the ASUS WL-500W router is shown in fig. 31.
Fig. 31. An example of a static routing table created on a router
ASUS WL-500W
Connect to the Internet using PPTP / L2TP
PPTP and L2TP are a type of VPN protocol. PPTP (Point-to-Point Tunneling Protocol) is a point-to-point tunnel protocol that allows a computer to establish a secure connection to the server by creating a special tunnel in the standard connection to the local network. PPTP frames PPP frames in IP datagrams for transmission over the global IP network such as the Internet. PPTP uses TCP communication for tunnel maintenance.
L2TP (Layer Two Tunneling Protocol) is also a tunnel protocol, with approximately the same capabilities as PPTP.
PPTP connection is the most common authorization method for providers to access the Internet for users connected via a dedicated Ethernet line.
PPTP, unlike PPPoE, allows ISPs to build segmented home networks while using a centralized user authorization and Internet access node.
However, with a large number of subscribers, a single PPTP authorization server and Internet access may not cope with the load. Therefore, sometimes providers install a whole PPTP server farm. To ensure equal distribution of the load on all PPTP servers, load balancing using DNS is used. This method is based on the fact that the DNS server periodically polls each PPTP server to determine the current load. The DNS server then responds to a request for a host address, returning the IP address of the least loaded PPTP server.
From the user's point of view, the process of setting up a computer to establish an Internet connection using PPTP and L2TP is not much different from setting up a connection using PPPoE. The problem of simultaneous access to the Internet and to the local resources of the provider's home network is solved in the same way.
Next, we will analyze the configuration of the Internet connection using the PPTP and L2TP protocols on one computer (without a router) running under the Windows XP SP2 (English version) and Windows Vista (Russian version) operating systems, as well as setting up the router. Note that the procedure for creating a connection via PPTP is no different from the procedure for creating a connection using the L2TP protocol, and therefore we will limit ourselves to considering only the PPTP protocol.
Setting up an Internet connection for a PC running Microsoft Windows XP SP2
When connecting to the Internet using PPTP or L2TP PCs running Microsoft Windows XP SP2, the first steps to create are the same as connecting to the Internet using PPPoE. To create a new connection, run New Connection Wizardby running the following commands: Start\u003e Programs\u003e Accessories\u003e Communications\u003e New Connection Wizard.
In the dialog box that opens New Connection Wizard (New Connection Wizard) go to section New Connection Type (Network connection type) and mark the item Connect to the Network at my workplace (Connect to the network at the workplace) - Fig. 32.
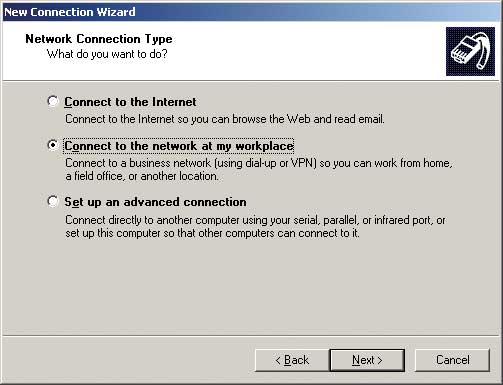
Fig. 32. Setting the network connection type
In the next section called Network connection (Network connection) choose how to connect to the network, and mark the item Virtual Private Network connection (Connection to a virtual private network) - fig. 33.
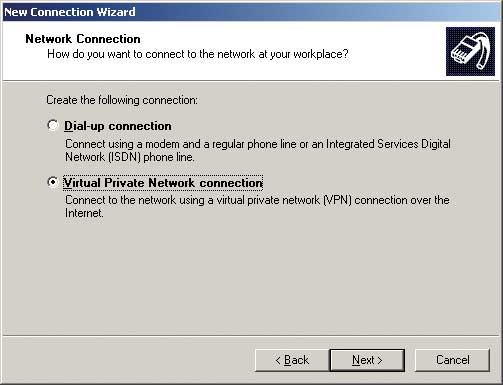
Fig. 33. Set the method of connecting to the network
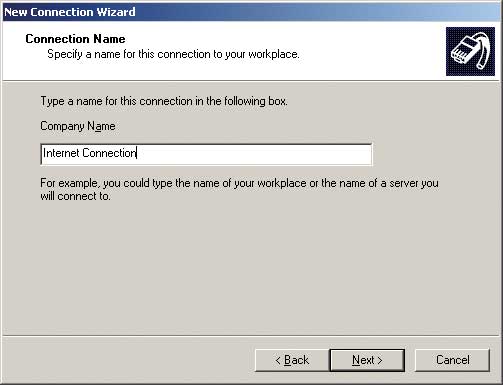
Fig. 34. Set Internet Connection Name
In section Public network (Public network) check the box. Do not dial the initial connection (Do not dial the number to pre-connect) - Fig. 35
![]()
Fig. 35. Installing the connection details
Then in section VPN Server Selection (Select VPN server) You must specify the name or IP address of the VPN server to which you are connecting. These data must be obtained from the provider (Fig. 36).

Fig. 36. Setting the name (IP address) of the VPN server
This completes the procedure for creating an Internet connection. You can mark the item Add shortcut to this connection to my desktop (Add connection shortcut to desktop).
After creating a new connection using New Connection Wizards left-click on the icon of the created connection and in the Internet connection window that opens, enter the username and password received from the provider (Fig. 37). In order not to repeat this procedure every time you access the Internet, check the box Save this username and password for the following users: (Save username and password).
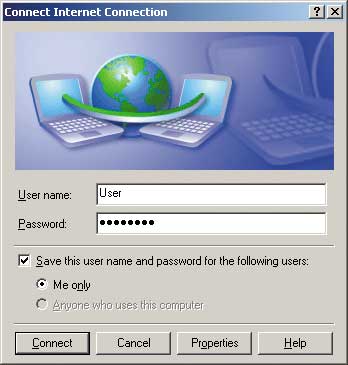
Fig. 37. Set username and password
Setting up an Internet connection for a PC running Microsoft Windows Vista
If you are using Microsoft Windows Vista, to create a PPTP Internet connection, open the window Network Management Center and select the link on the left side Establishing a connection or networkby clicking on it with the left mouse button. After that, a window should open Connect to networkin which you need to select the item Connection to the workplace (fig. 38).
Fig. 38. Run Internet Connection Wizard
In the next step, select the item Use my Internet connection (VPN) (fig. 39) and further (in the next window) - item Defer Internet Connection Setup (fig. 40).
Fig. 39. VPN connection setup step
Fig. 40. In this section, you must select the item Postpone connection settings
to the internet
In the next window in the field Internet address You need to enter the address of the VPN server received from the provider (for example, vpn.corbina.ru), and in the field Destination name - connection name (Fig. 41).
Fig. 41. Set the address of the VPN server
In the next window, enter the username and password that you need to get from your provider (Fig. 42).
Fig. 42. Set username and password
Then in the window Connection is ready to use push the button Close. This completes the process of creating a new connection.
If now in the window Network and Sharing Center select link Connect to network, then in the opened window there will be a shortcut to the created VPN connection (Fig. 43). By clicking on it with the right mouse button and selecting the item in the context menu Properties, you can check all the settings of the created connection and, if necessary, correct them.
Fig. 43. Displaying the shortcut of the created connection in the window
Connect to network
If you double-click on the shortcut of the created connection with the left mouse button, the connection process will start.
After a successful connection, a window will appear prompting you to select a user's location (private, work, public). It is recommended to choose the type of accommodation Public In this case, the detection of computers and devices in your home network will be limited.
Solving the problem of simultaneous connection to the Internet and to the resources of the local home network
As we have already noted, from the user's point of view, the main problem of the PPTP / L2TP connection is that the created connection to the Internet does not provide simultaneous access to local home network resources. This problem is solved in the same way as in the case of a PPPoE connection - by creating two connections (using either the Internet or local home network resources) or static routing tables (in this case, connecting to the Internet can be used simultaneously for access to local home network resources). We have already described how a static routing table is created, and, naturally, the procedure for creating it does not depend on the type of connection.
As an example, we present the commands for adding static routes used in the Corbina telecom network, where PPTP or L2TP connections are used.
Common to all:
route -p add 85.21.29.242 mask 255.255.255.255
The local network:
route -p add 10.0.0.0 mask 255.0.0.0
Statistics server:
route -p add 195.14.50.26 mask 255.255.255.255
Mail server:
route -p add 195.14.50.16 mask 255.255.255.255
Local resources:
route -p add 85.21.79.0 mask 255.255.255.0
route -p add 85.21.90.0 mask 255.255.255.0
Game servers:
route -p add 83.102.231.32 mask 255.255.255.240
route -p add 85.21.108.16 mask 255.255.255.240
route -p add 85.21.138.208 mask 255.255.255.240
route -p add 85.21.52.254 mask 255.255.255.255
route -p add 85.21.88.130 mask 255.255.255.255
route -p add 83.102.146.96 mask 255.255.255.224
Setting up an Internet connection using PPTP or L2TP using a router
If you want to access the Internet using PPTP or L2TP using a router, you will need a router that supports these VPN protocols. Note that not all routers support them, and L2TP support is generally a rarity.
The process of setting up a router to create a connection via PPTP or L2TP is very simple: in the settings section of the WAN interface, select the connection type: PPTP (L2TP) - and enter the username and password received from the provider. After that, all computers connected to the router via LAN ports will be able to use the Internet connection.
If you need access not only to the Internet, but also to the resources of the provider's local network, then not any router that supports PPTP or L2TP protocol is suitable. As in the case of a PPPoE connection, you need a router that supports simultaneous operation of two connections on the WAN interface and allows you to register a static routing table (how to do this has already been discussed in the appropriate section).
As we have already noted, with a large number of subscribers, providers can use a whole PPTP server farm and to ensure even load distribution across all PPTP servers, server load balancing is applied using a DNS server.
In order for the subscriber router to work correctly in such a network, in addition to being able to specify a PPTP server with a domain name, it must provide the ability to change the IP address of the PPTP server known to it every time you connect, regardless of the reason for the previous PPTP connection disconnection. In addition, the PPTP server can often be located not in the user's segment, but in the remote segment of the provider's local network, then access to the PPTP server is possible only through a gateway. Therefore, it’s not a fact that even when using a router with PPTP / L2TP protocol support and the ability to create a static routing table, everything will work.
findings
After a short course on configuring home routers, it becomes clear that the answer to the question of which router to choose depends on what type of connection your provider uses. If it uses a connection with the allocation of a static or dynamic IP address (usually with a MAC address binding), then this is the simplest case from the user's point of view and any router will suit you. If you are using a PPPoE connection, then you need a router, which, firstly, supports this protocol, and secondly, it allows you to register static routing tables.
When using a VPN connection (PPTP or L2TP protocol), you can use a router that, firstly, supports these protocols, secondly, it allows you to register static routing tables, and thirdly, it provides the ability to specify a PPTP server with a domain name and change the IP address of the PPTP server known to it each time the connection is established, regardless of the reason for the previous PPTP connection disconnection. Of these models of routers include the following:
- MSI RG54G3;
- D-Link DWL-2100AP;
- ZyXEL P-330W EE.
This, of course, does not mean that other routers will not work when using this type of connection, however, these models are guaranteed to provide simultaneous access to the Internet and access to home network resources. The best solution on the market today is the ZyXEL P-330W EE router, which compares favorably with other models in its ease of configuration using the specialized ZyXEL NetFriend program.