Capturing a video from a smartphone or tablet screen is not so easy. This is due to the fact that this option is not provided by the developers of the mobile operating system. To implement it, you will need not only to download special software, but also to open the Superuser profile on the device.
Programs for recording video from the display of a mobile device
You can shoot video directly from the Android screen using the following applications:
- Screen Recorder (SCR);
- ADB, etc.
In addition to the renter program itself, you will need to unblock root access to execute your plans. Activating it will void the existing warranty on the gadget. Therefore, if a phone or tablet was purchased recently, it is better to refuse to obtain Superuser rights.
If the warranty does not matter to you, the Kingo Root utility will help you open the superuser profile:
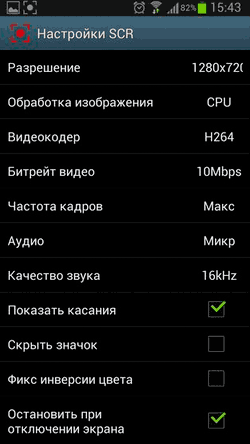
Record video from the phone screen via Screen Recorder
Review of software that can shoot video from the display mobile device, you should start with Screen Recorder, as it is one of the best of its kind. It should be noted right away that this utility has two assemblies: free and paid. The first allows shooting for no more than 3 minutes. If this is enough for you, we use it, if not, we pay for the Full modification.
To record video with Screen Recorder, you will need:
Using the Rec.Free program
Considering how to take video from your phone screen or android tablet, do not disregard the Rec.Free utility. As in the previous example, this application can also be downloaded from Play Market... At the same time, the free version allows you to record for 5 minutes, which is more than enough for most situations.
Rec.Free has a simple interface with minimal configuration. The user only needs to set the bitrate, select the recording time and specify the folder where the video will be located. To record with sound, check the Audio item. 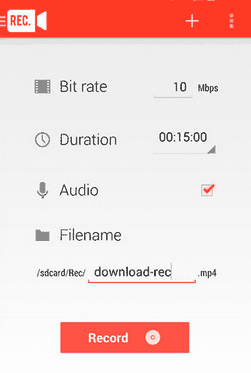
Recording video from a smartphone screen via a computer
Most programs for shooting video from the display of mobile devices are developed by self-taught programmers, so they are not supported by all models of devices. If your gadget is among the "unworthy", you should not be upset, since you can record a video through a computer. And the Mobizen app will help us with this. The procedure will be as follows:
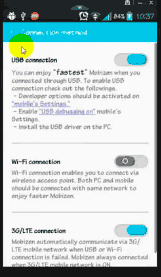
The shooting time with Mobizen is unlimited, and you don't need root rights for it to work. It does this program very attractive to many users of mobile devices, especially if the phone or tablet is under warranty.
Shooting video via ADB Run
ADB Run is a console program based on the Android Debug Bridge. Unlike the original, she already has all the commands inscribed in source and are triggered by specific numbers.
To record a video from the screen of a mobile phone via ADB Run, you must:

When the recording is finished, the video file will be saved to the Adb_Run_Record folder created on the computer desktop.
When buying a smartphone or tablet, we want him to be able to do everything: receive calls, work quickly with the Internet and documents, load games and much, much more. And, of course, it is important that you shoot high-quality video and photos. We will tell you about how to choose such a gadget and how to properly shoot high-quality video. On the eve of New Year's holidays, read our tips to make your home video beautiful and keep your fun, touching emotions and beautiful pictures happy life forever.
How to choose a phone with a good camera for shooting high-quality video
If you are just planning to buy a smartphone or tablet and want it to be able to shoot high-quality video, you must accept and realize the fact that only a well-known brand will have a high-quality camera. Moreover, it is not at all necessary to buy expensive models. Sometimes manufacturers offer a smartphone with a quality camera at an affordable price. However, in this case, they save on other characteristics.
In general, decide for yourself what exactly you need from your tablet or phone. Sometimes it is wiser to purchase a camera or camera. But if the choice is only between the brands and models of phones, then several points will be important for you.
- It is desirable that the camera be equipped with optical stabilization;
- The larger the aperture, the better. Optimal performance for video is F / 1.8-F / 2.4. If it is darker, the video will appear flatter.
Video shooting settings on a smartphone or tablet
- Pay attention to the video resolution. The higher it is and the more frames per second, the better. Be sure to check if the maximum video quality is set.
- If you do not plan to process video on a computer, choose FullHD (1080p) resolution. This is an ergonomic mode - the battery will drain less when working with such a video. Choose 4-c video if you will edit it.
- Please note that not all applications allow you to shoot video at the same time with software stabilization turned on and at maximum resolution. In this case, choose a shooting mode without software stabilization. The picture will be of high quality.
- You can also use digital zoom if you want to enlarge the image. But there are also pitfalls here. Not all cameras allow you to zoom in if you have already started shooting video on your phone. Therefore, check in advance if your smartphone or tablet is capable of zooming in while recording.
- If possible, set the white balance manually. This way you will retain more color.
- If you shoot video in contrasting lighting (for example, on an elephant) or plan to process or color correct the video, in the settings, reduce the contrast to a minimum.
- If in your camera the contrast cannot be set to minimum, select "auto contrast".
Shooting video on a smartphone or tablet: how to hold the camera, composition and other important points
- The first rule (even the commandment of filming) is never shoot a video with your phone upright! Respect yourself and your viewers. Use a tripod if possible. If not, then support your right elbow with your left hand (if you remove it with your right hand) - like in school, when you raised your hand, remember? This is one of the secrets of journalists, which helps if you have to hold a microphone or a voice recorder for a long time.
- The subject should not be located in the center. Only if it is justified by the artistic idea.
- Many cameras offer another useful option - a composition grid. Don't ignore this useful function.
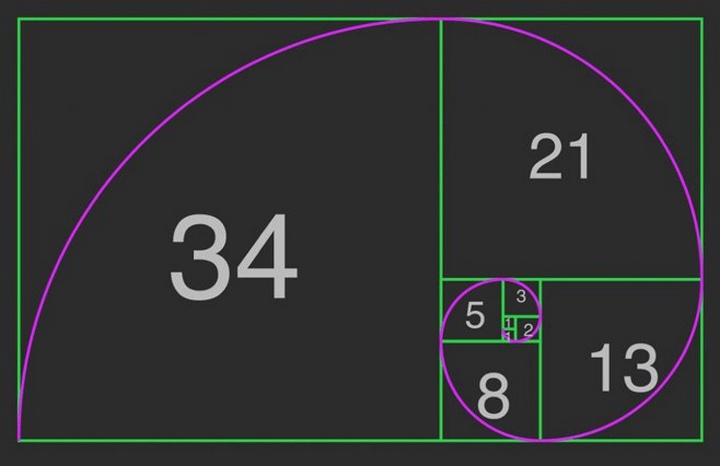
- Some programs offer the Fibonacci snail option. Place important video elements on the line in any part of it. It looks like this:
- Remember to alternate between large, medium and large shots. Shoot video in one size.
- And another important point is the length of the video. Try not to shoot videos in continuous chunks longer than 30 seconds. If you are going to edit a video, then the duration of one piece should not exceed 8 seconds. Do not shoot videos longer than 3 minutes. And on Instagram, the duration is limited to about 15 seconds.
Interesting statistics from Youtube: basically, users watch either the first 5 seconds (and disconnect if the video is not interesting), or 40 seconds (then it becomes boring), or 3 minutes (if the recording is very interesting).
- The ideal lighting for shooting video is low contrast, soft and intense. For example, you can shoot a video good quality on a smartphone or tablet in cloudy weather. If you're shooting indoors, turn on the light. Just avoid getting into the frame of powerful light sources.
- As for the sound, it is better to use a microphone (there are special small ones that come with many recorders). Do not place the microphone close to your mouth, it is best to attach it to the collar. Ordinary foam will help protect from the wind.
- If you have to shoot in motion, try to move with the subject or in front of the subject at its own speed. Do not slide the camera horizontally (from right to left and vice versa). There is a monopod for shooting on the go.
- I use a special selfie stick to shoot video selfies. Kmera should shoot from above, not from below.
Top 10 programs for shooting video on a tablet and smartphone
- ScreenRecorder
- Screencast Video Recorder
- SCR Screen Recorder
- Rec. (Screen Recorder)
- 8mm Vintage Camera
- Action movie f
- Recordable
- Hyperlapse
- VidTrim is one of the simplest recorders
- Replay for apple
For those who scrolled through the page, a special resume:
- Use special programs on your smartphone and tablet, which will allow you to fix the focus and adjust other parameters.
- Use a tripod and only shoot horizontally.
- Pay maximum attention to light and contrast!
- Record the sound close to its point of origin.
- Do not record videos longer than 3 minutes.
Photos in text: Depositphotos.com
Hi everyone. Today we will consider the method "how to take a video from the screen of a smartphone, tablet" on Android. It will be about the best application at the moment,
For use of this application Android version 5 or higher is suitable, although the developers write about compatibility with later versions. Alas, my experts install the application on Android 4.4 on different devices ended in failure.
The application does not needroot right, works fine, no glitches,has free and paid functionality. In the free mode, there are many functions available that will be enough to work with the recorder. Paid functions will be indicated in the overview and you can decide for yourself whether to use them or not.
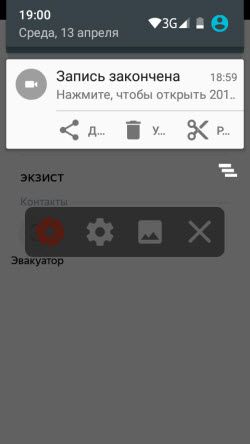
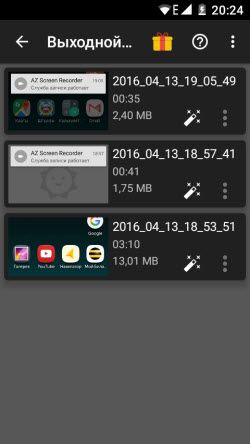
An example of a recorded video can be viewed in the previous article "". When watching a video, you can see a horizontal line in the middle of the screen. This line appeared not after working with the application, but when on the computer in the program. I did not redo it, left it as it is.
How to take a video from the smartphone screen
Download Application AZ Screen from the store Google Play.
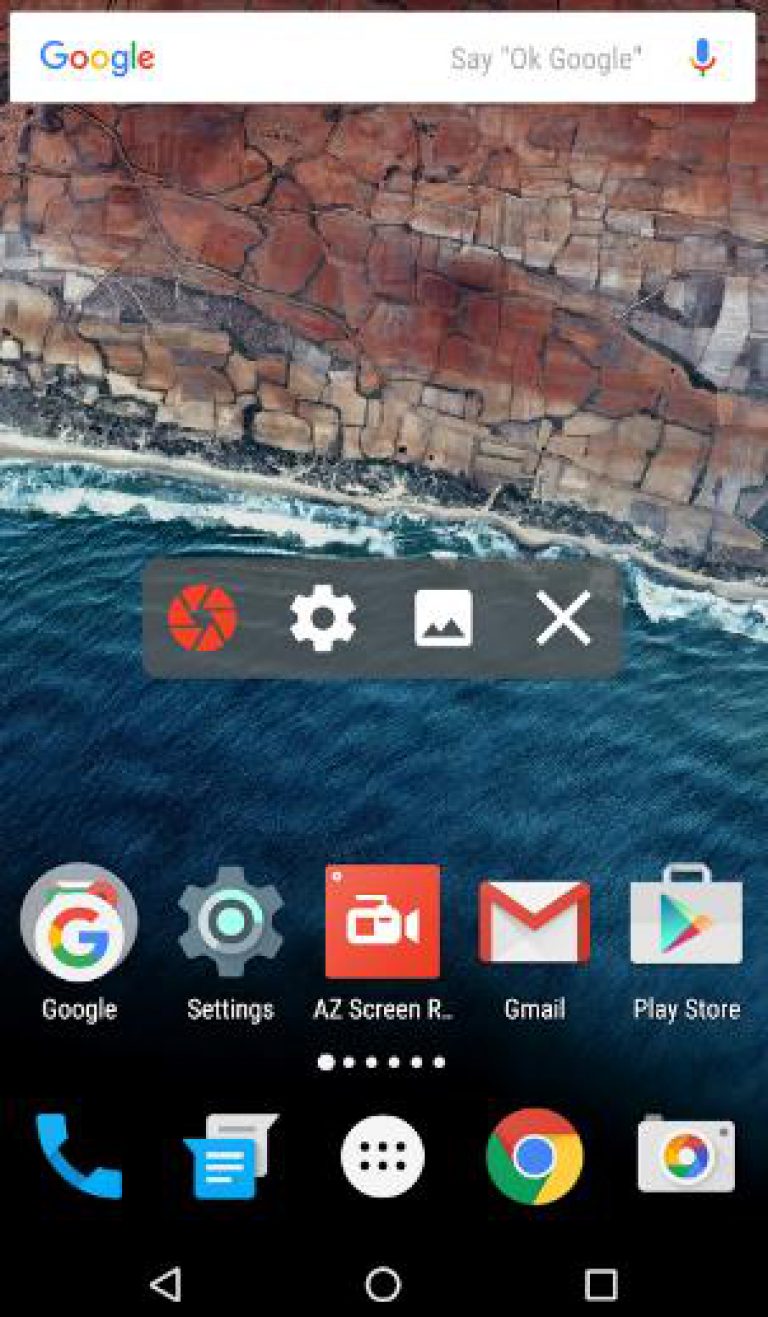
After installation and launch, icons for control and settings will appear on the smartphone screen. By default, they are located in the center of the screen, which is not always convenient. They can be moved anywhere, above or below.

1. The red aperture blades icon is the start of video recording. In free mode, you can record a 10 minute story.
2. The next icon (gear) is the recorder, we will consider all functions in more detail.
3. The landscape icon means keeping all filmed videos (can be changed in the settings). By clicking on it, you go to the list of captured videos.
4. The well-known cross, clicking on which exits the application.
Screen recording
To start recording, you need to click on the icon described above, and the countdown will begin and the recording will begin. The duration of the report can be set in the application settings.
During recording, the functions "Pause", "Stop" and "Edit" are available (available in the paid version).
In free mode, in the "Cut" section, you can perform several actions:
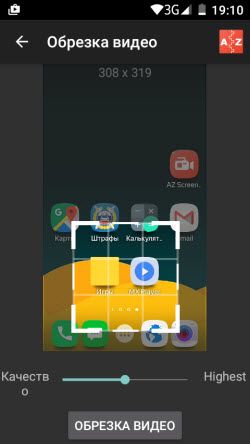
- extracting frames from video.
Settings
Control
There are three items in this section of settings:
![]()
- Encoder - this function allows you to set extended usage or stable.
- Invisible button (can do anything), available in paid mode.
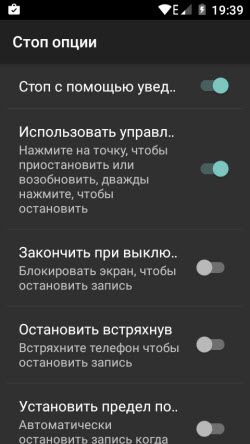
- Stop options - here you have several options for stopping the recording, to choose from, whoever is comfortable.
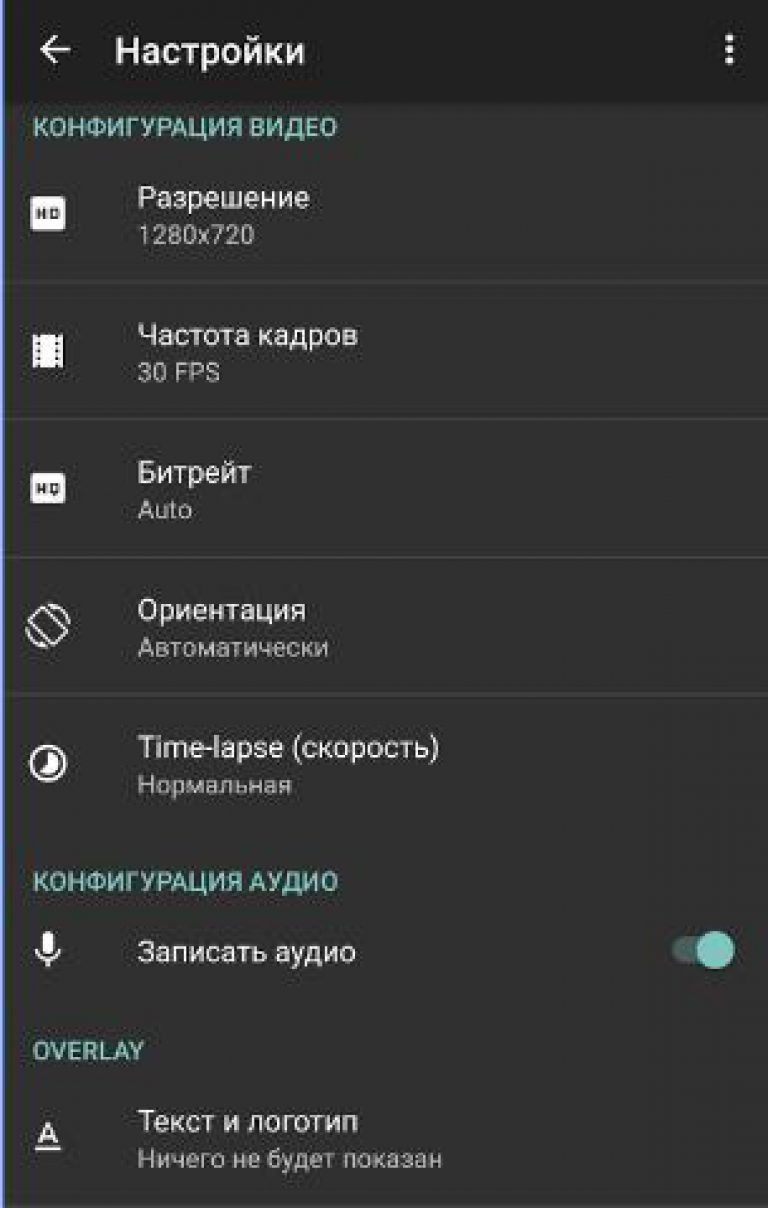
Video configuration
The most advanced section of video settings:
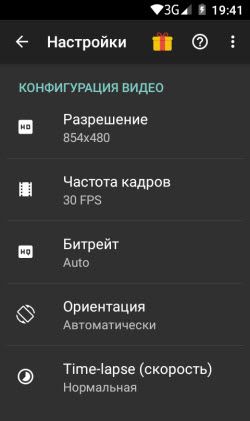
- Resolution - available 1280 × 720, 854 × 480, 640 × 360, 426 × 240.
- Frame rate - from 24 to 60 FPS.
- Bitrate - from 1 to 12 Mbps.
- Orientation - landscape, portrait and auto mode.
- Time Lapse - speed.
Audio configuration
Very easy setupthat requires you to enable or disable the external microphone.
Overlay
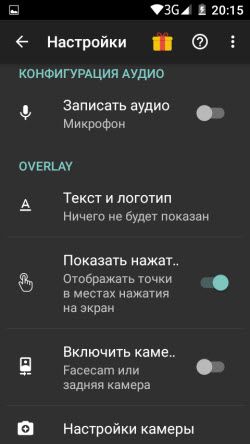
—The text and logo are an interesting feature. You can add text to the video you shoot by choosing a font color. Using any as a logo (will be shown throughout the video) .
— Show points of contact with the screen. This function is more suitable for teaching materials.
- Enable rear camera (in the paid version).
- Camera settings - this function is a complete addition to the previous paragraph, which means it works in a paid mode.
Timer
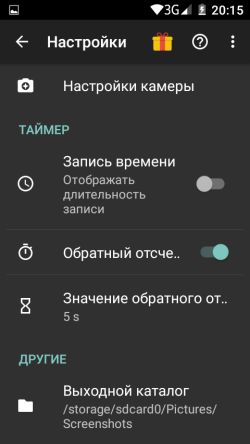
— Time recording - enable or disable the display of the recording duration.
- Countdown — enable or disable the n th countdown before recording starts.
- Countdown value - this function was discussed at the beginning. You can set any value that will be convenient for preparing for recording.
Others
This setting allows you to specify the folder for storing recordings.
We have covered the basic settings of the applicationAZ Screen. You can take a video from the smartphone screen without resorting to the settings, since by default the optimal settings... For your own purposes, you can make changes to the settings at any time and get the desired video material.
As you can see, in the free mode, more than the required amount is available desired settings, but if you want to expand the functionality, purchase it, the amount is purely symbolic. The developers have named the button for activating the paid mode "Feed with chocolate".
Try capturing video from your smartphone screen today
In this article, we will look at various popular applications for removing video from the phone screen under the popular oS: Android, iOS and Windows Mobile.
Virtual reality glasses
The most modern VR glasses for iPhone and Android smartphones, as well as for computers.
For Android, there are a number of applications that can shoot video by capturing an image directly from the display. There is only one caveat: Android version below 4.4, Root is required for such software to work. If your phone has Android Lollipop or higher, you can use the AZ Screen Recorder app to record.
Unlike other apps, AZ Screen Recorder does not add ads to recording in free version and does not impose a time limit. The program has a countdown timer, as well as the ability to draw on the screen and quickly edit the recording after saving. However, some features, such as video trimming, are only available after purchasing a premium account.
Other noteworthy recording apps include:
- SCR Screen Recorder Pro (Root required).
- Rec (Screen Recorder).
- Capture video from the screen.
Some custom firmwares have a built-in ability to record video from the screen. However, most often they offer stripped-down functionality, so you still have to use one of the listed applications to fully capture what is happening on the screen.
How to take a video from the iOS iPhone screen
Unlike Android, iOS has a strict ban on screen capture, which is associated with a restriction of security policy. AT App Store there is not a single application offering this functionality. Jailbreak your device will help you solve the problem: Cydia has free and paid tweaks for capturing video from your screen.
However, you can do without jailbreak by using a computer and special software to record video. For example, with the release of iOS 8 and OS X Yosemite, you can capture video on a Mac using the stock QuickTime player.
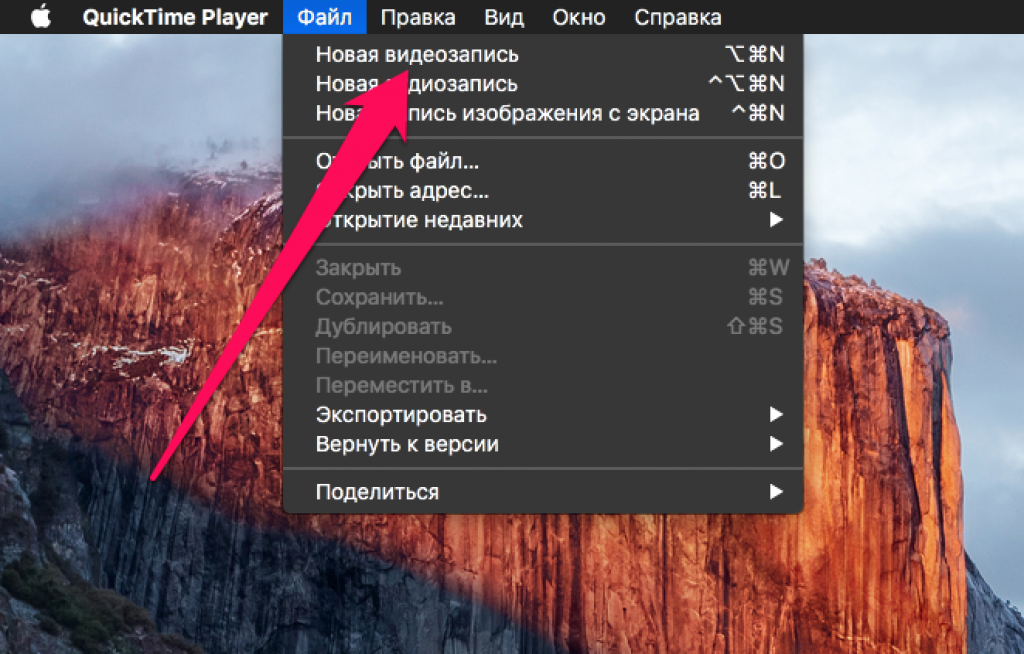
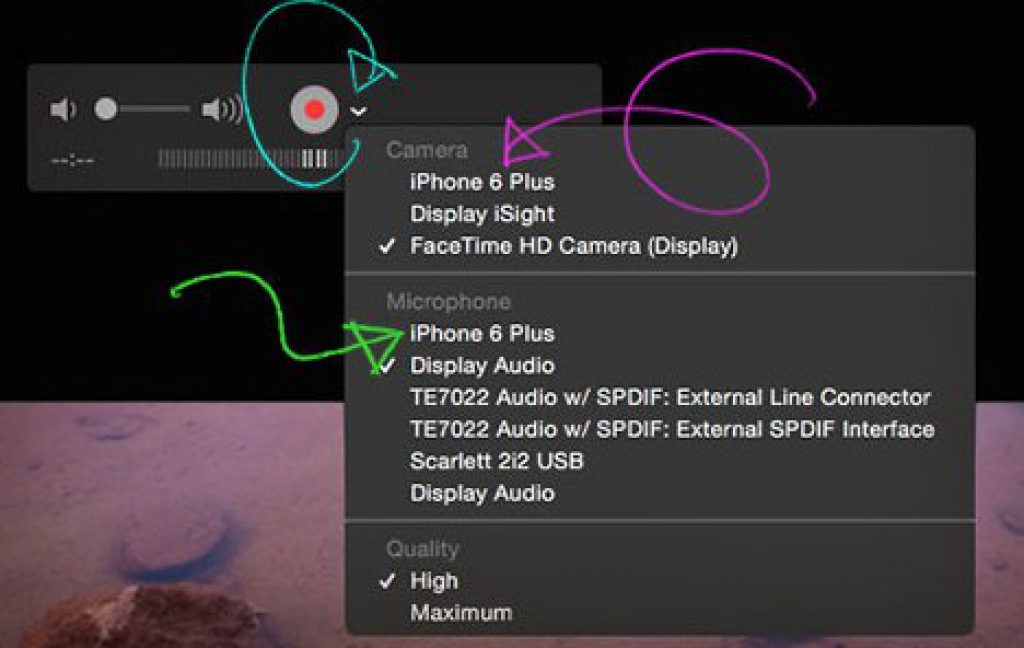
The phone display appears on the Mac screen. Press the red button to start recording. You can stop recording by pressing the same button. You can save your video through the File menu in QuickTime.
On a Windows computer, you will have to use other screen capture methods. You can shoot a video for free using file manager iTools.
- Connect your mobile device to your PC.
- Launch iTools and go to the Tools tab.
- In the Hardware Management field, select Real Time Desktop.
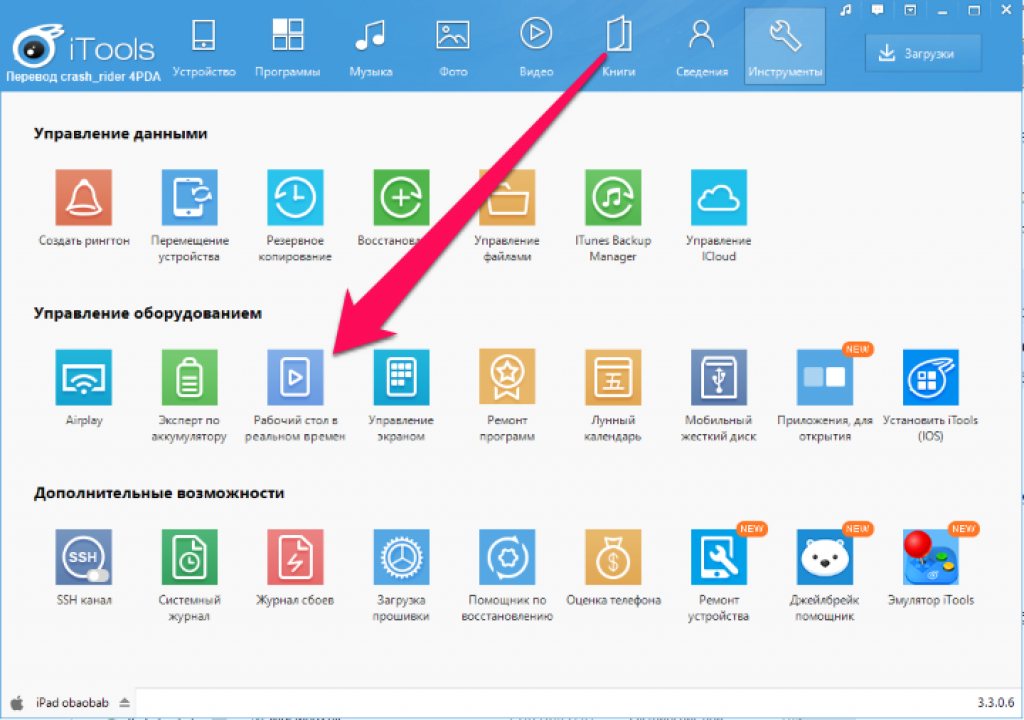
The display of the mobile device appears on the screen. To start shooting it, click on the red button. The program saves the recorded videos in the "Documents" folder. iTools works for free, but the video quality does not stand up to criticism - this method is not suitable for recording gameplay. If you want high quality video, look at two programs:
- Reflector 2.
- AirServer.
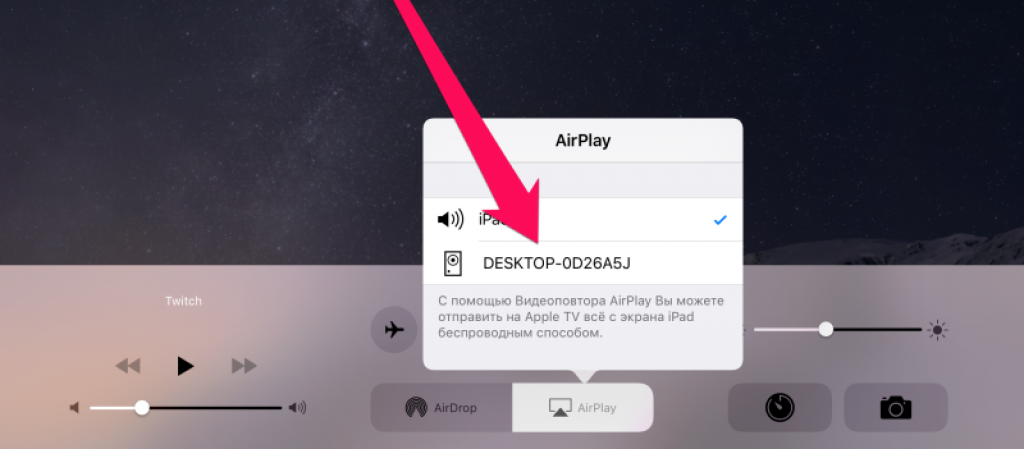
Their recording order is the same: you need to open Control Center on your iPhone or iPad, click AirPlay and select a computer from the list of available devices.
Both programs work free of charge for 7 days, and then require you to buy a license - this is their main drawback. As for the recording quality, AirServer has it slightly higher, although Reflector 2 can also be used to shoot the passage of the game or review the application.
On Windows Phone (Mobile) the situation is even more complicated than on iOS. In fact, there is only one proven way to capture video from a phone screen, which also involves the use of a computer and additional software. To capture video you will need:
- MyProjectionClient program on the computer.
- Enabled "Screen Projector" feature on the phone.
- USB cable for connecting devices.
Without connecting your smartphone to your computer, you will not be able to capture an image from the screen. But the video will be immediately saved on your hard drive, where you can edit it in any video editor.
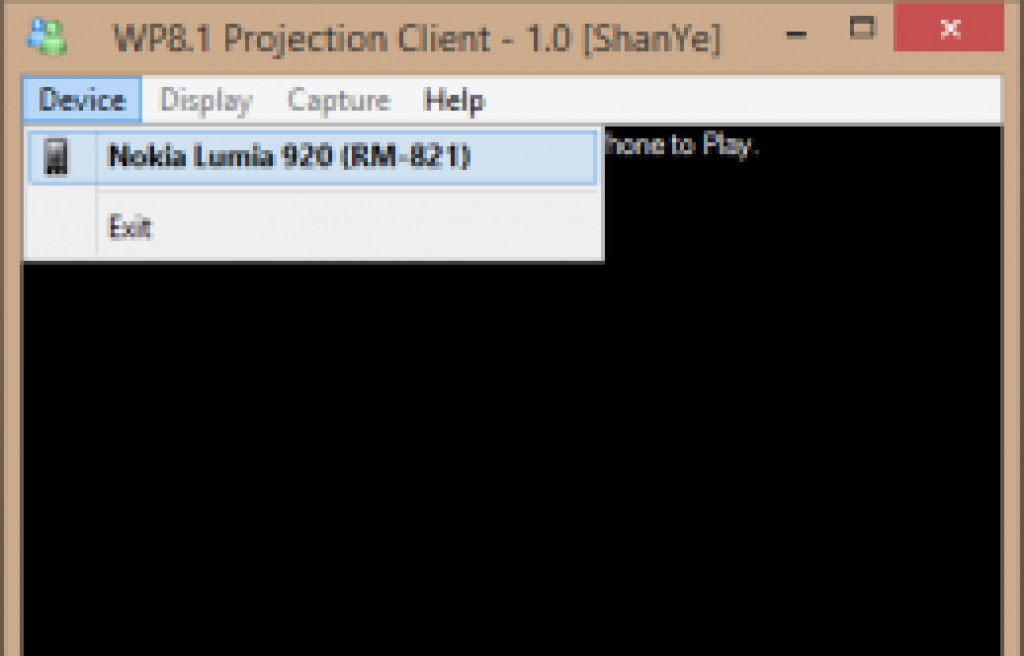

To take a video, click on "Capture" and select "Start Capture Screen to Video File". You can stop recording in the same menu using the "Stop Capture Screen to Video File" item.


