THREE WAYS TO MAKE AN IMAGE ON A PHOTO
If you decide to sign your photos before posting them on the Internet, but do not know how to do this, then this article may help you.
I'll tell you about three easy ways:
- just an inscription in Paint
- transparent convex lettering in Photoshop
- picasa label
All pictures are enlarged when pressed.
First way:
Does not require installation of any programs, as you already have everything you need. This is Paint, a standard program that comes with your computer's software package.
Step 1: Open the image with this program. From the menu, choose "Palette" and pick a suitable text color. This can be done in the lower right corner of the screen.
In the "Picture" menu, uncheck the "opaque background" item
Select the text tool
Make an inscription. The font can be changed, made bold, resized.
Second way:
Program Adobe Photoshop... It must be installed on your computer or you can use the online version.
I will show you how to make transparent convex text.
Open the drawing with this program. Select the Type tool. Type your text.

You can change the font and size of the typed text. The changes will be immediately reflected on the screen. You can also change the color, but it doesn't matter to us, because we will not see the color at all.

Select the "Layer" menu \u003e\u003e\u003e\u003e "Emboss". In this case, you should be in the text mode (this is the layer with which we are working now; you can see in which layer we are now in the panel on the right)

You can play around with the Emboss settings and see what happens. Or you can leave everything as it is and not touch anything, we have already got the embossing effect.

Making the text transparent. On the right in the window we have a "slider" with the word Fill. Set the value to zero.

Save our modified picture: File \u003e\u003e\u003e Save As
Method three
Picasa software
This is a Google product and is free. Very handy when working with photographs, because not as complicated as Photoshop, everything is clear at an intuitive level. With Picasa, you can quickly edit photos, send them to web albums or directly to a blog and many
what else. But we are now interested in the textDirectly in the program itself, you can write text over the photo thanks to the coveted button. It says "ABC" (indicated by the green arrow). Press this button and then follow the text prompts. It's very, very simple! Remember to keep your signed photo.

You can also use Picnik, an online photo editor.
Open the picture with Picasa. Select the Picnic button there (in the previous photo it is indicated by a red arrow) and follow the instructions (remember, you must be connected to the Internet).
When Picnic has loaded, select the "create" tab and in it the "text" menu

In the field for entering text, enter the inscription and click "add"

The appeared inscription can be rotated in any way, change its color, size and even make it translucent - look on the right in the window.

Then, when you're done, don't forget to click on the "Save" button.
Here are three of the easiest, in my opinion, ways to write on a photo. Good luck to all!
- In today's issue, I will be answering the question of how to write text on a picture. Now you can often see inscriptions on images that convey the meaning of the drawn, photographed ... In Vkontakte groups I meet such constantly. Here are some of them:
Motivating lettering

Humor

Post title, article

Life hacks

How it looks, I think everyone understands. Let's go directly to the actions.
What methods of writing text on the picture will we use:
- How to write an inscription on a photo using online services
How to write text on a picture in Paint
Before we consider all the ways to design inscriptions on a photo, I will show one free photo stock with high-quality pictures. From there you can type a wagon of thematic images for every taste.
Website https://www.firestock.ru

I follow my own advice, so the first thing I do is save the image to my computer.

Now the fun begins.
Working in Paint

There is also Paint 3D on Windows 10. With it, you can also successfully draw lettering on images. 

How to write text on a picture in Photoshop
Instructions:

How to make an inscription on a photo in online services
In addition to creating content for social groups. networks, inscriptions on pictures make a webmaster for blogs, sites. On the images they write the address of their resource in order to better advance in search engines and popularize their project. You can add your url not only to standard program from Windows Paint and Photoshop, but also with the help of special online editors.
Add text to photo with lolkot.ru
It is much easier than in programs to impose text on a photo on the website lolkot.ru.

Adding an inscription to a picture on holla.ru
Anyone can add an inscription to a picture using the site holla.ru. The site provides you with 2 full-fledged photo editors that will cope not only with the task of writing text on an image.
Since we live in a prime social networks, often we have to face the question - How to make an inscription on a photo. And this is by no means surprising, because every day millions of users post dozens of photos to all kinds of communities and on their pages.
This article will discuss the most popular ways to create inscriptions on a photo.
We make an inscription on the photo in Paint.
This method of creating an inscription on a photo is the most common and simplest, since the "Paint" program is already preinstalled on all computers / laptops with the Windows operating system, that is, it comes with a package of standard programs.
It is quite easy to learn and allows users to perform “standard” actions with images.
1. To create any inscription on your photo, you need to open the program first. Finding it is very simple: go to the "Start" menu, click on the inscription "All programs", then open the "Accessories" folder. In it you will find an icon "palette with a brush" and next to it there will be an inscription paint. Click on it.
2. A program window will open in front of you. You can drag the desired image into it or open it through the editor itself. To do this, click on the blue rectangle located in the upper left corner of the window and select the "Open" option.
After that, you just have to choose an image.

3. After you have opened the photo and made other changes, for example, you can start creating an inscription. To do this, click on the letter "A" and select the desired color.

4. While holding down the right mouse button, select the part of the image on which you want to write. Choose a font and size. Then click on the inscription "Transparent" (this option will allow you to create an inscription on the photo itself, without overlapping it).

If something doesn't work out the first time, or you simply don't like the selected font, you can easily delete the inscription (while remaining in writing mode) or change it.
5. Save the modified image.
Photo caption in FastStone Image Viewer.
This method presents some difficulties, especially if you are a beginner. but this program so "multifunctional" and simple interface that once you figure it out, you will only use it.
1. First, download the program (preferably from the official website of the product) and install it on your device.
2. Open. Select the "File" tab, and in it the "Open" option, specify the image you need.

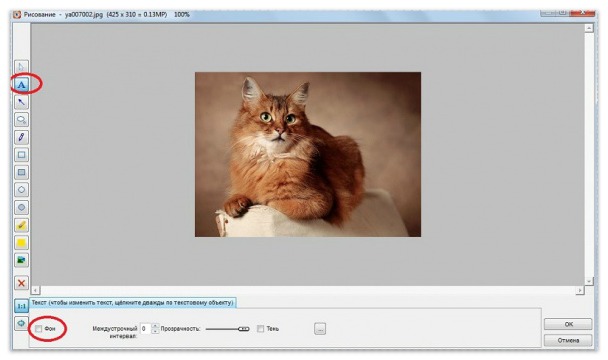
3. Now that your photo is displayed in the program window, click on the "Edit" tab and select the "Draw" option.

4. A large window will open. In it, you need to click on the letter "A". After that, you will see the appeared parameters at the bottom of the page. Uncheck the Background option.

5. Select the area on the image where the label will be created. From above you will appear extra menuthat allows you to select a font, change its size and color.
Set the parameters you need and start writing.

6. Without leaving the mode, you can set "transparency" to your text by dragging the slider located next to the "Transparency" label. In addition, you can move your caption around the photo and change its "size".
7. After completing all the "procedures" do not forget to save your image. To do this, click on the "OK" button, and then in the main program window, click on the blue icon.

Now you know how to make an inscription on a photo.
Adding an inscription to an image is one of the simple operations that can be performed in graphic editor... Depending on the result you want to get, you can overlay text on the image itself, on a wide, monochromatic frame created around the image, or on a dialogue bubble like those used in comics to indicate the character speaking a line.
You will need
- - Photoshop program;
- - image.
Instructions
Use the Custom Shape Tool to create an inscription in the dialog bubble. In the settings panel, click on the Fill Pixels mode icon. Expand the Shape list and select a Talk or Thought shape.
Click on the colored square in the tool palette to select a color that will fill the dialog bubble. Using the Layer option from the New group of the Layer menu, create new layer and draw a shape of the chosen shape on it. To do this, drag the cursor down and to the right while holding the left mouse button.
Use the Character option from the Window menu to open the font palette and select a font, style, size and color from it. You can change these parameters if required. Click on the text field and do inscription... If the text does not fit completely into the frame, reduce the font size by adjusting it in the options bar under the main menu or in the Character palette.
If a inscription must be on a solid color frame, increase the canvas size using the Canvas Size option from the Image menu so that there is enough space for the caption and image. Use the Rectangular Marquee Tool to select the part that should be visible from under the frame. Invert the created selection with the Inverse option of the Select menu.
Create a new layer and, with the Paint Bucket Tool activated, fill the selection with color. Make inscription against the background of the created frame. Most often, such inscriptions are located at the bottom of the image.
It so happens that you need to make an inscription on the image, for example, to comment on the illustration. Or you have found a suitable image for the site header and you want the title to be written on it. Now I will not talk about complex and expensive programs such as Photoshop, but I will show the easiest and most affordable way.
Each computer on which is installed operating system Windows, there is a simple graphical paint program... To find it, you need to press the big round button "Start" in the lower left corner of the screen. Usually, after clicking it, a list of the most recently used programs opens. If you haven't used Paint, then of course it won't be on this list. Therefore, first you need to click "All programs", then "Standard":
and already here find and click Paint.

After the program has started, open the picture on which we will write. To do this, you need to click in top line menu "File" → "Open"found on your computer desired file and double-click on it with the left mouse button.

Let's say I'm making a hang gliding website. For the background of the hat, I found a piece of sky and I want to write on it the name "Promised Heaven":

In order to write text on this image, you must first press the letter "A" in the toolbar (1), after that, under the tools, two similar pictures... In order for the background under the text to remain transparent, and our whole picture with the sky is visible, you need to click on the lower picture (2). If the top picture is clicked, the text will be written on a white (colored) background. We, in this case, do not need it.
Now we need to choose a color for the text. Above the image, you see multi-colored squares - this is the color palette. To the left of the palette, there are two superimposed squares. The color of the top square shows which color is currently set. To change the color, you need to click on the one you want in the color palette. White is fine for my picture, so I chose it (3).
In this program, before entering text, you need to create a field for it by the type of selection, that is, "draw" a frame. To do this, place the cursor where the upper left corner of the frame should be, hold down left button mouse and, without releasing the button, move the mouse diagonally downward until you get a frame of the desired size. The button can now be released.
We also need tools to change the size and appearance of the font. To do this, on the top menu bar, click View and select Text Attributes Panel. A panel will appear in which you can specify the font, its size and appearance:

I chose Constanta Bold 36.
Enter your text. If you need to move it in the center, place the cursor at the beginning of the text and press the Space bar as many times as needed.

Actually, that's all. The picture can be saved. If you now select any other tool, for example, the eraser, you will see the picture in the form in which it will be saved:

It turned out, of course, not a masterpiece of design art, but it is better than instead of the site header there will be an unrelated logo.
To save the picture, click on the top menu bar "File" → "Save as…"... Write a name for the file, find the folder for it and click "Save".


