You can make a lot of original and useful things out of unnecessary CDs and DVDs. The author of this idea talks about how you can decorate your howling kitchen and emphasize its style with coasters for mugs with hot drinks. The fact is that you can decorate the coasters with napkins, choosing a color scheme and a pattern that matches the theme of your interior in the kitchen. You can also make a set of such coasters for your loved ones as a gift, just pick a picture for decorating the coasters that will harmoniously fit into their kitchen interior. Such a gift will be appreciated and will constantly serve as a warm reminder of you.
To translate this idea of the author into reality, you will need:
1. Old CDs and DVDs that you are not using.
2. Dense corrugated cardboard.
3. Scissors.
4. Napkins for decoupage.
5. A simple pencil.
6. PVA construction glue.
7. Universal glue.
8. Construction putty.
9. Small spatula.
10. Sandpaper.
11. Alcohol-based degreasing liquid.
12. Rags.
13. Acrylic primer.
14. Gloss acrylic varnish.
15. Brushes for applying glue and varnish.
16. Foam sponge.
17. Files or plastic bags.
18. Acrylic paint.
Step 1.
To begin with, take corrugated thick cardboard and circle the previously prepared discs on it with a pencil. Then we cut out circles from cardboard with scissors. You can simplify the process a little and, without resorting to a pencil, outline the boundaries of the disk on the cardboard using a clerical knife, while the cardboard blanks will immediately turn out to be cut from the cardboard.
Step 2.
Now apply a layer of all-purpose glue to the shiny side of the disc.
Step 3.
Carefully, trying not to stain your fingers with glue, fold the blanks as follows: a disc with glue (glue up), then a circle cut from cardboard on top and again a disc greased with glue (glue down). As a result, it should look something like this:
Step 4.
Using the method described above, we glue the required number of blanks, then put them one by one in a file or bag so that we do not accidentally stain anything in the glue. Now you need to place the blanks under the press for several hours.
Step 5.
After the glue has dried, remove the blanks from the files and seal the hole in the middle of the disc with a putty.
6 step.
We also seal the end sides of the workpiece with putty. Now we will patiently wait until the putty hardens.
7 step.
After the putty has completely hardened, we process the workpiece with sandpaper. After all irregularities and roughness have been removed with emery, we degrease the surface of the workpiece using any alcohol-containing liquid. Then, with light tangential movements, we apply two layers of acrylic primer to the workpiece. Do not forget to dry each layer thoroughly.
Step 8.
Now we decorate the blanks with the previously selected napkins with a pattern. To do this, simply glue the napkins with PVA glue on the blanks. We give the glue time to dry.
Step 9.
After the napkin has dried, we will go over the edge of the workpiece with fine emery paper. This will help to gently remove any excess napkin that has been glued on.
This is how it should turn out:
Step 10.
Now, very carefully, we paint the end sides of the blanks with acrylic paint. In this case, the author uses brown paint, you can choose the paint that seems more suitable for you.
Step 11.
After the paint has dried, we will cover the coasters for the mugs with acrylic varnish in several layers. Dry each layer thoroughly.
As a result, you get such beautiful coasters that will serve as a decoration for any kitchen.
Thanks to the author for the idea!
Many have probably noticed that when you accidentally put a hot cup on lacquered or polished furniture, then after it there are often unpleasant traces that can permanently spoil the appearance of the furniture. To prevent this from happening, you must use special coasters for hot. On sale now you can find stands of all shapes and sizes, but it is much more pleasant to make this simple thing with your own hands. And for this, an unnecessary CD is the best fit. A little desire, free time and imagination and you will get an original cup holder. Now drinking tea every day at home or at work will become much more pleasant for you. Don't believe me? I suggest you try ...
For work we need:
CD disk;
- PVA glue;
- Glue stick;
- Printed napkins;
- Stationery file;
- Acrylic paints;
- Brushes;
- Acrylic lacquer;
- Acrylic putty;
- Putty knife;
- Foam sponges;
- Sandpaper "zero".

How to make a CD cup holder
We will make a stand for a cup from an old CD disc. We will process the disc on both sides, on one side and on the other we will get a colored drawing made using the decoupage technique.
First of all, we need to close the hole in the disk. To do this, we cut out 2 small circles from plain paper. 
and glue them to the hole area on one side and on the other. 

Now we take an acrylic putty and use a small spatula to apply it in a thin layer to the entire surface of the disc. 
We wait until it dries completely on one side and do the same on the other side.
While the putty is drying, we do not waste time and prepare drawings from napkins that we plan to stick on the disc. We tear out or cut out the motifs we like from the napkins,


iron them with a warm iron, 
separate the two white layers of the napkin, leaving only the color layer, with which we will continue to work. 
While we were working with napkin motifs, the putty on the disc was completely dry. Carefully sand the uneven places with sandpaper 
and wipe it with a damp cloth so that no dust grains remain.
We process both surfaces of the disk with PVA glue. 

When the glue is completely dry, prime the disc with white acrylic paint and also let it dry completely. 
Put the prepared napkin drawing on a small stationery file and moisten it abundantly with water. 
We carefully drain the excess water and attach the drawing along with the file to the disk, 
smooth the file with your fingers and remove it. 
In a separate container, we dilute the PVA glue in half with water and brush the pattern with a fan brush, moving from the center of the disc to the edges. 
We try to work so that wrinkles and air bubbles do not form under the drawing.
We are waiting for the disc to dry completely. You can use a hair dryer to speed up the drying process.
Carefully dry the protruding edges of the napkin, carefully sand it with sandpaper. 
We cover the surface of the disc with acrylic varnish in one layer. 
After the varnish is completely dry, we draw some fragments of the picture with acrylic paints. 
We traverse the edges of the disc with a sponge coated with brown paint. 
When the paint is dry, cover the disc with several layers of acrylic varnish, apply about 4-6 layers, and dry each layer thoroughly. 
Here we have such a nice stand. 


Of course, you shouldn't put a hot saucepan on it, but a cup of tea or coffee - please, the most important thing is that the furniture will not suffer from a hot cup now. Merry and productive creativity for you!
Elena Plokhikh
In the very near future, a wonderful family holiday is expected in our country - Mothers Day! For all who wish to present themselves a splendid opportunity to thank their beloved mothers, for all the sleepless nights, worries, worries that we sometimes manage to deliver to them! No blessings of the world will be enough to express our gratitude to mothers!
However, there is something that can convey our love and gratitude! What is this? This is some small SURPRISE, made with our own hands, containing all our affection for mom, made with love and a lot of positive thoughts!
Surely many of you have accumulated at home a lot of unnecessary disks that only take up shelf space. It's a pity to throw it away and what to do with them is also not clear. I decided to bring them to kindergarten and for our mothers to make coasters for cups... Making a craft takes a lot of time. Therefore, we got down to work in advance.
Target: teach children to decorate decoupage disc.
Tasks:
1. To promote the formation of children's interest in arts and crafts, in particular to decoupage technique.
2. Develop imaginative thinking and fine motor skills.
3. To cultivate love and respect for mom.
Necessary materials.
1. Disks(CD, DVD)
2. Three-layer napkins with a suitable pattern.
3. Acrylic putty.
4. PVA glue.
5. Acrylic varnish (or colorless varnish for interior decoration).
7. Sandpaper.
9. A sponge for washing dishes.
10. Hair dryer (for quick drying).
Getting Started:
To begin with, we cut out a circle from white paper and glue the hole in disk.


Let's dry (a hair dryer can be used for quick drying).

Then we cover disk another layer of putty, also let it dry or blow dry and apply the putty a third time.

The whole surface cover the disc with PVA glue.


We take a napkin, separate the two lower layers and put a fragment of the napkin on disk... Smooth gently from the center to the edges so that there are no bubbles. Be very careful - the napkin is thin, wet, and tears easily!


When the glue dries, along the butt disk we go through with fine sandpaper, thereby cutting off the excess napkin.

We also glue the napkin to the other side of our coasters.
We cover the craft with acrylic varnish on both sides (or colorless varnish for interior decoration)... Glue a thin cord or braid along the edge.

We got wonderful gifts for our mothers.
We admire a little and give it to mothers!
Hopefully the idea of creating such coasters you will like it!
Related publications:
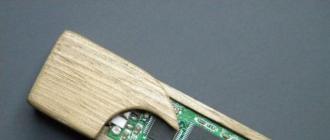
Decorating a kitchen spatula using decoupage technique. Master class with step by step photos and descriptions.
Dear friends and colleagues! I bring to your attention a master class for children "Stand for a brush". It is very simple in the way it is made.
Master class on decorating a computer disk with a craft from salt dough Video Master Class. I bring to your attention a master class on decorating a computer disk with a salt dough craft. If you've watched mine.
Good afternoon friends! The other day I decided to try with the children a wonderful technique of application as "decoupage". Everyone says to do it.
Objectives: - to unite the efforts of parents and teachers in raising children; - to involve parents in active participation in the life of their child.
MASTER-CLASS PEACLINES FROM PLASTIC AND CD DISC Materials: CD, plasticine, threads. 1. Cut off the edge of the disc with scissors. 2. We seal up.
Stand for a mug in the "Decoupage" technique. Master class with step by step photos.
Raisa Ivanovna Bolba, teacher of additional education of the I qualification category, MBOU DOD Center for Technical Creativity, the city of Belaya Kalitva.
This master class is intended for children of secondary school age, teachers of additional education, as well as all lovers of needlework.
Purpose: stand for a mug, a gift with your own hands.
Target: making a stand for a mug.
Tasks:
- to acquaint with the technique of decorating objects using decoupage;
- improve the skills of working with paint, glue, napkins;
- to educate purposefulness, accuracy, artistic taste.
About 20-30 years ago, mug coasters took a firm place in the life of almost every person, they began to select an original name for them. The most popular are the bonfire, coasters and birmat. The name "coaster" was borrowed from the German language and in translation means - the lid of a beer mug. In Germany, there were beer mugs with lids on top. Such mugs cost a lot of money, and in beer shops beer in these mugs was served only for wealthy people. And ordinary people drank beer from ordinary mugs, on which there was a small circle of felt on top. The Germans put this circle under the mug so that it would not get in the way, and at the same time soaked up the accidentally spilled beer. Thus, the lid has been renamed as a mug holder.
Various companies began to place their advertisements on coasters for mugs. Travel lovers bring such coasters for mugs with various drawings or inscriptions from various countries as a souvenir.
We will make a stand for a mug from old CDs, old postcards and patterned napkins.

For work we need the following materials:
- CDs,
- old postcards,
- napkins with a pattern,
- white acrylic paint,
- gouache,
- beautiful cord,
- pencil,
- scissors,
- hairdryer,
- PVA glue,
- glue "Moment-Crystal".
Sequence of work:
For one stand, you need to cut 2 circles from the cards. Colored cardboard will not work, because with repeated application of paint and glue, it will warp. Postcards have a laminated layer on one side and do not warp when paint and glue are applied.


Apply Moment glue to the disc and glue the cardboard circle first on one side, then on the other.


The lower part of the stand can be painted with gouache and varnished, or you can leave it as it is.

So, let's start decorating the stand. Apply paint such as green with a swab.

The paint can be dried with a hair dryer. Then apply PVA glue on a dry surface. The thicker the glue, the smaller the cracks on the surface of the stand will be.

Apply white acrylic paint to slightly dried glue and quickly dry it with a hair dryer. Under the jet of hot air, cracks form in the paint - crackle.

Cut out the motif you like from the napkin. If the napkin is multi-layered, then we use only the top layer with the pattern.

We put a napkin on a stand, drip PVA glue

And we smear from the middle to the edges of the motif.

Add a small text to balance the composition.

Cover the stand for the mug with a layer of thick construction PVA. After complete drying, we decorate the end of the stand with a cord, which we glue with the "Moment-Crystal" glue.

The mug holder is ready.

Another stand and a piece of crackle:


And here are the options for decorating the stands:

These mug coasters are convenient to use at work during your lunch break.
Good luck to everyone who wishes to repeat this master class!