Quite a common problem for owners of Epson R270, R290 and R295 printers
The printer does not see the cartridges, the "drop" is always on - the cartridge replacement lamp.
Sometimes this happens after resetting the ink level in the CISS or after flushing the head.
Sometimes, just after turning on, the printer will no longer recognize the cartridges.
The status monitor shows something like this:
The error can also be diagnosed as follows:
We take out one of the cartridges (if you have original cartridges) or tape the contacts on one of the CISS chips with electrical tape.
If all cartridges except "removed" were detected normally -
There are several reasons for this error:
- the print head is damaged (usually flooded after flushing)
- damaged cable to the head
- damaged cartridge recognition board
- the main board of the printer is damaged
The printer is equipped with a fuse to protect the motherboard from short circuits in the printhead control line.
The first step is to check this fuse.
First, we disassemble the printer.
We remove the trays for feeding and unloading paper, bending the mounts.
We unscrew the four bolts on the body and remove the cover.
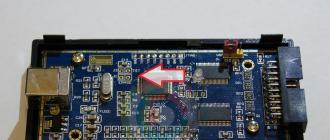
On the left side of the printer (when viewed from the side of the buttons) we see a vertical metal casing, under which is the main board.
Disconnect a dozen connectors, unscrew three bolts and remove the board.
Printer with cover and board removed.
The board removed
Remove the cover
Before us is the fee. Unscrew it completely
My charged fee
We are interested in a fuse marked F2
(Someone has already tried to repair this printer. There are traces of unwashed rosin in the place of interest)
You shouldn't just change the fuse without making sure that the components that caused the short circuit are working.
And even more so, you should not replace the fuse with a jumper.
In my case, the fuse was intact.
The fuse is marked with the letter F. Fuse rating 0.5A
If the fuse is intact, we inspect the train for scuffs or damage.
Mine was undamaged.
Let's move on to inspecting the printhead assembly. The owner assured that he did not rinse the head, so we postpone the check of the unit with nozzles.
Unlock the cartridge unit by rotating the gear and take it out of the parking lot.
Use a flat screwdriver to pry on the latches and remove the side "cheeks" that cover the loops and turn off ONE WIDE loop.
If you remove the narrow nozzle control ribbon, you cannot put it back in without completely disassembling the printer!
With a crocheted knitting needle, alternately press the cartridge sensor latches on the back of the head. (I managed to do it with a straight thin screwdriver)
Epson does not see cartridges - solution to the problem in pictures
Diagnostics
First, you need to identify the symptoms of your printer.
The malfunction can be - in the chips (put a new one, preferably a known good one), in the CSIC, or in the board
If the “droplet” indicator lights up when turned on, which indicates that there is no cartridge or the ink is out. When you press the button above the indicator, the printer will show that there are no cartridges, although you have all the cartridges installed. Take out one, any cartridge and press the button above the lit indicator, the carriage should return to its original position, but the “droplet” indicator will not stop burning, we press the button again, but now the printer will show that the cartridge that you removed is not there. Those. when there are all cartridges in the printer, the printer shows that there is not a single cartridge, and when one cartridge is missing, the printer shows that there is no one of it.
Reasons why your fuse may blow
Print head flooded with ink, electronics moisture, burnt head. Power surges, pulling out the power cord while the printer is running, pulling out electronic loops when the printer is on (especially on the head), contamination or deformation of the contacts on the electronic loop in the printer.
In the above situations, the fuse on the board is on, supplying power to the CSIC and the print head.
If you have a blown fuse, do not throw the jumper and immediately start the printer.
You need to find the reason why you have increased stress and eliminate it.
Instead of a fuse, you can put a jumper or a 100 Ohm-planar fuse.
Instead of transistors, you can put analogs, but I still could not achieve stable operation and therefore I use the originals.
Approximate parameters of transistors
Below are examples of boards from printers Epson Stylus Photo T50, Epson Stylus Photo R270, Epson Stylus S22, MFP Epson Stylus SX125, Epson Stylus TX117, Epson Stylus XP-103, Epson Stylus SX430W.
Epson Stylus Photo T50: fuse F2.
Figure 1 shows the board from Epson Stylus Photo T50, the multimeter shows that the fuse is defective.

Figure 2 shows a close-up of fuse F2.

Figure 3 shows a replaced, new fuse.

In Figure 4, the multimeter shows its resistance.

Epson Stylus Photo T50: ТТ3043 transistors; TT3034.
Figure 5 shows the transistors TT3043; TT3034. close-up.

Figures 6,7,8,9,10 show examples of ringing the legs of TT3043 transistors; TT3034, ringing from the middle to the other four legs.


The second transistor is called in the same way, our transistors are intact, no soldering is needed.
Epson Stylus Photo R270: fuse F2.
Figure 11 shows the board from Epson Stylus Photo Photo T50, the multimeter shows that the fuse is defective.

Using the example of the Epson Stylus Photo T50 printer, we showed how to replace the fuse, in the next photo we soldered the wiring Figure 12.

Epson Stylus Photo R270: A2098 and C6082 transistors.
Figures 13,14,15 show examples of the ringing of the legs of transistors A2098 and C6082.


All transistors are called in the same way, our transistors are intact, no soldering is needed.
Epson Stylus S22: fuse F1.
Figure 16 shows fuse F1 in close-up.

In Figure 17, the multimeter shows its resistance.

The fuse is intact, no replacement is needed, if your multimeter shows a value of 1 like the previous Epson Photo T50 printer figure 1, then you need to replace the fuse.
Epson Stylus S22: C6017, A2169 transistors.
Figures 18, 19, 20 show examples of the ringing of the legs of transistors C6017, A2169.


Epson Stylus SX125: fuse F2.
Figure 21 shows a close-up of fuse F2.

In Figure 22, the multimeter shows its resistance.

The fuse is intact, no replacement is needed, if your multimeter shows a value of 1 like the previous Epson Photo T50 printer, Figure 1, then the fuse needs to be replaced.
Epson Stylus SХ125: transistors С6017, А2169.
The transistors are checked in the same way as on the Epson Stylus S22 printer.
Epson Stylus CX7300: Fuse F1 Figure 23.

Epson Stylus CX7300: transistors A2098 and C6082 Figure 24.

Epson Stylus SX235W: Fuse F1 Figure 25.

Epson Stylus SX235W: transistors A2222 and C6144 Figure 26.

Epson Stylus CX4300: transistors C6017 and A2169 and fuses F1 and F2 Figure 27.

Epson Stylus TX117: transistors C6017, A2169 and fuses F1 Figure 28.

Epson Stylus XP-103: transistors C6144, A2222 Figure 29.

Epson Stylus XP-103: fuse F1, Figure 30.

Epson Stylus SX430W: transistors C6144, A2222 Figure 31.

Epson Stylus SX430W: fuse F1, figure 32.

Advice from the site
Most often, the fuses and transistors on the control board of Epson printers burn due to an incorrect "crooked" attempt to flush the print head, inept assembly, flushing on the contacts, the print head and its contacts flooded with ink, all this is the reason why the fuses and transistors are on. Therefore, we advise you not to risk it, but to buy special kits for gentle washing of Epson printheads, when using special washing kits, you do not risk burning your printer!
Sometimes Epson inkjet printers refuse to print, citing the fact that "the cartridges cannot be recognized"
Here is an incomplete list of printers that are susceptible to malfunctions:
Printers (4 colors): Epson Stylus T26, T27, T30, T40, C110, S22.
Photo printers (6 colors): Epson Photo R270, R290 / 295, R390, T50, T59, P50
MFP (4 colors): Epson Stylus CX3700, CX3900, CX4700, CX4900, TX106 / 109, TX117 / 119, SX125, SX425, SX550 ...
MFP photo series (6 colors): Epson Stylus RX590, RX610 / 615, TX650, TX700, TX710, TX800
First, we look at the status of the monitor on the computer, we need to find out what exactly we are facing. We do not recommend focusing on the readings of LCD displays of MFPs, since they do not carry all the information we need. There are two options:
1) One or more cartridges are not detected.
Everything is simple - either the chips on the cartridges are to blame, or there is no contact with the CSIC controller.
Let's just explain what a CSIC is. This is a smart chip controller on Epson cartridges. It looks something like this:
The easiest way to find out what exactly is to blame is to replace the cartridges, refillable cartridges (refillable cartridges) or CISS (continuous ink supply system).
Or try like this:

2) Not all cartridges are detected!
Most likely, the control board, loops and other electronics are to blame.
Attention! Repair according to the points outlined below is not recommended if you are repairing for the first time, have ONLY the skill of assembling-disassembling, or have never done anything like this (soldering, ringing, etc.)! Better entrust it to specialists. All repairs are carried out at your own risk. Think about it!
So, you still decided to take a chance and try to do everything yourself! Well, go ahead!
Possible options:
a) There is damage or there is a non-contact in the connectors and loops going from the carriage to the main board. In practice, this is rare and, if there are such cases, it is as a result of human intervention. On the TX700 / 710/800 series MFP, it makes sense to pay attention to the cable going to the CSIC board, it is laid separately from the entire bundle.
b) The SCIC board is out of order. Burning it out is difficult enough, but possible. Check if this controller is flooded with ink. This occurs if the user does not care about the printer, or ink pours past the cartridges, or exploits it for wear and tear, without worrying about periodic maintenance. Non-original ink is very "dusty", generously coloring the printer mechanism from the inside. To determine whether this is so, you can only replace this board. For now, let's leave this option (there is still nothing to replace), let's go further.
c) There is a possibility of failure of the CHIP strips or the main SCSI-CHIP, if they are separate. We check by replacing the CISS. Nothing to check? Move on.
d) CSIC board is de-energized! those. defective fuses on the main board. We begin to understand in detail!
To begin with, consider a part of the schematic diagram of the main board of the printer: (if you don’t fumble about this, then it’s better, after all, to spit on pride and take the printer to the SC)

Note that power is supplied to the CSIC and the printer's printhead through a fuse. It is imperative (!) To check whether he is "alive" or not.
First you need to find the fuse itself, or fuses on the board. They are denoted as standard F1, F2, they are rather small in size and are located close to 2 power transistors that control the power supply line of the PG and CSIC.
You will guess how to disassemble the printer and get to the main board (BOARD ASSY MAIN).
I will show using the example of the Epson TX117, TX200, T50 boards:
Note that power is supplied to the CSIC and the printhead
through the fuse. It is imperative (!) To check whether he is "alive" or not.
(How to disassemble the printer and get to the main board (BOARD ASSY MAIN) guess or google yourself)
First you need to find the fuse itself, or fuses on the board. They are designated
standard F1, F2, rather small in size and located close to 2x power transistors
controlling the power supply bus of the SG and CSIC.
Let's show on the example of boards Epson TX117, TX200, T50:


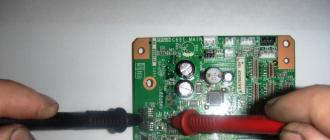
We check the fuse with a tester, and if it is "dead" - it is worth thinking: why did it burn out?
It is common knowledge that fuses protect the power supply from the load. Load in
in our case, this is the CSIC board and the printhead of the printer, and since the fuse is blown, this is not
by chance! We continue our investigation!
We restore the fuse with an ordinary jumper, look for the same heavenly, but for a long time, but
in our case it won't get any worse! The main thing is not to turn on the printer immediately after soldering, but to remove something else.
If the board uses conventional bipolar transistors, such as the TX117 TX200, then
we measure the transitions base-collector and base-emitter. Resistance must be at least 250 Ohm. If
the tester "rang", we change the transistors.
It is highly undesirable to change transistors for analogs, because the power supply circuit of the head is very similar to
old AF power amplifiers and is a balanced pnp / npn pair with zero
point. It is almost impossible to find them on sale, so if you change, then change both at once to
matched pair, rummage through the datasheets and find something suitable.
Now let's look at a more complex case - the board has TT series transistor assemblies. V
an example would be the T50 board.

After restoring the fuse, we measure the transitions on the assemblies, as shown in the photo, if
everything is OK, we connect the loops and measure the resistance between F2 and ground - the resistance should be
within 480 ohms.
If everything is in order, we assemble the printer and turn it on. This moment is called SMOG-TEST! If the smoke did not go straight away, it means that we have the opportunity to install cartridges and print the nozzle test, as the most important printer test.
You also need to pay attention to the following:
In a situation where we are faced with "dead" transistors, we should find out why they came out
out of order - first of all, you need to inspect the printhead connector for liquids - ink, for example. As practice shows, even one small drop in this connector is enough to burn out the main board. If we see traces of electrolysis on the loop, thoroughly clean both it and the connector! Remember, if you leave carbon deposits in this place (which is nothing more than electrically conductive carbon compounds), the printer will run a little and die again. In some cases, it is advisable to replace (re-solder) a burnt-out connector. Let's take a close look at the CSIC connector in the same way.
We deal with the non-definition of cartridges on Epson printers.
Here is an incomplete list of printers that are susceptible to malfunctions:
(Russian model range)
Printers (4 colors): Epson Stylus T26, T27, T30, T40, C110, S22.
Photo printers (6 colors): Epson Photo R270, R290 / 295, R390, T50, T59, P50
MFP (4 colors): Epson Stylus CX3700, CX3900, CX4700, CX4900, TX106 / 109, TX117 / 119, SX125, SX425, SX550 ...
MFP photo series (6 colors): Epson Stylus RX590, RX610 / 615, TX650, TX700, TX710, TX800
First, we look at the status of the monitor on the computer, we need to find out what exactly we are facing. I do not advise you to focus on the readings of LCD displays of MFPs, since they do not carry all the information we need. There are two options:
1) One or more cartridges are not detected.
Everything is simple - either the chips on the cartridges are to blame, or there is no contact with the CSIC controller.
I will immediately explain what isCSIC. This is the controller of smart chips on cartridgesEpson. It looks something like this:
The easiest way to find out what exactly is to blame is to replace the cartridges, refillable cartridges (refillable cartridges) or CISS (continuous ink supply system).
2) Not all cartridges are detected!
Possible options:
a) There is damage or there is a non-contact in the connectors and loops going from the carriage to the main board. In practice, this is rare and, if such cases come across, then as a result of the intervention of individuals, whose hands, I apologize, do not grow at that level. On the TX700 / 710/800 series MFP, it makes sense to pay attention to the cable going to the CSIC board, it is laid separately from the entire bundle.
b) The SCIC board is out of order. Burning it out is difficult enough, but possible. Check if this controller is flooded with ink. This occurs if the user does not care about the printer, or ink pours past the cartridges, or uses it for wear and tear, without worrying about periodic maintenance. Non-original ink is very "dusty", generously coloring the printer mechanism from the inside. To determine whether this is so, you can only replace this board. For now, let's leave this option (there is still nothing to replace), let's go further.
v) There is a possibility of failure of the CHIP strips or the main SCSI-CHIP if they are separate. We check by replacing the CISS. Nothing to check? Move on.
G) The CSIC board is de-energized! those. defective fuses on main board. We begin to understand in detail!
First, let's look at part of the schematic diagram of the main board of the printer:

Note that power is supplied to the CSIC and the printer's printhead through a fuse. It is imperative (!) To check whether he is "alive" or not.
First you need to find the fuse itself, or fuses on the board. They are denoted as standard F1, F2, they are rather small in size and are located close to 2 power transistors that control the power supply line of the PG and CSIC.
You will guess how to disassemble the printer and get to the main board (BOARD ASSY MAIN).
I will show using the example of the Epson TX117, TX200, T50 boards:
We check the fuse with a tester and if it is "dead" it is worth thinking about why this happened ?! It is common knowledge that fuses protect the power supply from the load. The load in our case is the CSIC board and the print head of the printer, and once the fuse has blown, it is no coincidence !!! Do you feel the danger of the situation? In any case, we continue ...
We restore the fuse with the usual "nozzle", to look for the same, of course, there is a sense, but in our case it will not be worse! Don't turn on the printer right away !!!
If the board uses conventional bipolar transistors, such as the TX117 TX200, then we measure the base-collector and base-emitter transitions. Resistance must be at least 250 Ohm. If the tester "rang", change the transistors.
It is highly undesirable to change the transistors to analogs, because the power supply circuit of the head is very similar to the old AF power amplifiers and is a balanced pnp / npn pair with a zero point. It is almost impossible to find them on sale, so if you change, then change both at once to a matched pair, rummage through the datasheets and find something suitable.
Now let's consider a more complex case, the board has TT series transistor assemblies. An example is the T50 board.
After the fuse is restored, we measure the transitions on the assemblies, as shown in the photo, if everything is OK, connect the loops and measure the resistance between F2 and ground, the resistance should be in the range of 480 Ohms.
If everything is in order, we assemble the printer and turn it on. This moment I call SMOG-TEST! If the smoke did not go immediately, then we have the opportunity to install the cartridges and print the nozzle test, this is the most important test of the printer.
What else should you pay attention to !!!
In a situation where we are faced with "dead" transistors, we should find out why they failed:
First of all, you need to inspect the printhead connector for liquids, for example, ink. As practice shows, even one small drop in this connector is enough to burn out the main board. If we see traces of electrolysis on the loop, thoroughly clean both it and the connector! Remember, if you leave carbon deposits in this place (which is nothing more than electrically conductive carbon compounds), the printer will run a little and die again. In some cases, it is advisable to replace (re-solder) a burnt-out connector.
Secondly, in the same way, we carefully examine the connector of the CSIC bracket.
Addendum: Recently I encountered a problem of this kind: We brought a T50 printer for repair, the problem is standard, "all 6 cartridges are not detected." The source of the defect is the ink-filled ribbon of the print head. I washed, cleaned the connector and the cable, checked the transistor assemblies, they turned out to be "alive". The fuse is dead. Restored the fuse with a jumper. I switched it on, the cartridges were identified, but on print - a blank sheet! I disassembled everything again and upon closer examination I found a neat, small hole in the chip of the PG signal encoder. Here is such a crap .. Now here, without fail, I am examining this mikruhu for "holes" :-)

Board repair option. Components soldered from the Epson R270 board.
First, it should be clarified that a similar problem can occur if the ink in the cartridge has run out for the first time after purchasing it. This is especially true for color cartridges. You can solve this type of problem yourself, the main thing is to correctly determine the cause of its occurrence.
Companies that create printers made their devices on such a principle that in the case of self-refilling of the cartridge, and not buying a new one, the printer may not detect it. Use the instructions below to solve the problem.
Epson does not see cartridges - the most popular solutions
On the Internet, you may stumble upon the following solutions to the problem:
- reinstall the "firewood" (that is, all settings);
- hold down the print cancellation button for a long time (more than 6 seconds);
- after delaying the cancel button, immediately order the copying process;
- clean contacts with an eraser;
- use the service of a replacement cartridge;
- buy a new cartridge if not printing.

Sometimes it just turns out that the state of the refueling is recorded only on the new device. Therefore, no further problems should arise. But in some situations, if you refill the cartridge, printing will actually not work. In this case, only the purchase of a new device will help.
What if the Epson printer does not recognize the cartridge?

Look at the contacts of the chip and the chip itself to see if it is misaligned. Make sure there is no plastic residue on the chip. If there is, carefully remove with tweezers. When refueling, many manage to stain the contacts of the CISS chip, or simply grab it with their hands, as a result of which the chip loses its electrical conductivity. The way out is to wipe the chips with alcohol and an eraser before installing.
The battery powering the chip has run out
This type of problem is especially common on the Epson SX model, since the cartridges of these printer models usually come with chips that are powered by special batteries. If the battery runs out, the cartridge may not be detected by the device.
Epson cartridge is not detected - main reasons

- After replacement, the cartridges are not fully inserted (usually a characteristic click is heard with correct installation), which is also the reason that the Epson TX117 printer, as well as other models, cannot see the black cartridge.
- Replaced an incomplete set of cartridges to be refilled. The device works normally only with a complete set of consumables.
- Software “zeroing after cartridge refilling failed, software driver malfunctioning. This is often the reason that the Epson printer does not see the cartridge after refilling.