Hello everybody! Today I will show you how to reset the pampers on the Epson XP-302 printer, but in this example, you can reset them on other models. At relatives, the printer began to print in black and yellow. They gave it to be repaired, they were told that it cannot be done, they need some codes ... Well, I decided to figure it out ...
At first I thought, I'll do a few calibrations and everything will be solved ... But the printer began to display this message: The service life of the ink-absorbing pad has expired.
I started to google what it is in general) On the Internet there is a program for resetting epson counters, called PrintHelp, but it asks for codes that need to be bought! Well, this is not the case) But on some printers it turns out to drop the Epson diaper for free.
If PrintHelp did not reset the counter for you for free, then on the Internet there is the Epson Adjustment Program (Epson has forbidden it to spread).
If the program does not help, then you can try SSC Service Utility or. Run the program to reset the epson diaper. It is called the Epson Adjustment program. So if suddenly it does not fit your printer, then look for a different version.
And so, after starting, select the model and port:

If your model is not there, it's okay, just choose like mine.

The main thing is that the drivers are installed. Otherwise, the program will not see the printer port. Click ok and then select Paricular adjutment mode.

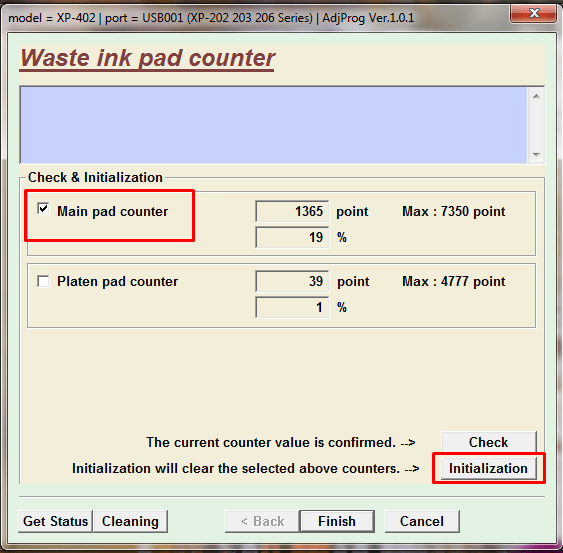
Select waste ink pad counter. This is an ink and diaper counter.

We put all the checkboxes and click Check, thereby we will check the counters.

I have already reset the counter and managed to print a number of pages. But if your printer swears at the diaper, then in the bottom field you will have a value of 100%. Select the top counter and click Initialization, i.e. reset the Epson counter.
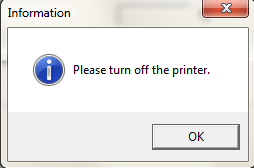
The program will ask you to turn off the printer.

Click ok, after it turns on and we can check. Select the top checkbox and click check again.

As you can see, the reset of the Epson diaper was successful! But remember, it's no coincidence that Epson throws this error. In addition to resetting, I also recommend cleaning the gasket under the cartridges.
Epson L120 requires service. Contact the service center. Adjustment program Epson L120
If your Epson L120 printer displays the message “Maintenance required. Contact the service center. " it is necessary to reset this error using one of the service programs.
A distinctive feature of this program is an unlimited number of counter resets, unlike other programs.
Resetting the error of the pampers (absorber, working off) in Epson L120
- The program was downloaded and activated.
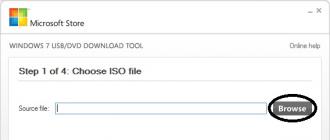
- Open the folder with the program and run the file Adjprog double click (fig. 2)

- In the window that appears, press the button Particular adjustment mode(fig. 3)

- Double-click the item "Waste ink pad counter"(fig. 4)

- If near Main pad counter check the box and press the button Check, then we will be able to check the current value of the counter occupancy (Fig. 5).

After reading the values, the program shows that the counter is overflowed. 100%(fig. 6), so the printer is in error and does not print

- To reset the absorber counter (diaper, working off), you must again put a tick next to the item "Main pad counter", and press the button "Initialization"(fig. 7)

- Push "OK" to confirm error reset (fig. 8)

- Turn off the printer button On / Off. and press "OK" in the program (fig. 9)

- Turn on the printer and we continue to work, error reset.
This error occurs if you print a lot or do a lot of head cleaning from the printer menu. There is nothing wrong with this error, this is the normal behavior of the printer, which is necessary so that you service the printer in time and the ink that collects inside the printer does not flow out onto your desk. Therefore, the error was cleared, but think about how to service the printer.
Video on working with the Adjustment program Epson L120, error reset “Requires maintenance. Contact the service center. "
All Epson printers with a continuous ink supply system have a special counter that counts the number of sheets printed by the printer. We need this counter in order to determine the approximate time for flushing (replacing) the so-called waste ink absorber or as it is popularly called a diaper.
What is a diaper in a printer?
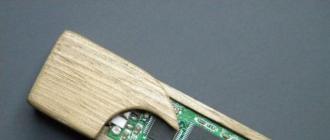
A pampers in a printer is a special plastic container that contains a highly absorbent material such as a sponge. It serves as a collection of ink that is released during the printing of the printer and does not fall on the sheet of paper, for example, during the idle time of the printer or in the period before and after printing.
This is what a diaper looks like in Epson printers
Adjustment Program - Program for resetting pads in Epson printers
This program is free and allows just a few mouse clicks to perform a soft reset (zeroing) of the pampers and ink levels on printers with CISS from Epson.
Full support for L210, L110, L300, L350, L355 models.
After downloading, unpack the archive with the program. It does not require installation, so after unpacking, you immediately need to run the executable file Adjprogcracked.exe.

Run the epson adjustment program to reset the pads in Epson printers
The main window of the program will appear, where you need to select the printer model.

Selecting the printer model in the epson adjustment program
Detailed step-by-step instructions with images are also in the archive with the program.
The version of the program for Epson L130, L220, L222, L310, L360, L365, L366 is located.
You may be interested in this:
When the printer is turned on or between prints during operation, Epson will automatically start the head cleaning procedure. Sometimes, if the print quality drops, you need to start cleaning the print head manually, through the driver. The print head is cleaned with ink, and the pump pumps it through the print head. After that, this ink is drained into a sump or diaper, which is located at the bottom of the printer. The diaper is an absorbent pad and of course it cannot absorb an infinite amount of ink. Therefore, with each cleaning, the printer counts and memorizes the amount of ink poured into the pampers. And as soon as, according to the printer's data, the diaper overflows, it gives an error - "Maintenance required". The printer stops printing and flashes red, blob and paper alternately.
As a rule, the printer counts with some margin, i.e. when the driver says that the diaper is full, in fact, not really. This is a reassurance so that a situation does not occur when you tilt the printer, and ink flows out of it onto your carpet. So, for good reason, the printer should be disassembled, the diaper removed, washed and dried, but the first time, in principle, you can not do this. And so that you never have to pull it out at all, it is better to take it out. The ink will drain into a jar next to the printer, from which it will not be difficult to pour out the ink.
So we figured out the diaper. Now you need to reset the working counter. There are a number of utilities for this.
One of the oldest,.

It works on Windows XP, Windows Vista, Windows 7 and works limitedly on Windows 8. With it, you can reset the diaper of old Epsons.
The next utility,
It allows you not only to dump the diaper, but also
Requirements:
Compatibility: Windows XP (x32), (x64), Windows 7.
Language: Russian, English.
Internet: resetting the diaper is only possible on a computer with an Internet connection.
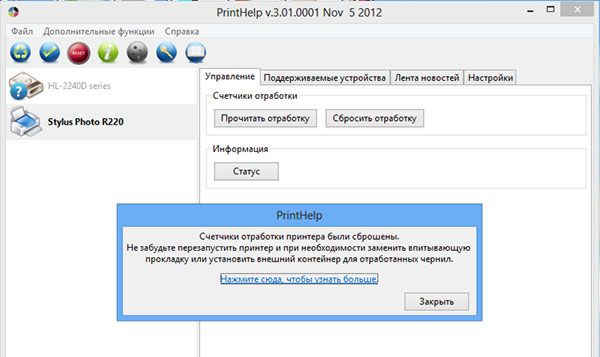
Once launched, the program automatically detects the installed printer. You just have to press the button, Reset processing. However, not all printer models can be reset for free, for some models, the authors of the program sell reset codes.
Another utility is. It is different for each printer.
With its help, the diaper can be reset as follows.
Connect a printer. Run the program

Select Particular adjustrment mode

Run Consumables maintenance counter (in other versions of Waste Ink Pad Counter)
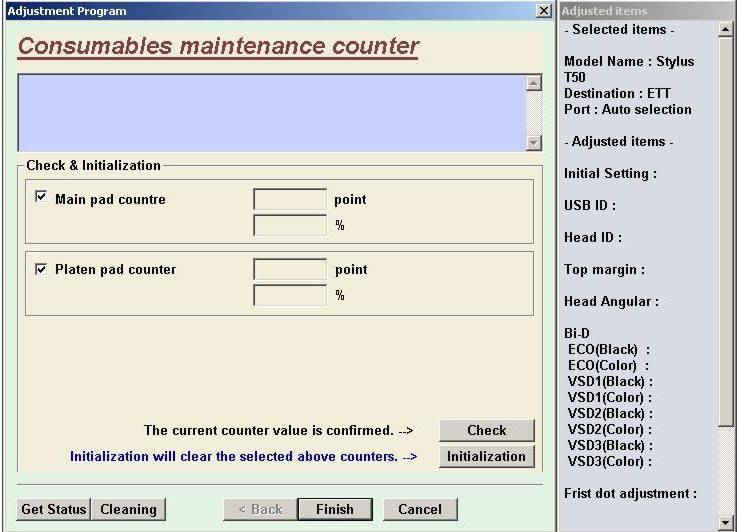
Click Check - the program queries the printer
if everything is fine, it will show the counter overflow
check the boxes - Main Pad Countre, Platen Pad Conter
Press Initializatiion - after finishing - the program will ask you to turn off and turn on the printer.
Working counter reset
"With the active operation of an inkjet printer, there comes a moment when the printer refuses to work and gives an error message, with a request to contact the service center. blinking of two red LEDs under the printer buttons, and also pops up an error window on the computer monitor.
Moreover, a warning about the imminent end of the service life of the absorbent lining (diaper) also pops up in the form of a system message on the computer monitor.

After the warning message appears, you have the opportunity to print another 15-20 images (photos) in A4 format, after which the printer will refuse to print until the waste ink counter is reset.
In all inkjet printers, a special container is used to collect waste ink (Waste Ink), which is often called a "pampers". This "diaper" is a container in which there is an absorbent material that absorbs waste ink well.
Where does waste ink come from in an inkjet printer? Each time it is turned on, the print head is automatically cleaned - a small amount of ink is pumped from the cartridges into the print head, which at this moment is in the extreme right (left) position of the printer, and the ink is “dumped” into the “diaper”. Also, when starting regular cleanings through the printer driver, ink is pumped from the cartridges through the print head into the absorber.
Since the volume of the container for collecting ink, with the absorber located in it, has a certain limitation, sooner or later, there comes a time when the containers overflow, and ink begins to flow out, which causes pollution of the printer itself and everything that surrounds it. ...
To avoid such an extremely unpleasant situation, absolutely all inkjet printers are equipped with a waste ink control system. In reality, this system is nothing more than a program counter that counts the number of times the printer is turned on and all the head cleaning procedures have been performed. Since the volume of ink pumped out of the head during cleaning procedures is approximately known, and the capacity of the sump is also known, it is not difficult to calculate when it is full.
When the counter of the amount of waste ink, presumably drained into the sump, reaches the value preset in the printer's control program, the printer first displays a warning about the imminent end of the life of the absorbent pad, and soon completely blocks the ability to send a print job.
If the inkjet inkjet pad is full, the service technician should take the following actions:
- to replace absorbers - "diapers"
- reset (zero) the Waste Ink Counter. "
You can reset the "pampers" waste ink counter using a special PrintHelp utility from the SuperPrint development team (Resetters). PrintHelp- universal service program for printers Epson, Canon.


The program can perform the following functions for Epson printers (not for all models):
- checking the current value of the waste ink counter
- reset the waste ink counter (some models require a RESET CODE)
- cleaning the print head
- enhanced cleaning of the print head during the initial refueling
- reading and writing the serial number of the printer
- reading and writing USB ID
- reading and writing HEAD ID
- creating a dump EEPROM backup
- paper feed test
- check and test of nozzles
- printout of color fills
- initialize (disable) PF deterioration offset
- getting a status about the status of the printer
- reading ink level
- reset Ink Level and reset Pampers in printers L100, L200, L800 free
List of supported Epson printers:
Models are highlighted in green for which the diaper is reset WITHOUT a Reset Code. Diaper reset WITHOUT Reset Codes is possible only for countries: Ukraine, Russia, Kazakhstan, Belarus, Moldova, Georgia
Artisan: Artisan 50, Artisan 1430, Artisan 700, Artisan 710, Artisan 725, Artisan 730, Artisan 800, Artisan 810, Artisan 835, Artisan 837
B: B40W, B42WD, B1100, B1110
BX: BX300F, BX305, BX310FN, BX320FW, BX525WD, BX600FW, BX610FW, BX620FWD, BX625FWD, BX925, BX935
C: C58, C59, C62, C63, C64, C65, C67, C68, C76, C77, C78, C79, C82, C83, C84, C85, C86, C87, C88, C90, C91, C92, C93, C94, C95, C97, C98, C99, C110, C120
CX: CX2800, CX2900, CX3100, CX3200, CX3300, CX3400, CX3500, CX3600, CX3650, CX3700, CX3800, CX3900, CX4000, CX4080, CX4100, CX4500, CX4600, CX4700, CX00, CX5000, CX5000 CX6500, CX6600, CX7300, CX7700, CX7800, CX8300, CX8400, CX9300F, CX9400Fax, CX9500F
D: D68, D78, D88, D92, D120
DX: DX3800, DX4000, DX4200, DX4800, DX5000, DX5050, DX6000, DX7400, DX7450, DX8400, DX9400F
EP: E-600, EP-302, E-600, EP-702A, EP-703A, EP-705A, EP-706A, EP-775A, EP-801A, EP-802A, EP-804A, EP-804F, EP- 901F, EP-902A, EP-903
K: K100, K101, K200, K201, K300, K301
L: L100, L110, L120, L200, L210, L300, L350, L351, L355, L550, L555, L800, L1300, L1800
M: M100, M105, M200, M205
ME: ME2, ME-10, ME-20, ME-30, ME-32, ME-70, ME-80, ME-82WD, ME-100, ME-101, ME-200, ME-300, ME-301, ME-303, ME-320, ME-330, ME-340, ME-360, ME-401, ME-403, ME-510, ME-520, ME-530, ME-535, ME-560, ME- 570, ME-600F, ME-620F, ME-650, ME-900WD, ME-940FW, ME-960FWD, ME-1100
NX: NX110, NX125, NX127, NX130, NX200, NX210, NX215, NX220, NX230, NX300, NX305, NX330, NX400, NX410, NX415, NX420W, NX430, NX510, NX5156, NX20530
P: P50, P60
PX: PX610FW, PX650, PX659, PX660, PX700W, PX710W, PX720WD, PX730FWD, PX800FW, PX810FW, PX820WD, PX830FWD, PX-203A, PX-V600, PX-V630
Photo: Photo 820, 830U, 890, 900, 950, 960, 1280, 1290, 1390, 1400, 1410, Photo 1430, Photo 1500, 2100, 2200
PictureMate: PM100, PM210, PM215, PM225 PM235, PM240, PM250, PM260, PM270, PM280, PM290, PM310. diaper reset is NOT available. Reading is available.
PM: PM-3500C, PM-4000px, PM-G800, PM-G4500, PM-G5000, PM-A820, PM-A890
R: R200, R210, R220, R230, R240, R245, R250, R260, R265, R270, R280, R285, R290, R295, R300, R310, R320, R330, R340, R350, R360, R380, R390, R800, R1800, R1900, R2000, R2400, R2880, R3000
RX: RX420, RX425, RX430, RX500, RX510, RX520, RX530, RX560, RX580, RX585, RX590, RX595, RX600, RX610, RX615, RX620, RX630, RX640, RX650, RX680, RX685, RX690, RX700
S: S20, S21, S22
SX: SX100, SX105, SX110, SX115, SX117, SX125, SX130, SX200, SX205, SX210, SX215, SX218, SX230, SX235, SX400, SX405, SX410, SX415, SX420W, SX425, SX415, SX420W, SX425, SX425 SX600FW, SX610FW, SX620
T: T10, T11, T13, T20, T21, T22, T23, T24, T25, T26, T27, T30, T33, T40W, T42WD, T50, T59, T60, T1100, T1110
TX: TX100, TX101, TX102, TX103, TX105, TX106, TX109, TX110, TX111, TX115, TX116, TX117, TX119, TX120, TX121, TX125, TX130
TX200, TX209, TX210, TX219, TX220, TX230, TX300F, TX320F
TX400, TX405, TX408, TX409, TX410, TX419, TX420W
TX510FN, TX515FN, TX525, TX550W, TX560WD, TX600FW, TX610FW, TX620FWD, TX650, TX659
TX700W, TX710W, TX720WD, TX800FW, TX810FW, TX820FWD, TX830FWD
WorkForce: WorkForce 30, 40, 42, 310, 315, 320, 323, 325, 500, 520, 600, 610, 615, 630, 635, 840, 1100
WorkForce WF-7010, WF-7011, WF-7012, WF-7015, WF-7018, WF-7510, WF-7511, WF-7515, WF-7520, WF-7521, WF-7525
WorkForce WF-2010, WF-2510, WF-2520, WF-2528, WF-2530, WF-2538, WF-2540, WF-2548
WorkForce WP-4011, WPM-4011, WP-4015DN, WP-4020, WP-4022, WP-4025DW, WP-4092, WP-4095DN,
WP-4511, WP-4515, WP-4520, WP-4521, WPM-4521, WP-4525, WP-4530, WP-4531, WP-4532, WP-4533, WP-4535, WP-4540, WP- 4545, WP-4590, WP-4592, WP-4595 - diaper reset is NOT available. Reading is available.
XP: XP-20, XP-30, XP-33,
XP-100, XP102, XP-103, XP-111,
XP-200, XP-201, XP-202, XP-203, XP-204, XP-205, XP-206, XP-207, XP-208, XP-211, XP-212, XP-214, XP- 215, XP-216, XP-217
XP-300, XP-302, XP-303, XP-305, XP-306, XP-311, XP-312, XP-313, XP-315,
XP-400, XP-402, XP-403, XP-405, XP-406, XP-411, XP-412, XP-413, XP-415, XP-510,
XP-600, XP-610, XP-605, XP-615, XP-700, XP-710, XP-750, XP-800, XP-810, XP-850, XP-950
For those printers in which the diaper is made in the form of a separate cartridge with a separate chip, it can be reset only with the chip programmers.
Using the program free... All functions are supported incl. and a diaper reset function. For some models, this function works after entering