In today's market of acoustic equipment, there are many sound systems - they can be of different types, power and design, you can choose speakers for every taste and for every need. However, purchased speakers are not always ideal. Many people want to try to make acoustic devices with their own hands - from the realization that this is not a product from a Chinese factory, but something created on their own, the speakers will even sound better subjectively.
Of course, buying speakers is much easier and probably cheaper. But putting together your own speakers isn't that difficult. The complexity of the process depends on several factors:
- What speakers do you need. Whether you want to assemble a full-fledged multichannel system or a simple stereo pair, they must be powerful or not very, broadband or multiband. From all this depends, first of all, the complexity of the calculations, and then only the complexity of the assembly.
- The number of parts available. The scale of the project can be different - someone assembles only the case, and buys electrical parts ready-made, and someone even makes a control microcircuit (crossover) and an amplifier on their own. The only thing that is bought in all cases is dynamic emitters, since it is almost impossible to assemble them outside the factory conditions.
- Experience and skills. The main thing that you need to have is straight arms, capable of doing woodworking at a decent level, because in the case of assembling speakers with your own hands, the final quality of the speaker system depends on the quality of the case.
If you are sure that you are ready to assemble the speakers yourself, you need to prepare tools and materials, and you can start. Leaving aside the question of what type the final speaker will be - it doesn't matter, the general principles of assembly are the same regardless of whether you are going to small front speakers or a huge and powerful 5.1 system. In principle, only the amount of work and the number of calculations will differ.
Column design
Before you start making acoustic devices with your own hands, you need to figure out what and in what form they can be made. First of all, you should find out what the speaker case can be.
The quality of the enclosure plays a huge role in making the sound clear and loud. If the box is assembled with gross design errors, the consequences can be very different - from a simple deterioration in sound quality (for example, it will be too dull) to complete inoperability of the speaker. Do not worry ahead of time - having calculated everything exactly, everything will work out at a very decent time. If there are any flaws, they can hardly be identified with the naked ear. It is also worth remembering that in working with a tree, a decimeter of error is not an error, so minor errors are quite forgivable.

The first thing to choose is the shape of the future columns. It can be almost any, but for independent work it is best to choose the traditional rectangular shape. If you plan to manufacture not a broadband speaker, but a subwoofer, then the shape should be cubic. Please also note that in the manufacture of a low-frequency speaker, the most accurate calculations of the volume of the speaker, as well as the phase inverter, are required, otherwise the bass will not be reproduced well enough, which will nullify the meaning of the work.
Column sizes can also vary. If you are going to use a large set of speakers - up to three mid-range, one tweeter and a low-frequency subwoofer - the speaker must of course be tall. At the same time, it can be narrow - the volume is quite enough for high-quality sound. In general, a lot can be said about calculating the volume - but all especially accurate calculations do not make much sense if you do not have ears that can catch the slightest deviations in the amplitude of the sound from a perfectly straight line. So it is enough to roughly calculate the required volume based on the diameter and power of the dynamic emitter. If the speaker is multi-way, the subwoofer is taken as the basis.
One of the most important points is the correct choice of material. The walls of the column housing can be made of different types of material, the main thing is that it meets three requirements:
- rigidity - so that the walls do not bend under the influence of the vibration of the speakers;
- ease;
- affordable price.
Medium density chipboard or MDF is best suited. Solid wood will not work for the reason that it is too flexible and creates a resonance effect. In addition, the column is not an absolutely static object - when working in it, vibrations and similar movements invisible to the naked eye always occur, which is why unpressed wood dries up relatively quickly and becomes unusable. One of the few woods that can be used to make a do-it-yourself speaker is ebony, or ebony, which is the hardest of all woods and is also perfectly polished. However, ebony is very expensive, so in most cases it will not work - after all, one of the goals of independent work is economy.

Another possible material option is multilayer plywood. It is easy to handle, and after assembly, the case can be finished with any decor - for example, natural veneer. Its only drawback is not the highest rigidity, so for greater structural strength, it will be necessary to additionally cut out the ribs that will be placed inside the box.
In addition to the materials described, it is possible to use GVL or DSP - they themselves have good sound insulation performance, which allows you to save some money on the protective material. However, they are heavy and difficult to handle. It is not recommended to use plastic at all - we will leave the polymers to the factory manufacturers. Thus, it is best to opt for chipboard, especially laminated one - it is better in properties and looks good, imitating almost any material - for example, the same ebony.
As a result, the column should have the following qualities:
- Flat Frequency Response - This parameter reflects the sound quality as it is the difference between the received electrical signal and the output sound waves. It is at obtaining the ideal frequency response that all efforts should be directed in the manufacture of a home-made column. The quality of the frequency response is affected by many factors - this is the correct location of the speaker parts inside the case, and the quality of the materials used, and even the environment.
- Decent efficiency. Since in dynamics the electrical signal is converted into mechanical movements of the diffuser - vibrations of its membrane, which create sound - the efficiency is always very low. You need to try to raise it as high as possible. The correct selection of parts can help in this.
- Subjective sound quality - the speaker should be pleasant to listen to, because it will not be used by a device for measuring the characteristics of sound, but by yourself.
- Nice design - the more attractive the speaker looks, the more enjoyable it will be to use.
Having fully prepared for work and having drawn a rough draft of the column, you can start making the column with your own hands.

Acoustic device technology
One of the main principles that should be followed when working is accuracy. It is necessary to make all measurements as carefully as possible before proceeding with cutting out the parts, and before fastening them, it is necessary to try everything on to each other.
The stages of making a column are as follows:
- The walls of the future building are drawn on the prepared chipboard sheets. On the walls, you need to mark the places for installing the speakers - the holes should be round and ideally fit the size of the radiators, so that in the end there are no gaps.
- Details are cut out. If the board is varnished, it is better to cut it with the trimmed side up so as not to damage the decorative coating.
- How to fasten the walls of the column? You can use two methods: either use glue or epoxy, or just screw it up. In the first case, you need to do everything very carefully so that the column does not warp. You can use the vise system to press the glue-lubricated parts together. It is also necessary to fasten the walls with thin screws carefully so that they enter at a perfectly right angle.
- The body must be airtight, therefore, if the joints of the walls are not tight enough, the cracks must be filled with felt impregnated with glue. If the back panel is removable, you need to stick a polymer or rubber seal along its edge.
- If the box is closed, instead of upholstering the walls with soundproofing, cotton wool or foam rubber can be filled in directly, filling the entire volume of the column with it. The main thing is that it does not come into contact with the rear surface of the diffuser. In addition, a channel must be formed from the emitter to the phase inverter.
- It is not necessary to calculate the length of the phase inverter - it is perfectly selected empirically. The diameter is easy to calculate - for example, a 5 cm wide pipe is perfect for a speaker with a diameter of more than 100 mm.The length is determined as follows - two homemade cardboard tubes are taken and inserted into each other, and then placed in the hole intended for the phase inverter. Then the column must be turned on and the tubes must be moved relative to each other until the air flow from the hole becomes most active.
- When the case is assembled, all that remains is to place the speakers and amplifier in it. Emitters are connected either in series or in parallel, depending on the required speaker characteristics.
If you follow the technology, you will undoubtedly get a very high-quality speaker.
DIY speaker creation: video
At first glance, making your own speakers is quite simple. However, this is a delusion. First of all, it should be noted that the models are manufactured with different elements. Depending on them, the parameters of the device and the sound quality will be different.
There are special requirements for computer speakers. You can also make a model for a car or studio yourself. In this case, it is very important to adhere to the instructions. First of all, for assembling the speakers, you should consider the standard model scheme.
Column layout
The speaker layout includes speakers, trims, diffuser and crossover. Powerful models use a special bass reflex. Amplifiers can be installed with field-effect or switching transistors. In order to improve the sound quality, capacitors are used. The woofer is matched with an amplifier. The dynamic head must be attached to the seal.

Single speaker models
Single speaker speakers are very common. To assemble a model, you will first have to deal with the case. Plywood is often used for this purpose. At the end of the work, it will have to be sheathed. However, the first step is to make the side struts. For this purpose, you will have to use a jigsaw. you can pick up a small power.
The inner side of the plywood must be stitched with vibration isolation tape. After fixing the speaker, the seal is fixed. For this purpose, glue is used. All that remains is to attach the diffuser. Some people make a separate shelf for it and fix it with stacking screws. To connect the speaker to the plug, a terminal block is installed. How do I turn on the speakers? For this purpose, a cable from the terminal block is used, which must lead to the power source.
Drawing of the model for two speakers
Speakers for two speakers can be made for home or car. If we consider the first option, then the diffuser will need a pulse type. First of all, strong plywood is selected for assembly. The next step is to cut the bottom strut. Models with legs are very rare. You can use regular varnish to cover the veneer. There is no need to glue the vibration damping tape to the A-pillar. The diffuser is mounted under the speaker. To make a hole in the panel, you need to use a jigsaw. The phase inverter is fixed at the rear wall. Some people make devices with horizontal speakers. In this case, the diffuser will be at the top of the structure. The speaker wires are of a two-wire type.

Devices with three speakers
Speakers (homemade) with three speakers are very rare. These devices are most suitable for multi-channel type. For the assembly of the model, first of all, sheets of plywood are selected. Some also advise using veneers. However, models made of natural wood are quite expensive on the market. The speakers should be installed horizontally. An amplifier is also required for the device.
Metal corners are used to fix it. Lag screws will be needed to connect the plates. In some cases, the plates are attached with glue. Further, the model will have to be partially covered with leatherette. The next step is to install the terminal block. In order to fix it on the body, you will need to make a separate hole. It is also important to note with regulators. Microcircuits are used for them of the capacitor type. When the speakers fade, you need to change the diffuser.
Studio devices
Studio speaker designs assume the use of powerful speakers. The diffuser is most often used of the impulse type. Many experts recommend installing two amplifiers. A Zener diode is required for normal operation.
For the purpose of self-assembly of the speakers, the case is first of all made. Round holes are made for the speakers on the front panel. You will also need a separate output for the bass reflex. The design of the columns is quite different. Some people prefer to paint the surface of the case. However, there are models covered in leather.

Models for computers
Speakers for computers are often made for one speaker. To assemble the model, thin veneer sheets are selected. A hole for the speaker is cut out on the front panel. The phase inverter should be located at the rear of the cabinet. If we consider models of low power, then the amplifier can be used without a resistor.
In order to adjust the volume of the speakers, special crossovers are used. These elements are allowed to be installed on the phase inverter. If we consider devices with a power of more than 100 W, then amplifiers can only be taken with resistors. Some select impulse diffusers for the model. At the end of the work, a terminal strip is always installed.
Car modifications
Available for two or three speakers. For self-assembly of the model, you will need plywood sheets. In some cases, varnished veneer is used. To fix the speaker, you need to make a hole in the panel. The next step is to install the phase inverter. Some modifications are made with low frequency cores. If we consider the speakers (homemade) of low power, then the phase inverter is allowed to be installed without an amplifier.
In this case, a multi-channel crossover is used to adjust the sound. Some specialists install terminal blocks behind the bass reflex. If we consider speakers with a power of more than 50 W, then the microcircuits are used for two amplifiers. The diffuser is fitted as standard with an impulse type. It is important to take care of the vibration isolation layer before attaching the housing. For the terminal block, a separate hole must be made on the plate. Some people think that the body should be cleaned without fail. The speaker wires will work with a two-wire type.

Open-body speakers
Open-case portable speakers are fairly easy to make. Most often they are made with one speaker. Holes are drilled on the back of the device with a drill. The plates are directly connected with lag screws. The diffuser for such devices is of the impulse type. Bass reflexes are often installed with a single amplifier. If we consider powerful portable speakers, then they use a resistor crossover. It is attached to the bass reflex. Many experts recommend installing the speakers on the seal.
Closed-case devices
Loudspeakers (homemade) with a closed case are considered the most common. Many experts believe that they are the best in terms of sound quality. The phase inverters for devices are suitable for the operational type. Woofers are installed in holes. For the purpose of assembling the body, ordinary plywood sheets are suitable. It is also important to note that there are modifications with cores. If we consider high-power speakers, then the terminal blocks are installed in the lower part of the case. The design of the models is quite different.

20W models
Assembling 20 V speakers is quite simple. First of all, experts recommend preparing six veneer sheets. They should be varnished at the end of the work. It is more expedient to start the assembly with the installation of the speakers. The phase inverter is used of a pulse type. In some cases, it is installed on pads. Also, experts recommend using rubber seals.
The speakers are powered via the terminal block. It is attached to the rear panel. The phase inverter can be installed with or without an amplifier. If we consider the first option, then the cores are selected of the phase type. In this case, the woofer can be omitted. If we consider speakers without an amplifier, then they use a crossover. At the end of the work, it is important to clean the body and varnish it.
50 W Devices
Speakers (homemade) 50 W are suitable for conventional acoustic turntables. In this case, the body can be made from ordinary plywood. Many experts also recommend using natural wood veneer. However, it is important to note that he is afraid of high humidity.

After choosing the material, you should tackle the speakers. They must be installed next to the bass reflex. In this case, you cannot do without an amplifier. Many experts recommend choosing only low-frequency crossovers. If we consider modifications with a regulator, then they use a pulse diffuser. In this case, the terminal block is installed last. You can always use leatherette to decorate the speakers. A simpler option is to cover the surface with varnish.
Speakers with a power of 100 W
Speakers for 100 W are suitable for powerful ones. In this case, the phase inverter is taken only of the impulse type. It is also important to note that the amplifier is installed with a crossover. Many experts recommend using veneer to assemble the chassis. It is more expedient to install the woofer on a lining.
Making columns with your own hands is within the power of someone who knows how to handle a soldering iron, and also understands electrical circuits. To work, you will need a small number of parts that can be borrowed, for example, from car radio tape recorders. Also, you will need material for the manufacture of speaker enclosures. Usually wood is used for these purposes, but you can even use a plastic case from an unusable acoustics. Before sitting down to the soldering iron and etching the printed circuit board, it is worth choosing the design, microcircuit, and capabilities of the speaker system.
What do you need from acoustics?
It's nice when the sound reproduced from a personal computer sounds in the entire audible range (from 20 Hertz to 20 kHz). To emphasize some specific frequencies, you need to use special filters. Most of the cheap speakers that can be found on the market reproduce sounds in the range from 50-100 Hertz to 15 kHz. This makes the sound seem incomplete, ugly. Therefore, do-it-yourself speakers must have higher performance to meet your needs.
Decide immediately what frequencies you plan to emphasize, whether your amplifier will have the ability to manually adjust. But if you decide to go the easy way, then it will be enough to filter out the low and high so that devices that reproduce this spectrum work in parallel with the main speakers. You've probably heard words like "tweeters" (small speakers that filter high frequencies) and "subwoofer" (a large wooden box that houses a speaker for bass reproduction). You will have to make them yourself.
What do you need for a subwoofer?
It won't work without a quality box. Surround sound is created by air that moves inside the box. Moreover, the air drives the speaker diffuser. This means that you need to make a closed box with one hole for air outlet. Since you are making speakers for a computer with your own hands, there is no need to use the huge speakers that are used for car audio. The ideal option is a car acoustics used as standard, which is installed in the front. Small diameter speakers, rubberized diffusers, soft and elastic. This is exactly what a subwoofer requires.

Of course, it will not create strong air pressure, but for a small room it will be enough to emphasize low frequencies. You will also need a bass amplifier, there are a lot of them on the radio markets. If possible, you can remove it from the old car tape recorder. The output power must be at least 20 watts, and the power supply of the microcircuit is preferably unipolar. But the most important thing is a low-pass filter (LPF), because how to make a speaker with your own hands with a subwoofer without this unit will not work. Do not overload the design with complex low-pass filters on microcircuits and operational amplifiers. A passive filter made up of resistors and capacitors is enough. Frequencies are cut off depending on their parameters.
How to make a subwoofer box
For the manufacture of the box, you need to use solid wood. Particleboard or fiberboard is ideal, its thickness should be no more than 5 mm so that the structure is as light as possible. If there are old Soviet TVs in wooden boxes, then you can make a good box out of them. Use a jigsaw to cut out all the structural elements. Do-it-yourself speakers must be durable, so do not spare glue and self-tapping screws for fastening. The bezel on which the speaker is mounted is attached last.
Use triangular wooden slats to stiffen the box. Try to glue all small cracks and gaps. After all, the air in the subwoofer will move, and you need it not to come out of the slots, since the sound deteriorates because of this. In the back of the box, you need to drill a hole for the wire, a connector is mounted on the outside for connecting to the amplifier. It is much more convenient if the do-it-yourself speakers are compact and without external blocks.
How to make a power supply
As mentioned above, you should not take a microcircuit with a bipolar power supply for the design. The reason is the complexity of the power supply, it is not easy to get the current required for operation. Therefore, it is best to make structures that can be connected to a unipolar one with a voltage of 12-24 V. And subsequently, repairing the speakers with your own hands will be much easier, if, of course, some kind of breakdown happens. The power of the transformer should be slightly higher than the power of consumers - all amplifier microcircuits.

The best option is to manufacture one power supply for all devices. For the effective location of all acoustics units, it is worth placing both a power supply unit, a low-pass filter with an amplifier for a subwoofer, and an ULF for the main speakers and "tweeters" in one case. This will allow you to use the equipment ergonomically, and the number of wires is minimized. On the back of the subwoofer, you need to install connectors for connecting the main speakers and tweeters. But keep in mind that the subwoofer is a source of vibration, therefore, the soldering must be done with high quality, and the attachment to the case must be done with rubber washers.
Do-it-yourself speakers: amplifier and power supply
The amplifier and power supply unit can also be embedded in the subwoofer housing to save space, and on the outside you can install connectors for connecting "tulips". The hole is filled with sealant, after which the front side is installed. It is also mounted first with a sealant, and then attracted with self-tapping screws. After the box has dried, it must be covered with a suitable material.

A simple circuit can be used as a power supply: a transformer, a rectifier bridge and 2-3 electrolytic capacitors. Such speakers for a computer, assembled with their own hands, will work great, the sound will be clear and pleasant. If there is a slight hum, then increase the electrolyte capacity. In the absence of elements with a large capacity, several pieces can be connected in parallel, then the total will be equal to the sum of all capacitors.
How to make basic columns with your own hands
You can use both wood and plastic to make the case. It is better to give preference to the first one, as its use in acoustics improves the sound quality. If you are too lazy to engage in sawing wood, then you can refine the speakers from the old radio tape recorder or use them without alteration. Your amplifier and power supply will be assembled in the subwoofer box, so all that remains is to connect the speakers to the required connectors. Therefore, if you have two speakers from the music center, you can safely use them.

If you decide to do everything in the best possible way, then by analogy with the subwoofer box, you also make two cases for the main speakers. If desired, they can also be pasted over with attractive material. Pasting with thin felt, for example, improves the sound quality of the speaker system. In these speakers, it is most reasonable to install two speakers each - for mid and high frequencies. This will both save wires for connection and provide a more attractive appearance of the entire system.
Manufacturing a printed circuit board for amplifiers and rectifiers
Perhaps no less laborious process that will take a lot of time. If the scheme you have chosen is simple enough, then you can apply the pattern to the foil material using a permanent marker. Only pre-treat the foil with electrolyte for car batteries or hydrochloric acid. This will degrease the surface and improve the pickling process. If the drawing of the printed circuit board is complex, then it is better to use laser-ironing technology and software for drawing tracks. Here's how to make a column with your own hands, namely a printed circuit board for it.
In the program, you outline the arrangement of elements, draw tracks, and then print the resulting image on a laser printer with maximum black saturation. It is better to use glossy paper. Then lay the drawing with the front side on the surface of the PCB foil, fasten the paper and wrap it in a clean rag. Now you need to drive the heated iron over the rags so that the drawing is printed as accurately as possible. This procedure takes 10-15 minutes. After its completion, moisten the paper in water, all excess will go away, and only the toner will remain on the foil. If necessary, adjustments need to complete the missing elements with a permanent marker.
Etching board
After the transfer is complete, you will need a ferric chloride solution. Most radio amateurs use it, since the etching process with it takes little time. If you use a solution of copper sulfate and salt, then etching can take a day or two, depending on the concentration of substances. It also happens that a solution of ferric chloride badly corrodes copper, so to increase the etching rate, you need to heat it. Just try not to miss the moment when the tracks will be freed from excess metal, otherwise the part of the foil under the toner will be destroyed.

In principle, you can make do-it-yourself music speakers without etching printed circuit boards. There is a hinged installation, which is much easier to do. But after all, a beautiful board with the correct installation looks much nicer than the wires and leads of the elements collected in a heap. And the possibility of interference in the case of surface mounting is much higher. After etching the board, it must be thoroughly washed and dried. And only after removing the toner layer with a solvent or alcohol, you can start installing the elements.
Mounting elements on a printed circuit board
Now you just have to outline the location of all the elements on the board surface. First, make marks in the places where you want to make holes with a drill with a diameter of 1-1.2 mm. It is not an easy task, since with strong pressure, you can simply break the drill. To improve the printed wiring, it is necessary to tin (cover with a layer of tin) all the tracks of the board. To do this, you need to process all of them with a rosin solution, then walk over each with a heated tin soldering iron so that the solder will reliably adhere to the copper surface. Excessive heating is not needed, since there is a risk that the foil will begin to peel off the PCB.

Before installing the elements, their terminals must also be tinned. Only in this case, do-it-yourself computer speakers will have the highest possible reliability. In the presence of vibration, the soldering can very quickly collapse, contact will disappear, and the amplifier will stop working or will work, but with a wheeze, unstable.
Conclusion
As can be understood from all that has been said, you can make high-quality acoustics from any material that is at hand. Pay only attention to its condition, do not use rotten wood for a subwoofer or speakers. The element base of the bass amplifiers is very small - one microcircuit is enough, which provides an output power of 10-20 watts in two channels. Simple music speakers, designed by your own hands, will serve you for many years, and the sound quality will allow you to enjoy both music and movies with special effects.
The quality of sound reproduction in the car depends entirely on the location of the device in the passenger compartment. It is also necessary to take into account all the technical parameters and the resonance index of the "boxes". The body of the sound reproduction device to be used in a particular application is ideally made of suitable materials capable of providing the necessary resonance. It is for this reason that the most productive work is DIY work. But how to make columns if you have never done this before? To fully understand the matter and search for an answer to this question, it is necessary to understand all the nuances of creating acoustic devices. Today you will get acquainted with information that will help you create a corpus with your own hands, which will positively affect your budget and give you a lot of useful experience.
What's important for speakers?
First you need to decide on the size of the equipment. And to determine the size, you should choose a location:
- The most popular place is the trunk because there is plenty of space. Also in this compartment there are all the conditions for creating a certain resonance, which makes the sound a little different.
- You can also mount it near the rear windows, but then you have to reduce the size of the cases, since large devices simply will not fit.
How to make do-it-yourself speakers at home? To do this, you need to get acquainted with the four stages of creation.
Measurements
To determine the dimensions of the case, you need:
- Choose a place.
- Estimate the occupied space.
- Measure the allotted area.
Important! If the trunk is chosen as the location, then 30 centimeters is quite enough, and at least 15 centimeters for positioning in the rear seats.

What are we building from?
In order to assemble the columns, the following materials should be selected:
- Chipboard. It will be very easy to find such material, and the democratic price tag contributes. The main advantage of chipboard is good recoil, which will save the car enthusiast from listening to distortion. Also, the weight of the chipboard structure will be practically imperceptible.
- Ebonite. Solid rubbers look good, but the muffled sound is a little frustrating. In addition, it will be very difficult for you to find a piece in the shape of a rectangle.
Important! Also, some buyers complain about an unpleasant smell, but ebonite is flame-resistant, unlike chipboard, so short circuits (short circuits) are not afraid of it.
- Wood. You can use any wood as a body, but seasoned experts recommend giving preference to oak or pine, since their structure has a good effect on the sound. In addition, no one forgets about the appearance, which in this case can be made very attractive.
Important! Wooden structures can be coated with a layer of paint, which will have a positive effect on the aesthetics of your invention.
Getting Started
How to make a speaker at home? The case is the most important component, so we will consider exactly its creation.
The most common and convenient option looks like this:
- Using a hacksaw, you harvest future parts from the selected material.
- Select the components to which the speakers will be attached and punch holes in the center.
Important! The diameter of the holes must be chosen so that it matches the diameter of the bottom of the device.
- Next, cut out small rings and attach them to the holes you made. This will help fix the speaker well. Create a shape that resembles a plate with an embossed bottom. Glue these rings to the finished components.
- Create a few more holes, only in the shape of a triangle. They need to be made around the aforementioned rings. These steps will help you achieve optimal sound reproduction so that all waves penetrate the cabinet.
- Take care of the inside of the structure and make small partitions. Choose a length that is identical to the body length. These parts will be needed to fix the bass reflex.
- Make the compact ports, into which you will later need to thread the terminals.

Build phase
To connect the body together, you will need:
- Fasten all the parts using glue and self-tapping screws.
- Fill the structure with padding polyester.
- Place the speaker in its place.
- Apply varnish to the invention in order to protect the material and give a decent appearance.
Important! For painting, you can also use special paint on wood, and some of the components can generally be made in any other color scheme.
Sound systems
In fact, columns are not always required. You can create acoustics in a car in another way:
- Make foam podiums. To do this, you need to create a cardboard template and put it on the place where the podium is supposed to be.
- Cut out a solid base. A sheet of plywood or reinforcement can help you with this.
- Create a base from two rings. The radius of the first one should be identical to the radius of the mesh, which is intended for protection. The diameter of the second ring must be matched to the column size.
- Connect the rings using self-tapping screws.
- Make 6 bars to recreate the slope. All parts will need to be fastened together with glue.
- Pour foam into the structure and leave to dry completely.
Important! Instead of plywood sheets, you can take pieces of different wood. For such a task, it is worth choosing only dry materials that do not have visible defects and cracks. In this case, it is also recommended to cover the entire structure with varnishes in order to give it reliability. If you are looking for more efficiency, then secure all components using 2 slats.
Assembling a speaker at home is not as difficult a task as many might think. With the necessary materials and information, you can not only get a good and high-quality speaker with clear sound, but also save a decent amount of money.
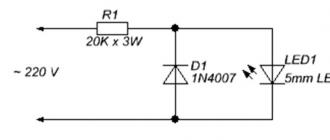
First you need to buy or make your own sound amplifier.
How to make a homemade speaker amplifier
This is a very simple way to assemble an audio amplifier. Absolutely everyone can assemble such an amplifier without much effort.
Necessary materials
Crown connector;
Crown 9 Volt;
1 Watt speaker with 8 kOhm impedance;
3.5 mm mini-jack;
10k ohm resistor
Switch;
Chip LM386;
Capacitor for 10 Volts and 220 μF;
Soldering iron.
Manufacturing
Step 1
Place the microcircuit on the table. In order not to confuse the sides and correctly solder all the wires to the microcircuit, you need to pay attention to the hole on one of the sides of the microcircuit. This hole must be positioned away from you, as shown in the image:

Step 3
The positive contact of the connector must be soldered to the second contact of the switch.

Step 4
The fifth "foot" of the microcircuit must be soldered to the positive contact of the capacitor.

Step 5
Connect the remaining capacitor contact with a soldering iron and a cord to the positive contact of the speaker.

Step 6
Having made a jumper, as shown in the picture, you need to solder the negative contact of the speaker with 2 and 4 pins of the microcircuit.

Step 7
Solder a resistor to the third contact of the microcircuit.

Step 8
Disassemble the mini-jack, connect the left channel to the right channel, and solder to the remaining channel of the resistor through the wiring.

Step 9
Connect the minus of the mini-jack to the minus of the speaker using a wire and a soldering iron.

Step 10
Solder the negative wire of the connector to the negative terminal of the speaker.

Step 11
The speaker for the future speaker is made! Now all that remains is to test. If the speaker does not work, then it is worth revising the previous points to correct errors.
Column assembly
Now we start making the column itself.
Necessary materials
Polypropylene pipe, the diameter of which is equal to the diameter of the column or slightly larger;
DVD or CD disc;
Drill;
Hot melt glue;
Scissors;
Drill or screwdriver with drilling attachments;
Sandpaper;
Manufacturing
Step 1
Cut the pipe, leaving a small bulge under the connector. Before you start cutting, you need to mark this bulge on the pipe according to the dimensions of the connector itself.

Step 2
Draw a circle on the disc in the center using polypropylene tubing. This circle must be cut with scissors and the edges must be aligned with a drill. Using scissors on the disc, make two small indentations close to each other for the wires.

Step 3
Insert the amplifier into the tube. If necessary, carefully fix with hot melt glue from the inside.

Step 4
Drill a hole above the bulge for the switch, equal in size to the switch itself or slightly smaller.

Step 5
In advance, you need to unsolder the wires from the switch in order to push the wires into this hole, and then solder them back. Then insert the switch into the hole. If necessary, fix with hot melt glue from the inside.