After installing or upgrading the system to Windows 10, many users have noticed the appearance of a folder such as ESD on their hard drive. Since it takes up 3 GB or more, in order to save space, users try to delete it. Is it worth it and what consequences can arise after deleting this folder?
What is an ESD folder and what is it for?
When you install an operating system, temporary installation files are loaded on your hard drive. They have a different type of action. The ESD folder, like $Windows.~BT and $Windows.~WS, stores files that are responsible for restoring the system after a critical error.
Since Windows 10 has strict requirements for PC hardware components, Microsoft developers recommend not deleting these folders for some time after installing dozens. If the system is stable, the ESD folder can be deleted.
Ways to Delete ESD Folder in Windows 10
You can delete the ESD system folder in Windows 10 as follows:
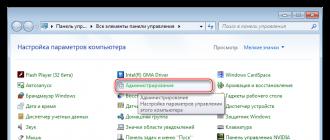
- Click "Start" and enter "Disk Cleanup" in the search box. We start the utility.
- Or press "Win + R" and enter "cleanmgr".

- A small window will open with a choice of disk to clean up. Select drive C.

- The analysis of the occupied space on the hard disk will start.

- A new window will open. Click "Clean up system files".

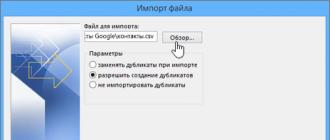
- In the new window, check the "Temporary files" box and click "OK".

- It is also worth opening the "Advanced" tab and deleting shadow copies of files. To do this, in the "System Restore and Shadow Copy" section, click "Clear".

- After clearing this folder, you should restart your computer.
Or $Windows.~BT, $Windows.~WS. It turns out that the ESD folder also stores various temporary files that can restore the system if, for example, a critical error occurs. But the question comes, is it possible to delete the ESD folder? I would like to say that yes, you can. The folder stores recovery files, which weigh quite a lot and, if you do not have much space on your hard drive, then you should delete it.
Advice! I suggest that you do not delete this folder for the first time, as well as Windows.old and others, because if you have only recently used Windows 10, then you can test it for now. If everything suits you, then you can delete all unnecessary garbage. I recommend doing this with regular Windows Disk Cleanup tools.
So, if you have administrator rights, then go to the utility "Disk Cleanup", you can enter it in the search field.
Now, we are in the field "Disks" you need to select the system drive, usually it is (C:). We press OK.

We are waiting for the system to evaluate the disk space that can be freed up.

The following window will appear, in which you need to click the button "Clean up system files". We are again waiting for the volume of the disk to be estimated.


Confirm actions by pressing a button "Delete Files" and wait for the operation to be completed.
Once the temporary files have been removed, you can do some more. To do this, in the Disk Cleanup utility, go to the tab "Additionally" and where the point is "System Restore and Shadow Copy" press "Clear". It is advisable to delete all control points, and leave the last one so that you can return if something happens.

Actually, everything. If you have any questions, ask them in the comments, we will try to figure it out.
Letter from a reader to Vladimir:
Hello Vladimir! I have a few questions for you. In all distributions of Windows 8.1 and Windows 10, which could be downloaded from the official Microsoft website a year ago, there was an image file of the operating system called install.wim. I know that the install.wim file is a disk image that contains operating system files in a compressed state. During the Windows installation process, all files are unzipped from the install.wim image to a disk (C :), by and large, this is the main stage of installing the operating system on our computer. All this is understandable. I am also familiar with a special tool called Dism, with which you can integrate drivers and updates into the install.wim file, enable and disable various components of the operating system, restore the integrity of Windows system files, in the end, Dism even allowed you to create your own individual assembly of Windows 8.1, 10. But here's what's interesting, in Recently, in all distributions of Windows 8.1, Windows 10, instead of the install.wim file, there is an image file of the operating system install.esd and the Dism tool refuses to mount this file to any folder, which means that there is simply nothing to integrate drivers, updates and other operations with the system image into the Windows 10 distribution kit! I see a way out of the situation like this - convert install.esd file to install.wim and then just work with the install.wim file.
1. What is the difference between the install.esd file and the install.wim file
2. Does Microsoft have tools to convert install.esd to install.wim or look for third party software?
3. Can the install.wim file be used instead of install.esd in the Windows 10 distribution after conversion, or will the install.wim file be converted back to install.esd?
How to convert install.esd file to install.wim
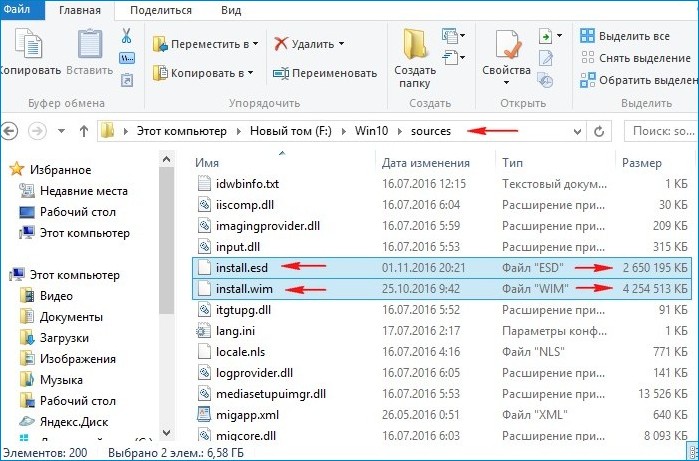
Hello friends. The install.esd and install.wim files, located in the distribution (ISO image) of Windows 10, are archives in which the files of the Windows 8.1 or Windows 10 operating system are in a compressed state, and Dism is a tool for working with these archives . The .wim or .esd archives can contain one or more other archives (releases) of operating systems (Professional, Home, etc.) The archives inside the Wim or Esd files are called - Images (Image). Any Image (Image) in the archive is always assigned an index of 1, 2, 3, 4... For example, we downloaded the Windows 10 distribution and connected it to the virtual drive (E:), go to the distribution's "sources" folder and see the file -install.esd archive,
to find out which Images (Image) are inside the archive, enter the command on the command line:
Dism /Get-WimInfo /WimFile:E:\sources\install.esd
where E:\sources\, this is the path to the install.esd file
As you can see, in the archive install.esd is located fourImage (Image) Windows with indexes: 1, 2, 3, 4.
Image Details: E:\sources\install.esd
Index: 1
Name: Windows 10 Pro
Description: Windows 10 Pro
Size (bytes): 14 244 778 516
Index: 2
Name: Windows 10 Home
Description: Windows 10 Home
Size (bytes): 14,040,329,647
Index: 3
Name: Windows 10 Home Single Language
Description: Windows 10 Home Single Language
Size (bytes): 14 047 031 800
Index: 4
Name: Windows 10 Education
Description: Windows 10 Education
Size (bytes): 13,988,924,495

What is the difference between the install.esd file and the install.wim file
It's important to know that when creating a new archive of the Windows 8.1, 10 operating system, a WIM archive file (install.wim) is always created, an Image is created in the archive (for example, Windows 10 Pro) and index 1 is assigned to it. Then, using the Dism tool, the archive other Images are added (Image). The second image added will be assigned index 2, the next image added 3, and so on. The created images can have three types of compression:
/compress:none(without compression)
/compress:fast(fast compression)
/compress:maximum(maximum compression), if you do not specify the /compress option when creating an image, then the compression will be Fast (fast compression) .
Microsoft in 2014 developed another type of compression Recovery(maximum maximum)
This type of compression compresses Windows files into an archive even more, resulting in a file install.esd weighs30% less install.wim file.
Only 3 Dism parameters work with the recovery compression type:
Dism /Export Image...... / compress:recovery
Dism /apply-image.
Dism /Get-WimInfo
To make it easier to work with archives, an archive with images compressed in Recovery is usually given the extension
ESD . The esd extension is desirable, but not required. It is wrong to assume that if the archive extension esd, then compression can only be recovery, also if the archive has extension wim, then compression can only be fast, max and none, I came across wim files with recovery compression several times. Dism works not by expansion, but by compression - you can put extension ESD and Dism - will create an image with "fast" compression.I made a short video on this topic.https://yadi.sk/i/B_8mfOjfxhqSkI hope now you understand the difference between the install.esd file and the install.wim file. Both files: install.esd and install.wim are archives with Windows files, and they differ in the type of compression. Ffile archive - install.esd is more compressed and weighs less.
It is also important to know that when creating a new archive of the Windows 8.1, 10 operating system, the compression type - /compress:recovery is not supported. You can compress in recovery only an already created WIM image, for example, enter the command on the command line:
Dism /Export-Image /SourceImageFile:F:\Win10\sources\install.wim /SourceIndex:1 /DestinationImageFile:F:\Win10\sources\install.esd /Compress:recovery
With this command, we compress the install.wim file located at F:\Win10\sources with the recovery compression type into the install.esd file located at F:\Win10\sources. As a result, in the "sources" folder, next to the install.wim file, another install.esd file appears. Both files contain compressed Windows files, but the install.esd file is smaller. Changing the type of compression is usually called a conversion.

There are three ways to convert the install.esd file to install.wim
First way, archiveESD needs to be unzipped first and then re-zip to .wim file using compression fast or maximum .
You can do it like this.
How to convert install.esd file to install.wim by creating VHD virtual disk file
In this method, we will do without third-party programs, we will use only the tools built into the operating system.
Go to Disk Management and create a VHD virtual disk.
"Action" --> "Create a virtual hard disk"

We mark the item "Dynamic expandable".
The size of the virtual hard disk is 20 GB.
Click on the "Browse" button.

Select a location in Explorer to save the virtual hard disk.
I will select drive (E:). I assign a name to the virtual disk - "Win10" and press the "Save" button.


The created virtual disk is 20 GB of unallocated space (Disk 1) in Disk Management.

Right-click Disk 1 and select "Initialize Disk"

By and large, it doesn't matter which item to mark: MBR or GPT.
I will check the item "Table with GUID Partitions (GPT)" and click "OK"

After initializing the disk, we create a simple volume on the unallocated space.


A new volume (G:) has been created.


Double click on the image with the left mouse and attach it to a virtual drive (in my case (F :)).

As you already know, the install.esd archive may contain one or more other archives with various releases of operating systems (Professional, Home, etc.) The archives inside the Wim or Esd files are called - Images (Image). Any Image in the archive is always assigned the index 1, 2, 3, 4...
Find out the indexes of all releases. Let's enter the command:
Dism /Get-WimInfo /WimFile:F:\sources\install.esd(where F: is the letter of the virtual drive containing the Windows 10 files, the sources folder, and the install.esd file).
We need Windows 10 Home Single Language (image index 3).
The .ESD format stands for Electronic Software Distribution. It is not a format in the usual sense of the word, but a technology that is intended for distribution. It is used to ensure that Microsoft software is distributed electronically. Among the distributions, there is also an image of the Windows 10 operating system. If the .ESD format is used for distribution, then all the programs that are presented in it will have a compressed form. If you download an image of the new operating system, it will be 35 percent larger in size than the Windows 10 file that is downloaded in the .ESD format.
This technology is not yet widely used for distribution of Microsoft products. So far, only those users who have access to the internal lines of the corporation can use it. Distributions in .ESD format are not intended for ordinary users. However, on the official Microsoft Internet resource there are several programs in .ESD that are in the public domain.
Today there are a lot of questions about this format for the reason that users cannot understand why there are programs in the public domain in the .ESD format, but they are almost impossible to download.
Initially, you need to go to the official website of Microsoft and download the ESD image of the Windows 10 operating system from there. It has direct links directly. It should be noted that the images of the operating system will be in English.
If the user already has Windows 10 downloaded, then there is no need to download its ESD image. It can be found in the system folders of the operating system. It should simply be copied from one folder and transferred to another.
When the ESD image is loaded, it must be decrypted or unpacked. It should take the form of an ISO image. This procedure can be done using the programs: Decrypter, NLite, WinReducer Wim Converter. First you need to figure out how this procedure is carried out in the most easy-to-use Decrypter utility.
First you need to unpack the archive and save all its contents in the ESD-Decrypter folder.
In this folder, you also need to copy the Windows 10 operating system and its ESD image from the system folders.
Then you need to go to the folder and open the decrypt.cmd file there. This file must be run as an administrator.
 Name
Name In the column Enter your Option you need to put the number 1.
After that, you need to press any button on the keyboard to go to the next step.
If we go to the ESD-Decrypter folder, we can notice that an ISO image file has appeared in it.
This file can be used to install the operating system at any time. It may also be required to create a bootable USB flash drive, or an installation disk.
If the user already has an operating system on the computer device, then there is no need to download the image from the ESD website. It is located in the C:\$Windows.~BT\Sources folder.

cool
Tags:
Currently, the Windows 10 operating system is a popular product. Its ISO image can be downloaded from the official Microsoft website. However, many users are interested in another ESD format. Programs 4.81 14
What is a folder ESD in Windows 10?
What is a folder ESD in Windows 10? What happens if I delete 2.5 GB of memory containing a folder? Will it affect my Windows?
Answer
Are you in the Windows 10 Preview Insiders Program? If yes, then this file may be useful.
ESD is for the delivery of electronic software. Microsoft uses it to deliver OS installation files to a computer from an internet connection. This is a compressed file. It can be converted to an ISO file. Windows users can use the ISO files downloaded on DVD/USB to install the OS.
I just upgraded to Windows 8
I just upgraded to Windows 8. Now I want to clean up disk space i.e. get rid of windows.old using the disk cleanup utility, however I get the option to remove ESD files to install windows which will clean up another 3 gigs!
Now the question is should I remove them or not?
Answer
Denial of responsibility. Before using Disk Cleanup, make sure all your files and settings are in Windows 8 where you expect them to be. Deleting the Windows.old folder cannot be undone.
We hope the above information is helpful. If you have any questions, please get back to us, we will be happy to help you.
While cleaning, I accidentally deleted the ESD files.
What are these files used for?
Should be a fairly large file as I now have about 3 GB of disk space.
Answer
When your Windows 10 is updated to a new build using Microsoft Windows Update, Microsoft will choose to use an electronic software delivery to send you install.esd, required to update your current build of Windows 10. Likewise, if you manually download the ISO from Microsoft, then use your Media Creation Tool, you will end up with an Install.esd file in the folder Sources, which he creates.
The Windows 10.Install.esd file contains a standard file install.wim, needed to install in a compressed format (in simple terms, like Install.wim had ZIPPED, but with a much higher compression algorithm).
If you are interested .wim not suitable for Windows Image is something you will see a lot of mentions when people discuss using the Microsoft Deployment Image Servicing and Management utility DISM to restore their Windows image when it became corrupted.
I'm not sure which ESD you actually removed. When you do an upgrade, you get a new build as well as a Windows.old folder that can be used to revert to the original build if things don't go so well. If you deleted the Install.esd file inside Windows.old it's not ideal, but it's not the end of the world as this folder is designed to self-destruct after 30 days, which is good considering its huge 3+ gigabyte data size, or if you're like me closer to 16 gigabytes
Also, during installation, two hidden system folders are created in the root directory (usually C:\ for most users). They also contain ESD files.
You can always download whatever build you just updated from Microsoft if you want to install Install.esd again.
What is this ESD folder in C: and can I delete it?
After getting windows 10 (with 8.1) this folder showed up. It's 3GB in size and if I don't need it I delete it
Do I need? Or is it important?
Answer
It looks like you can use it to create a recovery disk or a full install disk, and you can probably use it to repair selective OS bits if they ever get corrupted. You're probably pretty good at it until you want these things to be higher.
Running Disk Cleanup will probably remove it for you.