While computers with an old, but dearly beloved, XP perfectly discover each other on the network and see folders open to the public.
In windows 7, work with networks and sharing has been radically redesigned. There were "network placements" (home, work, social network and domain network) and this was done, of course, for the good of us, but it turned out, as they say, as always.
By default, seven defines all new networks as public, and they have very strict security rules: network discovery is disabled (the computer is blind and cannot be seen by other machines), file and printer sharing is turned off (other computers do not see shared folders, folders, printers ), access to the computer from the network is password protected.
Ever since the dark days of Windows Vista, many people remember this screen for selecting network locations that appears whenever a computer connects to a new network.
.png)
So, how to open access to files over the network in windows 7 ( share files)?
Each time you select a network location, you can select Home network. Or you can set up a computer once for convenient use when connecting to any network with the inhabitants of which you want to share files. If you care about the safety of your confidential data, just do not provide access to them and try not to open files and folders with full access (for writing and reading).
If you are afraid that third parties will have access to your files when, for example, you are at the airport and connected to a Wi-FI network, install the program
Kill watcher
and block access to your computer from the outside with two clicks of the mouse. Kill watcher stops the server service, and your files become inaccessible over the network even for reading.
.png)
Preparing for sharing
Click on the network icon in tray and follow the link to Network and Sharing Center.
.png)
.png)
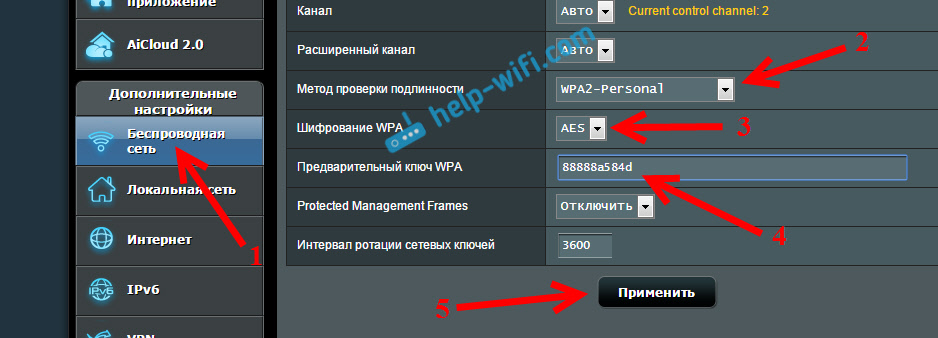
In the window that appears, set the values \u200b\u200bof the switches, as shown in screenshot:
.png)
Note. I do not recommend allowing access so that network users can read and write files in shared folders. These folders are located on drive "C", and the gap to them is write access, you open the way for trojans and viruses to your machine. Do this only if all the computers on the network are familiar to you and antivirus software is installed on them.
How to share a file or folder
Right-click on a folder or file and go to The properties.
.png)
Go to tab Access and click on the button Advanced setup
.png)
Check the box next to Share this folder and click on the button Permissions
.png)
Click Add
.png)
In the window that appears, click Additionally
.png)
Press button Search middle right (1) - a list of services and users (2) will appear in the bottom field of the window. Scroll to the bottom and find Network. Highlight Network(3) left click and click Ok(four). Then again Ok.
.png)
In the field highlighted in yellow, you can set the rights for users who will connect to you via the network.
.png)
The differences between full access, modification, and reading are shown in this table (material from Windows Help).
.png)
In short, the only difference between full access and change is that with full access you can delete files.
When you configure the desired user rights, click Ok two times and go to the window properties folders to tab Security. Next, you need to perform actions similar to those that we performed when setting permissions.
Press button Edit.
.png)
In the window that appears, click Add.
.png)
Press button Additionally in the next window.
This article will show you a simple way to configure access to files on Windows 7, for those cases when you need to provide anonymous access to shared resources of Windows 7. This setting assumes that network access will be without a password, without restrictions. This is a common situation for home and office networks.
Similar articles for other OS:
So, step by step.
Allow sharing for folder
In Explorer, you need to find the folder that you want to share (give it access to), and right-click on it. In the context menu, open the Properties of this folder. In the properties window, go to the "Access" tab and click the "Sharing" button:
After that, in a new window, you need to specify full permissions for the Everyone group of users:


After clicking the "Finish" button, this folder will be available on the network:

Now you can see in the properties of the folder that it is accessible over the network:

Configure Windows 7 Network Settings
Next you need to open " Network and Sharing Center"(via the Network icon in the tray or through the Control Panel) and in the left part of the window click on" Change advanced sharing options ":

In the next window, the profile of your local network will be immediately opened - there you need to enable two parameters and click the "Save Changes" button:

After that, in the same window, go to the "General" profile:

And there, disable the option "sharing with password protection" and of course click the "Save Changes" button:

This completes the setup of network access without a password for Windows 7. Now it will be possible to go through the local network to this computer and Windows will not require a password.
If Windows requires a network password
Despite the fact that the settings described above are made, when you log on to this computer, another computer may request a network password. This is possible if both computers have local users with the same name, but with different passwords.
There are two solutions to this problem:
- Remove matching user logins.
- For users with the same login, specify the same password. An empty password is also considered the same.
How to cancel sharing of the Windows 7 folder
On Windows 7, the abolition of sharing is implemented not at all obvious, unlike Windows XP. On Windows 7, to cancel sharing, you need to click on the "Advanced Settings" button on the "Access" tab and turn it off there. The peculiar logic of the Microsoft developers.


Sharing a Windows 7 folder through the command line
File sharing can be configured much faster if you use the command line (console, cmd.exe). Just one command to execute in the console:
net share files \u003d c: \\ files
She opens a folder sharing c: \\ files and sets the network name for it files.
Through the console, you can also cancel sharing:
net share files / delete
This command deletes the network (public) folder files. Folder c: \\ files of course remains in place.
Windows 7 file sharing through the Shared Folders snap-in
The set of Windows 7 management tools has a special program (snap-in) for managing shared resources on the computer. It is called "Public Folders" and you can start it with the command fsmgmt.msc (in the console or through Win + R):

Otherwise, this snap-in can be opened through the Start menu: "Control Panel - Administrative Tools - Computer Management - Shared Folders".
Setting passwordless access for other OS
If you live in Krasnodar and you need to configure a local network in Windows
If you find this article useful or just liked, then feel free to support the author financially. This is easy to do by throwing money on Yandex Wallet No. 410011416229354. Or on the phone +7 918-16-26-331 .
Even a small amount can help write new articles :)
Updated - 2017-02-15
You have created your own with access to the Internet . Now is the time to take full advantage of the network. And they are not so few. But first, we’ll look at how to create a shared folder.
You will not run with a flash drive from computer to computer. Having a local area network is already just ridiculous and inconvenient. For this, a local area network is created so that resources are shared. You can share the entire hard drive, or you can create a separate folder and store documents for general use in it.
You will have your own file server with file sharing. Moreover, this folder will open from your computer, and it does not need to be searched throughout the network. Everything is quite simple and does not require any, material costs. It’s enough to set up sharing of this folder .
How to make a shared folder
We have already created a small one, and now you can make a folder common to all computers.
Create a new folder on any computer on the network and call it “ My files "(You can name it your own way). We right-click on this folder and select the item in the drop-down menu. Sharing and Security.

A window will open Properties: Name of your folder . Tab Access checkmark the points Share this folder and.
For Windows 7 the choice in the list will be as follows: - General access - Home group (reading and writing) -

AT WindowsXP The following window will open.

With the first paragraph, everything is already clear, but about the second I will explain a little. The fact is that if you do not check the box Allow changing files over the network , then the person who opened your folder on his computer will only be able to view files, but he will not be able to delete them and change anything in them. This feature is sometimes very useful. If you are confident in your network partner, then check this box, and if not, it is better to secure your files.
At work, I have one folder on my computer, in which there are files of the programs necessary for the work. In order not to go to all rooms with a flash drive or disk. Moreover, if I have a DVD disc, and the drive does not read it on some computer, then this is very inconvenient.
And so I sit down at someone else's computer, open my folder on the network and install the necessary program. And so that someone stupidly did not delete these files, I do not have a check mark on the item Allow file changes . But you can copy these files. So - see for yourself.
Now configure so that other users on your network can open this folder on their computers. To do this, go to another computer and click on the desktop icon network environment .
A window will open network environment .

Select the entry on the left Display workgroup computers and click on it with the mouse.
The following window will open.

Select in it the computer on which your folder for sharing files is created and open it. You, of course, will not have so many computers.

Find the network folder icon. I have it My files ". And drag or copy it to your desktop.
System administrators call this - share the folder.
Now you do not have to search the network every time. Files will be stored on the computer on which this folder is created. In the same way, you can create any folder on any computer connected to your network and share files.
So we examined the question - how to make a shared folder.
Users of a single local network often perform related tasks, so often there is a need for the sharing of certain files / folders. Windows 7/10 operating systems have all the necessary tools for setting rights and providing shared access to individual users and groups. In this article, we will consider in detail how you can create a shared folder and “share” it over the local network.
Setting up sharing in the Control Panel
First of all, we will make the necessary settings in the "Network and Sharing Center" section. We’ll go into it through the “Control Panel” and then click on the link “Change advanced sharing options” on the left.
Here we expand the active network profile and turn on all options except the item "Sharing with password protection".

If you want to set password protection, make this function active too.

Now in the “Network” section you will see computers from the network environment. You can go to any of them and see folders for which sharing is already enabled. Let's try to share a folder, and check its visibility on other computers.
Open shared folders and files
Note that the sharing procedure in Windows 7 and Windows 10 is practically the same. In our case, the “seven” will be used. For example, create a new folder in the root of the disk or in any directory with the name "General". Next, click on the icon with the right mouse button and select the “Properties” item in the menu that opens. Let's go to the “Access” tab.
Now click on the "Sharing ..." button.

In the “File Sharing” window, open the drop-down list and select the “All” user.

Click on the “Add” button and make sure that the selected user is added to the list. By default, the list contains the owner of the folder - the Administrators group. She has the right to set permissions for ordinary users. For example, for the Everyone group, you can set the permission level to Read or Read and Write.

Selecting the option you want, click the "Sharing" button and thereby share the folder for computers on the same network. A corresponding message box will appear.

The second way to share
You can share a folder on a local area network in Windows 7/10 in another way. In the "Properties" window on the "Access" tab, click the "Advanced Settings" button.


As we can see, the “Everyone” group is already on the list. We can configure access rights for it or click the "Add ..." button and select another user.

In the "Enter the names of the selected objects" field, enter the desired user and click "Check Names".

If such a user is not found, a warning message window will appear.

To select a user from the list of all available users and groups, click the "Advanced" button, and then "Search".


For example, select the “Guest” account, confirm the selection with the “OK” button, and then again “OK”. The corresponding entry appears in the list. Set the necessary permissions and apply the changes. The fact that the folder has become public is hinted at by the appearance of the network path next to the "Sharing ..." button.

In Windows Explorer, you can define shared folders without going to the "Properties". Just select the directory of interest and check whether there is a corresponding inscription on the bottom panel.

How to quickly share folders in Windows 7/10
In Windows 7, it is possible to open sharing in just a couple of clicks. Select the desired folder and click on the corresponding button in the upper horizontal menu.

We select users and give them permissions according to an already familiar scheme.

Open public folders on network computers
In order to get to the shared directory from another PC, you need to select the target computer in the "Network" section of Windows Explorer.

If you plan to use the folder constantly, you can. To do this, right-click on the icon and select the option “Map a network drive ...”


The created disk will be displayed in the Explorer tree tree and in the Network Locations area.

 Home groups
The functionality of Windows 7/10 systems includes the ability to create so-called, with which you can also provide shared access to files and folders. To create a group, go to .

Press the button “Create a home group”, then check off the items that we want to share, and at the end we will set a password for connecting to the group located on the local network of the PC.


Now try to join the created group. To do this, go to the same section on another computer Control Panel - Home Team. Here we find information about an already created group. Click the "Join" button, and then "Next."


Set the sharing settings and enter the password in the next window.


We complete the procedure by pressing the “Finish” button.

Now in the Explorer tree, select the "Home group" branch and click on the name of the group (it will be assigned a username).

The “Video”, “Images” and “Music” folders will be displayed on the right. The composition and number of folders will depend on the settings specified when creating the group of settings.
Now you can easily add folders to a group. In Windows 7, after selecting the desired folder, click on the “Sharing” button at the top and set “Home group (read)” or “Home group (read and write)”.


We perform the necessary actions, and then we go in from another PC and make sure that the folder has been shared.

That's all. We hope that the information provided will be useful to you.
Windows XP Organization sharing folders, disks and printers performed at the user level. On the one hand, this is of course very convenient: when trying to access a particular folder, you do not need to remember and enter various passwords. But at the same time, it is necessary to create accounts on each computer for all users who need access to the resources of this computer over the network. If you do not want to create accounts for all users on computers, you can activate the guest account. True, in this case, any user within the local network will be able to access your shared resources. But let's talk about everything in order.
When at our disposal, we can begin to use it directly. One way to use the network is to provide sharing drives and folders computers.
You cannot share a single file on a local network: to make the file available to other network users, you must open shared access to folderin which it is stored. Remember that opening a shared folder, you thereby give access to all folders and files located in it.
In networks with Windows XP, there are two modes of sharing:
- Easy sharing of computer resources
- Advanced sharing of computer resources
Easy file and folder sharing
Simple file and folder sharing is enabled by default. You can verify this if you click “Start” - “Control Panel” - “Folder Options” - the “View” tab. Opposite the “” should be a flag:  If there is no checkmark, then the computer is using advanced sharing.
So, let's say I want to “share” the “Reports” folder, which is located on my computer on the local drive C.
To open shared access to any folder or disk, you need to right-click on the desired object - select “Properties” - go to the “Access” tab.
If we are sharing the disk or folder for the first time, then you will need to click on the following link:  And then select “Just enable file sharing”:
  In the window that opens, check the box next to “Share this folder”:
  Thus, you will open network users access to the files contained in this folder in read-only mode. They cannot change the files in this folder or write their files to it.
In the “Share Name” field, you can enter the network name of the folder under which it will be displayed in the list of shared resources on the local network. But this is optional.
If you check the box next to “ Allow changing files over the network”, Then allow users to copy their files to this folder, as well as modify the documents contained in it.
Then click “Apply” - “OK” in this window. After that, the folder will become public and a hand symbol will appear on it: 
For security reasons, you should not open full access to system folders (Windows, Program Files) and folders containing important data. It is best to create a special folder or folders for shared network files and open full access only to these folders.
To enable users of your network to access shared folders - on the computer where they are located, you must enable the account “ the guest" This will allow anyone to access the shared folder from any computer on the network.
To check if the guest account is activated on the computer, right-click on the “My Computer” icon on the desktop and select “Manage”. In the window that opens on the left, in the “Utilities” section, select “Local users and groups”. Having opened it, we become on the “Users” folder - in the right field we find “Guest” and double-click on it:  In the next window, the “Disable account” checkbox should be unchecked:
  That's all for easy sharing to files and folders. As a rule, this mode is enough when working in a home network. However, in a local area network of an organization, a more serious delineation of user rights is required. In this case, you must enable “Advanced file and folder sharing”.
Advanced file and folder sharing
If you want to use advanced shared access to files and folders on network computers, you need to go to “Start” - “Control Panel” - “Folder Properties” - the “View” tab and uncheck the box next to “ Use simple file sharing (recommended)" The Guest account must also be disabled for security reasons.
Folder sharing permissions in advanced mode are the same as in simple mode: Right-click on the desired folder or disk - select “Properties” - go to the “Access” tab and put a marker in the item “Share this folder” :  In the “Share” field, you can enter the network name of the folder under which it will be displayed in the list of shared resources on the local network.
In the “Note” field, if you want, you can enter a description of the folder (for example, “working documents”, etc.).
You can also limit the number of users who can use a shared folder at the same time. But it only makes sense to do this on very large networks or on weak computers.
And now we come to the most interesting moment in the organization of shared access - the differentiation of access rights for network users in relation to the folder. Differentiation of access rights - this is the creation of certain rules, according to which network users (each individually or a group of users) will be able to perform certain actions with the contents of the shared folder: full access, change, or just reading its contents.
To set these rules, click the “ Permissions" You will see a similar window:  Here you can add a user or group to the list and define permissions for him by checking the boxes next to the corresponding items.
I draw your attention to the fact that the above method (advanced mode) will work without problems if on both computers (on which the folder was shared, and which is trying to access it over the network) same usernames with the same passwords. In other words, if you are working as a user Vova , shared the folder, then in order to access it from another computer, a user must also be created on it Vova with the same password (as on the first computer). Moreover password must not be emptyotherwise, Windows will refuse to share the folder. If the above condition is not met, there may be problems with access to shared directories (drop-down windows with inscriptions like “denied access”, etc.).
So, let's add users here and set permissions for them:
Click the “Add” button. In the next window, click “Advanced”:  In the window that opens on the right, click the “Search” button:
  I want to allow access to the folder to users wound up on this computer (including the user Vova
) Therefore, at the bottom of the window, scroll through the entire list and find the name “Users” - select it and click “OK” - then again “OK”:
I want to allow access to the folder to users wound up on this computer (including the user Vova
) Therefore, at the bottom of the window, scroll through the entire list and find the name “Users” - select it and click “OK” - then again “OK”:  In the next window, I decided to give the right to read and modify files in this folder - therefore, put the appropriate daws and click “Apply” - “OK”:
  That's all! Now I can easily enter this folder from another computer (where the user is Vova
) and change the files in it.
That's all! Now I can easily enter this folder from another computer (where the user is Vova
) and change the files in it.
To see all of the computer’s resources open for public access, go to any PC on the network in “ network environment" Then select “Display workgroup computers”. By double-clicking on the name of any computer, its resources are displayed, which are open for sharing with other computers on the network.