They turned out well in the photo, but the color of the dress blends in with the wallpaper of the room? Do you run an Instagram in beige colors and don’t want to ruin the harmony with a purple jacket? Don’t give up on beautiful photos because the color of the outfit doesn’t match your wishes. You can easily change the color of clothes in a photo using the convenient PhotoMASTER editor. Read the article to find out how to do it!
Change shades to “One, two, three”
The program contains two tools for changing the shade of objects. Which one is best to use depends on the specific situation. We will consider both options. To change the color of clothing you need to do the following:
- Step 1. Preparing for work
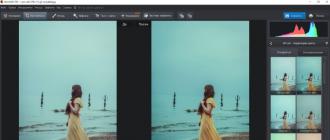
First, you should install “PhotoMASTER” on your computer. available on our official website. Wait for the distribution to download and install the software using the Installation Wizard. Find the photo editor shortcut on your desktop and double-click on it. The main menu will appear, where you need to click on the “Open photo” button and select the desired photo. It will load into the program's working window.
Adding photos to the editor
- Step 2. Change the color of clothes
To change the color of clothing in a photo, you can use one of two methods. The first one is simpler and faster. Under Enhancements in the right panel, find the Color tab. Here you will see sliders with different shades. You need to choose the one that matches the tone of your clothes. To recolor a sea green dress (in the screenshot), you need to change the “Cyan” and “Blue” parameters. Adjust the shade to your taste.

Changing the color of the dress by adjusting the shades of blue and blue
The first method is not suitable if the photograph contains other objects of the same color as the clothing. For example, you need to repaint a green skirt, but there is grass in the frame. You'll have to use another editor tool.
Go to the “Retouching” tab. Select the Corrector tool. It allows you to carefully select a separate image fragment for further processing.

Selecting the “Corrector” tool
Adjust the brush size using the slider in the right panel. Do not make the diameter too large, otherwise it will be difficult to work with narrow areas. Carefully paint over the item of clothing whose color you want to change. In our case, a pink blouse. Try to completely paint the part without going beyond the boundaries.
The more accurately and evenly you paint an item of clothing, the more natural and attractive the color-changed version will look. Please be a little patient!

Paint over the blouse with a concealer brush
Once the piece of clothing is completely selected, let's change its color. Move the Hue slider. You can repaint the item in any of the basic shades. Choose the option you want. The screenshot below shows how the pink blouse miraculously turned into blue.

Choosing a new color of clothes
Once a base color is selected, you can adjust the hue more flexibly and precisely using other settings. Set saturation, temperature and hue to suit your exact needs.

Adjust clothing color using hue and saturation settings
- Step 3. Saving the finished image
After completing all the manipulations and obtaining the desired result, all that remains is to save the photo. Press the Ctrl+S key combination on your keyboard. You can also click the “Save” button above the settings panel or go to the save tool through the “File” drop-down list located on the top panel. You will be asked to select a location on your computer where you want to save the edited photo.
Your entire wardrobe in one program
You see, changing the color of clothes in a photo using “PhotoMASTER” is extremely simple. You can experiment endlessly with shades, achieving the perfect match to your wishes. The tool will be useful if you need to choose exactly the color of a dress that will suit your face, if the background color does not harmonize well with the outfit, or in case you want to make a bright accent on a wardrobe item.


The PhotoMASTER program will show that there are simply no limits to the flight of fancy. Photo montage in our editor will make any photo bright and creative!
You got a photo, but you’re not happy with the color of the clothes? — Using Photoshop, you can change the color of clothes and thereby save a successful photo!
And this is just one example when such skill in working with a program is needed when working with clothes. Also, for example, you found someone else’s photo and to make it unique, you can change the color, then the picture will become suitable for use in your project/collage and safer in terms of sanctions from the search engine. In this lesson you will learn how to change the color of clothes in a photo using Photoshop.
This is what changing the color of clothes looks like:
Let's open the image to work with:

So, before us is a beautiful lady in a rich blue dress. And how many varieties of these dresses there are in the world, different styles, shades, lace and ruffles. But what if you like this particular dress, but don’t like the color? It's OK. The color can be easily and naturally replaced with another shade that you like. There are several ways to implement this idea. We will look at just two of them in this article. The first of which will be Image Correction.
The lesson was prepared by a site subscriber as part of the project:
Can you do no worse? - Submit your application!
Method 1 - Image Correction
Step 1
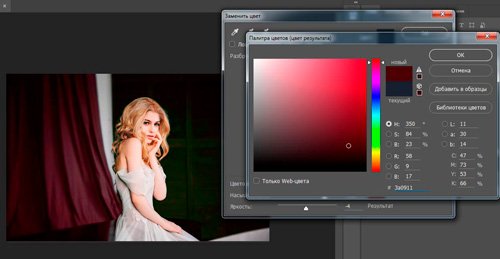
So, in order to change the color of clothes using correction, select the command Replace color which is located in Image - Correction.

Step 2
In the window that appears, you first need to select the color that you want to replace.
To do this, there are pipettes in the upper left corner of this window. The main eyedropper indicates the choice of one color, with a plus you can select several colors at the same time and, accordingly, with a minus it allows you to remove a color from the list of replaceable ones.
Also using the key Shift You can easily and quickly switch from a regular pipette tool to a plus pipette. And by holding the button Alt to the pipette with a minus.
Using these tools, select the necessary colors for the girl’s dress and adjust the scatter. As you move the slider, the number of shades captured will change.

Now let's change the girl's dress to the color you like using the sliders below:
- Color tone allows you to select the shade from which we will choose the color;
- Saturation is responsible for the richness of the shade we choose;
- Brightness is responsible for how dark or light our color will be.
You can also use the palette to select a specific color.

Finish
The disadvantage of this method is that choosing a natural color can be problematic, because the choice of color always depends on what it was originally, and somewhere there may be pieces of the previous color, which you need to carefully sit on and paint over all the artifacts that appear.
To keep them as small as possible, you should always adhere to the basic advice when working with photographs in Photoshop - take high-resolution sources. Recommendation - .
Method 2 - Hue/Saturation Adjustment Layer
The second way is to use an adjustment layer Hue/Saturation.
To implement this, you first need to select the color that needs to be changed. For this we use Color range, located in the menu Selection, which defines colors in approximately the same way as Changing colors.
Select the desired color and add Layers - New Adjustment Layer - Hue/Saturation.

The advantage of this method is that if somewhere the color has not changed due to poor selection, then you can always go over the adjustment layer with a white brush in places where we need to add more replacements.
Here are our dress color options:
Now you know how to change the color of clothes from one to another. But what if the clothes are white? Then the efforts with the adjustment layer method are useless, and the color replacement works very roughly and poorly. For example, this is what happens if you try to add a red tint:

There is a way to change the white color of your clothes.
Step 1
First, let's highlight the dress in any way convenient for you, be it simple or .

Step 2
Now let's fill it completely Filling or paint the selected area with any color using a new layer.

Step 3
Let's apply it to a new layer, after which we see that the dress has acquired at least some shade, this will be to our advantage.

Step 4
On the main layer we darken with the tool Dimmer areas that are difficult to see - where you should add shadows, in my case these are the arms, stomach and hem of the dress.
With shadows and a dress and create a new one Adjustment Layer, which we previously used to make a green dress. Now we can adjust the color we want. This one will do just fine:

Step 5
Then, using a soft white brush, we go over the adjustment layer along the edges of the dress, where the replacement effect is hard to see. This is what we got.

If you notice an error in the text, select it and press Ctrl + Enter. Thank you!
1 voteHello, dear readers. Replacing colors in a picture is quite an interesting and addictive activity. Personally, I can spend quite a lot of time doing this entertainment. There are several tools that will help with this work and each of them is suitable for its own case.
Today I will tell you how to change the color of a picture in Photoshop and which method to use in each specific case. You will like it, I assure you.

It should be noted that I use Photoshop CC, but we won’t do anything specific, so you can safely start reading even if you have a simpler version of this program. Not an online service, of course, it is weak and non-functional, but in cases with CS3, 5 or 6 you will not notice any discrepancies.
Let's get started?
Simple color correction
Equipment for high-quality photography is quite expensive, and it doesn’t matter if you don’t have it. You can get good pictures using editing programs such as Photoshop. To be honest, I use this opportunity for almost every photo I post on my blog. I like the colors brighter than what is usually posted on the Internet.
By the way, if you are interested, read the article already published in Start-Luck. I’ll take a pre-prepared picture to start talking about simple color correction and get to work.

I open the tab in the top menu “Image”, and then the “Correction” category. Take the time to understand from your own experience what “Brightness/Contrast”, “Richness”, “Hue/Saturation” and other options that you will find in this tab are.
You won’t spoil or break anything, and you can always return to the original version by simply refusing to save changes when closing the picture. Just look at how certain tools behave. As they say, what you come to on your own is always remembered better than when everything is explained to you on your fingers.

For example, open “Color Tone” and pull the various sliders, you will immediately see how the picture changes colors and will be able to build a logical chain between your actions and the result. Don't forget to check the "View" box.

Color balance changes colors more strongly, the settings are more subtle and interesting.

If you want to work with a certain element, it’s enough; I’ve already talked more than once in simple and understandable language about how to do this with more than 8 tools and methods. I won’t repeat myself, it’s not difficult to find the publication, just follow the link just above.
Now I will use the simplest method - the “Magic Wand”. I just click on the object and the desired fragment is highlighted. Using the tolerance setting, I set the variation in color.
As you know, there are many shades of white, blue and any other color. The higher the tolerance number, the more shades from the spectrum the program will determine and highlight using a wand.


Change the direction of the curve and the color becomes different.

By the way, if you want to work with the background in this way, that is, the area that is outside the selection, then you need to first select it, and then in the “Selection” tab of the top menu, select the “Inversion” option.

You can remove running ants using the keyboard shortcut Ctrl+D.
Replacement by contrast
I talked about this method in great detail in the article. « » . Now we will quickly run through the main functions. I'll give you a little instructions, which will be enough.
This tool is ideal for replacing a bright, stand-out color in a picture. For example, a yellow apple on a white background, a red car in a green forest, or, as now, a bright girl in a dark room.

I return to the “Adjustments” section and select the “Color Replacement” tool here. Using the Eyedropper tool, which appears automatically, I select the shade that will change. In this case, I click on the curtain. Then I move the Scatter slider so that the girl becomes almost black, and all other objects have outlines ( I wrote a whole article about how to draw a black background).

Please note that the curtain and the wall still need to have outlines; simply setting the spread to 200 will not work. Otherwise, the program will not take into account shades and will paint everything unattractively with a single color. Now I click on the color plate at the very bottom of the window, under it it says “Result”.

I click through the spectrum and different shades until I achieve the perfect result.
Ready. Without repainting the photo, we got an excellent result. In just a few seconds. Now let's talk a little about the disadvantages. As I said above, it is convenient to use this method if the image has contrast. To repaint a particular girl's dress in a different shade, you will have to highlight it. I can offer another interesting one, in which much attention is paid to complex objects, for example, hair.
I’ll use the Magnetic Lasso tool myself.

Now I transfer the dress to a new layer by pressing Ctrl+J at the same time. ? Read the post that I recently prepared for beginners about them in detail.
We return to “Color Replacement” in the “Correction” section. In this case, you will have to change the hue using the “Hue”, “Saturation”, “Brightness” sliders. If I click on the “Result” box, it turns out extremely disgusting and implausible.

In my opinion, the shade of the young lady’s dress is still far from ideal, and therefore I want to blur it a little. I open the “Filter” tab and select everyone’s favorite “Gaussian Blur”.

The robe became less clear, but the shade evened out somewhat.

As I already said, this method works best if there are contrasts, so I’ll be satisfied with this, and I’ll tell you about the last tool for today.
A quick tool for complex cases and dramatic changes
I like the Color Replacement brush better than other tools for a similar task. You can find out about it in the article « » , in which I turn the most ordinary girl into a red-haired Smurf woman with blue skin.
Finding a brush is not difficult; to do this, you need to right-click on a regular brush. An additional menu will open in which you can select the desired tool.

I choose a color. Everything is as usual. Window on the right. In this case, black, and then I paint over part of the girl’s hair. Please note that all shades are preserved.

You can put green.

To change the brush size, use the keys.

I can also offer a training video on this topic.
Well, if you want to understand the program more professionally and understand exactly how this or that function works in the Photoshop program, then I offer a very useful course “ Photoshop for beginners in video format ».

Maximum useful information about tools. That's basically it. Don't forget to subscribe to the newsletter to stay up to date with the latest, useful and simple information.
See you again and good luck.
Fans of photography with a smartphone have probably wondered at least once how to make a photo in black and white, but leave one object in the picture in color? Moreover, without resorting to programs on a PC or laptop.
Some photo editors, for example, have a similar function. In general, by downloading this application to your smartphone, you can completely forget about additional software, since Pixlr Express seems to have it all. But especially for those who want to achieve this effect as quickly and easily as possible, there is one excellent option.
This is one of the most convenient and simple tools for processing photos on a smartphone. Actually, there is nothing in it except the ability to remove colors from the image. But this is its beauty.
The entire application is tailored to one function. This makes control and navigation in Picaflor easier than ever.
So how does the Picaflor app work?
Having opened the application, we immediately get into editing mode. Here we have two options: either upload a photo from the smartphone’s library, or take a new photo without closing the application.

Let's try to play with the photo, or rather, with the shoes of the beautiful girl. Click on the eyedropper, that is, the central button of the control panel (it’s at the bottom). Two color scales appear in front of us. Actually, these are the two main and only tools in the application.
After tapping the eyedropper, the photo automatically turns black and white. Now we can start choosing the color we want to leave in the photo. We chose burgundy color for the shoes.

The editor's upper scale allows you to select the color that should remain as intended. A rectangle will appear in the top left corner showing the selected shade.
Bottom - excludes all other colors. As you move the slider on this scale, you need to look carefully at the photo and make sure that no color artifacts remain.
This completes photo editing. Thus, to desaturate the photo and still leave one bright shade, it took us about 5 minutes at most. So, if you need to quickly achieve the "Pleasureville effect" using your smartphone, choose the Picaflor app.
Its only drawback is the presence of a watermark. But you can disable it after purchasing the Pro version for 66 rubles.
Guys, we put our soul into the site. Thank you for that
that you are discovering this beauty. Thanks for the inspiration and goosebumps.
Join us on Facebook And In contact with
website I have put together for you several simple and easy-to-use programs to improve your photos. You might even want to get rid of all Instagram filters after you try one or more of the apps on this list.
Pixlr Express
Over 100 effects (including lighting), frames, cropping, resizing and rotating images, automatic image enhancement, red-eye removal and even teeth whitening. What’s nice is that the functionality base is constantly being updated by developers.
Snapseed
Very convenient, fast and practical interface. Everything you need for initial photo correction is collected here, including editing brightness, saturation and contrast in individual areas of the image, the diameter of which you can also adjust. In addition, the application works quite quickly, which is good news.
Photoshop Express
This application, of course, will not be a professional analogue of Photoshop. But for initial photo editing it’s quite suitable. Available for free in the application: 10 frames, 10 filters, adjustment of exposure, brightness and contrast, saturation and color tones, red-eye removal. And for an additional fee you can purchase many additional goodies.
Pix: Pixel Mixer
A very simple and interesting photo editor, loved and familiar to many. Well designed and high quality made. The main thing that it can please you with is more than 30 filters, over two dozen textures and about the same number of frames.
PicsArt Photo Studio
The program allows you to create collages, change filters, control the tone and color of photos, add text effects, remove red-eye and much more. In addition, you can create hand-drawn images. In general, there are really a lot of functions.
Pixlromatic
What’s especially pleasing about this application is the nice interface and speed of operation. In addition, it boasts many effects, frames and custom filters. By the way, the full version, which gives access to more than 100 effects, 100 frames and 200 textures, will also cost you inexpensively - only one dollar.
Muzy is a very simple and functional application: you can make collages from pictures, play with a bunch of frames, use the built-in editor for images, and you can even add text. Quite a convenient and funny thing.
Camera360 Ultimate
An excellent camera, many effects, a smooth and beautiful interface allow this program to stand out from the large number of photo editors. Appearing three years ago, it was constantly improved and supplemented by developers, and the result was a well-designed and high-quality application.
Phonto - Text on images