Many today is interested in the question of changing the background in the photo. To edit the image, there are a large number of diverse programs. Each has its pros and cons. The user may find a program that will be more comfortable for it. In the article, we present materials that can become peculiar photo editing lessons.
It is very convenient, as a person who has encountered such problems (for example, how to change the backgrounds for children's photos), such lessons help help.
I offer information on work in Photoshop. When a request for help from my friends, who want to change the backgrounds for wedding photographs, I advise the following. First of all, when replacing the background, you need to have about the same level of illumination, they should harmonize each other. Before starting work, open the photo in which you want to change the background. On click on the Quick Mask icon (fast mask), or press Q on the keyboard. Check the intermediate marker.

Now select the marker and draw around the object to be removed. Make sure that you are covering the edges, this means that the main point of the tool must lie in about half the outline of the object, which must be removed, and the second half is in the background. You can change the size of the backlight size for greater accuracy in the corners and on small sites. Then select the "Exhaust Filter" Tool Tool on the toolbar and click once inside the area you want to save. Click the preview button, and the program will show you the final type of image, as soon as the "extract" completes its work. Click the "OK" button if the result satisfies you, or you can start all over again.
Duplicate the layer before starting the filter. Now press Ctrl + click on the miniature of the extracted layer to load it into the selection. Next you can use "Select" - "Refine the edges" to improve the effect and, therefore, isolation. After that, press Ctrl + C, and then Ctrl + V to get the extracted fragment of the purified object on a separate layer. When you start photoshop the next time you will see the "Extract" command below the "Filter" menu.

Now you can use it as described above, and the question of how to change the background in the photo is completely exhausted. Keep in mind that there is an algorithm responsible for processing and selection - " Magic wand" It can be used for a wide variety of purposes, whether it is an object or subject in the photo.
Now you know several methods, how to change the background in the photo with using photoshop. You get the best results only in the case when there is a good contrast between the object and the background. This is one of the reasons why many remove the subject on the background of green or blue Screen: Then it turns out an excellent contrast in a green or blue channel and the ability to create a mask to extract the object appears simple way. Following the above tips, you will know how to change the background in the photo.
If you need to quickly remove the background in the photo, but there is no time to study professional programs, excellent option will be used online services. They will help in the shortest possible time to perform the necessary operations.
Remove the background directly from the browser is impossible, as it is designed to solve other tasks. To replace the background there are special services where specialized software is installed. This online software allows manipulate manipulation Photo with tools like Photoshop.
Top Online Services
The sample will be presented here better optionsallowing you to edit photos online. They are characterized Extended functionality capable of solving the task for several mouse clicks, and the simplicity of the interface.
pizap
This photo editor is the best for those who prefer to set their photos to various social networks And make interesting collages. Sometimes it is compared with Photoshop, which, unfortunately, no online version. Pizap functions have a lot of functions that makes it most preferred Among users.
Editing process:

Using online library:

Everything is simple enough, despite the fact that the English-speaking interface. On the site additionally you can find video instructions.
Photoflexer.
This online program Photo processing allows you to use top tools editing. Basic distinctive features PHOTOFLEXER are working with layers and with several types of secretions. 
To change the background of photo online for free, you need to perform a number of actions:

It is important to know that for successful work on it will take use latest version Adobe Flash. Player. Otherwise, incorrect operation is possible or the complete absence of a normal application loading.
Pixlr.
Among online tools For editing PIXLR is characterized by the most wide functionality. He combines professional opportunities Photo processing and intuitive interface, although the working shell has similarities with Photoshop. 
To change the background on the photo online we do the following:

Despite the seeming difficulty, everything is extremely clear, the Russian-speaking interface makes the process simple enough.
PhotoStreet.
Photo editor with rear background photos. A simple and understandable PhotoStreet interface will not create problems with the task. Some special skills and skills are not required here.
To replace the background online, we use step-by-step instructions:

Often photos that the decoration is embodied is much more beautiful and unusual. Any background replacement is, in fact, separation of photographs into two or more parts, each of which is then placed in a separate layer. After that, the most important part of the photo remains unchanged, and the secondary parts and the back plan are retouching or replaced at all.
How to change the background in Photoshop
Consider the instructions for replacing the background in Photoshop (version CS6 and later):
- Open the source photo.
- Open a photo for the background.

- Add photos to Photoshop. Choose approximately same photos in size.

- Make an active basic photo by clicking on the left mouse button (LKM) on a tab with the name of the photo.

- In the lower right corner, a downloaded photo with the title will appear " Background”.

- Using the tool " Fast allocation»Allocate the desired fragment.

- To highlight hair and other complex elements, use the "" tool.

- By pressing on this button Settings will be displayed.

- Applying the necessary, spend along the edges of the selected photos before getting a neat result.

- In the case when unwanted colors remain after the selection in the photo, it is necessary to use color cleaning. To do this, change the position of the slider in the "output" area called "". To use the selection in the "output" area, you need to go to " New layer with a layer-mask. " Click "OK".

- A new layer mask will appear in the palette.

- We start replacing. Go to photos " Background”.

- Pulling the LKM to drag this tab to the tab with the main photo. Holding the LKM to lower the cursor on the image that appears. The cursor will change its appearance On an arrow with adding selection. Release the mouse button. Must happen this result:

- Between the first picture and the chosen picture is inserted with a fragment inserted from it.

- If necessary, change the size of the picture. Make an active new object and using "Editing" - "" or CTRL + T key combination. Resize.

- The transformation frame appears around. Clamp shift and move the corners of the transformation frame so that they are combined with the main.

- After the transformation is finished clicking on the ENTER key.

- Make the foreground scaling, to make an active layer with a selected fragment.

- Press Ctrl + T, activate free transformHolding shift to resize. Press ENTER.

- Crop the remaining parts of the main image with the help Cadry».

- Clicking the points of cropping and dragging them to adjust the frame of the selection of the picture. Press ENTER. If the initial photos were the same in size - the cropping would not be used

- After a detailed consideration, it can be understood that the brightness in the background and the dedicated object differs. Adjust the brightness allows the tool " Curves».

- In the properties panel "Curves" click on the application of the correction to the bottom layer, and the curve in the field of light halftone is lowered before receiving the desired result.

- Combine all image layers by pressing SHIFT + Ctrl + Alt + E.

- Add shadow for realistic. Create a new layer.

- Apply the overlay mode to it ", click" perform the fill with neutral color (gray 50%) ". Press "OK".

- Choose a brush black color.

- Install the opacity is 10-15%, the "normal" brush mode and the rigidity of 0%. Size - to choose from.

As a result, we get high-quality replacement background in Photoshop. 
Actions with background
Raster editor Adobe Photoshop. It makes it possible to easily work with layers. The presence of the necessary tools allows you to process the images of web designers and professional photographers. Using the functions of the photo editor, you can easily change the background in the photo, add a few layers for color correction.
Beginner photo edits and designers will benefit the described methods of working with the background of images.
Blackout
For dimming, hold the following instructions:


Change color
To change the color of the rear image in Photoshop, you must:

Shone
In order to shove the background, you need:

You can also read the video:
Enlarge background
There are two options for increasing the back plan.
Monotonous background
To increase the homogeneous background follows:
- Select the image you want to enlarge.

- Open it in Photoshop.

- Go to the "Image" - "" menu, or press the CTRL + ALT + C key combination.

- In the window that opens, specify the type of measurement " Pixels”.

- Specify the desired canvas size, click the "OK" button.

- Separate the area Any convenient way.

- Conduct inversion selected area.

- Activate the tool " Pipette”.

- With it, choose the color to be filled rear end Images.

- Activate the tool " Fill”.

- Click on the dedicated " white"Areas.

- If there are neakkurat borders - "transitions", remove them with the help of a brush.

- Result:

Complex background
To work with a complex background you need:
- Open the image in Photoshop.

- Go to the "Image" - "menu.
- Increase canvas.
- Select areas of the three parts of the photo and copy them to a separate layer:

- It is not worth paying attention to the fact that there are discrepancies in colors and in the location of objects, they will be adjusted during work.
- Using tools " Stamp"And" Brush"To achieve the desired result. Work is very painstaking.

- Result:

Good day time, my dear friends. Today Monday, but the weekend continues. How are you? How is your mood? I have great! Felt May. How much I have seen different photos where people stand against some Eiffel Tower, although they themselves (as it turns out) in Paris was never. Apparently they want to pontoon, cool over someone or the opposite dreams of going there.
If you also want to find yourself against the background of something, then you need to replace the background. I'll tell you about how to change the background in Photoshop in this article. I will show you all actions on two examples.
We will break our lesson for two stages: first delete the backgroundAnd then insert a new background and all the mooring as it should.
Example with a homogeneous background
Example with a heterogeneous background
But it does not always happen perfectly. I mean, it is rare to find a homogeneous background, so previous way It will be difficult to take advantage. Right i say? That's why I will show you how you can change the background in the photo and all make chiki-buffs, if the background is heterogeneous.
- Open the image in Photoshop. Just immediately remove the lock from the layer so that we can edit it. Remember how this is done? If not, then simply click on the left mouse button.

- Choose any selection tool. In this case, I would take either "" or allocate with the help. Mmmmm ... All the same, I'll take a quick mask. Just do not forget that the fast mask itself does not work. You also need to choose to paint what we need to highlight.
- Now carefully select the object that should remain and remove the mask. We just get so that the object is not allocated, but the area around it. This is necessary for us. But if you select Lasso, do not forget to invert later, i.e. Go to "Allocation" - "Inversion", well, or click SHIFT + CTRL + I.

- After that, I press the standard Delete. And remove taking into account the contents, after which we remove our dotted line.

- Well, then again you load a new background on this document. Only the background with the rear layer descend below the background with the girl, as well as we did in the previous example.

- Here you need to remove some shoals. You can post and also remove gaps between hair. And I would have reduced the very girl very much, but I think she looks gigantic on this background. You do not find?
- After that, it is possible to give naturalness, namely, to play with, or go to "Image" - "Correction" - "Levels", and moving different sliders to choose the most suitable illumination type.

Well, in principle, our image is ready. Now the girl sunbathes not on the beach, but on the grass in the pure field)). Here is such a simple reception.

It seems to be simple. You can certainly still take kosyachki to achieve more realistic effect. For example, a part of the palm and the stops can be lasty with the help of an eraser. So it will be seen that her hands and legs are slightly in the grass.
Methods are very simple and do not require strong training. But if you want to own a photoshop perfectly, then you will definitely look lovely video course on this topic. Thanks to these lessons, you really explore photoshop from A to Z with unsurpassed ease.
Well, I'm saying good to you today. I hope you liked my today's lesson. But if you want to know the first about the release of the new lessons you need, you will definitely subscribe to the update of my blog. Also advise you to see the other my articles. Surely you will find a lot of interesting things for you. Good luck to you. Bye Bye!
Sincerely, Dmitry Kostin!
3 votesHello, dear readers blog Start-Luck. The background replacement is one of the most beloved and desirable functions that allows you to create incredible paintings. This skill is always impressed everywhere. Not only when it comes to entertainment, although this moment is important.
Today I decided to tell you how the background is replaced online for free. I would like to find out whether the result would really look like a professional work or without Photoshop could not do, as the result will look like a coryato. Closer to the end of the publication, we will find the answer to this question together.
I will consider three services. Although foreign, but quite understandable in use, the second in Russian, and the third is based on all the favorite photoshop program. I will give you some useful professional recommendations that will help to achieve a first-class result in each case and will make the desires of the demanding reader and who wants to seek to deal with the problem.
Well, let's get started?
Pizapru
The first photo editor, which will be discussed - Pizap . He is at english languageBut, I am convinced that it will not cause any problems. You will not even notice the difference, especially if you enjoy my step by step leadership To use this resource.

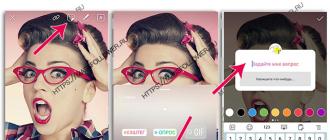
First of all, you need to create background. Select the "Edit" button.

You can choose from finished images, there are a lot of them. To do this, click on Pizap Backgrounds. If you want to insert your photo, then in this case you will need to click on "Computer".
You can learn from my previous publication.

Now you need to pick a pattern. Decide, of course, you, but I suggest you choose such color gamutSo that it is at least a little echoed with the original picture. The result will be better. I, for example, are now going to make a background for a puppy sitting in the grass, and therefore I am looking for a green pattern.

Now you need to remove the original rear background on my photo and, in fact, add it. Click "Cut Out Tool". Icon with a silhouette of a person.

A new window has opened. I add your pictures using the "Get Photo" button.

Now click "Computer" to choose a picture.

On the side of the work window are brushes (Brush). I need to highlight the object, which will later be cut out of the background. For convenience, use different scales of the brush. If it turned out unevenly, you got out of the edges of the picture, use erase (erase) to correct the situation.
After the main object is painted, click on FINISH.

Ready. It remains only to deal with the scale.

This is such a wonderful result I got. There are paid pro-tariffs here, but you can download a photo of normal quality for free and without registration, and most importantly no watermarks.
If I was asked to evaluate this service on a five-point scale, I would put him a firm five. What? A good pattern of templates, you can enjoy free of charge, the eraser and tassel works well. For online service - everything is just wonderful.
But let's go to the next "representative".
PhotoLitsa
Russian editor for photomontage you can find at PhotoStreet.ru. . First of all, as in the previous case, choose, or rather, add background. "

First choose from the list of the category "Autumn", "Mountains", "Sunset", "Antiquity" and so on. After clicking on a miniature with a picture, so that it appears in the working window, and then all "fold".

Now download your photo for which we have just selected background.

You can download a photo from a computer or find it on the Internet. Very big, in my opinion, the disadvantage is that the service does not recognize, the one that implies transparency. We will return to this issue, so that I will not sharpen attention on it.
The main thing is that your photo should be exclusively in JPG.

Now we take an eraser, it will help get rid of an existing background.

Most likely, this is a subjective opinion, but the fact that the eraser has not round, and I did not like the square shape. In theory, of course, the pixel also has such a form and, probably, the creators were guided by this thought and maybe it is even correct.
In this matter, I'm not too competent, I can only express an opinion regular user "I don't like it, it's not convenient, I want a circle." I will be glad if in the comments you support me, challenge and express your attitude to this tool.

With this editor, we also finished. I would assign him the "four", everything is on the same five-point scale. I really didn't like the eraser, the templates seemed somewhat outdated, although in comparison with the first resource they are significantly larger, the program interface is a bit old, and there are no additional effects for processing the pictures itself. I mean - tone, saturation, and so on.
It seemed to me that the project was made for a very long time and since then it was not updated.
Pixlr.
Well, the last for today - Pixlr.com. . I already talked about him, making or, let's say in the article. This service is a trimmed, lightweight, simpler version of Photoshop well-known. This resource does not imply any templates, all pictures must be on your computer so that you can work with them.
I can offer you an article if you need it. After everything is downloaded, and PIXLR is open, click on "Upload Images".

Select two photos with the mouse by closing the Ctrl button, and then use "Open".

I highly recommend using the PNG image as the main one. It suggests that the edges of the photograph will be transparent. This is not another square pattern, but a streamlined composition. A little later, I will show how to work with the edges in Pixlr, and I can also offer my article. Here we are talking about the full version.
So, output photos of which you are going to get rid of the background. Now select it using hot keys Ctrl + A, and then copy it by climbing Ctrl and at the same time C.

Now on the fore plan print a picture with a background. Just click on it. Once you do it, clamp Ctrl + V.

If you do not like the result, you can work with a scale. In this case, you will need to open the "Edit" menu on top and find in the list of FREE TRANSFORM functions.

I think this work will not be difficult for you.

To smooth the edges (or get rid of the background), take the eraser. This tool is in the left pane. Using opacity settings (in the picture indicated by the number "2"), you can make edges with softer or rigid (I designated the result as "3").

Of course, this editor, as the first, I assign a well-deserved five. It is very functional and allows you to get acquainted with the basic features of the popular Photoshop.
If this program scares you a little or it seems very difficult, I can offer the course " Photoshop for beginners in video format ", Which will introduce you to this utility, will tell about the instruments that are available in it and allow you to otherwise treat all your favorite program. She will definitely stop confused you.
I have everything on this. Before new meetings and do not forget to subscribe to the newsletter of this blog to follow the latest publications and group Start-Luck VKontakte .