Fine-tuning PaintTool-SAI
PaintTool-SAI is easily configurable through configuration files that can be opened and edited in a normal Windows notebook (but only in it, no Word and others like it, they can add additional codes to the file that will spoil it).
I will configure Portable (portable) version 1.0.2d (you can find the version number by opening the file sysinfo.txt, the topmost line), but this description is suitable for version 1.1.0. and most likely for other versions.
For portable version all the files that we need are in the folder App, which lies in the main program folder. For version 1.1.0, everything lies in the main program folder.
Have you ever heard of the "poverty line"? In fact, the term "threshold" is used in determining the condition, as well as the boundary that must be met to fulfill this condition. In the case of the poverty threshold, the condition is that the annual income must not exceed a certain amount to be considered "below the poverty line", "threshold" is the amount used to verify this condition.
But what does he do with graphics? On the contrary, if the threshold is high, pixels with large differences in values will be selected. In this case, to see a clear example, go to the parameters of your tool and increase the threshold by moving the cursor to the right. 
You will see that the selected surface will be much larger! But be careful not to put too high a value, because otherwise it will overflow into parts that will not be selected.
Before any corrections I advise you to backup all the folder with the program, just in case. That is, save somewhere a copy of it.
All changes will take effect only after restarting PaintTool-SAI.
How to create your own preset
To begin with, let's try the simplest thing: add your preset with the preset resolution of the file. These presets are convenient during the creation of a new file, we simply select the item with the required parameters from the list, and do not set them each time manually.
Here's what you can get with the correct settings. The observed chess board points to the transparent parts of the image. This tool is very similar to the adjacent selection, except that this time only the hue for selecting adjacent pixels is taken into account. For example, if the selected surface is blue, it will display only the blue color.
If you increase the threshold by several points, you will see that it expands rapidly, because it will also take into account the pixels are more orange or more greenish or more blurred. Therefore, this choice is best used if the hue of the element to be selected is very contrasted with the rest of the image.
To do this, we need to open the file presetcvsize.conf. In the screenshot, I added a translation of the values for each item. The most recent is the name of the preset, it can be any, but must be in quotation marks. For example, I have added a new preset:
1920, 1080, 72, 0, 0, "1920 x 1080 (Full HD)"
Here's how it looks in SAI
How to add your texture to the layer properties
Practically in pruning, this tool follows variations and edges to select the shape. For exercises, start at the starting point to try and combine your sycas and spam boxes. Place the other points around the selected part. You can move incorrectly positioned points by clicking and dragging them.
After you finish touring, click in the middle of the element that you twisted so that the path became a choice! And there you have to do what you want! This tool is based on a special algorithm for selecting an element that is in the foreground of the photo. This requires knowledge of at least a drawing and handwriting tool. But be careful, this tool is resource intensive.
papertex papertex.conf, and add a line:
1, papertex \\ FileName.bmp
FileName.bmp
Here's how it looks in SAI
How to create your own texture brush
To do this, you need to add a file with the finished texture (bmp file format, grayscale color mode, size 512x512 pixels) to the folder brushtex. Then open the file brushtex.conf in the notebook, and add the line:
First of all, you must first surround the element you want to select, that is, the flower. Do this as if you were using a handwriting option. From there, the part that you did not surround will be darkened. But it remains that improvements can be made, as some parts of the flower are also blackened, while we do not want it, while we have parts that we do not want to choose. To do this, you now have a brush that you can use to draw and, thus, refine the work.
But first, make sure that the Connected option is selected in the tool settings. 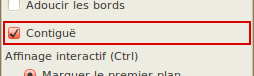
Begin by drawing about your entire flower to select the set of colors that make it up. Everything will be recounted to clarify the choice. In this case, in fact, no corrections are required, but if you are left with black parts inside the selected object, simply draw these include these parts.
1, brushtex \\ FileName.bmp
it consists of a special code (one unit) and a path to the texture, FileName.bmp is the name of your file. It is desirable that the texture is seamless.
This is how it looks in the program
How to create your brush shape
(only two types of brush forms)
Type 1
To do this, you need to add a file with the finished texture (bmp file format, grayscale color mode, size 512x512 pixels) to the folder blotmap. Then open the file in Notepad brushform.conf, and add a line:
Again, everything will be recalculated to exclude those parts that you deleted. So, you can copy this flower into a new image or erase what's around, after changing the selection. 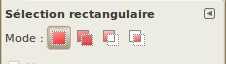
Below is a brief demonstration of each of the four modes.
Replace the current selection. Add to my work. Subtract from current selection. Intersection with the current selection. Smoothing allows you to soften outlines that are inclined or rounded to prevent their staircase effect, also known as anti-aliasing or aliasing.
1, blotmap \\ FileName.bmp
it consists of a special code (one unit) and a path to the texture, FileName.bmp is the name of your file. It is desirable that the texture is seamless.
Type 2
To do this, open the folder elemap. It contains graphic files of the bmp format with a size of 63x63 pixels, which can be edited in their own way, using only two colors - white and black. The path to the newly created graphic file must be added to the configuration file brushform.conf, adding a line to it:
Indeed, which of us has ever faced one of the following two situations? You are proud to show your work, which you simply do as big, but you are told that your edges are uneven. You practice, but you are horrified to understand that your edges look like stairs. . Er, but what is this ladder?
You can clearly see the ladder on the right circle. To prevent this problem, you should pay attention to the options defined for certain tools. 
Except in very rare cases, you should always leave this option checked. And make sure that your image is not in indexed colors, otherwise the anti-aliasing will not work.
2, elemap \\ FileName.bmp
it consists of a special code (two) and the path to the file, FileName.bmp is the name of your file.
The pale-violet coordinate system does not have to remain visible, it is needed for easy editing. As I understand it, the tool works in such a way that it rotates the shape in accordance with the direction of movement of the brush. After experimenting, you can achieve their own unusual effects.
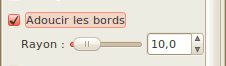
Sometimes you do not want to have sharp edges, but rather a soft edge that merges with the background of the image. This option allows you to adjust the softening of the edges of your selection. Very practical, for example, to create a shadow. From left to right: there is no softening, 10 pixels, 25 pixels and 50 pixels.
![]()
Sometimes you make a rectangular or elliptical selection in a certain place, but you can not always go from one corner to another for technical reasons. In these cases it is much easier to start from the center of your choice. 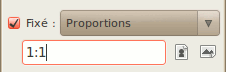
You only need to check this option and set the ratio width: height.
I made my brush shape by simply painting this box 63x63 in black. I called this form Square_Max. Then I picked up such settings as in the screenshot. It turned out a tool with interesting subtle features. The main disadvantage is that it slows down (does not have time for the hand), the stronger, the larger the size of the edited image and the radius of the instrument.
Here are some examples of the relationship. Capture, illustrating multi-window mode. You can mark two panels on the left and right and the image window in the middle. The left panel combines the dialog box for tools and tools. The right panel combines the dialogs of layers, channels, paths and the undo history in the grouping window, as well as dialogs of brushes, patterns and gradients in another grouping window.
It can also contain foreground and background colors, brushes, gradients and drawings, as well as the thumbnail of the current image. At the same time, you can open multiple images in the Split: Separation windows: the restriction is superimposed only by your system resources. If you go to the scaling factor of 100%, scrollbars will appear to scroll the image in the window. Groups of layers, channels, paths, Canceling history :: Note that the dialog boxes are in the tabs. It shows the structure of the active layers of the image and allows them to be manipulated different ways. Without it you can work, but even less advanced users find it necessary to constantly have it. Group of windows Brushes, Templates, Gradients. It is located under a group of layers of windows.
- Toolbar: contains a set of icon buttons for selecting a tool.
- The image can be larger than the image window.
How to fix incorrect display of two names of color transition modes in the layer settings
1 - open the file language.conf
2 - find a string of characters:
"help.chm"
3 - immediately after it, press the input a couple of times, move the cursor up on the formed blank lines and paste the following text:
BlendMode_Sub = "Subtraction"
BlendMode_AddSub = "Slozhn-Vychit"
You will find the same elements, with some differences in their management. There are dozens of other dialogs, but users open them only when they need them, and then close them, and warned users usually open the toolbar and window. At the beginning of the layer window is empty, because at the moment the editor does not contain an image, it will be filled when the image is loaded.
Then you can view the rest of the guide at your leisure to find out many other more subtle and specialized features. Screenshot of the toolbar. Here short review of what you will find there. Section 1, "Toolbar" provides an overview of how the tools work, and each tool is described in the "Tools" chapter. Foreground and background colors: the color area displays the current foreground and background colors that are involved in many operations, and clicking on one will bring up this. This will open a list of all currently open images, which will allow you to change the active image if you want. The "Settings" dialog box is available on the image menu bar in the "Edit settings" section.
4 - save yourself
How to change Russian into English
I'm used to using the English version of SAI. So I changed my Russian back to English.
To change the language, you need to take a file language.conf from the English version and replace it with a similar one from Russian. I took it from version 1.1.0 and it came up for portable version 1.0.2d, but not quite, you need to add something.
Each of the following sections describes in detail the parameters that you can change. Preferences for the environment. This number indicates the minimum number of operations that can be canceled, and until the maximum cancellation memory size is reached, additional operations will be stored in the cancellation history. information about the cancellation mechanism.
This number sets the upper limit of the memory used by the image to store the undo stack operations. If this limit is exceeded, the oldest operations will be deleted, if this does not lead to a number less than the above minimum. This value is not a strong restriction: if you try to create a new image larger than this size, you will need to confirm that this is the image of the size you want.
1 - open the file language.conf
2 - look for a string of characters (with quotes):
"Status Bar"
3 - right after it we press input, there will be a new blank line.
4 - insert the following text into a new blank line:
WindowFunc_HSLMode = "HSL-Mode"
5 - looking for a string of characters (together with quotes):
"Status Bar (& U)"
6 - right after it we press input, there will be a new blank line.
7 - insert the following text into a new blank line:
By default, one is used, but there may be more than one processor on your computer. This option allows you to select the thumbnail size displayed in the dialog boxes "Open image" and "Save image". The possible values are "No Thumbnails", "Normal" and "Large".
Determine here the maximum size in megabytes that you provide for a thumbnail. Besides the maximum size The thumbnail will not be saved. Closing an image is not reversible; cancellation is not possible. If these confirmations prevent you, you can avoid them by disabling this option; But you will need to remember the images that you need for reserve copy.
WindowMenu_HSLMode = "HSL-Mode (& p)"
8 - look for the line containing DlgJpgSave_Title
9 - Change DlgJpgSave_Title on DlgJpegSave_Title (added the Latin letter " e")
10 - doing the same for the next 10 rows
11 - find a string containing a string of characters:
12 - delete this entire line (together with the semicolon at the beginning of the line) and all the lines below, exactly up to the line containing the string of characters (the whole string is already left entirely):
13 - remain
The English version has not been tested by me completely, errors and incorrect work are possible, so this version replacement at your own risk and risk, if anything, change back to Russian.
Well, perhaps, and the whole tutorial. There is more to set up there especially and there is nothing.
Pleasant drawing.
Paint Tool SAI - a graphic editor designed to create vector and raster graphics. A great advantage is its compatibility with all versions of Windows and a small size that allows you to download full version Paint Tool SAI quickly.
Features of paint tool sai 1.2.0.
- Simple interface. It does not require long training, it is possible to understand it intuitively.
- Presence of hot keys. Those who have worked with Adobe Photoshop before will be fairly simple, keyboard shortcuts are similar. In addition, there are also additions.
- High performance. Graphics editor does not require large PC resources.
- Support for the main formats, including .psd, and its own format.sai.
- Compatibility with the graphic tablet.
- The ability to draw both raster and vector graphics.
- Customize the workspace. The user can choose the windows that are necessary for him in the process of work and distribute them on the surface.
Someone may think that the Paint Tool SAI is an obsolete design, but this is its advantage. Because of its simplicity, it will quickly become irreplaceable. In addition, you can download it for free.


