In our time, it has become very fashionable to have photo books in the home archive instead of ordinary photo albums. On the one hand, it is much more convenient, since you do not need to spend time selecting photos, printing them, and then arranging them. But on the other hand, a photo book is not a cheap pleasure. Given the above, I want to bring to your attention my response to expensive photo publications. I propose to make a photo book with your own hands in a budget version, that is, in a format of 8 cm * 8 cm and with 20 photographs. This mini book in hardcover, I hope, will be a worthy addition to your photo archive.
So, to create it you will need:
1. printed photos (even number);
2. double-sided adhesive tape on a paper basis (or glue "Moment");
3. double-sided adhesive tape on a foam basis;
4. piece of leather (leatherette, fabric);
5. iron corners (optional).
And now everything is in order.
I. We need printed photos. There are two ways to get them in the right size.
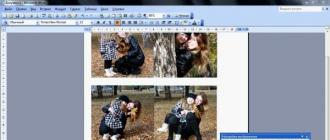
First way: select the desired photos and paste them two together in Microsoft Word.
There, set them to the required size on the appropriate tab, if necessary, crop them. 6 photos will fit on an A4 sheet (3 blocks of 2 photos of 8cm * 8cm in size).


After processing all the photographs, we print them on a printer on photo paper.
Second way: you can do everything the same as in the first method using Adobe Photoshop, if you have sufficient skills to work in it.
Photos must be MANDATORY an even number plus two on the cover. Their size will determine the size of the entire photobook. Photo paper should be taken one-sided, better matte with a density of 160-200 mg / cm3. If it is not possible to print on a color printer, you can do it in black and white, especially since it is now in fashion, a kind of retro chic!
II. Cut out the photos in blocks of two and one for the cover.

It is better to use a clerical knife and a ruler for this, rather than scissors.
III. Now glue all the blocks together except for the cover. To do this, you can use double-sided tape, or you can take glue like "Moment". Personally, I prefer tape, because it is more convenient to work with, does not require special care. However, it costs much more than glue, given its high consumption. In the end, you get such a “book” photoblock.


IV. We make a cover. To do this, cut out of any cardboard two squares in the size of two covers.

Glue the first to the front of the block, and the second to the back.

Now we need to decorate the end of our almost finished photo book. We take a piece of leather (leatherette, fabric) as high as a book, and 2 cm wide more than the width of the end of the book. We glue it in a stretch exactly to the end and with an overlap on the covers.

You should not pull too hard, otherwise the book will open on its own. The gaps on the cover do not need to be more than 5 mm, because. cover will peel off. And now the most important thing - cut out photo covers with glue.

We enjoy our work.

As a kind of exclusive detail, you can make a voluminous cover. To do this, you need to print one copy of the cover (front) more. From it we cut out any details that, in your opinion, are suitable to create the desired effect. I have a camera lens and a tape with an inscription.

We stick on double-sided adhesive tape on a foam basis for a 3D effect. Voila, the photo book is ready!!!
PS: If you are having difficulty working with Microsoft Word - http://microsoft-help.ru/
Thank you for your attention. Successful creation!
Modern newlyweds are those who can afford stylish weddings, unusual photo shoots, unique shots. Among the latest achievements is his own book in memory of the solemn day. In this article, we will talk about how to make a wedding photo book.
The difference between a photo book and a wedding album
A photo book is printed photographs on printing paper, bound or assembled into rings. The advantages of such storage of memorable pictures are:
- The ability to collect and edit photos, create collages, increase and decrease the size of a photo
- Using different fonts and additional pictures in the design
The advantage of the photo album can be safely attributed to its small size. A photo book is a minimum of 30 spreads with a large number of photos. An album is a maximum of 10 spreads with the best photographs, the captions for which are made by hand.

Creating a photobook is an opportunity that the newlyweds have received thanks to new technologies. To date, there are several software that easily and simply allow you to create your own unique book of memories without resorting to the services of a professional. After the layout is completed, the book is usually sent for printing. Modern printers offer low prices for this type of service. The average price is 2000 rubles.
For those who decide to make a photobook with their own hands, we offer several options for lightweight programs.
Making a photobook with your own hands
The first stage is preparation. Conventionally, it can be divided into 4 steps.
- All photographs taken on the day of the wedding are selected. Sometimes photographs taken before and after the celebration are included in the book.
- Photos are sorted in chronological order.
- Each block is then sorted by the quality of the photos taken.
- Only high-quality photos are selected that will be used in the creation.
The second stage is the choice of the program with which the work will be done. To date, a photobook layout can be created in Photoshop, FotoFusion and the Cyfrobook editor program. All these programs are equipped with a main window, an additional panel for working with size, color and fonts.

The algorithm of actions is as follows:
- Select book size, title, number of pages, cover
- Selected photos are transferred to the layout
- Optionally add captions to each picture.
- After completion of the work leave the order for printing
- Upon receipt of the book, be sure to check and compare with the layout in order to avoid annoying misunderstandings
Typesetting errors that can affect print quality:
- Photos are not very good quality and professional shots alternate. The difference will be immediately visible on the pages.
- Excessive photo stretching. It should be noted that the finished print in the size of 2.54 cm must contain at least 250-300 pixels in digital format. Otherwise, the photo will be blurry.
- Shredding pictures for more page capacity. A book is a product that is pleasant to pick up and look through more than once. Therefore, do not increase the number of shots. It is better to add several spreads if all the selected photos do not fit.
- If, after all, only non-professional photographs captured important moments, then you can make a separate chapter only from such prints.
- The best design option is one font. Do not use different colors and fonts - this will reduce the cost of the effect.

There is another way to create a photobook with your own hands. To do this, buy a photo album with thick cardboard pages. Selected photos are printed on self-adhesive paper. After that, they are carefully pasted on the page according to the plan. The main thing is to carefully distribute the photo on the page so that there are no swellings and bubbles. Upon completion, the pages are laminated.
Photo styles
Just like the style of a wedding, the style of a photo book can vary. It may correspond to the theme of the celebration, or it may differ in design. The most common styles for wedding photo books are:
- Romantic style - photos are selected strictly in chronological order. They add a photo of the first meeting and a “lovestory” photo session. You can also insert a photo of parents and parting words.
- A book with a sequel is created after a certain period of time. The final photos are pictures with the firstborn.
- Retro style - most of the pictures are in black and white. Emphasis on the faces and gestures of the young.
- Books with spicy and funny photographs - if the wedding photo session was held in a certain style, then this will definitely be reflected in the nature of the photo book.

Videos about creating wedding photobooks
We offer several video tutorials on working with various photo editors to create your own photo book.
Hello!
Photobook is not just an album with a set of photos and a cover, it is much more. Photobook made with soul,shows your emotions, feelings, experiences, and a self-made photo book makes it unique and most beloved. Of course, you can contact a photo studio and they will offer you a standard design, or you can use special programs (now virtually every photo lab has them). But trust me, the power of Photoshop is many times greater than any standard program that you will be offered. Of course, not everything will turn out right away, skill will come with experience. And one day you will be able to make your photobook With independently. Make it unique and one of a kind. I suggest you try to make a photo book with your own hands, bring new colors into your life, create your own little bright world!
You can make a photo book yourself from scratch, there is a section on the site for this, or you can first use our best practices and use templates from VIDEO - LESSON for filling out photobook templates.
To begin, let us briefly recall
How to make a photobook with your own hands.
First you need to decide on the following points.
- Photobook type.
It all starts with what you have to think through. What type of photobook would you choose. In this article I will talk about the individual design of premium photobooks. For Premium photobooks, the turns of the indoor unit open 180 degrees. This allows you to use the entire space without loss and place images at the joints. What is Premium photobooks you can find out - Choosing a photo center
We select a photo center where you can print Premium type photo books. This must be done from the very beginning, because. on the sites of these photo centers you can find out the sizes of the sheets of your future photo book. - Photobook size.
We proceed to the choice of the size of the photobook (we choose from those sizes that the photo center offers). Here it should be clarified that the sizes of spreads for self-creation of photo books in different graphic editors, including Photoshop, are different for photo centers !!! - Photobook theme.
Now, you have to decide on the content, the subject. What event or holiday will your photobook be dedicated to: vacation at sea, birthday, anniversary, wedding, first bell at school, or maybe just the past summer. - Decor.
It will be interesting if the book contains not only your photos, but also text (your memories, poems, notes from diaries, notes from your kids' albums), memorable little things, such as postcards, notes, tickets to the theater or cinema, souvenirs. Such pleasant little things can always be photographed or scanned and added to your photo book. - Style.
After that, you need to choose the style in which your future photo book will be. What I mean? If you are going to make a photo book about a baby, then it is natural to use bright and cheerful colors, and if it is a wedding or an anniversary, then soft colors will be more suitable. But this is your individual choice. There are no rules here. Everything is decided by your preferences and imagination. - Background.
The next step is to choose a background on which the entire composition of your photobook will be built. It can be a background from a photograph, a nature background, a texture background (wood, paper, fabric), a solid background, a gradient, and much more. The background can be the same on all pages of the photobook or different on each spread. All this can be found on various Internet resources. - Photo preparation.
After choosing a background, we prepare photos that will be used in the design of your photo book. If necessary, we process them (color correction, sharpening, eliminating photo imperfections, etc.), but for the first work, all this can not be done.
If your choice fell on the Photoshop program, then on the site you will find many lessons on creating photo books in this wonderful editor.
In the window that opens, click New order if you want to create a new book from scratch, or Open order– if you want to make changes to an already created order.
Selecting the type and format of the photobook
In the left part of the window, select the type and format of your photobook. The image of the selected option in finished form on the right will help you with the choice. Here you can also choose the type of cover: photo cover or book cover.

Once you have defined these settings, move on to the next step.
Photo selection
Select the photos you want to insert into your photobook. On the right side of the window, all the photos you have selected will be displayed. In further work with the book, you can also add and remove photos.

When all photos are selected, proceed to the next step.
Choosing a photo layout option
Choose how the photos are arranged per page and the number of pages. Depending on the total number of photos, the program will suggest the optimal number of pages. Here you can also choose the number of photos on one page - for the option with autocomplete. The "Autofill" feature will help you make an album faster if you are using our program for the first time.

Proceed to the next step.
Background selection
Choose a background for your book. The background can be either a solid fill or any of the templates prepared by our designers. Click the dropdown list in the menu Background selection. For your convenience, all templates are grouped by topic: Children, Journey, Wedding, Miscellaneous etc.

With the background selected, click Continue and wait a bit - the program will distribute your photos in accordance with the selected settings.
Adding texts
Now let your creativity run wild! Double-click on the text field and add a title for your book, select the color and font of the inscription.

Photo editing
Change the size of photos, their placement on the page, the angle of rotation, add new photos and delete unnecessary ones.

For your convenience, the program will issue a warning that the photos are of low quality and it is not recommended to enlarge them without losing print quality. Pay attention to the border safe area- all elements beyond this border will not be visible when printing a book.
Decorating a photobook with clipart
Add pictures from the collection Clipart for decoration, simply by dragging the picture you like onto the page of the book. You can change the size of the picture, its position on the page and the angle of rotation.

All pictures are grouped by topic: Trips, Children, Vintage etc.
Frame selection
Select a photo frame by simply dragging the frame you like onto the photo page.

Mask selection
Select Mask- an effect similar to a frame that allows you to highlight the desired photo and add a "zest" to it or make the desired accent. Black indicates where the image will be displayed, while white indicates the background pattern.

Adding Effects
Add effects by dragging the icon with the effect you like onto the photo. Effects change the selected image's color (for example, to black and white), brightness, and contrast.

Editing while working
Additional options
Additional menu options Format will help you in your work. Here you can resize photos, crop them, or set a photo as a background. Different elements can be aligned relative to each other, centered on the page, placed in the foreground or background, placed in a “mirror”.

Save for later editing
Got creative and want to get back to editing the album tomorrow? Be sure to save what you have.

Placing an order
Is your photo book ready for printing and it's time to place an order? Feel free to press the button Order!
Preview: look again, are all the photos in place?

Select the type of cover: photo cover or book cover; cover finish: glossy or matte lamination, metal corners; number of copies. If necessary, add your comments for us.

Choose how it is convenient for you to send us the file - download via the Internet or bring it on disk. Enter your contact details. Please note that fields marked with a red asterisk are mandatory.

Choose how it is convenient for you to receive the order - order delivery or pick it up yourself at one of our offices. Fill in the data for delivery

Congratulations! Your order has been sent! You can check and print the order form again. And we will call you and inform you about the readiness of your photobook.

When I first encountered the design of my own photo book,I had a lot of questions. Finding answers to these questions took a lot of time. Then I came across an article by one wonderful girl who explained in detail how to create a photo book with your own hands. Thanks to her, this passion appeared in my life. I will try to repeat her feat - to describe the whole process of creating an individual design for your unique photobooks.
It all starts with what you have to think through
1. What type of photo book will you choose. In this article I will talk about the individual design of premium photobooks. In photobooks "Premium" the turns of the indoor unit are revealed by 180 degrees. This allows you to use the entire space without loss and place images at the joints. Features of a photobook of the "Premium" type
2. Select a photo center where you can print premium photobooks. This must be done from the very beginning, because. on the sites of these photo centers you can find out the sizes of the sheets of your future photo book.
3. We proceed to the choice of the size of the sheets of the photobook (we choose from those sizes that the photo center offers). I want to clarify that the sizes of the sheets of a photo book for self-creation in different graphic editors (including Photoshop) are different for all photo centers !!!
4. Now, you must decide on the content (themed). What event or holiday is your photobook dedicated to: vacation at sea, birthday, anniversary, wedding, first bell at school, or maybe just the past summer. In addition, it will be interesting if the book contains not only your photographs, but also text (your memories, poems, notes from diaries, notes from your kids' albums), memorabilia (such as postcards, notes, tickets to the theater or cinema, souvenirs). Such nice little things can always be photographed (scanned) and added to your photo book.
5. After that, you need to choose the style in which your future photo book will be. What I mean? If you are going to make a photo book about a baby, then it is natural to use bright and cheerful colors, and if it is a wedding or an anniversary, then soft colors will be more suitable. But this is your individual choice. There are no rules here. Everything is decided by your preferences and imagination. Examples
6. The next step is to choose a background on which the entire composition of your photobook will be built. It can be a background from a photograph, a nature background, a texture background (wood, paper, fabric), a solid background, a gradient, and much more. The background can be the same on all pages of the photobook or different on each spread. All this can be found on various Internet resources.
7. After choosing a background, we prepare photos that will be used in the design of your photo book. If necessary, we process them (color correction, sharpening, eliminating photo imperfections, etc.), but for the first work, all this can not be done.