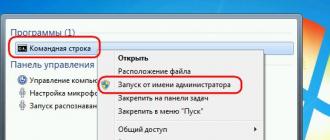
Few people would have thought that to turn on the iPad for the first time, preliminary preparation is required. But it is so. In order for you to save time when you first turn on the iPad, we suggest you read this article.
We note right away: in order to turn on the iPad, you cannot do without using a computer, desktop or laptop. The fact is that on the iPad you cannot freely record programs via a USB port using a file manager. To connect your tablet to a computer (PC or Mac), you will need iTunes, which is completely free and available for download on the Apple website.
iTunes provides the user with the following options:
- navigation through the multimedia library;
- implementation of a letter-by-letter search;
- organization of multimedia library;
- creating folders and playlists;
- editing metadata: artist, cover, composer, etc.;
- import and recording songs from CDs;
- playback of movies, music, podcasts;
- visualizer, multi-band equalizer, mini-player mode;
- listening to Internet radio;
- purchase of multimedia content on the Internet;
- synchronization with iPhone, iPod, Apple TV and iPad.
If you took out your brand new iPad, turned it on and saw a desktop on the screen, on which application icons are located, you should know that your tablet has already been turned on and registered.
When you turn on a brand new iPad, a green icon with a USB plug is displayed on the screen.
If, nevertheless, your tablet was turned on, it's okay. The only thing you need to do is to make sure that no applications have been installed on it other than the standard applications.
The majority of users in our country have the Windows operating system installed on their computers. Therefore, downloading iTunes from the Apple website is necessary for this particular operating system.
After installing iTunes, you can connect your iPad using the cable that came with your tablet.
After downloading the program, you will be offered two options for the next steps: set up iPad as a new device or restore information from a backup. In your case, you must choose the first option. After a while, the tablet will turn on and you will see the operating system screen.
After that, you need to go through the registration process, which contains one pitfall - if you do not have a MasterCard or VISA plastic card, you will not be able to buy programs in the AppStore. Although the AppStore has a huge number of free applications. In addition, some manufacturers of games and applications distribute their applications for free as part of ongoing promotions - a plastic card is not required for this.
Consider the order of your actions in the iTunes program:
- Go to iTunes Store.
- Find in the list of programs any free application (such applications are marked with a button labeled FREE).
- Click on it and then press the button INSTALL APP.
- After that you must see login/registration window.
- Press the button "C create a new account", and then the button " Further«.
- We agree with the license agreement(where without it?). Fill in your email address and password to register a new account in the AppStore. Moreover, the password must be complex and must meet the following requirements:
- at least one letter must be capitalized;
- at least one letter must be uppercase;
- the password must contain numbers;
- the same character cannot be repeated more than three times;
- password can't be shorter eight characters.
To avoid a situation where you have forgotten your password, you will be prompted to select a security question and an answer so that you can recover your password. After that, you need to refuse spam by unchecking the corresponding checkbox and clicking the "Next" button.
- And most importantly: when the next window appears in the column " Credit card"You must put a dot in front of the word" None» or press the button with the corresponding inscription. In the absence of this button or dot, know that you did something wrong.
For this it is necessary
Apple products have always stood apart among the products of its segment. In those days, when a computer in our area was considered such only if it belonged to the proud class of Pi-C (or IBM-compatible, as they said then), products with a bitten apple on the logo were known only to a narrow circle of experts.
Everything changed in 2001, when the famous iPod media player was launched by Apple. Developed a success that made a splash iPhone, a gadget that does not need a special introduction. Tablets from Apple - the iPad - have finally conquered the mobile device market.
The intuitive accessibility of the interface and attention to the needs of users have turned Apple products from rare toys for advanced hipsters into a mass consumer product for a wide range of people from teenagers and techies to retirees and housewives.
Despite the already mentioned accessibility and intuitiveness, Apple managed to maintain a special approach that distinguishes its products from a number of analogues.
This, of course, is an undoubted plus, however, at the same time, a user who has dealt only with personal computers controlled by the Windows operating system (and there are quite a few of them, you will agree) may experience certain difficulties at first when dealing with new technology for them.
To avoid such difficulties, when you first turn on the device, it is better to use useful tips from experienced users. We've put together tips for you on how to set up your iPad and we sincerely hope you find this information useful.
First meeting
So, you have a box with a brand new iPad in your hands, and in order for a piece of plastic to turn into a completely ready-to-use device, you will need:
- a computer connected to the Internet;
- wireless network Wi-Fi;
- and ... in general, that's all.
After turning on the power of the device, you will be prompted to select the interface language. The iPad interface supports more than a dozen different languages, but you should not be afraid of confusion: the main languages used - English, French, German and, of course, Russian, are displayed separately in the start menu. The full list of available languages can be viewed by calling the corresponding menu.
After selecting the language (later the choice can be changed in the device settings), press the " next" (arrow in the upper right corner of the screen) and wait a few seconds. After that, you will be prompted to select a region. This choice will affect some of the services Apple provides.
To start using the tablet, you will need to activate it in the iTunes service, for which you will need to install the appropriate application that comes with the iPad on your computer. With the help of iTunes, later it will be possible to synchronize mail accounts, buy applications, download and synchronize audio and video files, store a backup copy (more on this below).
After selecting a region, the iPad will prompt you to connect to a Wi-Fi network to activate iTunes. In the list of found networks, select your home network and enter its password.

After activation, the device will ask if you want to use location services. Geolocation determines the spatial position of the user and allows the use of maps, and is also used by some applications.
The user's location is confidential information protected by the user agreement, so if you are not James Bond or Edward Snowden, you can safely turn on location services.
Backup copy
The next step is to choose how to set up the device. You are offered three points:
- Set up like a new iPad;
- Restore from iCloud copy;
- Restore from copy.
Let's dwell on this point in a little more detail. Apple devices give the user the ability to make a backup copy (the so-called Back-Up), which allows you to save all information about the device settings, installed applications, contacts, etc. This allows when buying a new Apple device not to set it up from scratch, but simply transfer the backup copy.
But this function is especially necessary in case of loss (theft, breakage) of a smartphone or tablet. It's no secret that in our time, information stored on a media can be many times more expensive than the media itself, so in no case neglect saving a backup copy.
In this case, no matter what happens, you will lose only the device itself, albeit not cheap, but you will fully save the data stored on it, contacts, messages, correspondence, photos, videos, etc.
The standard backup location is a remote drive or "cloud". Storing data "in the cloud" allows you not to save the device's memory, and most importantly, to get access to your information from any gadget from anywhere in the world, as long as there is access to the Internet in this part of the world. Apple's "cloud" technologies are just represented by the iCloud service.
If for some reason (for example, lack of stable access to the Internet) you do not want to store information on a remote drive, you can save a backup copy on your computer using the iTunes application.
But, since you are interested in setting up the iPad, it is logical to assume that this is your first point of acquaintance with Apple gadgets, so feel free to choose the first point.
Account setup
The next step is personalization. For personalization in the Apple environment, an Apple ID account is used. The account is your "passport" in Apple services. you are prompted to sign in with an existing AppleID or create a new one.
You can also skip this step, but it is not recommended to do this, since only by personifying (that is, proving that you are exactly you, and not a random person or, even worse, an attacker) using an account, you can use all the services offered fully.
By selecting " Create AppleID", You will be taken to a page where you will be prompted to enter an email address that will be your login at the same time, come up with a password and a security question to reset your password. In choosing a security question, you are completely free, the main thing is that this question is known only to you, and you are sure that you will certainly not forget the answer to this question.
Important! Be sure to use a real-life and used (not "disposable") email address as a login. Subsequently, this address can be very useful to you, for example, to recover your password.
In addition, you will be prompted to enter your bank card details, with which you can make purchases in the online Apple Store app store.
If for some reason you do not want to enter your card details, you will have to go for a little trick: create an account using iTunes. To do this, through iTunes on your computer, go to the Apple Store and select any free application, for example, the iBooks book reader.
When you try to download the program, you will be prompted to log in to an existing "account" or create a new one. We need the second option. In the menu that appears, enter all the same data - the address-login password and security question with the answer. But in the field for entering bank card data, select none. Then log in to your newly created account on your iPad.
Next, we agree to connect to the iCloud cloud service already described and activate the Find iPad service. With the help of this service, after logging in with your account, you can track the position of the device (this is where geolocation comes in handy), send a sound signal to it, which will greatly help in the search.

Or if the iPad is stolen. you can block it and remotely give a command to destroy all information stored on the iPad. We can then restore all the information from the iCloud backup - a very useful service!
Details Category: Settings, instructions for iPad. Created: 18.04.2013 18:35 Author: [email protected]What I did out of ignorance on the first day of using the iPad, I already wrote in the section "About Us". If you got to this article before you started trying to turn on the iPad, then you are lucky and you did without extreme sports and managed to keep someone's head intact. Many people have time to get scared, like me, and come to the wrong conclusions, like "I was given a defective iPad." No need to be afraid. You will indeed need to connect your device to your computer, but it's actually quite simple.
So, you have decided to take this step. If you have an iPad with a newer iOS operating system (iOS 5 or later), you may not need to go through the entire process of connecting your iPad to your computer.
Let's summarize what we need to get started:
1. Computer with Windows 7, Vista or XP SP3 or later or Mac
2. Be sure to have the Internet on your computer
3. iTunes and QuickTime programs installed on the computer
4. Apple ID account
5. Connect your iPad to your computer. Actually, for this you need the iPad itself and a cable to connect to the USB port of the computer. The cord comes with the iPad and at the same time is a 2-in-1 device - a USB cord, which in turn is stuck at one end into the charger unit.
Items 1 and 2. I think you already have, if not, then you have two options - either buy a computer or sell an iPad (just kidding).
Point 3."Installing iTunes" should not cause difficulties. Download file from Apple website http://www.apple.com/ru/itunes/, so you get the latest version guaranteed, and in general you get exactly iTunes, and not the problem "nothing works, they told me - do not buy an iPad." Make sure the version of iTunes is for your operating system. At this stage, we are only interested in installation, a more detailed iTunes setup will be discussed in a separate article. By the way, iTunes is already installed on your iPad by default, although this should not bother us at all for now. So, download, install and launch iTunes on your computer.
Item 4. Now you need to create your Apple ID.
Note: An Apple ID is an account that allows us to use all "Apple" services such as iTunes Store, App Store, iCloud. You can link a bank card to it for online purchases of music, movies, programs and games. And you only need one Apple ID for all these services. Important point- if you have two devices, for example iPad and iPhone, then one Apple ID will still be enough for you, and all purchases will automatically appear on both devices.
iTunes on the computer you have launched. Hope. Detailed instructions for creating an Apple ID are available on the Apple website http://support.apple.com/kb/HT2534?viewlocale=ru_RU
On a note: I want to note that you can register your Apple ID both with and without a bank card. If you register without it, then if you wish, you can always add a bank card later, and if you are overcome by fear, no one bothers you to link to your Apple ID virtual bank card Well, now there are no problems with this anymore. I tied an ordinary card, pah-pah-pah, but there were no problems. Now in the App Store, prices for games and programs are already set in rubles, so you don't have to think about converting dollars into rubles. If you still link the card and start shopping, then be prepared for the fact that 1 ruble will be debited from you as a check on your card, which will be returned after a while. Previously charged $1. Also, do not be surprised if, when buying a game or program, money will be debited from the card with a delay, this is normal. Consider that "Apple" is in no hurry to charge you money immediately.
Item 5.
You have iTunes running, or we are launching it. The last step is to connect our iPad to the computer using a USB cable. We see a choice: set up the iPad as a new device or restore from a backup. We choose the first option. After a while, everything will be set.
Articles and Lifehacks
"Apple" tablet remains one of the most sought after and desired gadgets around the world. Unfortunately, new users often cannot even imagine how to set up ipad. Let's try to understand the initial and key settings, as well as some of the functions of our device.
Getting started with the iPad: initial setup
We note right away: if at the time of setup we did something wrong, you can always start doing it all over again by pressing the “Home” button.
So let's get started. Turn on the tablet by holding down the Power button (depending on the model, it can be on the side or on top). After the greeting, we swipe across the display from left to right. Select your language, country or region (this is necessary for the correct display of the time and date). Now we connect to a Wi-Fi network (if it is not there, we use cellular communication) and go to the "Geolocation" menu, activating the services we need.
The next step is to set up Touch ID (if the tablet has a fingerprint scanner) and set a password for data protection (should consist of 6 characters). The Touch ID feature will help you make purchases and unlock the tablet with your fingerprint, but you can’t do without a password. To reduce the number of password characters, for example, to 4 characters, you need to select the "Options" item.
Now we know how to set up the iPad initially. If we want to transfer information to it from an old Android device, from iTunes or iCloud, it's time to do it. If you do not need to restore anything, select "Set up as new". Next, enter your Apple ID (if not, create a new one) and proceed to set up iCloud Drive.
Erase iPad and set it up as a new device
If we still need the information that we are going to delete, we create a backup copy of it (on a computer or in the "cloud"). This applies to music, contacts, photos, videos, and so on. To delete data, go to the "Reset" menu through the main settings of the tablet and select "Erase All Content and Settings" ("Erase settings and content"). We confirm our actions and proceed to set up the iPad as a new device. After the welcome screen is displayed, select "Set Up as New iPad" ("Set up as a new iPad"). Skip signing in with your Apple ID ("Skip This Step"). We specify our actions (“Don’t Use”).
After deleting all the information, the device will be rolled back to the factory settings. Now you can restore all data from the backup.
The Apple iPad is perhaps the most recognizable tablet brand in the world today.
For the first time in its history, Apple announced two tablets at the same time. This happened in November 2012, less than a year has passed since the release of the iPad3, although it is customary to change the lineup even for large manufacturers at least a year later. It is not known what led to such a hasty release, because in terms of technical characteristics, the 3rd iPad was significantly superior to its competitors. The announcement was so fast that even after a few weeks not all iPad lovers were aware that the apple ipad 4 tablet and the iPad mini had been announced and were being sold.
Appearance
To avoid confusion, the new iPad began to be called the iPad 4, while Apple called it the same as the 3rd when it was released - just New iPad, removing the number. If outwardly the tablet has not undergone major changes, and resembles the iPad 2, then the technical characteristics have changed quite seriously. The changes affected not only the updated connector, which all Apple models have switched to since the end of 2012, but also the processor, which has become more productive, a 4-core graphics chip, etc. The package includes: power supply, Lightning cable, user manual and the tablet itself.

Set
Technical data and design
Specification:
- Screen: 9.7 inches, resolution 2048x1536, IPS;
- Processor: Apple A6X up to 1.4 GHz (2 core);
- OS: iOS 6.0.1;
- Graph. Processor: PowerVR SGX (4 cores, 300MHz frequency);
- Internal memory: 16/32/64 GB;
- RAM: 1 GB;
- Navigation: GPS, GLONASS;
- Cameras: front 1.2MP (video 720p), rear 5MP (1920x1080);
- Networks: optional 3G, Wi-fi and 4G LTE (does not support Russian networks), Bluetooth 4.0;
- The battery is designed for 10 hours of operation without networks, and 9 hours of operation with Wi-fi, 3G or 4G networks on (11560 mAh);
- Add. devices: built-in speaker, microphone, headphone jack, dock connector, gravity module.
Specifications
The tablet used the new two-core Apple A6X processor on a 32nm chip, clocked at 1.4GHz, which increases the computing potential, which is important for resource-intensive games, which have recently been released in large numbers. The new quad-core graphics processor is also gaming, and allows you to process better graphics, support a resolution of 2048x1536 (with 300 dpi). The tablet has a standard amount of RAM - 1 GB, which is quite enough to fully use all applications and new hardware. The built-in memory of the tablet is 16-64 GB, the apple ipad 4 32gb tablet is most often delivered to Russia. Unfortunately, the tablet does not support memory cards, which is a big minus.
The tablet has built-in support for Wi-fi and Bluetooth 4.0, optionally you can choose to support 3G and 4G. 4G does not support Russian telecom operators. The built-in GPS module is responsible for navigation, which, in addition to GPS, also supports GLONASS. Video formats: MOV, ASF, MPEG-4, 3GP, 3G2, H.264, VC-1, WMV-9, MP4, RM, RMVB (there is AVPlayer to play them). Supported audio: APE, OGG, FLAC, WAV, RA, MP3, WMA. Text formats: PPF, FB2, DOC, XLS, TXT.
Device design
The design has remained virtually unchanged. The familiar all-metal aluminum alloy case, which has already become the hallmark of the iPad, a high-definition Retina display with a coating resistant to scratches and mechanical damage. Standard for iPad vertical positioning of the display, with a touch button to return to the main menu.

Front view

The tablet measures 241.2x185.7mm, is 9.4mm thick, and weighs 662g (without docking station). The assembly is of high quality, there are no squeaks and backlash. Occasionally there are tablets with signs of poor assembly, this is a marriage, immediately demand a replacement. In general, the tablet completely repeats the design of the iPad 2, with the exception of the docking station connector, now it has become different and if you buy the 4th one from your hands, then first of all you should pay attention to it.

1st device diagram

2nd device diagram
SIM card installation (optional)
To install and remove the SIM card, there is a tool for extracting the SIM card in the kit, if it is not available or it is lost, you can use an unfolded paper clip. In iPad 4, the SIM card is installed through the tray.
In order to install a SIM card, you need to insert the end of the SIM ejector into the hole that is in the SIM card slot in the tablet. It is necessary to insert it and push until the tray pops out. Insert the SIM card into the tray and insert the tray back, and press lightly until it clicks.

Install Sim
Remember that the SIM card should be installed when the tablet is turned off or restart the tablet after installation. After turning on or rebooting, the system will automatically register with the mobile operator.
The SIM card is removed by the same manipulations.
Wireless network
The tablet has a built-in support module for dual-channel Wi-fi, as well as support for Bluetooth 4.0. Optionally, you can choose a tablet with 3G support.
Remember, if the network is not in use, it is better to turn it off, since the included network consumes a lot of energy and the battery runs out faster.
WiFi connection
There are several ways to set up Wi-fi on a tablet: manual setup and setup using the AirPort utility.
Manual WiFi setup:
- A settings window will open, where on the left you need to find the Wi-fi line.
- A window for configuring Wi-fi will open on the right. In it, first of all, you need to turn on the network using the switch (if the network has already been configured, the tablet will automatically connect to the last one used). To connect to an already used network, but for example, the password has changed there, click "Forget this network" and reconfigure the connection.
- The tablet will automatically find available networks to connect to.
- If the network is encrypted, you will be asked for a key (password).
- If the connection is successful, the connected network icon will appear at the top.
Connecting with AirPort:
- Install AirPort Utility from the App Store
- Launch AirPort Setup Assistant
- Select "Settings"
- Then Wifi
- In the "Set up AirPort Core Network" section, click on the name of the station (base) you want to set up (connect to an existing network)
- Follow the instructions of the program.
Bluetooth connection
The apple tablet 4 can connect with Bluetooth devices such as headphones, headset, call kits, etc.
To connect Bluetooth you need:
- On the desktop (or in the program menu) find the "Settings" menu.
- A settings window will open, where on the left you need to find the Bluetooth line.
- On the right, a window for setting up Bluetooth will open and a search will be made for devices available for connection.
- Select the desired device from the list of devices.
- Then follow the instructions of the system.
3G connection (optional)
To connect to the Internet, a SIM card must be installed and defined by the operator (in the operator menu there will be the operator's name and a signal strength indicator in the upper part of the display).
Then:
- On the desktop (or in the program menu) find the "Settings" menu.
- A settings window will open, where on the left you need to find the line "Cellular Data".
- A window for setting up a SIM card and other things will open on the right.
- Select "APN Settings".
- Enter in the fields the data that the table below contains, if your operator is not there, contact him and take the settings.