Greetings friends and readers of my blog!
I understand that most of you moved to a brand new tenth Windows, and the rest remained faithful to the good seven. However, there are also those who use the much-loved XP. For example, it is perfect for an office netbook or an old desktop computer in some seedy post office or somewhere else.
Therefore, on one of the weak laptops, I keep just the same OS, in which case I can find something or check it on a new machine. Therefore, today I will tell you what it is to create a bootable windows xp flash drive, how it happens and what is needed for this. Go!
What flash drives are suitable?
Of course, the carrier is the most important part of our entire enterprise. Since we are talking about the Windows XP operating system, we can immediately say that it takes up little space, both when packed and unpacked from the iso image. Let's deal with the media type first.

USB type. The most suitable option. First, all computers have such a port. secondly, no card reader is needed. Thirdly, these are the cheapest flash drives you can find on the market. You can try to order in online stores more original models with a protected case, a waterproof shell, as well as with a full set of protection, even from a magnetic storm. But in general, among all these parameters, simplicity is important. The fewer parts in the device, the less it will break. Therefore, the gadget will last longer.

SD and MMC. The type of media for which there is already a port in laptops and in all card readers. Used in cameras and video recorders. They are quite cheap and are quite suitable for recording a bootable device with "piggy" (windows XP) on board. To boot from such a card, you will need a card reader that will connect via USB.

microSD. Such a device is in almost every cell phone, tablet and camera. It will require either a card reader or an adapter to an SD type. Drives are cheap, but the cost depends on the class of the gadget. They are divided into 2, 4, 6, 10. The higher - the faster the flash drive will work.

Now let's deal with ports. This applies to USB devices. They come in 2.0 versions and 3.0. The first type works on all computers and laptops. These are standard USB connectors. But the second ones are blue ports, faster. If your computer does not have USB 3.0, and the flash drive works on this format, it does not matter, it will function well on 2.0, however, the speed will be standard. Accordingly, the cost of devices is very different due to these parameters. I do not advise spending money for the sake of an increase in several megabits per second, if we are talking specifically about the operating system of the XP release.

Volume. This is an important aspect of the choice. New operating systems take up a lot of space on the drives before they are installed. From 6 to 20 gigabytes. However, they take much longer to install. And the operating system, which is discussed in the article, weighs very little. Only 4 GB will be enough, and there will still be a lot of space for drivers, office programs and other software.
What do you need to do before recording?

Since I want to describe the whole process to you in detail, with all possible software, here is a list of software. to be downloaded.

UltraISO- download here. The main tool for creating bootable flash drives. The most popular among ordinary users who do not have special skills.

Rufus - take right here. A very useful thing. The software writes bootloaders very quickly. There are more settings than in the previous software, but the software is more professional. Download, install.

winsetupfromusb 1.7 and another product that runs on more modern systems. For example, with some versions of the programs described above, there may be problems in the tenth Windows. And this software works great on new operating systems.

Let's follow the link here.

Scroll down the page to the bottom.

Open the downloaded file in the browser directly through it.

poke this rectangle on the right

Then you click it again.

English text will appear, which you don’t really need, just move on.

Again the text about the license and other things. We are moving forward.

An offer will appear that we do not need. We click here.

Check the boxes everywhere if they are not there (although usually they are immediately set by default).

Again, in the squares we poke once and move on ...

Unpacking will go, then the software installation itself. This will scan your laptop. It is possible that several useful programs will be installed for free.

Click on the finish button.

The working window of the client will appear, which means that the installation is complete.
With the help of this software we pull from here- XP 64 bit version.
You can start burning.
Flash drive recording
We will start the process with Rufus.
Rufus open the software on behalf of the administrator. In the first position we expose our flash card. In the second - the recording method is set " MBR for computers with BIOS or UEFI". This is an important aspect. Otherwise, when loading the BIOS, it simply will not be able to determine our device and you will have to redo everything again. We don't need it, do we? Now let's start.

We agree with the warning that appears that all files will be erased and the device cannot be turned off.

Now we observe the progress of the recording, which will be right on the screen. It displays the creation of the boot sector and the transfer of files. 5 minutes is the average waiting time. Do not rush to leave the computer.

After completion, our flash drive can be used!
Now consider UltaISO.
So, we start our software exclusively on behalf of the admin.


In this position, indicate the media (flash drive), the recording method is always USB HDD + and no other. I would not do the formatting, but if you wish, you may well. It's just that the container will still be erased when the recording starts.

Everything, now, after the end of the burning process, you can use our map to load Windows.
Well, now let's try to do the same with winsetupfromusb.
First you need to select our flash drive in the program interface. It is advisable to format it first, just in case.

We put a daw in autoformat, we specify the system FAT32, then in the align department, and we also poke into copy BPB. Everything, with putting down the necessary here finished.

Here you need to indicate exactly where on your hard drive the ISO image file with the operating system lies.

Now we start and write.
If you see this picture, then the recording went well.

How to do it on UNIX systems?
Among you, my dear readers, there are those who use Linux systems. I will explain to you how to make a bootable USB flash drive in Ubuntu.
From here download the WinUSB software. By the way, there are instructions on how to install it. Be sure to read if you have no skills in this aspect of computer topics.

We click here.

This interface opens.

In the top position, select our flash drive. In the lower part we position (target) our storage medium. Next, we make a record.

When the process is over, you will see this sign. Do not be afraid of the red icon, it only warns that the operation has completed.

Afterword
I would like to immediately explain why piggy is better on older PCs. The system not only weighs little and works fast enough. Most importantly, it does not require a lot of resources from the computer. For example, even with a laptop with 2 gigs of RAM and a processor with one core, the OS will work stably and quickly. However, for the tenth Windows, such parameters are minimal, not even recommended. Therefore, it will simply slow down, the atoms will not start at all.
I will also mention that it is impossible to create a bootable USB flash drive through daemon tools. A disk is possible, but a usb-carrier is impossible. Therefore, without the additional programs described above, such an operation is almost impossible unless you use the command line. Remember this.
And the last tip. In mac os, such procedures cannot be carried out. All the programs that I have indicated above work only under Windows or Linux. They simply will not be installed on the Macintosh operating system. There is another software for it, which I will talk about in another article.
Conclusion
On this I will end the article. By the way, here is a video on our topic. Take a look, you will learn a lot of new things for yourself if you are not familiar with this aspect.
All the methods that I gave you above will allow you to create a Windows bootloader for free. I hope you share this article with your colleagues and friends on social networks. And also subscribe to my blog, and you will always know when new materials appear. On this I say goodbye to you, all the best to you and see you again on the site, my dear readers! See you!
A bootable Windows flash drive is very easy to make. The article will describe three simple quick ways to create a bootable USB flash drive from a ready-made ISO image. All methods are free and popular, although among them there are simpler and more complex options, using different software. Also, all utilities fully work in Windows XP.
If your laptop or computer is new, with BIOS UEFI, and whose hard disk uses the GPT table layout style, then on such a computer you can also install Windows 7 using a different algorithm. Also, if a device, computer, laptop, netbook, etc. has a USB 2.0 port and USB 3, and you decide to install Windows 7 from a bootable USB flash drive on such a device, then undoubtedly USB 2.0 must be connected port, since Windows 7 itself does not support the USB 3 port type, which is usually marked in blue.

If the bootable flash drive is connected via a USB 3 port, then an attempt to install Windows 7 will end with the following error:
“A required optical drive driver was not found. If you have a flash drive, floppy disk, DVD or CD with such a driver, please insert this media."
Create a bootable flash drive
Now the first thing you definitely need is an ISO image of the operating system. The second is the need to take care of the flash drive itself. Since this media will be formatted, the data from the flash drive must be moved to a safe, secure location. It is also important to note that the volume of the flash drive must be strictly at least 4 gigabytes.It is imperative to check and make sure that a particular motherboard accurately supports booting such a plan (from a flash device).
- Creating a bootable flash drive using tools (recommended last, since the method is not very effective);
- Creation at the expense of ;
- Utility ;
Creating a bootable flash drive with UNetBootin
You need to download the program and run it (the program is portable, it works without installation).
It is necessary to mark the item called ISO image, and then select the letter of the USB drive.

The location of a specific image must be specified manually.

Next, click open.

Now just click OK.

There is a short process of copying system files to a USB flash drive.

After a short extraction of the necessary files, our bootable USB flash drive is completely ready.

Create a bootable USB flash drive using UltraISO
A slightly complicated solution, unlike the above, is to use the program UltraISO. However, you can quickly understand the program by following the instructions. The functionality of the program is made in understandable Russian, and the trial period of use under the license is completely functional and suitable for our purposes.
Next, you need to select the Russian language and download the program, which is very simple. Run as administrator, then select the trial period of use.

Before us is the usual program window.

The next step is to find our ISO image on the hard drive, which contains the operating system. It is worth recalling that such an image can be created by any other program, and then indicated here. In the main UltraISO window, right-click on the file, and in the menu that opens, select the open option.

Next, we indicate our image with the system, in our case it is the image of Windows 8.1, which is located in the installation folder. Find your image and click open.

Also now you can put a USB flash drive in the slot of a netbook or laptop. You need to select the Boot menu in the main window of our program and click on the hard disk image recording. An inserted flash drive should be present in this window.

Next, click write.

A hint will appear from the fact that your flash drive will be erased, we agree.

Then we wait for the recording process to finish.

Now we can carry our operating system in our pocket.
Cast aside doubts, believe in yourself, making a bootable USB flash drive for Windows 7, 8.1 or 10 is as easy as shelling pears, and you will definitely be convinced of this. There are several ways to create a bootable USB flash drive from iso, using different programs - simple and smart, humpbacked and crooked, which one to choose is up to you.
In this article I will try to show you a fairly simple method and with 100% performance. Whether you like it or not, but soon the world of optical drives will sink into oblivion and will never return again, everyone without exception will have to learn how to create a bootable USB flash drive, and in my opinion it is better to do this before than after the collapse of the OS. A thousand times proven program for a bootable Rufus USB flash drive will help to realize your need.
How to make a bootable USB flash drive Windows 7-8.1 correctly - detailed instructions.
So, the correct creation of a bootable flash drive 7, 8.1 will require the following from you. Flash drive from 4GB to 8GB (depending on the size of the iso image). Next, you will need a good ISO image of the operating system, and note - not a shmurdyak rebuilt by some unknown person, with a set of outdated programs, but a 100% working official version of Windows 7 or 8.1 (whatever you like). It is this image that will save you from surprises, ensure error-free operation and update DirectX, drivers, etc., and allow you to make a high-quality bootable flash drive 7, 8.1.
For those who have problems with the Windows iso image - the disk is scratched, the DVD drive is broken, it is missing from the laptop initially, too lazy to create an image, etc., I suggest using the largest Russian-language torrent tracker and fill this gap. Win 7 and Win 8.1 images are based on official Microsoft releases, with the addition of a small useful feature - for example, the Win 7 image contains all 32-bit and 64-bit versions from Starter to Ultimate, which you will agree is very convenient.
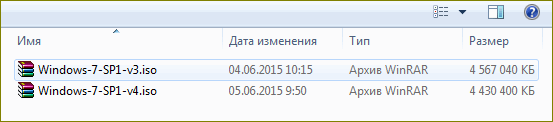
The second thing we really need is a program for creating a bootable Rufus flash drive. Does not require installation, just download and run. To avoid any surprises, the name of the folder with the program, folders with the image and the path to them should not contain Russian letters, use Latin - English.
Next to the Rufus program folder, create another one with the intuitive name Windows-7 or Win-8. Opening the file manager Total Commander(if you don’t know what it is, it’s time to learn how to operate files correctly) or an archiver WinRAR- unpack the archive with the program, transfer the Windows image from the downloads folder to the created folders.
It remains to voice the last cautionary phase - transferring and saving information important to you from a USB flash drive to a hard drive. The first step in the process of creating a bootable Windows 7 flash drive will be formatting - cleaning and repartitioning the media.
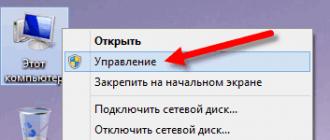
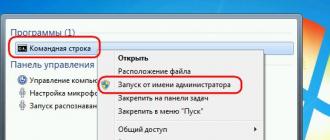
Step one. We turn our eyes to the desktop, double-click to launch the "Computer" shortcut, right-click on the flash drive shortcut. In the menu that opens, left-click on - "format", then - what to select and where to click, shown in the picture. We are waiting for completion, the preparatory process is completed, we are 100% ready to make a bootable Windows 7 USB flash drive correctly and the first time.
1. Open the folder with the Rufus program - run it, in the program window that opens, find the “Device”, point to the USB flash drive, if it didn’t pick it up automatically.

2. The next item is - "Partition scheme", select "MBR for computers with BIOS or UEFI". If you need to install the operating system on a hard disk with a capacity of more than 2000GB, use - "GPT for computers with UEFI".
3. "File system" - FAT32 can be used with images less than 4GB, images larger than 4GB assume the use of the file system - NTFS.
4. We leave this item unchanged, "Cluster size" by default is 4096 bytes.
5. "ISO image" - click on the optical drive icon, select the iso image of the required system in the explorer.
6. We raise our eyes a little higher, set a name that is understandable for you for the “new volume label” - in English letters, Win-7 - for example.
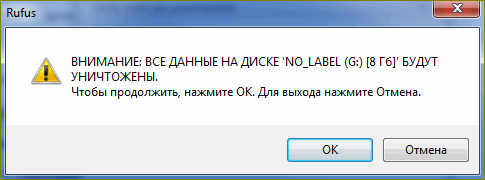
7. We check the correctness of the choice and the next action we command Rufus to make a bootable flash drive 7, press the button - "Start". The program will issue a warning in Russian, click "OK" and leave the computer alone.
We take our playful hands and carry them to the kitchen, by force of will we force them to pour tea or coffee - we slowly enjoy the drink. This is a simple precaution, by your absence you will ensure the continuous creation of a bootable Windows flash drive, you will not be able to cause an error, overload the processor, drive the file subsystem into a stupor, etc.
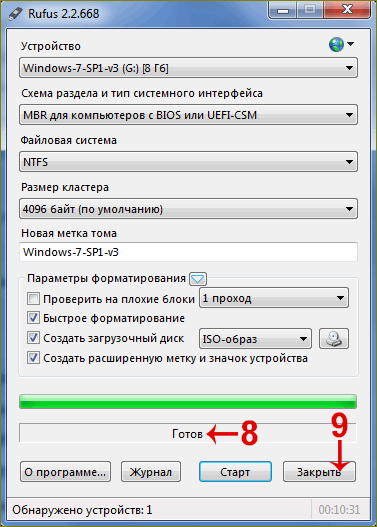
Depending on the speed characteristics of your PC, after 5-15 minutes you will see the inscription - 8 "Ready" - the bootable USB flash drive has been created, press nine - "Close".
That's actually the whole science of how to make an image of a bootable flash drive - you now know. As you can see, there is nothing daunting and impossible, the main thing in this matter is to maintain the sequence of actions and you will definitely succeed.
How to make a flash drive bootableBIOS.
To successfully install Windows from a USB flash drive, it remains to answer only one question - how to make a USB flash drive a boot disk in BIOS? The question is important, because the installation start is different from your usual order with a DVD, which leads to a common mistake and a surprised look.
For those who have lost sight of, I remind you that in the process of creating a flash drive, we chose the USB-HDD item. The bootable flash drive is recognized exactly as we called it, so you don’t need to look for activation familiar to DVD in the BIOS section - First Boot Device.
We put the installation flash drive into a free USB 2.0 connector, wait until the PC picks it up, and go into reboot. During the system boot process, press Delete or F2, enter the BIOS. Depending on the BIOS version, the name of the required Boot sector may differ, but the principle of operation will be the same. Open "Advanced BIOS Features".
Next, click on the “BootSeq & FloppySetup” section, find “Hard Disk Boot Priority”, go in and see the list of drives installed in your PC. Your bootable flash drive should be in the last place of honor - this is what needs to be fixed. To make a flash drive a boot disk, we need to raise it to the top of the list - using the keyboard arrows (up and down), select the flash drive. Next, use the "+" keys, press - until the installation flash drive becomes the first in the list. We complete the manipulations in the BIOS by pressing the "F10" (save) button.
In order to make flash drive bootable in BIOS - UEFI, we find all the same sector Boot - Boot, before us opens "Fixed Boot Order" and the sea "Boot Option" under it - this is the setting of the system boot sequence. We look at “Boot Option # 1” - as a rule, there is a hard drive or SSD, the system polls it first and the operating system starts loading from it. Click on "Boot Option # 1", find and select the inscription "USB Key:" with the name of your flash drive.
We press "F10" - the installation of Windows 7 from the USB flash drive has begun, then we are waiting for the first reboot, go into the BIOS, return the hard drive to the first place, save. After the reboot, the installation will continue, if you missed this moment - refuse to re-install, the PC will start rebooting, go to BIOS - return the HDD to its place.
How to make a bootable USB flash drive image active in BIOS - and now you know that. The probability that you will fail is almost zero - and these are not just words - this has already been proven by more than one tens of thousands of users. A little attention plus a sequence of actions - more is not required of you. No. 2 -.
Before installing the OS, I advise you to look at - I'm sure you will find something interesting for yourself. Well, after successfully installing the operating system, do not forget to tell your friends how to make a bootable Windows 7 USB flash drive correctly - it will be useful to everyone. Good luck!
Best wishes $
Denker.
Since almost no one uses CDs and DVDs anymore, it makes sense that the Windows image for further installation is best written to a USB drive. This approach is indeed much more convenient, because the flash drive itself is much smaller and it is very convenient to store it in your pocket. Therefore, we will analyze all the most workable methods for creating bootable media for further installing Windows.
For reference: creating bootable media implies that an image of the operating system is written to it. From this drive itself, the OS is installed on the computer in the future. Previously, during the reinstallation of the system, we inserted a disk into the computer and installed it from it. Now you can use a regular USB drive for this.
To do this, you can use proprietary Microsoft software, the already installed operating system itself, or other programs. In any case, the creation process is quite simple. Even a novice user can handle it.
All the methods described below assume that you already have a downloaded ISO image of the operating system on your computer, which you will write to a USB flash drive. So, if you haven't downloaded the OS yet, do it. You must also have suitable removable media. Its volume should be sufficient for the image you downloaded to fit on it. At the same time, some files may still be stored on the drive, it is not necessary to delete them. All the same, during the recording process, all information will be irretrievably erased.
Method 1: Use UltraISO
Our website has a detailed description of this program, so we will not describe how to use it. There is also a link where you can download it. To create a bootable USB flash drive using Ultra ISO, do the following:

If there are any problems during the recording, errors appear, most likely the problem is in a damaged image. But if you downloaded the program from the official site, no difficulties should arise.
Method 2: Rufus
Another very handy program that allows you to create bootable media very quickly. To use it, follow these steps:

It is worth saying that there are other settings and recording options in Rufus, but they can be left as they are initially. You can check the box if you wish. "Check for bad blocks" and specify the number of passes. Thanks to this, after burning, the installation flash drive will be checked for damaged parts. If such are found, the system will automatically correct them.
If you understand what MBR and GPT are, you can also indicate this feature of the future image under the inscription "Partition scheme and system interface type". But doing all this is completely optional.
Method 3: Windows USB/DVD Download Tool
After the release of Windows 7, developers from Microsoft decided to create a special tool that allows you to make a bootable USB flash drive with an image of this operating system. Thus, a program called . Over time, the management decided that this utility could well record other operating systems. To date, this utility allows you to record Windows 7, Vista and XP. Therefore, for those who want to make media with Linux or another system other than Windows, this tool will not work.
To use it, follow these steps:

Method 4: Windows Installation Media Creation Tool
Also, Microsoft specialists have created a special tool that allows you to install on your computer or create a bootable USB flash drive with Windows 7, 8 and 10. The Windows Installation Media Creation Tool is most convenient for those who decide to burn an image of one of these systems. To use the program, do the following:

In the same tool, but for Windows 10, this process will look a little different. First check the box next to the label "Create installation media for another computer". Click "Further".
But then everything is exactly the same as in the Windows Installation Media Creation Tool for version 8.1. As for the seventh version, the process there is no different from the one shown above for 8.1.
Method 5: UNetbootin
This tool is intended for those who need to create a bootable Linux USB flash drive from under Windows. To use it, do this:

Method 6: Universal USB Installer
Universal USB Installer allows you to write images of Windows, Linux and other operating systems to drives. But it is best to use this tool for Ubuntu and other similar operating systems. To use this program, do the following:

Installing Windows XP on a netbook has two features:
- the first is the limitation of installation methods due to the lack of a CD/DVD drive;
- the second is the need to configure BIOS Setup so that the system can be installed on a hard drive with a SATA interface, which in the vast majority of cases is equipped with modern netbooks.
The first limitation is quite easy to get around by preparing, for example, an installation flash drive with the operating system distribution kit, which we will do. As for the second, here - how lucky. The fact is that at the time when Windows XP was released, SATA hard drives did not yet exist. Therefore, the system does not have the appropriate drivers in its distribution, and the netbook's hard drive is not recognized by it. The easiest way to solve this problem is to reconfigure the BIOS, and the most correct way is to integrate the missing driver into the distribution. We will consider the first option, but, I must say, it does not always work.
Preparation
To create an installation USB flash drive with Windows XP, you will need:
- flash drive, with a capacity of 1 GB;
- distribution kit of the operating system on CDDVD or in the form of an ISO file;
- a computer equipped with an optical drive for reading discs - it will be used to create a flash drive;
- if the system distribution kit is presented in an ISO image, a CDDVD reader is not needed, a virtual drive emulation program is required, for example: UltraISO, Daemon Tools, Alcohol 120%, etc.
- WinSetupFromUSB is a free utility for creating a boot sector on a flash drive and transferring a Windows distribution to it.
Create a bootable flash drive
In order for the USB flash drive to be recognized by the computer as a bootable device, it must be prepared - formatted in NTFS or FAT32 - both types of these file systems are suitable for installing Windows XP. The second step is to create a boot sector on the flash drive and write the bootloader to it. This is followed by the stage of transferring the distribution files to the USB flash drive and testing for performance. We will do all these operations using WinSetupFromUSB.
Formatting
- Connect a flash drive to your computer, preferably an empty one, and run WinSetupFromUSB.
- Run the Bootice utility built into the program, on the “Physical Disc” tab, click on the “Parts Manage” button - this will create an active boot partition on the flash drive. On a clean flash drive, it will be the only one.

- Next, you need to format: click “ReFormat USB disc” - “Next” - “OK”. Let all settings remain by default (drive type - USB-HDD).


Create Master Boot Record and Boot Loader
- Open the Bootice utility window again and click on the “Progress MBR” button.
- On the “Master Boot Record” tab, select the bootloader type - Grub4DOS, to install it on a USB flash drive, click on the “Install / Config” button.

- The next window will prompt you to change the default configuration settings, but we don't need to. Click "Save to Disc" and close the window.
- Next, you will again find yourself in the main Bootice window. Now you need to press the “Progress PBR” button to create a master boot record on the flash drive.
- Moving on to the “Partition Boot Record” window, check Grub4DOS again, click “Install/Config” and then “OK”. The stage of creating the bootloader is completed.
Copying Windows XP to a flash drive
- If you are using a CD/DVD with the system distribution kit, install it into the drive; if it is an ISO file, mount it using emulator programs into a virtual drive. The figure shows how to do this in UltraISO.

- In the main WinSetupFromUSB window, in the “Add to USB disc” section, check the “Windows 2000/XP2003 Setup” box, click the button on the right, and in the explorer window that opens, select the storage location for the Windows XP distribution. To start the copying process, click on the “Go” button.

Testing
- After the distribution is completely transferred to a flash drive, you need to make sure that it will be possible to start a netbook from it. At the bottom of the WinSetupFromUSB window, check the "Test in QEMU" checkbox - testing in the "QEMU" virtual machine, and click "Go".

- If you see the Windows installation process in the QEMU window, everything is done correctly.
Netbook BIOS setup
Boot Priority Order
- Plug your Windows XP flash drive into your netbook's USB port and turn it on (or restart it).
- In order to enter the BIOS Setup settings, hold down the key that is intended for this. Most often this is F2, but there may be another - F10, F12, F1, F4, etc. You can find out more precisely by reading the splash screen that appears on the screen immediately after turning on the netbook.
- Navigating inside the BIOS Setup menu using the arrow keys and confirming the actions by pressing “Enter”, go to the “Boot” section. In the boot device polling list “Boot Device Priority” - “1st Boot Device”, raise your USB flash drive (USB-HDD) to the first place by pressing the F5 and F6 keys (moving the selected item up or down).
Switching the SATA hard disk controller to an IDE-compatible mode of operation
This is the very setting that will help Windows XP recognize the netbook's hard drive.
- Use the arrow keys to navigate to the “Advanced” section and change the value of the “OnChip SATA” parameter from “IDE-AHCI” to “Native IDE”.
- If your BIOS version does not have the “OnChip SATA” setting, find the “IDE Configuration” parameter and set it to “Compatible”.
- To exit the BIOS menu, press F10 and “Y”, which means exit and save the changes.
Installing Windows XP
- Reboot the netbook (the installation flash drive must be connected). After it is turned on again, the process of copying the system distribution files to RAM will begin. When it completes, you will see the Windows Setup Welcome window. It will await your response. Press Enter to continue installing Windows XP.

- The next screen will prompt you to accept the license agreement. We'll have to accept, without this the system will not be installed.

- Next, you will need to select or create a partition where Windows will be installed. If there is only an unallocated area on the disk, pressing “C” will create the necessary partition.

- The next step is to format the newly created or existing partition. Choose NTFS.

- After formatting is complete, the installation process will begin. First of all, you will be prompted to select the system language:

- Next - specify your data (name, organization):

- And enter the serial number. This can be (and even more conveniently) postponed until later.

- In the next step of Setup, Windows creates an administrator account. You will be prompted to assign her a password. In the same place it is necessary to set the name of the computer.

- The next screen is to set the date and time. You can install now, you can postpone.

- The configuration of network parameters is also not a matter of paramount importance. Leave as is, adjust later.

- The same goes for creating a workgroup or connecting to a domain. The option is relevant for enterprise networks, but it is not necessary to configure it at the moment.

- Next, the system will continue with the installation with the settings you specified, which will end with the familiar Windows XP logo screen. This completes the main stage of work.

Congratulate yourself, you've done it - installed Windows XP on your netbook by yourself. The next steps - setting up account settings and getting started with Windows - is a whole different story.