How to install the driver for the video card? This question is often asked by users of personal computers, because drivers are not always installed automatically, especially for video drivers. Installation can also be done using the windows update center, but it also does not always work, due to the frequent release of video cards. Therefore, the best option would be to download the driver from the internet.
Of course, if you have a disk with all the drivers after buying a computer, you can insert it and install everything you need. But this may not always work out, for example, due to the installation of an operating system with a 64-bit bit depth, although the driver disk is only for 32-bit. Or if you bought a new video card. So, I recommend downloading and installing the video driver from the official website of the developer, due to the latest updates and stable operation of these drivers. In this article, this method will be discussed.
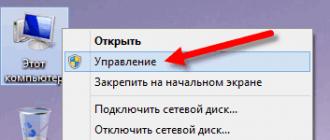
First you need to determine which driver you need to install, this will help us with a unique identifier (ID) that all computer devices have. You can find out exactly which id the equipment has through the device manager. To do this, go to property my computer as shown in the picture below.
In the window that opens, click on the tab device Manager located on the left side of the window.

In the list of available devices, we find video adapters, right-click on the existing one, where we select property.

Go to tab intelligence, where in the drop-down list of properties, select the item equipment id. Several identifiers appeared, copy the name of the first one to the clipboard.

We open any available browser and paste this identifier into the search bar. A list of sites will appear, where it will immediately be determined which video card we have. In my case it is nvidia geforce gt 440. From this I conclude that you need to go to the website of this manufacturer.

Go to the official site nvidia.ru. On the main page, click on the item drivers ->download drivers.

In the window nvidia driver downloads, select the type, series, family, wasps, language and click search.

The site determined which driver package suits us and brought it out. Click download now.

We accept the license agreement by clicking on the button accept and download. The file will start downloading to your computer.

Run the downloaded file. An unpacking window will open, click ok.

The graphics driver installer is running, accept and continue.


We are waiting for the end of the running process.

To complete the installation, click the button reload now.

And after starting the system, go to the task manager, where we see a successfully installed video card driver.

ABOUTleave your opinion about this article, and of course, ask your questions if something suddenly went wrong for you.
Thank you for your attention!
In many laptops and other devices on windows 7, there is often a problem installing drivers for NVidia series video cards. What attempts have not been made by inexperienced and even experienced users - up to reinstalling the entire operating system. Other drivers were downloaded, reinstalled, rolled back and even called in specialists called “tyzhprogrammers” ...
The easiest way: use programs to automatically update drivers. They themselves will determine the necessary driver, download and install on the computer.
However, the root of the problem can be in completely different problems, ranging from a banal incorrect driver installation to problems in the video card itself. This article will describe how to solve the most common problem with NVidia video card drivers.
First, let's break the article into several subsections.

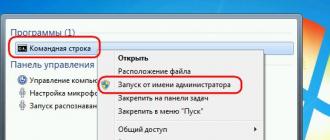
2. The next step is to set up the system. First, let's go to the "Device Manager". After clicking the "Start" button in the search, enter this name and get to the right place. There you need to go to the category "Video adapters". Your video card will probably be called "Standard VGA Graphics Adapter", although that is not true either. If the name of your video card is entered there, then the matter is different. But we go further. 

4. Next, go to the folder, which is set as follows by default: C:\NVIDIA\DisplayDriver\301.42 (folder with the name of the driver version)\WinVista_Win7\International\Display.Driver\. In this folder, which is full of files that it is advisable not to touch, we need to find the nvaa.inf file. He will be in there somewhere.

We open it with a regular notepad and look for the desired line. In our case, this is a string. Now you just need to add under this line what is stored in the clipboard - the identifier of our video card. Below is a line called . We do this magic trick and under it ... Save, exit. We go into the video card installer and ...  Problem solved! The driver is ready to be installed. Next, you just need to follow the instructions given in the installation wizard and restart your computer. After that, you can check in the device manager if everything converges - is there the name of your video card in the "Video adapters".
chopen.net
How to install NVIDIA display driver on windows 7 / windows Vista?
Note: Please make sure your graphics card supports the driver you downloaded before starting the installation. For each video card in the series: Geforce Desktop PC, Geforce notebook PC and Quadro Professional use a unique driver. Make sure that your video card supports the driver you downloaded by going to the “Supported Products” tab in the section for downloading drivers, as shown in the screenshot below.

Once you have verified that your graphics card supports the driver you downloaded, please close all open programs. If you have an antivirus program or other system monitoring application running in the background, disable it temporarily as this may prevent your driver from installing.
1) Make sure you are logged in with an account that has administrator rights. If you are logged in as a guest or standard user, windows will not let you install the driver. Download the latest NVIDIA driver from the NVIDIA Driver Downloads page. If your browser asks you to "Save" or "Run File", click "Save". By selecting the “Run file” option, it will be saved in a temporary folder. If the file is stored in a temporary folder, windows may delete the file while you are installing the driver and this will result in a failed installation. Save the driver to windows desktop. Once the driver has loaded on your windows desktop, you will see a new desktop icon similar to the one shown in the screenshot below:
2) If you are installing a new graphics card on your computer, the windows setup wizard may install the drivers separately. If the following message appears in the lower right corner of the taskbar, you need to wait until windows completes its installation before proceeding with a new one.
3) Right click on the file and select "Run as administrator" as shown in the screenshot below.
4) After you have run the NVIDIA driver setup file, your first message will ask you where to save the NVIDIA driver files. These files are not used by the NVIDIA installer and are only important if you manually install the driver. You can leave the default path and select OK to continue.

6) If you have agreed to the terms of the license agreement, you will be presented with installation options as shown below. Most users will choose Express Install (recommended). For advanced/experienced users, there is a Custom (Advanced) installer option to view additional installer options. If you selected Express Install (recommended), click Next. The installer will start copying the driver files and once it finishes you will be prompted to restart your computer to complete the installation. Restart your computer. After you have returned to windows, the installation is complete.
If you select Custom (Advanced) installation option - Custom (Advanced), go to the section below labeled - Custom (Advanced) - Custom (Advanced) installation option:

Custom (Advanced) installation option
1) If you selected the Custom (Advanced) installation option, click the "Next" button to continue.
2) Custom installation options allow you to select which NVIDIA Graphics driver components you want to install. We suggest that you select all the graphic elements of your graphics card to use most of the features. Older graphics cards may not show all of the components listed below. If the parameters presented to you do not match the screenshot below, this is normal. The only mandatory item that needs to be installed is the graphics driver. If you've had installation problems in the past, we suggest "Performing a Clean Install" which will remove all previous NVIDIA drivers and registry entries from your computer. This will help solve installation problems with inappropriate old drivers. After selecting the graphics you want to install, click "Next".

3) The installer will copy all selected graphics to your computer. After the installation is completed, a window similar to the screenshot below will appear on the screen. To restart your computer, click "Restart Now". When you return to windows, your download will be complete.

nvidia.zendesk.com
How to install driver for Nvidia graphics card?
There are 3 ways to install the driver for the GeForce Nvidia video card: manual, automatic and the easiest. Let's start, of course, with a simple one.
If you have another video card installed, then immediately proceed to the next article - how to install drivers on an AMD video card.
What is the purpose of installing the Nvidia driver?
A few words about why you need to install the GeForce Nvidia graphics driver. Especially for those who are not satisfied with the phrases “this is how it should be” and “this is required for the normal operation of the video card”.
There are at least 3 reasons why you should definitely install the Nvidia driver:
- You will not be able to set the native resolution on a monitor or laptop screen (it will be “soapy” 800x600 or 1024x768 pixels).
- windows 7, 8 or 10 will work without cool gadgets like the transparency effect, Aero, etc. That is, your desktop will look like a C-minus.
- You won't be able to play games. There is nothing to say here. You won't even launch the game as it will immediately ask you to install the Nvidia driver.
Good to know: How to find the right driver?
How to install Nvidia driver from disk?
The easiest way is to install the Nvidia driver from the disc. When buying a computer, the kit always comes with a set of disks, including a video card.
There is one nuance here. They are issued only when buying a PC. If you have a laptop, this option is not suitable for you. Go straight to the next one.
How to install Nvidia driver from disk? Elementary! Insert it into the drive and start the installation. If there are several items in the menu, then find the appropriate one - for example, "Install Driver".
The advantages of this method:
- native drivers are written on the disk;
- no need to know what video card you have;
- no need to search for a suitable driver on the Internet and download it.
If for some reason this option does not suit you (there is no drive, the disk is damaged, etc.), then proceed to the next one.
See also: How to roll back video card drivers in windows 7?
How to install the GeForce Nvidia driver manually?
Manual installation of the Nvidia graphics driver is also easy. In this case, you just need to download it from the Internet and install it.
Important! You need to download drivers only from the official website of the developer. Otherwise, you risk catching viruses and other nasty things.
So, to install the drivers for the Nvidia video card, do the following:


Run the file and follow the instructions. Installing the GeForce Nvidia driver is easy, so there will be no difficulties with this.
Tip #2: Your screen may flicker or turn off during installation. No big deal, that's how it should be.
After the installation is complete, the program will ask you to restart your computer (or laptop). You can reload not immediately, but at any other time (in case you have working files open, something is being downloaded or recorded). But the Nvidia driver will only fully work after a reboot.
Tip number 3: how to find out the version of your windows? To do this, right-click on the "My Computer" icon and select "Properties". A new window will open, where the version of Windows and its bit depth (32 or 64 bits) will be indicated.

Automatic driver installation for Nvidia graphics card
Automatic installation of the driver on the Nvidia video card is carried out using a special GeForce Experience utility. This option is much easier and faster than the manual method and is great for:
- those who do not know the model of their video card;
- those who find it difficult or just too lazy to look for a driver on the Internet;
- gamers (the program optimizes game settings, can record video, etc.).
First you need to download this utility. For this:
 Going forward, GeForce Experience will always report new drivers and ask whether to install them or not. Gamers are advised to always update them as they come out, and all other users - at their own discretion.
 Now you know how to properly install the driver on the Nvidia video card. After rebooting the PC (or laptop), set the screen resolution to native and select a more beautiful windows theme (for example, Aero). And if you are a gamer, then you can install games and play with your friends online.
(1 rating, average: 5.00 out of 5) Loading...
it-doc.info
What to do if the Nvidia driver is not installed on the computer
 An error when installing a video card driver is a common problem that users of computers running Windows OS often face. Today we will take a closer look at what to do if the driver for the Nvidia video card is not installed on a computer running windows.
Typically, a video card driver installation error occurs for two reasons: either you are trying to install a driver that does not match the model of your video card, or there is an installation conflict on the system because the computer already has video card drivers installed.
How to fix Nvidia driver installation error?
Step 1: Download the right drivers
First of all, you need to make sure that you have downloaded the correct drivers on your computer that apply specifically to your video card model. You can find out which model of video card is installed on your computer in several ways:
Method 1: Using the "Device Manager"
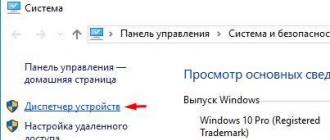
Open the "Control Panel" menu, in the upper right corner set the "Small Icons" setting, and then open the "System" section.

In the left area of the window, go to the "Device Manager" section.

Expand "Display adapters". At this point, you can see the model of your video card.

Method 2: using the device ID
If you do not see the name of your video card in the "Device Manager" window, for example, the standard name "VGA adapter" is displayed instead, then right-click on the intended video card in the same window and go to "Properties" in the window that appears.

In the pop-up window, go to the "Details" tab. In the Property field, select Hardware ID, and in the Value field, copy the first line.


The search results will display the exact model of your graphics card.

Based on the information received, you will need to go to the official Nvidia website, and then search for and download drivers that correspond not only to your video card model, but also to the version of the operating system you are using.
Stage 2: Complete removal of drivers
Now that you've made sure you've downloaded the correct drivers, you'll need to perform a clean uninstall of your old graphics card drivers. The easiest way to do this is with the Display Driver Uninstaller utility, the download link of which is located at the end of the article.
Before you run the utility, you will need to go into safe mode, which will not use the installed video card drivers. To do this, send the computer to reboot and at the very early stage of turning it on, start quickly and repeatedly pressing the F8 key until a window with the option to boot the operating system is displayed on the screen. You, of course, need to select the "Safe Mode" item.
After loading the utility in safe mode, run the Display Driver Uninstaller utility. In the "Select video driver" field, select "Nvidia" (if you use a different graphics card manufacturer, select it). To start the procedure, click on the "Uninstall and restart (highly recommended)" button.

The utility will begin the process, after which your computer will restart in normal mode. Login to your account and then quietly run the preloaded driver distribution. This time, the installation of the video card drivers will be successful.
Download Display Driver Uninstaller for free
Download the latest version of the program from the official website
It is very important to know how to properly install a new driver for Nvidia video cards, because friezes, brakes, dead pixels, missing or missing textures in games - all these problems can be the result of outdated drivers or their absence at all. Moreover, improper installation of the NVidia driver can also lead to problems.
Where to download and how to properly install the driverNVIDIA
You need to download drivers for NVidia video cards only from the company's official website. Otherwise, you can endanger your PC, besides, it makes no sense to download GeForce drivers from third-party resources, because everything you need can be found on the manufacturer's official page.
There are two options on how to install the graphics driver on an NVidia GeForce graphics card. We will describe in detail about each of them.
How to install the driverNVIDIA manually
Manual installation of the driver for the NVidia GeForce video card is ideal for those who are not a supporter of installing programs that load the computer's RAM and constantly work in the background, which, of course, also applies to NVidia GeForce Experience, a special utility that automatically searches for and installs drivers.
To properly download and then install the Nvidia driver, follow the instructions below (we recommend that you read the two tips below first):
- You will see a page with a form for manually filling in information about your video card. Select your product type, graphics card series, graphics adapter family, your operating system and language, then click the green Search button on the right.
- After the driver for your NVidia graphics card has been successfully found, you will see more detailed information about it, and a "Download Now" button. Click it and download the driver to your PC.
- After downloading the driver, you must unpack it. Select the folder where you want to extract the files and click OK.
- Then, after the unpacking is complete, the installation process of the GeForce driver will automatically begin. Accept the terms of the license agreement by clicking "OK" and follow the instructions.
Tip 1: before unpacking and installing a new video card driver NVIDIA , it is recommended to delete the old one. To do this, go through the "Start" menu to "Programs and Features" (or "Add or Remove Programs", depending on the OS version) and find the application " NVIDIA graphics processor xxx.xx” (instead of xxx.xx there will be the version number of your driver). Then click "Uninstall / change", confirm the action and wait for the uninstallation.
Tip 2: before proceeding with the instructions on how to install the driver NVIDIA , we recommend disabling your antivirus as well. There are many examples when antivirus software removed certain files without warning or notification or blocked driver installation. NVIDIA .
How to install the driverGeForce by usingNVIDIA GeForce Experience
Installing NVidia drivers using the special NVidia GeForce Experience program is much easier and faster than manually. Moreover, the program itself has many useful features, especially for a gamer - from optimizing game settings to the ability to record in-game video and automatically extend laptop battery life during the game. However, some users do not like that it loads the system to a certain extent by running in the background. The choice, in any case, is yours. We would recommend using the utility.
So, to answer the question of how to properly install the GeForce driver through the program, do the following:
- Open the official NVidia website
- Highlight the top menu "Drivers" and click on "GeForce Experience"
- You will see a page in front of you describing the benefits of this program and a large green button "Download now". Click it and wait for the download to complete.
- After downloading GeForce Experience, open the installation file and install the program on your PC following the simple instructions.
- When the program is installed, go to it, go to the "Drivers" tab and click "Check for Updates" in the upper right corner of the utility.
- If your driver is out of date, you will be notified that an update is available. Click on it and the program will automatically install the latest GeForce NVidia driver.
Attention: during the installation of the driver, the computer will restart - do not be alarmed, this is normal. You do not need to take any actions yourself, restart the PC as well - this will lead to a failure in installing the driver NVIDIA . In addition, be sure to disable the antivirus before installation - often, during auto-installation, antivirus software adds the program to the “black list” blocking the connection to the Internet, which leads to an error in installing drivers.
As a rule, the manufacturer of NVIDIA graphics adapters offers their owners the use of specialized applications or the ability to install drivers from a regular EXE file to install the appropriate drivers or some additional components. But for some reason, it is with these video cards that the largest number of errors are observed, when the corresponding utility or “Wizard” reports that the NVIDIA installer has failed. What is the reason for such an unpleasant situation and how to get rid of this problem, we will try to find out further.
NVIDIA Installer Failed - What Causes the Errors?
The fact that this is a software failure, no one should have any doubts. And in most cases, this is due not so much to the program itself, but to incorrect user actions when choosing the necessary software or to conflicts that arise due to the presence of unremoved residual components in the system, which allegedly indicate that the driver or additional software components are installed in the system. . In this case, sometimes a cluttered hard disk, on which there is a huge amount of temporary files, can also have a negative impact. However, in spite of everything, the failure of the NVIDIA installer can be fixed by very simple methods, which will be discussed later.
Preliminary steps to remove old drivers
So, the very first and most optimal solution would be to completely clean the computer of old drivers. To do this, you can use utilities like Display Driver Uninstaller or Driver Sweeper. The first program is good because it removes not only the main components, but also all residual files on the disk or even system registry keys, and when using the second application, sometimes the system has to be cleaned manually.
As for the first program, after starting it, you need to set the normal launch mode, then select the name of the manufacturer from the list located on the right (in our case, NVIDIA), and then click the delete and restart button. After that, you need to agree with the message about preventing the installation of the driver from the Windows Update databases and wait for the restart.

In the case of the second utility, the steps are just as simple, however, after removing all components, you will need to manually clean the system registry by searching for the name of the video card manufacturer, and then, as in the previous version, perform a full system restart.

Note: In both cases, it is highly recommended to forcibly clear all TEMP folders containing temporary files.
Clean install of the NVIDIA driver
Upon completion of the preliminary preparation, you should visit the official NVIDIA online resource and download the necessary driver from there by the model name of your video card or use additional utilities like GeForce Experience. Now the most important thing!

To install the NVIDIA driver, the settings in any installer program must imply a "clean" installation (there is a corresponding item in the main window of the "Wizards" for this). Using it will save you from possible conflicts if previous versions of the control software were not completely removed.
Manual download and installation of drivers
However, even in this case, the failure of the NVIDIA installer may reappear. Most often, the problem is that you downloaded a driver that is not of the same bitness as the installed Windows (the installer application will report that the driver being installed is incompatible with the operating system).

In this situation, it is better to look at the bit depth in advance, using the properties of the computer for this, and then find the appropriate software on the same official website.
Often, the driver by model name seems to be executed correctly, and the NVIDIA installer settings are activated in the desired mode, but the driver does not want to be installed under any pretext, and the program again displays an error message (most often it is reported that no corresponding driver was found for this driver). equipment).
As it turns out, the reason is simple: you downloaded the wrong driver. Despite the same common names of accelerators, models in the same line can differ quite a lot from each other. You can determine the exact name of the graphics card in the DirectX dialog (dxdiag). You can also take advantage of viewing the hardware ID in the "Device Manager" on the details tab, which is more preferable. After that, it remains only to download the desired driver and install it again.
Other possible problems
Finally, sometimes if the NVIDIA installer fails, nothing may depend on the official software itself. As noted by many experts, all kinds of computer viruses and, oddly enough, even anti-virus programs can become possible causes of this phenomenon. Actions in such a situation are clear to many. First, you need to perform an in-depth system scan for threats, using portable scanners for this, and if the installation process is blocked by protective means, try temporarily deactivating the standard antivirus and reinstalling.
Sometimes you can also encounter conflicts with other software (for example, PhysX components). In this case, you first need to get rid of them, using either uninstallers or utilities like Driver Sweeper for this, and then perform the very “clean” installation of the driver that fully corresponds to the equipment again.
When it comes to drivers for NVIDIA video cards, most users can be divided into 2 categories - those who use the drivers that come with the operating system, and those who install driver packages from the NVIDIA website.
Recently, the NVIDIA driver installation package has grown significantly. Now it includes not only the necessary driver, but also many other components that may not even be required, depending on the purpose of the computer.
The NVIDIA installer installs the 3D Vision components, HD audio driver, PhysX software, and GeForce Experience by default. Even when the user disables the checkboxes corresponding to additional components, some additional services and telemetry services will still be installed in the system.
Install only the driver for the NVIDIA video card
Important! The instructions below allow you to install only the graphics driver without unnecessary components. Make sure you don't need any additional components before you follow these steps.
Also note that installing the driver will still add components such as the two services Nvidia Display Container LS and Nvidia Telemetry Container. Once installed, you can disable or remove them.
1. Remove the old driver from the system
2. Download the latest NVIDIA driver

4. Install the driver in Windows
You need to open device Manager Windows because driver installation will be done through the control panel applet. The easiest way to open Device Manager is to press the Windows key, type hdwwiz.cpl and press the Enter key.
Find your video card in the list of devices, right-click on it and select "Update driver".

Then select the option "Search this computer for drivers" and select the folder with the driver.


You should eventually receive a "Windows has successfully updated your drivers" notification. This means that the driver is installed and is being used by the system.

Conclusion
If you want to install only the driver for the video card without additional components, then this instruction is one of the possible options. You can also achieve a similar effect by disabling the checkboxes in the NVIDIA installer and manually cleaning and disabling components after installation.
Found a typo? Select and press Ctrl + Enter