To restore partitions in a DOS environment, read the instructions for the professional utility TestDisk:. However, in simple cases, the DMDE program, which works directly in Windows, can help.
How to recover a deleted disk partition under Windows OS.
We will show you how to restore a partition in Windows 8.1.
Disk removal
For example, we take drive D on a test machine. We go to the disk, we see that files of different types are located there:
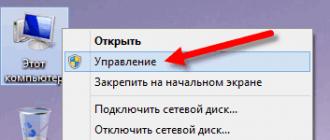
Now let's take and delete drive D. To do this, right-click on the system shortcut This computer and choose Control:

Entering the section Disk Management we see how the hard drive is marked: boot partition, system drive C: and drive D: with a volume label data. We right-click on the D: drive and select from the context menu Delete volume :

Click Yes:

And we see that the volume is deleted. The section is deleted and in its place we see an unallocated area:

Thus, we artificially simulated deleting a partition. In everyday life, the disappearance of a partition may be the result of malicious programs or erroneous user actions.
Now we will show you how to repair the D: drive.
Disk recovery using DMDE
Download the DMDE program from the official website: http://dmde.ru/download.html:

Open the downloaded file:

The program does not require installation. Therefore, just unzip the archive into a folder:

and run the dmde.exe file:

In the program window DMDE on the left select Phys Device , on the right side, select the physical hard drive where the missing partition was located, and click OK:

After that, the program will search for partitions on the disk and display them as a list. We find in the list the partition that needs to be restored, select it with the left mouse button, and press the button Insert:

(In our case, we see a remote section called data, the volume of which matches the volume of the remote partition. Based on these signs, we understand that we need to restore it)
In the next window, you need to select the partition type. As a rule, the DMDE program itself determines the correct partition type and sets the selector to the desired option. You just have to press OK:

Now you need to press the button Apply to write changes to disk:

Confirm the recording of changes with the button Yes:

Save the file containing the data to roll back the changes:

Partition recovery done!
Checking the result of DMDE
We press the button Refresh in disk manager:

We see that the disk D: removed by us in the experiment with the volume label data reappeared in the system:

We go to This computer and we see that drive D: is displayed here as well.
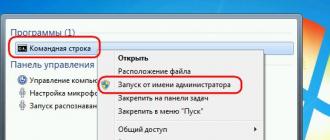
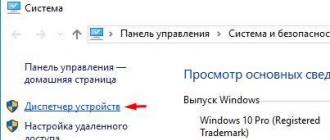
If the hard drive's partition table has been corrupted, it's usually possible to salvage the data. We'll show you how to do it. If the partition table is damaged, data can usually be salvaged Your drive can easily be left without a working partition table - if you disconnect the external drive from power too soon, if a virus tries to nest in a protected area of the hard drive, or if sectors, in which the table is written have simply become unreadable. After that, you will definitely receive a message from Windows: “Before using the disk in drive X:, it must be formatted. Format?". Rescuing data and cleaning the hard drive Of course, in the vast majority of cases, you do not want to format the drive at all, because your data is on it. But without a partition table, the system will not be able to access the hard drive. You need to find a way to somehow extract information from the corrupted media. First of all, you need enough disk space to store the rescued data. To restore the disk partition table, you can use the free TestDisk utility. It can be downloaded from the manufacturer's website cgsecurity.org or taken from the CHIP DVD. You will also need the DiskPart tool. Starting with Vista, this program comes with Windows, but XP users will have to download it from microsoft.com. The TestDisk utility is needed to detect data without a partition table and copy it. DiskPart will then clean up the hard drive, allowing you to eventually create working partitions using the native Windows Disk Management tool, which is available under Computer Management. Don't Be Afraid of the Command Line Of course, TestDisk and DiskPart are powerful tools that can be tricky to use. But do not be afraid: carefully read each message, view each screen and try to follow our instructions as much as possible. If your computer uses multiple HDDs and/or SSDs, it is especially important to pay attention to drive letters and symbols. There is nothing more offensive than deleting partitions of a completely uncomplicated healthy medium. By the way, after the procedure, you can safely use a hard drive with a once corrupted partition table. Even if bad sectors on the HDD became the source of the problem, you should not be afraid that this will happen again. The disk's own sector management tool marks them as bad so that they are not used in the future. Even if there are no problems with the hard drive at the moment, keep this manual, and when an emergency arises, you will be fully prepared. NOTE CHIP is not responsible for damage to your hardware or loss of data that may result from following the recommendations in this article. How to do it? 1. RECOGNIZING THE PROBLEM If Windows warns that your hard drive is not formatted, this is not necessarily true. You can check if this is the case by running the built-in Windows Disk Management tool. 2. CHECK THE HARD DISK If there are no problems in the Disk Management tool (Control Panel | Administrative Tools | Computer Management), the disk will be marked as "RAW" or have the status "Healthy". 3.FIRST ATTEMPT TO RECOVERY Use the native Windows utility chkdsk in the cmd command line editor, which must be invoked as an administrator. Run the command "chkdsk x: /f", where instead of "x" substitute the letter of your drive. 4. RUN THE PROGRAM FOR ANALYSIS If the previous procedure did not bring success, run TestDisk. Use the "Enter" key to confirm the "Create" setting. In the next step, select your hard drive and run the test with the “Proceed | Intel | analyze | Quicksearch. 5. OVERWRITE THE PARTITION TABLE Select your partition, click "Continue" and create a new partition table using the "Write" function. If the section does not appear, repeat the process using "Deeper search". 6. SAVE THE DISAPPEARED FILES If the process was not successful, repeat the steps of step 4, but after "Continue" select "List files". Follow the instructions at the bottom of the window to copy files. 7. RETURNING THE HARD DISK TO WORKING STATE After successful copying, run the DiskPart program as an administrator. Using the "List disk" function, display all hard drives, select the one you need with the "Select disk x" command and clean it ("Clean"). 8. FORMAT AND PARTITION In Disk Management, initialize and, if necessary, partition this disk, and then return the data to it.
If you accidentally deleted a disk on your PC or several partitions, do not worry, lost data can be recovered. There are many programs for this. These are the paid Acronis Disk Director, free TestDisk, AOMEI, Partition Assistant Standard Edition and DMDE. Consider how to recover a deleted disk using the latest program.
Recovering a deleted disk using DMDE
In order to recover a deleted disk partition or an entire disk, you need to download the DMDE program by clicking on the link. Next, open the archive and run the .exe file.
In the window that opens, select the physical disk, indicate that this is a device and click "OK".

The search for deleted partitions and disks will start.

After the search, a table of results will appear. We look at the remote disk. It will be marked with green letters "BCF". We pay attention to volume. It must match the one before the removal. Select the desired disk and click "Insert".

In the next window, select the partition type. If your PC has Windows XP or 7 operating system installed and you have removed the “D” drive, then you should select “Logical Disk (MBR)”. “Main disk (MBR)” is selected only if the “C” drive on which the operating system is installed is lost. If you are using Windows 8 and above and your PC supports the latest GPT standard, we recommend choosing the third option.

Also, to facilitate the selection, it is worth looking at the standard of the remote disk in the previous window.

Before restoring the disk, check the box "... save file data for rollback" and click "Yes".

Choose a location to save the file.

The disk has been restored. Now go to "Disk Management", select the "Action" tab and "Update".

The remote drive "D" will appear, but without a letter. Right-click on it and select "Change drive letter or path".

A new window will appear. Click "Add".

Select the letter "D" and click "OK".

Close "Disk Management". Go to "Computer" and see that drive "D" is restored.

Recovering a deleted partition using DMDE
Restoring deleted hard disk partitions using the DMDE program is much more complicated. First of all, you need to disconnect the hard drive from one PC and connect it to another, which already has the program installed.
Disk Management will display two basic disks with installed operating systems.

For example, let's delete all partitions from the connected disk and restore them back.
We start the DMDE program. Select a physical disk. Its name will be displayed below, so we select the one that is connected to the PC and on which the partitions are lost. We click "OK".

The search for deleted partitions will start.

Select only the desired section. Initially it will be "Reserved by the system". We look at the volume so as not to restore an earlier and unnecessary partition.

We select "Primary Partition (MBR)", since we need to restore the partition with Windows 7. Click "OK". If we are restoring a disk with Windows 8, we select the third option.

In the next window, select "Reserved by the system" and click "Apply".

We save the data for rollback and click "Yes".

The first section has been restored.
In the same way, we repeat all the actions with sections that are referred to as "BCF".

After restoring them, go to "Disk Management". Click "Action" and "Update".

After we change the drive letter, rearrange it back to the PC and start the system. The data has been restored.
In practice, you don't often have to deal with partitioned disks. However, when we encounter this, we always hear the same story in variations… How can you accidentally redistribute a hard drive, and what should you do to get the files back? Read on to find out...
Random redistribution
If you are using Windows, it is almost impossible to delete the system partition, even if you specifically try to do it, not to mention accidental deletion. Windows will recognize and block such attempts. However, if you are booting from another media and trying to upgrade or replace the operating system, the risk of "pressing the wrong button" is extremely high.
“I wanted to try Ubuntu,” said one of our customers. - I booted from the flash drive and as the destination and indicated the SD card. But it turned out that instead of an SD card, I chose a hard drive. The system partition has disappeared."
This is a typical scenario. Linux, Ubuntu, beta versions of Windows, and just about any OS installed from another medium opens the door to user error. It doesn't cost anything to make the wrong choice and ruin your hard drive. And all we can recommend in such cases is to use a dedicated computer for such experiments and never store anything useful on your hard drives.
Restoring deleted partitions
So can it all be returned? Well, if the hard drive has already been repartitioned and the new operating system has formatted the partitions to its own file system, there will probably be some work to be done to find some of the lost data. Solve the issue and restore all your data and original partitions with one click? You can forget about it immediately! Even if you restore the original partitions and the original file system (which may not be possible, since at least some of it may be overwritten by the new file system), some data at the beginning of the disk will inevitably be overwritten, and your original operating system will most likely never won't load like before.
So, you will have to restore data step by step.
Don't use the System Restore option (yet)
Does your computer have a special recovery option? Most often, when using this option, the system is automatically "reset" to the factory default settings. What does "factory default" mean? This is the pre-installed operating system and software that comes with the computer when you purchase it. All user data such as bookmarks, documents, cache, etc. will be lost and overwritten. Therefore, it is better not to use the System Restore option for the time being. Instead, you need to save your data and only then reinstall Windows.
Step 1. Recovering information from a disk.So, first of all, you need to get your lost personal data back. Use a good data recovery tool like RS Partition Recovery, let it explore your hard drive partition by partition, find and recover files and folders. You will need to save your personal data such as documents, photos, music, videos and other valuable files. There is no need to restore anything from the Windows folder, the Program Files folder, or other system areas on the drive (more on that later).
Using RS Partition Recovery to recover files from a deleted partition is quite simple. Download and install the program without installing it on the same hard drive that you are going to reverse engineer. Run Partition Recovery: Select the hard drive you want to restore from the list of physical devices and check for deleted partitions using the Find Partitions option. Once your Windows partition is detected and displayed in the list of available disk volumes, select that partition and run the Data Recovery Wizard. The wizard will guide you through the entire recovery process step by step.

When it comes to saving your files, make sure that the recovered data is safely stored on separate media (such as a DVD-R disc, USB flash drive, or separate hard drive) and check that you've recovered everything before moving on to the next step. .
Step 2: Reinstall WindowsNow it's time to use the System Restore option available on your computer. Just restore the factory default settings. If you no longer have access to the System Restore option, you will need to obtain a Windows boot disk and product key. On most computers, the Windows product key is on a sticker or a separate label. Sometimes you can contact technical support to get a bootable installation disc and a Windows product key.
If you bought a version of Windows independent of your computer, reinstalling it is just as easy. Just follow the same steps as when installing Windows for the first time.
Seems like a lot of hassle? This is true. Working with converted hard drives is a complex and time-consuming process. The good news is that you will most likely be able to recover your core files without any problems. Today's data recovery tools are just designed to solve such problems as deleted partitions, repartitioned hard drives, missing or empty file systems, and other situations.
Disk and partition recovery in Acronis 2011
Using the restore function, you can easily and quickly restore lost information, or return your computer to a working state from a previously created backup. You can restore the contents of an entire disk/partition, as well as individual files, folders, email settings, etc.
Restoring a disk or partition from an image is a simple process and, as a rule, does not cause difficulties. To start the data recovery procedure, launch the program, for example, from the desktop by clicking on the program's shortcut.
Click "Go to main window".

Click the "Restore" button. The partition recovery window will appear.
If you need to restore the state of the partition to some date in the past, click View and Restore.

After selecting the desired backup version, click the "Restore" button to open the partition recovery window again.

If you have backed up a drive, you can choose to restore the entire drive at once by clicking Switch to Disk Mode. To be able to select partitions again, click Switch to Partition View.
You can select a different partition for recovery. Partitions on which a recoverable partition can be placed will be highlighted in black. Unsuitable sections will be highlighted in red. However, keep in mind that all data on the target partition will be lost as it will be replaced by the restored data and file system from the backup.
Transferring a system from a backup to another partition or to another partition of another hard disk is similar to the clone function.
In the properties of the selected section, you will need to select the type of section.

If you select the partition type Primary, Active, after the recovery procedure, the computer will boot from it. If you select the partition type Primary, you will need to install Acronis Disk Director in order to boot the computer from this partition. Then install OS Selector - a tool for managing the loading of several operating systems on one computer.

Partition and disk images contain a copy of the MBR (Master Boot Record) disk track zero. If you need it to boot your system, restore it every time.
Click "Show MBR".

Check the box next to MBR.

On this preparation for restoration can be considered complete. Click the "Restore Now" button.
During recovery, you can choose Acronis Universal Restore technology included in Acronis True Image Home 2011 Plus Pack. The Acronis Universal Restore feature allows you to restore a bootable copy of the system on other hardware. Select this option if you are restoring your system disk on a computer with a different processor, motherboard, or storage device than the system that was backed up.

Click the "Yes" button. All data on the system partition will be replaced with data from the backup.


Reboot required. Click Reload. After restarting the computer and restoring data from a backup, you will receive a completely reanimated operating system.