Want to know how seriously the system unit is warming up (this is especially true in the summer) and will reduce the noise of the computer, which seems to be about to take off. Then you need to get into the BIOS, trying to wait for the necessary settings, unless of course you’re afraid to change something, but this is only suitable for advanced users or all the others try to get by with the utilities that go on the drives with motherboards, which theoretically allows you to control the fans, although usually quite inefficient. As always, there is a third way: utilities from third-party developers who can work with most modern hardware. One of the popular utilities that allows you to take data from sensors on the motherboard, video card, power supply and hard drives, as well as control the operation of fans, is SpeedFan.
The utility installation takes place according to the standard scenario, confirmation of the license agreement, dates of placement of the icons for launching the utility, select the folder where the files will be placed. Well, that’s all, the program is completely ready for work.
SpeedFan collects all kinds of data about your computer like temperature, voltage, CPU frequency and cooler rotation speed, and allows theoretically (why you will learn later) to regulate the fans and change the frequency of the processor.
The utility interface looks ugly, but it’s simple and understandable where all the features are grouped into separate tabs, although some of them have very strange names:
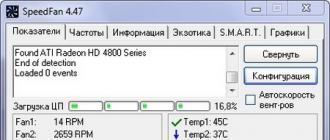
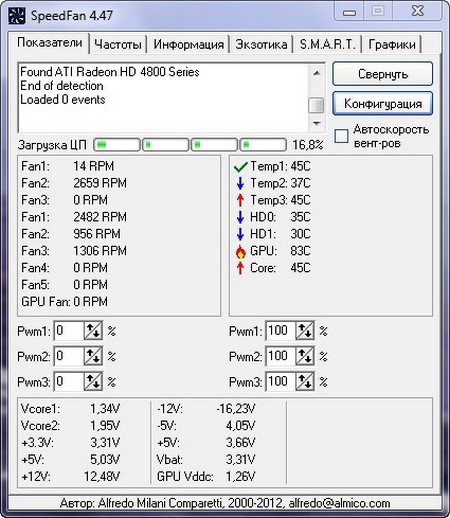
- Indicators. Here we are given all the information about temperature, fan speed and voltage, but most importantly, it is from here that we limit the fan speed. We limit the speed by changing the numbers in the points signed by Pwm * (from previous versions they were called Speed \u200b\u200b*), setting how many percent it will work on the maximum speed of the cooler.
Frequencies. Here you can change the frequency of the processor and system buses, but I don’t recommend turning anything on or off for ordinary users far from computers. If anyone is interested in choosing the motherboard manufacturer first, then the clock generator that is used (it’s best not to pick anything), then we’ll set what frequency the processor will work depending on the load on the system.
Information. For ordinary users, there is nothing interesting here. In fact, they propose to read data on the chipset used on the motherboard and send utilities to the developers so that they can implement support for common hardware and sensors.
Exotic. Under such a strange name, a plate is hidden where all the parameters that the utility monitors are displayed, using arrows to illustrate which values \u200b\u200bfall or rise.
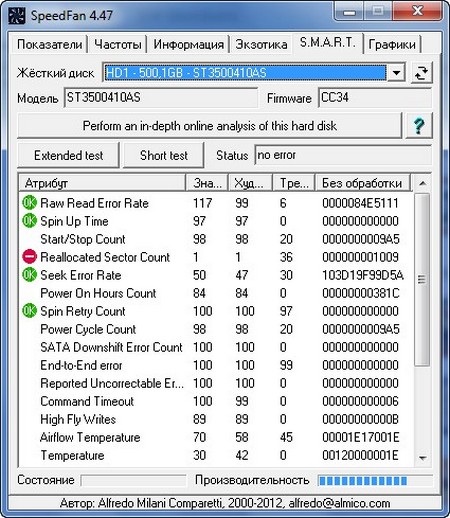
- S.M.A.R.T. here we can find out about the state of the hard drives, where the green circles indicate that everything is fine. If you see a yellow triangle, the hard drive is in a pre-emergency state, and a red circle means that part of the parameters went beyond critical values, and data loss is only a matter of time. We select the necessary hard drive from the top drop-down list.
Charts. In this section, anyone can get acquainted with the statistics of changes in temperature, fan speed and voltage in the form of graphs.
Now about some features of SpeedFan. For starters, the utility does not always correctly determine the temperatures, so for the experiment, you can first try alternative utilities and compare the results to make settings. Also, so that the fan speed can be regulated, they must be connected to the motherboard in a 3-pin connector. Although, again, not every motherboard allows you to adjust the fan speed.
The name of the fans looks very sad, which only differ in digital indices and it is not clear which one is responsible for what. Although it all depends on the motherboard, meaningful names bark on some parts of the coolers. One has to go to the truth with cunning experiments how to stop with crayfish, drive in games and just watch how the speed changes after changing the parameters.
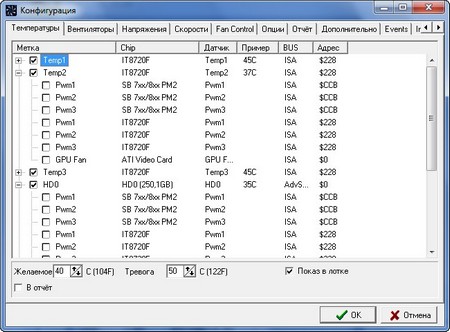
You can get to the settings from the “Indicators” tab by clicking on the “Configuration” button and a lot of interesting things are hidden here, which will allow you to configure SpeedFan for yourself. Here you can turn off unused or duplicating sensors and fans, set the optimal and critical temperature for each sensor (for example, I had to raise it to 85 degrees for a video card), enable automatic adjustment of the fans, depending on the temperature of the sensors. For dessert, those who wish can write scripts that will be executed during certain events, launching programs, sending emails or triggering pop-up windows with warnings.
SpeedFan basically works, giving out a bunch of useful and not very information, allowing you to adjust the fan speed. But it’s right to make this work a whole art, where you first have to experiment to figure out the terms and climb the forums. Although, as the simplest option, which does not require much effort, you can reduce the numbers in Pwm * on the main tab.
If your computer is very noisy, your hands straight and ready to spend some free time, then it is worth installing and setting up SpeedFan correctly.
Works great in 32-bit and 64-bit operating systems. The program interface has been translated into several dozen languages, including Russian, although some phrases have remained in English.
SpeedFan free download page http://www.almico.com/sfdownload.php
Latest version at time of writing SpeedFan 4.47
Program size: installation file 2.04 Mb
Compatibility: Windows Vista, Windows 7, and Windows XP
SpeedFan is a program that monitors the state of your computer. The utility provides real-time data on the cooler rotation speed, on the processor temperature, on the voltage of the power supply and on other important parameters. Among other things, the program is able to identify current problems of the system, show graphs for various indicators, and also control the speed of rotation of all fans.
The main tab is “Indicators”. It contains all the most important information on the system. For convenience, icons are used to warn of an increase or decrease in temperature. A fire icon indicates a critical condition, but many devices support operation at sufficiently high temperatures. Therefore, do not be scared prematurely, but rather look into the technical passport to find out the exact range. A bit lower is the cooler speed control unit.
A separate section is devoted to S.M.A.R.T technology for the selected hard drive. In fact, these are 2 types of tests - extended and short. After starting any of them, information about errors, if any, will appear in the status column. There are 3 icons to display the status of a particular attribute: green with the inscription "OK", a yellow triangle with an exclamation mark, and a red Stop sign with a white stripe. The first means that everything is fine with the attribute, the second - the attribute is close to the threshold value, the third - a critical case.
The default is English. However, it can be changed into Russian through the tab “Indicators” → button “Configuration” → “Options” → “Language”. It is worth considering that the prompts and some parameters and all attributes from the S.M.A.R.T section will remain in English. So, RPM stands for the number of revolutions per minute of your fan. But most of the text in the program was still Russified.
SpeedFan allows you to display important performance indicators of your computer. However, the main function of this program is to monitor the cooling of the entire system and directly to all available coolers. This utility will be very useful for the prevention of breakdowns during iron overheating.
Good day, dear friends, readers, visitors and other personalities. Today we’ll talk about the program Speedfan that is clear from the title.
I think that you all remember the article "", which told you a lot of all sorts of useful information about heating the contents of your iron friend and a few words about how to deal with this heating, namely, for example, by or.
But what if everything is more than normal with temperatures, and the computer is buzzing like a damn? The answer is simple: you need to somehow control the speed of the fans, because they are the cause of noise in most cases. Just how to do this and will be discussed in this article.
Intro about computer cooler speed
To begin with, how does the adjustment take place, if at all.
Initially, the rotation speed is determined and set on the basis of temperature indicators and settings specified in.
The motherboard, in turn, does this by changing the voltage / resistance and other nuances, intelligently controlling the number of revolutions ( RPM), based on the settings you set, as well as the temperature of the computer components as such and inside the case in general.
However, far from always, despite all sorts of technologies of smart adjustment ( Q fan and others like them), it does its job distinctly, and therefore the twists on, either inject too much (often this happens), which creates not an illusory noise, or too weak (rarely), which raises the temperature.
How to be? Variants at least three:
- Try to set everything up in BIOS;
- Take advantage of specialized programs;
- Either physically pick something with power (or by buying all kinds of reobases and other physical devices there).
Option c BIOS, is far from always justified, because, firstly, such a technology is not everywhere, secondly, it is far from being as intelligent as it seems, and thirdly, it may be necessary to change everything manually and on the fly.
Additional speed information
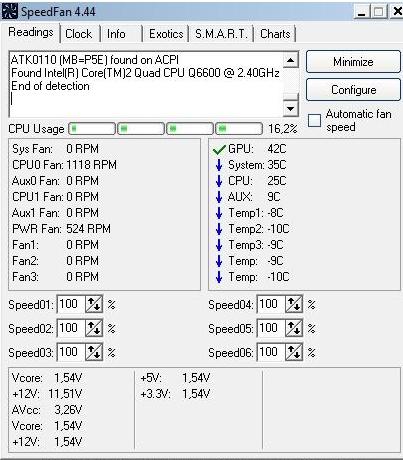
Field " Cpu usage"and the indicators next to it show the current load and it. Buttons" Minimize"and" Configure"allow you to minimize the program, or open its settings.
Check mark " Automatic fan speed"includes automatic rotation control. You can use it, but there is no sense, as such, otherwise why would you even install this program if everything suits you as it is?
IMPORTANT! The list of indicators does not necessarily apply to this or that cooler, as it is signed in the program! Ie if it CPU or Fan1, - does not mean that it is the speed of the processor cooler, because it all depends on which slot the fan is connected to by the assembler (or by you) directly on the motherboard and how correctly the program reads data about this connector! Ideally, determine the speed by changing the value and looking into the open case.
Details on the various controls in SpeedFan
I tell you that there is something in the case of the indicator of rotation speed (measured in RPM, i.e. in the number of revolutions per minute):
- SysFan (Fan1), - shows the rotational speed of the twist (I mean the fan) connected to the SysFan socket on the motherboard. It can be either a cooler installed on the chipset or any other simply plugged into this connector (all the connectors on the motherboard are signed accordingly);
- CPU0 Fan (Fan2), - shows the rotation speed of the twist on the processor, i.e. the fan stuck in the socket CPU_Fan on the motherboard;
- Aux0 Fan (Fan3), - talks about the current speed of rotation of the fan connected to the connector Aux0;
- CPU1 Fan (Fan4), - similarly CPU0, but only if you have a second processor or socket for a cooler labeled CPU1_Fan;
- Aux1 Fan (Fan5), - similar to Aux0, i.e. shows the rotation speed for a cooler plugged into the connector AUX1_Fan;
- PWR Fan (Fan6), - it happens that the rotation speed of the cooler installed (not always) is indicated here, or simply the speed of the fan that is plugged into the connector PWR_Fan on there. board.
Once again, I note that each parameter here corresponds to connector on the motherboard and almost any cooler can be stuck in any of these and then its indicator will be displayed in the corresponding column.
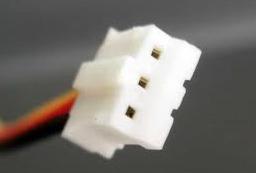
Naturally, it must be stuck through a small 3-pin- connector in the motherboard, but not powered by the power supply. To make it clear, let's show you a photo.
Cooler connectors and photos
Correct connector and correct socket (socket in the picture 4-pin, and the connector 3-pin) so that it is possible to watch and adjust the rotation speed:
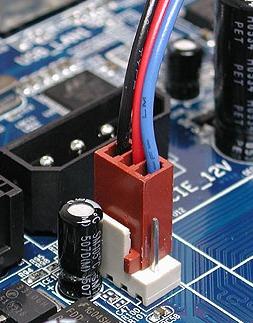
"Wrong" connector, ie power from the power supply, which not allows (see note above) to monitor and, often, change rotation speed with the help of the program, BIOS and something else:
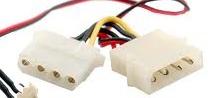
If you’re assembling some of the coolers (for example, case coolers) powered by a PSU with the above-mentioned connector, I recommend that you get into the computer and flip them into the motherboard so that you can drive the fans as you like.
To the right of the above values, as I said, temperatures are indicated. Personally, for me, they are not removed accurately and adequately, and therefore I recommend using analogs like or to draw conclusions on the basis of them.
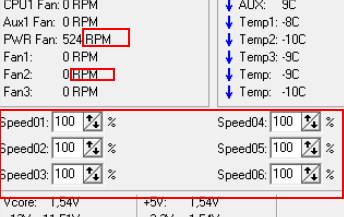
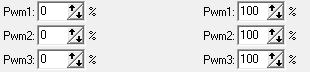
And now the most delicious. Below, opposite each inscription Speed01-06 (or in later versions of the program, this may be Pwm1-3, Pwm1-3), there are arrows, clicking on which we can adjust the speed of rotation of a fan. Actually, we need them. Try to play with them by moving them up and down and you will see how much quieter / louder your computer can work.
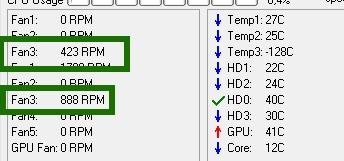
By the way, in order to understand which graph the speed of which cooler regulates, just observe the change in values RPM. Naturally, it is not recommended to turn off the fans completely, so as not to burn anything and, of course, that you must simultaneously look at the temperatures when adjusting the values.
Disable / enable automatic speed control in BIOS
Depending on the type of motherboard, version and type of it BIOS and other factors, the program may not work if in BIOS adjustment on or off automatically or based on predefined patterns.
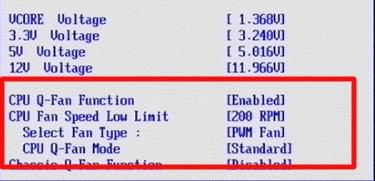
Therefore, perhaps, if you encounter problems in the program and it works (or does not work), or you want to entrust the control of the motherboard, you may need to turn on or off the built-in BIOS adjustment system. Roughly, depending on the version, this is done like this:
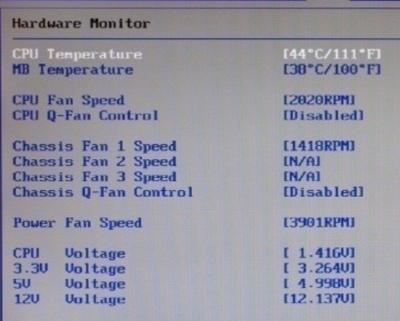
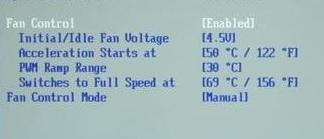
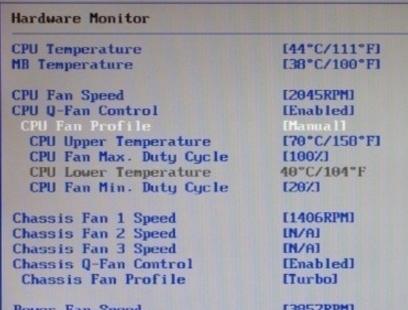
Those Q fan pregnant Enable enables automatic control based on the specified parameters in BIOS, but Disable disables this option. Depending on type BIOSAs you can see in the screenshots above, this parameter can be located on different tabs and look different. It is also possible that you need to switch CPU Fan Profile from Auto on Manual or vice versa.
Unfortunately, it is impossible to consider all the variations, but one way or another, this tab is always present on any computer (with the exception, perhaps, of laptops) and you can find it there. In particular, this is not always called Q fanit might be something like CPU Fan Contol, Fan monitor and similarly.
In a nutshell, something like that. Let's move on to the afterword.
Afterword
Something like this. About all sorts of deep settings and other tabs, within the framework of this article, I will not talk, since they are not particularly needed. The remaining tabs are responsible for overclocking, information and other useful data (more on that later).
In the next article from this series, I described in detail how to adjust the speed, because they have their own BIOS and a fan, powered not from the motherboard or PSU, but from the card itself, and therefore control them through Speedfan or the motherboard will not work.
As always, if you have any questions, thoughts, additions, comments and all that jazz, then welcome to comment on this post.