Bad sectors are found on almost all HDDs. Especially on those that are actively used for a long time. Sometimes a problem gets out of control and turns into a real disaster, destroying all the data on the HDD in any partitions. To prevent this from happening, learn how to restore bad sectors of your hard drive at home.
What are bad sectors and why do they appear?
You can imagine a bad block in the form of a book with the last chapter torn out. You can read it up to a point. But as soon as there is a space in the pages, you cannot finish reading. HDD also works. The magnetic head reads information within the track, but at some point it encounters a damaged surface or an empty bit of information, which leads to the inability to extract information to the end.
Almost all hard drives have bad partitions. It can be one or several, and in most cases it is not scary. But over time, there are more and more of them, and they make it increasingly difficult to operate information on the HDD. Such areas can be detected by scanning the hard disk for bad sectors with special utilities.
There can be many reasons for the appearance of bad sectors:
- hit the disc or use in the wrong conditions;
- interruption of recording by turning off the power;
- overheating and temperature jumps;
- natural wear on the heads and burner;
- low-quality products.
You can immediately divide the broken sectors into non-recoverable and recoverable. The first include those caused by shock or overheating. They are destroyed once and cannot be restored, and information, as a rule, disappears irrevocably. The second type of bad sectors appears as a result of a break in the recording process. They can be revived by simply rewriting the disc.
Over time, write and read speeds may decrease. And after a small drop in your laptop, the drive may even refuse to work. Everything would be really bad if there was no way to regenerate bad blocks in some way. The fact is that hard disks have a certain reserve area, which means a potentially larger volume than stated in the check. You can use the extra space to transfer contents to it from damaged areas. How to recover bad sectors of the hard drive in this way is described below.
Danger is near
You can notice the problem not only after a hard drive failure, but also in the initial stages. You should be wary after the following symptoms:
- write / read speed of the disc has dropped;
- unusual noise is heard when accessing the HDD;
- began to overheat;
- subjected to mechanical stress;
- the system often falls off, and when it starts, chkdsk starts automatically.
Typically, these reasons indicate the beginning of the end of your HDD. In order not to lose data, the first good solution would be a backup. Transfer all the necessary files to another computer, flash drive, disk, and, if possible, even set up synchronization with the cloud.
Most modern hard drives are checked for bad sectors themselves, without user intervention. This is both good and bad, because you cannot influence the elimination of bad blocks and learn about their appearance on system partitions.

When to scan?
You can scan the hard drive for errors with a certain frequency, which depends on the frequency of use of the computer and is calculated individually. Someone conducts scheduled computer maintenance once a month, someone - once every six months.
To do this, you can use system utilities or programs to restore bad sectors of the hard drive. A scan should be performed immediately after detecting the problems listed above.
Scanning with regular tools
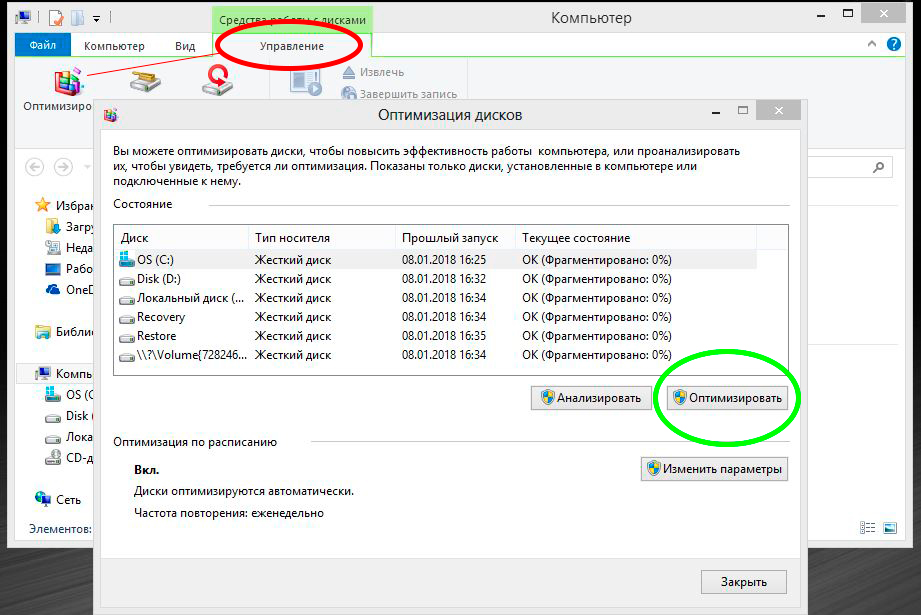
Starting with Windows 8, the system itself is able to scan disks on a schedule and thereby extend the operation of the HDD. You can configure the scan schedule at the address: “My Computer” / “Management” (a tab will appear in the main menu when the section is active). In Windows, checking the hard disk for bad sectors can be carried out by the regular chkdsk program. The utility can be launched in several ways:

The work is not fundamentally different, so consider the first option:
- Open a command prompt as administrator. Right-click on the Start menu icon or just in the lower left corner on Windows 8 and select "Command Prompt (Administrator)" from the list.
- If you want to scan a non-system disk, enter the command with the chkdsk / f / r keys to scan and fix the entire disk immediately, and chkdsk D: / f / r to fix only the D partition or any other one. Additionally, you can enter the / x switch to disable the volume being checked during the scan. In case of diagnostics of a working disk, the program will offer to reboot in order to perform work without logging in.
- If chkdsk finds errors in the partitions used, it will offer to reboot and fix sectors before the system starts.
To display all options, type help chkdsk. A list appears in which all available keys with explanations are visible. You can use any combination of your choice if you understand the essence of what is happening and the possible consequences. At the end of the scan, all data about the operation will be displayed in the log.
Third party programs
In addition to the built-in chkdsk, you can use third-party programs to fix bad sectors on the hard drive. There are many software that can recover damaged partitions.
Among the popular free software I would like to highlight Victoria. This program for recovering bad sectors of a hard drive is well known and at one time was very popular with masters. The Victoria program is able to work both in window and in DOS mode, which allows you to use it even on dead systems to recover information.

Interface Victoria
The program is perfect for recovering bad sectors of the hard drive. Victoria is intended more for experienced users, since it practically does not contain an interface and does not even have a crack in the kit. But this does not prevent her from working correctly with hardware and file systems.
There are a lot of settings, switches and different numbers, and when you open the program for the first time, it can be difficult to navigate. But, following the instructions below, let's find out how to recover bad sectors on the hard drive.
Testing and analysis
In the Smart tab of this program, you can quickly assess the overall status of the disk. The score is set based on an analysis of the various values \u200b\u200bgiven in the table. There you can view the status of each parameter individually.

For simple testing, go to the Tests tab. There are a lot of settings in each section, so for the initial analysis you can leave everything by default. Click on the Start button and wait for the test to complete. A full check of a hard disk for bad sectors takes a long time. Therefore, you can safely leave the test for the night and go to sleep.
Additionally, the window contains a graph of speed or color indication of sectors. You can switch the view by the Grid flag near the timer.

Sector Correction
If you wait for a few checks, there is no time, then after assessing the condition, you can immediately proceed to the treatment of bad sectors of the hard drive. Victoria uses the Remap method to rewrite blocks. It reassigns the bad blocks to normal from the backup disk space. To repair bad sectors, do the following:

During the check, all errors found and a report on the measures taken will be displayed in the log. It also indicates on which part of the disk problems were detected.
How to crop?
Often, bad partitions prevail at the beginning or end of the disk. The thought immediately visits: “And if you do not use space with bad sectors?” Yes, you can cut it off and no longer use it. You can find out which section of disk space is best cut off by:

It is worth working with the system drive only in DOS mode until the OS is loaded. While backup or restore can be marked up directly from under Windows. This method is good for a large HDD. But it doesn’t help to restore the damaged partitions on the hard drive, as it happens during the remap process.
Prevention
So that the hard drive does not "die" in your arms, it is advisable to carry out some preventive measures. Depending on the type of equipment.
If you have a laptop:
- try not to hit him;
- do not shake much, especially during working hours;
- do not subject to vibration or temperature changes.
If you have a desktop computer:
- do not place the system unit in a damp place;
- do not overheat components;
- even though the HDD itself is tight, the board may be damaged by a layer of dust, so get rid of it;
- install additional cooling on the hard drive if the computer is actively used or the hard drive is unable to cool on its own.
A useful preventative measure for all hard drives is defragmentation. For its implementation, there are many programs, both full-time and third-party.
Now you know how to restore bad sectors on the hard drive and, perhaps, you can even save valuable information on it in case of problems.
Bad sectors on the hard drive
What are bad sectors on the disk? First, briefly consider the organization of information storage on the hard drive.
A hard drive actually actually consists of several magnetic disks. Magnetic read heads move over rotating discs. When recording the head, certain sections of the disk are magnetized, thereby zeros and ones are recorded - that is, information. Information is recorded anywhere, but in strictly defined parts of the disk. The disk is divided into tracks, and they, in turn, into sectors. Information is recorded in these sectors.
In some cases, information from a sector on a disk cannot be read. Such a sector is called broken. The cause of bad sectors may be a sudden power outage during a hard disk write operation, a shock during operation, overheating, or physical wear and tear. Most often, bad sectors on the hard drive are formed due to the first two reasons.
The program to check the disk and restore bad sectors Victoria
Victoria is a free program of the Belarusian programmer Sergei Kazan for restoring bad sectors and checking the hard drive. This program also has a Windows version. But I highly recommend using the DOS version for more reliable work with the hard drive. Below you will find instructions for working with the DOS version of Victoria.
Victoria program allows you to see the SMART table of the hard disk, scan the surface of the disk for bad and badly read sectors, restore bad sectors, completely erase all sectors on the hard disk (low-level formatting). So to the point!
Check disk for bad sectors
Before you begin to check and restore bad sectors of the hard disk, you need to prepare. It is necessary to properly configure the hard disk controller in the BIOS so that the program can work correctly with the hard disk.
It is necessary to set the SATA controller mode to BIOS in the BIOS IDE . In AHCI mode, Victoria will not be able to recognize the hard drive and will not be able to work with it.

Now you can boot into DOS using a bootable USB flash drive and launch Victoria.

First of all, you need to select the IDE channel with which we will work, that is, to which the tested hard drive is connected.
 To do this, press the "P" key (Latin). Once the menu appears, select the channel and press Enter. If your drive is connected to the SATA port, then most likely you need to select Ext. PCI ATA / SATA. If your drive has an IDE connector, then select the port to which it is connected.
If the controller is correctly configured in the SATA BIOS on the motherboard (in IDE mode), the program will display a list of channels. You must enter the channel number to which the test disk is connected using the keyboard. In our case, this is "3".

Enter the number "3" and press Enter. After the channel has been selected, it is necessary to initialize the hard disk in the program. To do this, press F2 . The service information of the hard disk (its model, size and other information) will appear on the screen. If this happened, then you did everything right and the program was able to connect to the disk.

Now the first thing to do is look at the SMART hard drive table. In many cases, information from it can clarify the situation even without scanning the surface. To view the SMART disk in Victoria 3.52, press the key F9 .

In the table, we are primarily interested in two points: Reallocated sector count and Current pending sectors . The first parameter shows the number of sectors transferred to the backup zone (restored or remap), the second parameter shows the number of suspicious sectors, that is, the hard drive could not read for one reason or another.
As you can see in the figure above, the number of restored sectors on this disk is very large (767). This suggests that the disk most likely has some problems with the surface of the disk. In addition, SMART also shows the presence of suspicious sectors, which confirms the version of damage to the surface of the disk. Such a disk may possibly be restored, but you should not use it in the future. Such a large number of bad sectors indicates that the disk is no longer reliable. It is better to replace such a disk with a new one and clone information from the defective disk to it. But first, in any case, you need to try to repair the bad sectors on the hard disk.
To return from SMART, press any key.
Recovery of bad sectors of the hard drive
Now consider the question of how to recover bad sectors on the disk. Correcting bad sectors is actually nothing complicated. For starters, you can simply scan the disk for bad sectors, but we will immediately turn on the recovery function.
Now a little should be said about the recovery mechanism of bad sectors or bad blocks. Unreadable sectors come in two forms.
In the first case, the sector cannot be read due to the discrepancy between the information recorded in it and the checksum at the end of the sector. This problem can happen if the power was suddenly turned off during the recording process. That is, when the information in the sector managed to be recorded, and the checksum remained old. Such bad sectors are not essentially defective. It’s just that they contain conflicting information that the hard disk cannot recognize. Such beaten sectors are treated by erasing the information in them and recording new correct checksums. After that, the sector becomes for reading and writing.
In the second case, there is physical damage to the sector (demagnetization, scratching, etc.). Such a defect may occur, for example, due to shock or overheating of the hard disk during operation. In this case, the process of repairing bad sectors is more complicated. Each disk has a spare unused area. That is, any drive actually has a slightly larger capacity than is actually used. This area serves to redirect unreadable sectors into it. A new physical address is entered into the disk table in the spare area for the defective sector. The logical address remains the same. That is, the sector, as it were, remains the same, but in reality it is already located in another place (remap). This approach of course reduces the speed of reading and writing in the area of \u200b\u200bthe disk with the sector transferred, since the magnetic heads have to move to the end of the disk (to the backup area) when accessing the redirected sector. But this approach justifies itself with a small number of redirected sectors and the data processing speed decreases slightly.
Recovery of bad sectors with Victoria 3.52
 Now apply the theory in practice. To open the disk check menu, press F4 . In the dialog box that appears, move the cursor to the item for selecting actions with unreadable sectors and use the cursor on the keyboard to scroll left or right, select BB: Erase 256 sect , as it shown on the picture. Now press Enter and the process of scanning the surface of the disk for bad blocks will start. The process is quite long. If you want to interrupt the scanning process, press Esc on the keyboard.
If a bad sector is detected, the program will try to erase it (erase). If the sector is physically healthy, then this attempt will succeed. There will be no information in the sector, but it will be possible to use it in the future. Do not worry too much about the information. If the sector is not readable, then it will be practically impossible to extract it from there, so erasing the sector does not lose any additional information. If the sector cannot be read due to a physical defect in the disk, then the attempt to erase the unreadable sector will fail and an error will be reported, as in the figure below.

Even if the process of erasing sectors ends with an error, I recommend not to stop scanning, since there may be bad sectors on the disk of both the first and second options. And if the beaten sector can be restored by erasing, then it is better to do so than to transfer it to the reserve area (which is quite limited).
 If it was not possible to restore the broken sectors by erasing, then you should try to transfer the unreadable sectors to the backup area (remapping). Press the key F4 . This time, use the arrows to select BB: Classic REMAP, as it shown on the picture. After that, press Enter. The scanning process starts again. But this time, when a bad sector is detected, Victoria will try to redirect and transfer the bad block to the backup area. On some disks, the spare area is very small, so if it runs out of space, the attempt will fail. In our case, everything went well (figure below).

Bad sectors on the hard drive are restored successfully. Now you need to check the file system for errors (for example, through ERD Commanderutility chkdsk or boot into Windows, if possible) or format the drive. After that, you can continue to use the hard drive without any problems.
Good day!
Sooner or later, any computer (laptop) user is faced with problems caused by malfunctioning of the hard drive (note: often called shortly - HDD) ...
Most often, the symptoms of the fact that the HDD is not all right are:
- the inability to download the "old" Windows (and install a new one);
- reset some OS or program settings;
- the inability to open any files or programs (often an error related to file integrity may appear);
- very slow copying and reading files;
- high processor load when accessing the disk and trying to open (read) any file from it;
- windows freezes when trying to read, copy files from disk;
- the appearance of clicks, rattle, tapping, etc. during the operation of the disk (pay special attention to this if there were none before!);
- unreasonable computer reboots, etc.
When the symptoms listed above appear first thing (everything still works) - I recommend copying everything important documents to a separate medium.
Well, after that, you can start checking ...
In general, a hard drive is a fragile thing, and if not handled with care, it can be quickly disabled. The reasons for its unstable operation (and failure), most often, are:
- unexpected interruptions in the power supply - when the PC is simply de-energized (laptops, by the way, are protected from this). As for the PC, not every user has a UPS (UPS) (unfortunately);
- forced power off by the user. Sometimes, when the computer hangs "tightly" - other options simply do not fit;
- strong vibration, blows to the disk - most often laptops that carry with them suffer. Also, the disk can be damaged during transportation;
- during unstable operation of the power supply, poor contact on the disk (when the power - that is, it is, no ...);
- work is not in optimal temperature conditions (most often overheating);
- physical wear (with very long work);
- bad lot (with some flaws) from the manufacturer of the disks.
All these factors can be the cause of errors in the file system and bad sectors (they are also called bad blocks, bad - means bad, translated from English) Consider checking this and that in detail, and in steps ...
For errors
Checking and fixing file system errors in Windows is performed using the built-in program - chkdsk. It is available in all versions of Windows: XP, 7, 8, 10. By the way, maybe you even saw its work after an emergency power outage: before loading the Windows OS, a black screen is observed and some percentages run there, something is checked ( example in the screenshot below) ...

How to run the chkdsk utility
Method number 1 - in this computer
First you need to open the explorer and go to "This computer" ( note: previously always called "My computer").

Then open the "Service" section and click the "Check" button (you will need administrator privileges).


Windows has completed verification
Method number 2 - through the command line
Also run the utility chkdsk it is possible using the command line (however, the command line must be run as administrator).
To do this, open the task manager (a combination of buttons - Ctrl + Shift + Esc), then click file / new task write in the line "Open" CMD, and check "Create a task with administrator privileges" (an example is shown in the screenshot below).

- chkdsk d: - command to check the disk in read mode;
- chkdsk d: / f - verification and correction of errors found;
- - get help about the features of the utility.

Bad blocks / bad sectors
What are these bad blocks?
Perhaps, starting this subsection of the article, a brief explanation is indispensable. In fact, a hard disk consists of several magnetic disks over which a read head moves. When recording to a disc takes place, the head magnetizes certain parts of the disc ( from computer science: zeros and ones ).

This information is recorded in certain areas called sectors. Sometimes information cannot be read from a sector (the reasons why this happens are indicated at the beginning of the article) - such sectors are called broken (or bad blocks. Bad - bad.
To check the disk for bad blocks, you need a special. program: it will contact all sectors on the disk and try to read information from them. If everything is in order with the sector, the read time is 3 milliseconds, the critical read time is 600 milliseconds (this time indicates that this block has become “unreadable” and is not worth working with).
By the way, the same specials. utilities can not only find such sectors, but also reassign them to backup (a similar operation is called Remap).
Now about how this is done ...
The best programs for working with HDD (test, diagnostics, etc.) -
From under Windows
One of the best programs for testing and diagnosing a hard drive is Victoria. With it, you can see the readings of the table S.M.A.R.T. (disk self-monitoring technology, in more detail), evaluate the technical condition of the drive, replace the damaged sectors with backup workers, and much more.
Another important point: Victoria does not show file system defects, software errors, etc. She evaluates the physical state of the disk! About search and correction of errors - see the first part of the article.
Victoria
Developer's site: http://hdd-911.com/ (different versions)
HDD HDD operation mode settings tab -
After checking the disk Victoria, return the option back. Otherwise, the disk will start to slow down, Windows will "sprinkle" errors.
By the way, below is what the problematic drive will look like. Pay attention to the line G-sensor shock couter (the tab shows whether you didn’t knock, didn’t hit the disk) - as you can see below, they knocked. Because of this, in fact, the disk began to freeze and slow down. In general, his status Bad (and red). In this case, there is only one solution - to copy all the information from it (which is possible), and buy a new disk.
TEST Tab
We proceed directly to testing the disk: for this, open the TEST tab and set the settings (as in the screenshot below: read, ignore) To start the test - press the button "Start".
Victoria will begin to check the disk, and you will begin to see how the numbers will grow next to the rectangles of different colors (selection-3 in the screenshot below). Particular attention should be paid in red and in blue rectangles (these are bad sectors that have become unreadable).
If blue rectangles were found on your disk - you need to drive the disk again Victoria with the option enabled Remap (rectangle-4, see screen below). In this case, Victoria will replace these sectors with reserve ones, which is why they recall in this case the word "treatment" ...
Testing (treatment) of a disk // TEST Victoria
If you have too much blue rectangles - then such a treatment, if it helps, it is likely not for long. If the disk started to “crumble” - I recommend transferring all the data from it (if you haven’t done it yet due to some strange set of circumstances ☻) and look for a replacement for it.
By the way, the appearance of blue blocks on the new hard drive is unacceptable!
ADDITION!
I would like to draw attention to one point - if you run a scan and scan a disk from under Windows that is running from the same disk that you are scanning, then the test results may be somewhat inaccurate (and the appearance of green, or even orange rectangles - may do not talk about anything). Perhaps in this case, you can only look at the blue (bad blocks).
A much more accurate option is to use the Windows OS installed on another drive, or the emergency bootable LiveCD. Check Victoria from under DOS - will show much more accurate results and give a real assessment of the disk. How to make it is described below ...
Out of DOS
Of course, many are afraid of DOS and that everything will be incomprehensible there (at least not like in Windows). Still, I will try (as far as possible) to show, by example, where and what to click to check my disk.
Victoria (3.5 for work from under DOS)
Of. Website: http://hdd-911.com/
As already said, Victorius has quite a few versions. To work from under DOS - you need a special. version (usually using 3.5). It is a normal ISO-image, which must be correctly written to a USB flash drive (or disk). Often the image is in the RAR or ZIP archive, the ISO image from the archive must first be extracted (WinRAR to help).
How to correctly record Victoria so that it boots from a flash drive
- to record the ISO image - you need the WinSetupFromUSB program (official site of the WinSetupFromUSB program -);
- first insert the USB-stick and run the program;
- next, select your flash drive in the list and check the boxes next to the items: Auto Format it with FBinst, align, copy BPB, FAT32;
- in point Linux ISO / Other Grub4dos compatible ISO - indicate your ISO image with Victoria;
- press the go button (note: the program will ask you several times that you are aware that all data from the flash drive will be deleted! Copy everything important from it in advance so as not to be distracted at this time).
Actually, if everything is OK with the flash drive, and you did everything correctly - in a couple of minutes you will see a message Job done - work is done!
Note: if you write the flash drive incorrectly (for example, many write using UltraISO), you may see an error like "no kernel sys ...". Just overwrite the USB flash drive as described above.
How to boot from a flash drive with Victoria. Choosing the right drive for the test
By and large (if the flash drive is written correctly), then the download is no different, as if you did it for the installation flash drive with Windows.
The best option, in my opinion, is to call the Boot Menu and select our flash drive. If you don’t know how to call the Boot Menu, you can use this article:
If you recorded a USB flash drive in WinSetupFromUSB (as recommended above), then you will need to select Victoria in the boot menu (see screen below - "vcr35r").
Not the fact that by default, the program will select the hard drive that you need. To select a disk yourself - press the key P.
A menu should appear: use the up and down arrows to move the pointer. The last item in this menu is responsible for choosing the hard drive on the PCI / ATA / SATA / RAID controller.
If you used the last menu, then you need to specify the disk number (set in the found list) and press the Enter key (example below).
Drive Testing in Victoria (DOS)
To start testing in Victoria - press the function key F4. After that, a menu should appear where you need to set the parameters: "Start LBA", "End LBA", "Linear Reading", "Ignore Bad Blocks" (ignore unreadable sectors). The selection is made using the "Right" and "Left" arrows.
Important! Instead of linear reading, you can set "Write (erase)", "Write from file", and in the next menu item - "BB \u003d Erase 256 sect": be aware that such parameters erase the information on the HDD!
To test run - press the button again F4. Gray rectangles should immediately run across the monitor screen. Now you just have to wait for the check to finish (by the way, Victoria announces the check time, see the lower right corner - remain).
What to look at and what conclusions to draw ...
In principle, everything that I talked about checking a drive from under Windows is also relevant here. Right - sectors are shown, depending on their reading time. The more reds and oranges, the worse the disk is. If there are a lot of red ones, it means that the disk can finally fail completely (as a rule, in this case it slows down a lot, files are read and copied slowly on it, often the PC freezes, etc. "joys").
Addition
Pay attention also to the section Defects (right, approximately in the center of the screen). If everything is fine with the disc, ideally, it should say - "No defects found" (as in the photo above). If you have found defects in this section, this may indicate serious problems with the disk.
And lastly, if you are having difficulty working with the program and don’t know what to click, try looking in the help - the key F1. In general, with the Victoria utility, be careful and do not "test" your disk if it has the necessary data.
To show all aspects of working with Victoria and consider all the nuances - I think this is hardly possible even within the framework of several articles. Well, and the goal is to assess the state of the hard drive, I hope I have completed it, and therefore I am completing the article.
For additions on the topic - thank you in advance.
Good luck!


Hello friends! When writing articles about errors, I often mention the possible malfunctioning of the hard drive. And also, I give recommendations to check our HDD for bad sectors and its general integrity. It doesn’t go far above, for example, an article in which I mentioned this.
I want to immediately introduce you to our protagonist of today's article, a program for testing and verification hard drive for errors under the name " Victoria". And why this utility? Yes, at least because it is very simple and understandable, and also, has long proved its effectiveness and quality of work. Even in my practice, I already identified a very large number of failed disks with it, and sometimes I even managed to recover.
The program itself is designed to check a hard drive with an IDE or SATA interface for errors and damage. From herself, she presents a utility that is completely ready for an in-depth, and most importantly, quick assessment of the technical condition of the HDD - disk.
How to check your hard drive for errors using Voctoria
I check the HDD Victoria using the boot disk " SonyaPE Live CD". You can download it as an ISO image. But also, you can use any other Live CD, it’s just that my preferences are based on SonyaPE.
After downloading the archive, unpack it to any place on the computer, and. When finished with the recording, insert the disc into the CD - drive and at the next reboot go to.
Also, there is a separate file " .exe", Which you can safely run and check the disk for errors in a working Windows`se. But to be honest, I can not guarantee you 100 percent efficiency from this method of verification. But for acquaintance you can try.
So, inserting the disc and booting from it, we get to the SonyaPE Live CD menu. You will see a list of tools that you can use. Of course, most of them are more suitable for system administrators and computer technicians, but among them is the very Victoria that we need today.
Having gone down an arrow a couple of lines below, we mark “ Check HDD HDD Victoria 3.5.2 DOS"And confirm the selection with the" Enter". The utility will start loading on the screen.

You will see the interface of the running program. Since we will only check the disk for errors, I will not talk about all the features of the program. Only now, I want to immediately draw attention to the fact that by clicking " F1»You will open a help window where you can find a description of each button in this utility.

To get started, click " F2”, Which will start the automatic search and definition of the hard drive on computers. If a message appears stating that the disk could not be found, in this case we will use an alternative method by pressing the " R". A window with a port selection will appear on the left.
So, if your HDD is connected to SATA, then accordingly select " Ext PCI ATA \\ SATA", If through the IDE loop, we try each of the remaining four options. The same option is suitable if there are several hard drives on the computer. The port is defined and selected by the arrow panel and the " Enter».

If the correct port has been selected, you should be asked to ask which channel will be used. We select the one in the “ Drive"Indicates the name of the hard drive. For example, this is my first one, so I put “ 1 "And confirm the choice, after which a notification" at the bottom of the window will appear Done».

Now, to start the check, press " F4". A small window for HDD scan settings will open. In the first paragraph, leave " Start LBA: 0", Which means starting the scan from the very beginning of the disk. Second line " End LBA: 6986216"Indicates the final stage of verification, we also leave the specified default value.

The next line can also leave “ Line check”, Which will allow for a quick and at the same time accurate diagnosis of the condition of the disk. Here in the fourth paragraph, instead of " Ignore Bad Blocks"Expose" BB Advanced REMAP"Since with this value when detecting damaged blocks and errors, the program will attempt to fix them, and not just skip, as indicated in the previous mode.

To start scanning, having set all the settings, as I recommended, click " Enter". The process itself can take about an hour, depending on the speed of the hard drive.

Having finished checking the hard disk for errors, you can see a report on the number of healthy and faulty blocks. Everything that is painted in gray and green is a normal condition. The fact that it is displayed in orange means that soon damage and defective blocks will appear on the disk. But the last color is red which colors “ bad"Blocks, in other words, shows the number of defects on the disk. With a large number of them, we can say that the disk starts to fail, or it no longer works.
I’ll also note that with 1-5 troubles “ remap"Sometimes copes and he manages to restore them. To complete the test, you need to restart the computer and eject the disk.
How to check hard drive for errors with Victoria in downloaded Live Cd
I will immediately describe the second option for scanning the disk, in case the DOS version could not find or determine the installed HDD on the PC. This time, booting from the disk, select the first line " Disk system administrator SonyaPE 05/15/2010". Start loading Windows XP and desktop.
On the desktop, find the Victoria 4.46b b icon and launch it. A window will open in the program interface, which differs from the DOS version. By default, when you open the tab " Standart»Which gives a full description of the selected hard drive. The main difference between this version of the program is that it detects hard disks automatically, and the entire list of disks can be viewed on the left side.

So, having selected the HDD to be checked, click on the “ Test". A testing window similar to the DOS version will appear. Before starting the test, I recommend to note " Remap”, Which will correct the errors if they are detected. And press the button " Start»To start checking.

As for the error report, it is similar to the one I described earlier, all that gray and green is good, orange, red and blue is bad. To complete the test, close the window and restart the computer in standard mode.
In conclusion, I want to say that perhaps with the help of this utility you can not always be able to restore the hard drive. But one thing is certain for sure that 100 percent will help you in checking the hard drive for errors and in diagnosing its technical condition Victoria.
Recovering deleted files is not a problem; there are dozens of utilities for this. But what if the drive is damaged, has an erroneous description of the geometry, or access to it is blocked by a password at the controller level? Then the Victoria utility comes to the rescue. It is written in assembler, takes a few kilobytes and works with the controller directly.
WARNING
All information is for reference only. Victoria uses low-level operations, the meaning of which is described in the manual. The editors and the author are not responsible for any possible harm.From MS-DOS to Windows 10
Victoria was conceived as a means of advanced diagnostics of drives (then - hard disks, and today also SSDs) and management of their work settings through low-level commands. The Belarusian programmer Sergey Kazanskiy developed it for ten years and released an author's set of utilities for data recovery. During this time, many commercial releases of Victoria were released, several free versions and one unofficial one, which we will pay special attention to.
Victoria was originally a disk utility for MS-DOS written in assembly language. The ancient OS was better than Windows, due to the fact that in a single-task environment it is easier to provide exclusive access to the disk. With the advent of porttalk.sys driver support, Victoria version 4.xx learned to work in the multitasking WinPE environment as well as in Windows from XP to 10 of any bit depth. Launching it has become easier, actions in the graphical interface have become clearer, and the operating mode itself has changed. But the trouble is: without understanding the new features of the program, some users began to lose data and entire disks instead of restoring them. Therefore, the latest official version 4.46b has developed "protection against the fool."
By default, only non-destructive operations with drives are available in it. This is not just a read-only mode, as in other utilities that access the HDD / SSD using the Windows driver. At the first start, Victoria also blocks the ability to change HPA (and screw up with disk geometry), accidentally run low-level formatting and “shoot yourself in the foot” in more sophisticated ways.
Universal Soldier
Victoria is the most versatile utility. It refers to a drive of any type (HDD, SSD, USB Flash) and with any ATA-compatible interface. Her job is to send ATA commands to any device that supports them. Therefore, all that was said about Victoria’s work with disk drives is also true for solid state drives, except that it relates to their design features. It is clear that for an SSD, it makes no sense to look at the spindle spin time and try to control the speed of head positioning - it has neither one nor the other. Nevertheless, it is quite possible to test and even restore SSDs using Victoria.
Victoria 4.47
This version was made in 2013 by a programmer from Moscow Oleg Shcherbakov. He patched the latest official build of Victoria 4.46b. Download better. Shcherbakov published it on this site along with the source code for the patches. Other resources can be distributed under the guise of the new “Victoria” anything.
INFO
At the time of writing, the abandoned site of the developer of the Victoria program was infected. Therefore, instead of the URL www.hdd-911.ru specified in the documentation for the program, a link is provided to an alternative source for downloading the Victoria utility.Although Victoria is far from a new program, it also found critical errors that needed to be fixed. One of them led to the fact that it was impossible to run Victoria on 64-bit versions of Windows. Due to another, you might have problems working with large disks. If the volume was higher than a terabyte, then Victoria 4.46b simply spent all its virtual memory on rendering and color marking LBA blocks under test. In version 4.47, Scherbakov fixed all this.

PIO vs API
Victoria has two operating modes: PIO (port input / output) and API (application programming interface). In PIO mode, the drive controller is polled by the program through the porttalk.sys driver. If you select the API, then the operating system tools will be used. The speed of working with a disk in PIO mode drops, because DMA and high-level read and write optimizations are not supported. However, PIO mode allows you to use all the features of Victoria and send any ATA commands directly to the disk controller, bypassing the OS and standard drivers. It is through PIO that they most often work with disks in data recovery laboratories. Victoria supports both drives with a modern SATA interface, and old ones - PATA (aka IDE). Victoria can work with external drives (features will be described below).
Having chosen the PIO mode, at the beginning of work it is necessary to scan the bus and identify the disk controllers using the PCI-Scan button. To the right of it is a disc port selection window. Internal drives are usually detected without problems, but for external drives, you will first need to find out their port. This can be done in the properties of the equipment or in any diagnostic program (for example, AIDA64). After that, you must manually set the port in Victoria. Even during scanning, you can check the All dev (all devices) checkbox and, using the exception method, find the desired drive in the list of found ones.

PIO mode is advisable to use for low-level commands. A simple search for bad sectors and their reassignment to the spare disk area is much faster (but less reliable) in API mode.
The limitations of the API mode are as follows: you cannot set and remove ATA passwords, the work with Host Protected Area and viewing registers is also disabled. If any of these functions is needed, then you can switch to PIO mode. It happens that PIO mode is not available. This happens when using older versions of Victoria on 64-bit operating systems. Another cause may be errors in working with the porttalk.sys driver or the choice of the SATA AHCI mode. Guaranteed to get out of the situation as follows.
- Write boot
with WinPE x86 and put the Victoria program on it with a simple copy. - We connect the necessary drive to the SATA / PATA port, if you have not done so already.
- Disable all other HDDs or SSDs (optional).
- We go into the CMOS setup, switch the mode of the SATA controller from AHCI to compatible (compatible, native or IDE).
- Download WinPE. If necessary, install drivers, including porttalk.
- We launch Victoria in PIO mode, initialize the desired HDD or SSD and execute the necessary command.
Settings can be specified through the GUI or in the vcr40.ini file. The same file will help to block the work with the primary port. By default, it is enabled in order to protect the system drive from accidental modification. In order to select Primary in the list of ports, you need to do two things:
- Disable the option "only non-destructive functions" and close the program.
- In the section of the vcr40.ini file, add the line Enable PM \u003d 1, save the changes and restart the program.
Porttalk
Recent versions of Victoria can automatically install the porttalk driver, but it is completely useless on 64-bit systems. The fact is that for the sake of greater security, they removed a couple of functions that are needed for porttalk and Victoria to work. Therefore, the porttalk driver (and, accordingly, PIO mode) works only in 32-bit versions of Windows, where there are functions Ke386SetIoAccessMap and Ke386IoSetAccessProcess.
External drives
External drives are ordinary laptop (2.5 ″) or desktop (3.5 ″) models in containers with USB and FireWire interfaces. They are equipped with various controllers under the general name "SATA-bridge". Many of these bridges do not broadcast low-level teams. Therefore, with some external drives Victoria can immediately work in PIO mode in the same way as with internal drives, and with others you will first have to suffer. In the simplest case, it will be enough to remove the disk itself from the case (do not open the Hermoblock!) And connect it directly to the port.
Rare beast: SATA-hard drive without a SATA port
At Western Digital and, possibly, other manufacturers, some external hard drives were already produced with a soldered SATA-USB bridge. Therefore, they do not have a standard SATA connector. Nevertheless, they can still be connected directly to the port by soldering a SATA cable to the pins on the disk board. To understand whether your disk belongs to such a series, you have to google by model number and look for datasheets.
Passwords
One of the most popular low-level commands in PIO mode is working with passwords. According to the specifications, access to the disk can be limited with a password. It is set by the user from the BIOS or using external utilities. There is also a factory-preset master password. You can only lock a drive with a user password. If you forgot it, then the lock can be removed with a master password.
Depending on the specified security level, the result of entering the master password will be different. At a high level, the master password acts on a par with the user password. It just unlocks the drive, and that’s it. If the maximum security level (max) is set, then entering a master password instead of a user password will only unlock the disk after all data has been completely erased on it (secure erase).
Working with ATA passwords is complicated by the fact that, according to the standard, they always consist of 32 bytes (no matter what length you specify). Extra characters are ignored, and missing characters are added automatically. The problem is that different programs add them in different ways. Especially sinful are the standard protective utilities on some laptops. Instead of traditional zeros (or at least spaces), they use non-printable characters. The 00h code cannot be typed from the keyboard at all (even via (ALT) + code). There is only one way out: do not enter the password in the program window, but read it from the file. Any characters can be written to a file using a hex editor.
Often, the user cannot unlock the drive, even when he enters the correct password. When changing a laptop or losing a standard utility, any other (for example, HDDL) will add a password of up to 32 bytes with its own characters.
There is also a preliminary password modification. On many laptops, it is actually encrypted before being sent to the controller. Usually these are the simplest logical operations, but it does not get any easier. The user thinks that the password is known to him, while in reality the controller accepts a completely different one. If you tried all the variants of the supposed user and standard master passwords, but did not achieve the result, then there is only one way out - to carry the drive to the laboratory, where they will work with it in technological mode.
How to recover lost terabytes
Sometimes it helps to work Victoria in PIO mode with HPA (Host Protected Area) - the service area of \u200b\u200bmemory in which the disk geometry is saved. It determines the volume of the drive, setting it as the number of LBA blocks.
In my practice there was a curious case. I received a standard complaint: “the computer does not turn on” (read, the OS does not boot). The owner complained that he had been suffering for about a month. First, he traveled to all service centers, then invited various enikeyshchikov - to no avail. I arrived, looked and thought hard too. All components are serviceable. The disk is detected in the BIOS, but it does not boot from it. Launched Linux from a flash drive. Winchester is visible, but logical partitioning utilities show a strange picture: 64 MB in total and one partition with an unknown file system.
And then I realized that on the hard drive just flew HPA. As a result, a terabyte disk was defined as a 64-MB stub. I switched the SATA port mode from AHCI to compatible in CMOS setup, took a USB flash drive from WinPE and launched Victoria in PIO mode. Then he sent the NHPA team (to restore the factory volume).
Usually in such cases, it is possible to instantly restore the passport value of the LBA blocks, but this time a miracle did not happen. Therefore, I found a utility for the hard drives of this series and sent a similar HPA recovery command from it. A terabyte of data returned from oblivion on the next reboot.
Why did Victoria fail? I suppose because this disk had some specific features unknown to me or to the universal program.
Bad Sectors
Most often, Victoria is used to find and eliminate bad sectors. If the drive is fine with HPA and password protection is not worth it, but you cannot read files from it in a reasonable amount of time, then it's time to check the surfaces. Victoria can do this in any mode (PIO / API) using sector-by-sector reading (read), writing (write), and writing with verification (verify).

When restoring data, you can use only read, but its options are also different. The simplest of them is sequential: from the first block to the last. The initial and final LBA value can be specified manually, which is convenient immediately for many reasons. Firstly, this gives you the opportunity to check disks of any size, simply by performing fragments of up to one terabyte test. Secondly, you can re-check the suspicious area and exclude external factors. Victoria analyzes the time access to the sector. Usually for new drives it does not exceed 5 ms in 80% of sectors. Sectors with polling times of less than 50 ms are also considered normal. Those in which it is measured in hundreds of milliseconds are candidates for bad sectors.

If the sector was counted after a few seconds, then this is a clear bad block. Such a disk controller must identify itself during downtime and replace them in the address table with healthy sectors from the backup area. However, in practice this does not always happen. Victoria may ask the hard drive to do such a operation (Remap) for those sectors that have not been responding for too long. Formally, during this procedure, part of the information is lost, but in reality it was already lost at the moment when the sector became bad.
In the paid version of Victoria, the Restore function was available - an attempt to read data from a bad sector at any cost and then overwriting them to a healthy sector. However, the program has not been officially supported since 2008, so it is unlikely to get its full version. Free Victoria repeatedly helped out by restoring HPA, resetting passwords and eliminating bad sectors, which caused other data recovery programs to hang.

How Free Victoria Saved Secret Work
I will share with you another story. Laboratory at the research institute, our time. The analytical instrument is controlled from the computer that was bundled with it. A very specific software is preinstalled on the computer, which developers no longer support. The distribution is neither on disk nor on the site. There is only an installed program, and it has stopped working. The laboratory performed a study on a long-term state contract. Without a miracle device, employees found themselves tied hand and foot. Tormented and found out that the problem is with the disk. From antiquity, it was covered with bads, and normal work became impossible. An attempt to make a clone of the disk with the skipping of bad sectors was unsuccessful - the cloning program hangs tightly. They drove the disc with Victoria test with the Remap function. Pre-selected the necessary settings. By the evening of the same day, they successfully removed the disk image, and then restored everything from it to the new hard drive. The device came to life, the contract was completed on time.
Additional features of Victoria
Victoria analyzes in detail the state of the drive and can fix almost any malfunction in its operation. Actually, this is what Victoria differs from the mass of other utilities in. If most programs simply show SMART attributes, then it can forcefully launch entire sets of self-test tests.

Victoria has four methods and three types of surface testing (a total of twelve modes). In each, it automatically calculates the total number of defective blocks and writes their addresses to the log. Like a disk editor, Victoria can display the contents of sectors and allows you to change it. In PIO mode, Victoria displays information about the logical partitions on the media even if it is not detected at all in the BIOS. Not a single utility with API access is capable of this. Additionally, Victoria is able to control the level of acoustic noise of the disk (AAM), adjusting the speed of movement of its heads during the search, launch low-level formatting, change the volume of the HDD and run benchmarks. It can even be used to check the physical interface (cable and port status). At home, it will save the HDD or SSD in many difficult situations, in addition to severe mechanical damage, requiring the autoblock to be opened. In the laboratory, they can cope with them, using Victoria as one of the proven utilities.

Conclusion
Much more can be written about Victoria, but for the details I still have to send you to the Russian-language documentation. And, since the versions of the program vary in all their subtleties, I recommend reading the manuals for versions 3.5.2, 4.46b and 4.47.