1. Contact information. 3
2. Technical requirements. 4
2.1 Checking the browser version. 4
2.2 Checking the JAVA version.. 5
2.3 Clearing the Java cache. 6
2.4 Clearing the browser history of Mozilla Firefox. 7
2.5 Clearing the history of Internet Explorer 8
3. Problems when entering the portal. 10
3.1 No connection to server.. 10
3.2 Message "User blocked". 10
3.3 The message "You need to set a new password." eleven
3.4 Message "Form design error". eleven
3.5 Slow operation of SUFD.. 11
4. Problems when working with documents. 12
4.1 The document is not visible. 12
4.2 Windows of directories and documents do not open. 14
5. Errors when signing documents. 15
5.2 Checking the installation of certificates. 15
5.3 Checking plugin operation. 17
5.4 The message "The certificate with the specified thumbprint was not found in the system." 18
5.5 Error while signing the document: blocking the pop-up window. 18
5.6 Empty window "Cryptographic operations". 20
5.7 The "Cryptographic Operations" window displays a long error message with a set of characters at the end. 21
5.8 Message "Digital signature is not advanced". 21
6. Sending arbitrary messages. 23
8.1 Organization selection list. 27
8.2 Setting the display of the list of documents. 27
8.3 Sorting by column. 29
8.4 Filtering by columns.. 29
1. Contact information
Free hotline regarding support of the remote financial document management system (SUFD): 8-800-100-16-19
Telephones of the dispatch service of the Department of Information Systems(consultations on setting up workstations for work, consultations on working in PPO EDMS and SUFD):
79-16-24, 79-16-19, 79-16-69, 79-16-17.
When contacting the OIS department, you need to know:
Attention! The new password must be different from the previous ones, otherwise the system will display a message stating that the password has already been used, a new one is required.
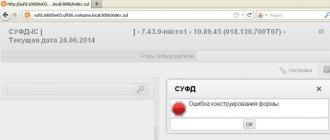
3.4 "Form design error" message

You must contact the dispatch service to link organizations to the user's login by calling: 79-16-69, 79-16-24, 79-16-19, 79-16-17.
3.5 Slow operation of SUFD
It is necessary to delete the browser history (especially in the Mozilla Firefox browser) and clear the Java cache (described in paragraphs 2.3 - 2.5).
Contact your provider for advice.
4. Problems when working with documents
4.1 Document not visible
The filter may have been set by the user
The list of documents (catalogue) displays only those documents (catalogue entries) that satisfy the set filtering parameters.
The filter panel is designed to filter records in the list of documents (reference book) according to the specified parameters:
To cancel filtering, click on the button https://pandia.ru/text/80/148/images/image019_2.jpg" width="22" height="22"> ("Apply filter"). The figure shows an example using this type of document filtering.
https://pandia.ru/text/80/148/images/image021_4.jpg" width="492" height="235 src=">
Possibly archived
Working with archival documents is carried out using the button:
https://pandia.ru/text/80/148/images/image024_3.jpg" width="623 height=199" height="199">
The table header will be highlighted in green when working with the archive. The transition to active documents is carried out in the same way:
https://pandia.ru/text/80/148/images/image026_2.gif" width="558" height="78">
To eliminate the error, the user of the web client should enable pop-up windows for the site from which the SUFD web client is launched in the settings of the corresponding browser (MS Internet Explorer, Mozilla Firefox, etc.).
For example, in Mozilla Firefox, along with an error, a warning line about a blocked window will appear at the top of the window with the possibility of making the necessary settings. You should do the following:
https://pandia.ru/text/80/148/images/image028_2.jpg" width="521" height="89 src=">
If necessary, the pop-up blocker settings can be changed in the Mozilla Firefox settings. To do this, open the "Tools - Settings ..." item in the browser's main menu, go to the "Content" tab in the "Settings" window and change the values of the corresponding parameters.
Destination" href="/text/category/adresat/" rel="bookmark">destination .
To perform documentary control, you need to place the cursor in the list of documents on the document being checked and click the button https://pandia.ru/text/80/148/images/image031_4.jpg" width="585" height="259">
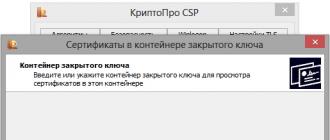
5.2 Checking the installation of certificates
Start button → All programs → Crypto-Pro → Certificates.

By selecting a personal certificate, you can verify the installation of root certificates. When incorrect installation, the "Certificate" window will look like this:
To sign documents with a qualified personal certificate (produced after 01/01/2014), you must install a root certificate valid until 06/28/2018
To sign documents with an unqualified personal certificate (produced before 01/01/2014), you must install a root certificate valid until 05/24/2016.
You can download the root certificate from the page:
http://karelia. roskazna. en/page/26689
Instructions for installing certificates can be downloaded from the page:
http://karelia. roskazna. en/page/26749
5.3 Checking plugin operation

5.4 Message "Certificate with the specified thumbprint was not found in the system"
When signing a document in the "Cryptographic operations" window in the "Certificate owner" field, the value "Certificate with the specified thumbprint was not found in the system" is indicated:
https://pandia.ru/text/80/148/images/image039_2.jpg" width="623" height="267 src=">
The error occurs if the browser settings are set to block pop-up windows. To fix the error, you need to change your browser settings.
When using the Mozilla FireFox browser, you must follow these steps:
1. Right-click on the "Settings" button.
https://pandia.ru/text/80/148/images/image028_2.jpg" width="521" height="89">
To completely eliminate this problem, you must:
1. In the main menu of the browser, go to the following path "Tools - Settings - Tab" Content "
2. Uncheck the box next to the “Block pop-up windows” setting.
https://pandia.ru/text/80/148/images/image041_2.jpg" width="294" height="371 src=">
5.6 Empty window "Cryptographic operations"
When signing a document, after clicking the "Signature" button, the "Cryptographic Operations" pop-up window remains empty.
DIV_ADBLOCK59">
https://pandia.ru/text/80/148/images/image044_1.jpg" width="502" height="353 src=">
If after restarting the browser and following the steps, the error persists, then you need to contact the ORSBI department.
5.8 "Digital signature is not advanced" message
It is necessary to verify the already applied signature on the document: select the document in the list of documents and click the button ("Signature verification") on the toolbar. The test result will be displayed in the information window.
 If the document does not pass EDS authentication, the result column will be marked "ERROR" and its approval status will be determined as "Approval failed".
In the event of such a situation, it is necessary to remove the first signature and sign the document again. Only the user who put it can remove the signature on the document. To remove the signature of a document (if the document has not yet been sent), select the document whose signature is being deleted in the list of documents and press the button https://pandia.ru/text/80/148/images/image048_0.jpg" width= on the toolbar "637" height="305 src=">
The subscriber can view the received information documents, attachments to them, as well as create documents.
The "Create New Document" button opens the document form.

The form fields are filled in as follows:
a) The "Recipient" field (top row of boxes) is left unchanged.
b) Indicate the “Document Validity Date”.
c) The field "Document name" is selected from the directory, for this, in the "Code" field, you must type "INF" and click the button ("Apply filter"). In the "Document Name" field, the value "information notices" will be entered.

e) Fill in a short description (message subject).
f) Add attachments.
Attention! If the attachments exceed the specified amount, the document does NOT pass documentary control and is not saved, please control the amount of attachments: After filling in the form fields, the document is saved, controlled, signed and sent.
7. Working with statements
To work with statements, go to the menu item "Documents - Operational reporting - Reports - Reports". An electronic form of the list of documents will open, shown in the figure:

In order to print the statement, you can use the "Print Reports" button on the toolbar. To print the attachments, you must open the statement for viewing. The shape is shown in the following figure:

By button 1, only the Statement will be printed. In order to print or save attachments to it (applications for cash flow, payment orders), it is best to do this: check box 3, then press button 2 (“Print”), located directly above the table of attachments. As a result, a window for multiple selection of print templates will be displayed on the screen, from the drop-down list, you must select the format for printing each type of document (pdf, xls, rtf) and click the "OK" button.

In the window that opens, select "Open" or "Save", click the "OK" button:

As a result, a form with a list of documents will be opened. The statement/Supplement will be in one of the documents, all applications for cash expenses will be in the other, in the third file there will be all payment orders. You can print only the type of documents you want.

8.1 Organization selection list
The organization selection list is used to select the organization on behalf of which the documents will be processed. To call the list, you need to perform a single left-click on the "Magnifier" icon (or in the area to the left of the icon). To quickly jump to the documents of the required organization, enter the UBP code or part of the name of the organization in the search bar and press the "Enter" key:
https://pandia.ru/text/80/148/images/image058_0.jpg" width="480" height="256">
8.2 Setting the display of the list of documents
In the list of documents, you can easily configure which columns and in what order should be displayed for viewing. In order to configure which columns should be displayed, you must perform the following sequence of actions:
1. Right-click anywhere on the line containing the column headings of the list of documents and select the "Settings" item in the menu that opens.
https://pandia.ru/text/80/148/images/image060_0.jpg" width="213" height="187">
Among the available columns are the columns "Client" (name of organization) and the column "Personal account number". As a result of customization, the list of documents will contain only those columns that were marked during customization.
In order to configure the sequence in which columns should be displayed in the list of documents, you must perform the following sequence of actions:
1. Place the cursor on the heading of the column to be moved.
2. Press the left mouse button and, without releasing it, move the column to the left or right to the desired position.
https://pandia.ru/text/80/148/images/image062_0.gif" width="13" height="16">).
If you click on the column header area again, the records will be sorted in descending order of the values in the selected column (the icon will appear to the right of the column name).
Clicking the column heading area a third time restores the order of the entries in the list by default. Subsequent clicks on the column heading area will cycle through the sort order in the same way.
8.4 Filtering by columns
To quickly filter entries, you can set filtering conditions in the top empty line of the list. records corresponding to it.
Filtering parameter values must be entered in a case-sensitive manner. The "%" sign replaces any number of any characters. To apply the filter, you must click on the "Apply filter" button on the filter panel, to reset the filter, click the button https://pandia.ru/text/80/148/images/image065_0.jpg" width="623 height=247" height= "247">
We already wrote that with the transition to version 4.0 of the Crypto-Pro cryptographic provider, users of various systems working with digital keys began to experience all sorts of problems. For example, new keys in the interface of the BC of Rosselkhozbank, users using the Crypto-Pro CSP version 4.0 received an error about the absence of the necessary cryptographic provider and was solved by installing a random number generator (RNG). The problem did not bypass the users of SUFD. Signing error cryptsignmessage 0xc000000d is the topic of our today's article. Why does it appear and how to fix it - we figure it out together.
Signing error cryptsignmessage 0xc000000d in SUFD. Fixing
So, the error of the Crypto-Pro program when working with digital signature keys, issued under the number 0xc000000d, appears mainly on 64-bit operating systems (Windows 7, Windows 8, Windows 8.1 and Windows 10) and server platforms that have such a bit depth.To fix it, you need to edit the registry. If you do not have skills above the average computer user, use the help of comrades who are more knowledgeable in this matter or do everything clearly according to the instructions. Press the key combination Win+R. (Win is the key on the bottom row of your keyboard, branded as a window). In the Run window that opens, type regedit and press Enter. The registry editor will open, it will look something like this:

Next, we need to export the registry branches HKEY_LOCAL_MACHINE\SOFTWARE\Microsoft\Cryptography\ And HKEY_LOCAL_MACHINE\SOFTWARE\Wow6432Node\Microsoft\Cryptography\. We sequentially open these two branches and do data export. To do this, right-click on the required line and select "Export".

With the second branch, we proceed in the same way: we select a place on the computer where we will save these backup copies of the branches, give them any names, and save. We do export in case the program does not work properly, so that in which case we can return everything back. Next, we remove the following entries from the registry:

In some versions of the program, the first branch may not be, we are not surprised. After deleting, we restart the computer, go to the SUFD, see if the cryptsignmessage 0xc000000d error is gone. Since this recommendation is available on the official website of Crypto-Pro technical support, the problem is fixed for most users. To export the registry values back (if the error has not gone away and you want to return the previous state), right-click on the exported branch and select merger.
The signature window is a so-called pop-up window. The error occurs if the browser settings are set to block pop-up windows. To fix the error, you need to change your browser settings. When using the Mozilla Firefox browser, you must do the following: In the main menu of the browser, go to the following path “Tools - Settings - Content tab” Uncheck the box “Block pop-up windows” (Fig. 2). Figure 2.

Enter the portal address and click the "allow" button as shown in Figure 3. SUFD portal address You need to enter this address in the address line, which is highlighted in red. To save the settings, click the "Close" and "OK" buttons. Figure 3. Adding a portal to exclusions.


To fix the problem, you must perform the following sequence of actions: 1. Add a personal certificate to the "Personal" storage using the installation of a certificate through "Crypto Pro 3.6". 2. Restart the browser, log in to the Portal (log in with your login and password to the SUFD Portal) and repeat the signing of the document. 3. If the error has not disappeared, then call the information systems department by phone and clarify whether this certificate is installed on the UFK server. There are still errors with signing. One signature is affixed, and the second is not affixed, then it is necessary to remove the signature that has become famous. The signature is removed with the "delete signature" icon.


If a window appears as in Figure 6, then you need to check the "Always trust content from this publisher" checkbox and click the "Run" button. If a window appears as in Figure 7, then click the "No" button so that the resource is not blocked. Figure 6. Warning window Figure 7. Blocking window


If, when signing a document, a window appears as in Figure 8, it means that the necessary certificates are not installed in the system. If the character string in the error matches the following string "8a a4 4f 36 e3 5b f 83 0f 00 4a 97 ab d5 09 2f", then the UCA2011 root certificate is not installed on the system. (ucc2011) and install it in the trusted root certificate store. Figure 8. Window with an error


The problem may occur for several reasons: 1. The document is not selected in the list of documents. 2. The document has not passed the "documentary control" - it is necessary to carry out documentary control or correct errors in the document, if it has already been carried out. 3. Signing certificates not installed - install certificates using "Crypto Pro 3.6". If items 1-3 did not help, contact the RSIBI department or the information systems department (tel).

When authorizing in the SUFD Portal, the error “HTTP 500 ERROR” appears. This error means that the UBP code (the code of the participant in the budget process) of the organization is not tied to user accounts. To solve the problem, you need to contact the information systems department (tel).

When signing a document, the error “No certificates/No valid certificates found” appears. The error can occur for several reasons: 1. Valid certificates are not installed - you need to install the necessary certificates. 2. Wrong date and time on the working machine - you need to set the correct date and time! For stable operation of the SUFD Portal in the Windows 7 operating system, you must run the Portal (Mozilla Firefox browser) as an administrator. To do this, follow these steps: 1. Right-click on the desired shortcut (Mozilla Firefox browser shortcut) and select "Properties". 2. Go to the "Shortcut" tab, click "Advanced", check the box "Run as administrator" (Fig. 9): Figure 9.

3. Or go to the "Compatibility" tab and check the box "Run this program as an administrator" (Fig. 10): Figure 10.