Hello!
It's no secret that many of us already have more than one computer in our house, there are also laptops, tablets, and other mobile devices. But the printer, most likely, just the same one! And indeed, for most, one printer in the house is more than enough.
In this article, I would like to talk about how to set up a printer for sharing on a local network. Those. any computer connected to the local network - could print on the printer without any problems.
And so, first things first…
1. Setting up the computer to which the printer is connected
2) When you go to explorer (for Windows 7 users; for XP you need to go to network) at the bottom, in the left column, computers are shown (network tab) connected to the local network.
Pay attention - whether your computers are visible, as in the screenshot below.
3) On the computer to which the printer is connected, drivers must be installed, the printer must be configured, etc. so that you can easily print any document on it.
1.1. Printer access
Go to Control Panel\Hardware and Sound\Devices and Printers(for Windows XP " Start/Settings/Control Panel/Printers and Faxes"). You should see all printers connected to your PC. See screenshot below.
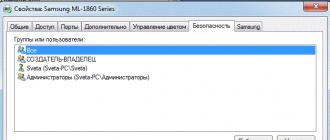
You also need to look at the ““ tab: here check the “ print" for users from the" all« group. Turn off the rest of the printer management options.
This completes the setup of the computer to which the printer is connected. We pass to the PC from which we want to print.

2. Setting up the computer to print from
Important! First, the computer to which the printer is connected must be turned on, as well as the printer itself. Secondly, a local network must be configured and shared access to this printer must be opened (this was discussed above).
We go to " control panel/hardware and sound/devices and printers". Next, press the button " add a printer«.
You should be asked several times whether you really trust this device, whether to install drivers for it, etc. You answer in the affirmative. Drivers for Windows 7, 8 are automatically installed by themselves, you do not need to download or install anything manually.
After that, a new connected printer will appear in your list of available devices. Now you can print to it like a printer, as if connected to your PC.
The only condition is that the computer connected to the direct printer must be turned on. Without it, you can't print.
3. Conclusion
In this short article, we have analyzed some of the subtleties of setting up and opening access for a printer on a local network.
By the way, I’ll tell you about one of the problems that I personally encountered while doing this procedure. On a laptop with Windows 7, it was impossible to set up access to a local printer and print to it. As a result, after a long torment, I simply reinstalled Windows 7 - it all worked! It turns out that the OS preinstalled in the store was somewhat curtailed, and most likely, the network capabilities in it were also limited ...
Did your printer work on the local network right away, or were there puzzles?
Many offices install a local network in order to exchange data, use common technical means. For medium and small offices, it is easier to install one powerful printer, instead of several small ones. It must be connected in such a way that it can be accessed from all computers of the institution. To turn a regular printer into a network printer, you need to correctly change some device parameters.
There are printers that connect directly to the router, bypassing the computer, but they are expensive. The easiest and cheapest way is to make a common printer available to the public. It connects to one of the office computers in a standard way - via an LPT or USB port, then it is made publicly available on the network. This method of networking the printer is limited in its capabilities. The computer or laptop to which the shared printer is physically connected must be active for the maximum time on the network. Install drivers and software on it from the disk that is always included with the printer, or find and download it on the Internet at the manufacturer's website. Check system performance. Make the printer public. To configure, open Devices and Printers (or Printers and Faxes) in the control panel. Find the installed printer, open its "Properties" by right-clicking on the icon of your printer. In the "Properties" window, the desired tab is "Access". Check the box next to "Share this printer". Leave the printer's network name suggested by the system, or enter your own. For example: "OKI_C510dn". Under this name, the printer will be recognized as a shared resource on the local network. Specify any name, but without spaces. All computers connected by the network have the same operating system as the computer with the connected printer - click "OK". Procedure completed. If there are computers on the local network with a different operating system, install the appropriate drivers for them. In the Properties window, in the Drivers section of the Access tab, click the Additional Drivers button. A list of drivers will open, in which check the boxes against those that you may need for other Windows. Pay attention to the “Installed” column, if the word “No” appears there, then you need to install a driver disk from the printer manufacturer, or download the selected drivers from its official website. For example: , Canon , Epson , OKI . Now you can use the printer as a network share. On the remote computer, go to the "Devices and Printers" (or "Printers and Faxes") section, call the "Add Printer Wizard". Its window will open, in it, as the connection method, select "Network Printer", then "Next". It remains to correctly specify the path to the installed network printer. Follow the syntax: two forward slashes, network computer name, slash, network printer name. For example: "\\MyComp\OKI_C510dn". Click "Next". The printer installation process will end with the system prompting you to print a test page - do it.

The advantages of such a connection to a network printer: there is no need to buy new equipment, it is standard for Windows, easy to use, without additional software. Cons: A computer with a physically connected printer must be running before using it, slow performance during a remote print session, long print wait times, especially for color printing.
There are cases when you need to print a document through a printer connected to a computer on the local network, but when setting up access to it, a number of problems appear. Consider an example of a typical work network with an accountant's computer connected via a router and a LaserJet 1200 printer attached to it, as well as a workstation connected to the same router. Both computers are running the Windows 7 operating system.
Sharing
The first difficulty that the user faces is the lack of access to a remote computer on the local network, in this case, to the accountant's computer, to which the printer is connected via a USB cable. This is because, by default, in the Windows 7 settings, network discovery is disabled. This is necessary for security.
To enable it, you must do the following: sit down at the machine to which the printer is connected via USB (for convenience, let it be called “buh” in the example, and the working machine from which you want to remotely connect to the printer is “user1”).
Press the round button on the left at the bottom of the desktop, a menu will open in which you must select the "Control Panel" item. Next, find the shortcut labeled "Network and Sharing Center" in the list. In the window that opens, on the left side, you should have the item "Change advanced sharing settings", click.
Make the following changes:
"Enable network discovery", enable this checkbox so that your computer is visible to other users on the local network.
“Turn on file and printer sharing”, this is the main parameter for which you, in fact, came here, turn it on.
"Turn on sharing so that network users can read and write files in shared folders." This function can be useful for exchanging files over the network, if you open access to the folder on the “buh” computer, you can add files to it from the “user1” computer and operate with them.
"Turn off password protected sharing." You check this box if there are no foreign computers in your local network and there is no threat of information leakage, otherwise, do not touch this item, but every time you turn on the computer, you will have to go through authorization on a remote machine.
If computers are in different workgroups, this can make it difficult for them to access each other. Both machines must be in the same workgroup, such as "WORKGROUP" as shown in the figure below. To do this, click on the "Edit" button and write the name of the group.

Next, click on the round button at the bottom left of the desktop. In the menu that opens, select "Control Panel". A window will open in which you need to find the Devices and Printers item, which is what you need. A window with devices will open. Right-click on the LaserJet 1200 printer and select Printer Properties. Go to the "Sharing" tab and check the box "Share this printer". Click "Apply" and "OK". Now you are ready to connect.

Connecting a network printer to another computer on the local network
If you know how to use the command line (otherwise, skip this and the next paragraph): sit at user1's computer, try to ping the accountant's machine. Open the same menu by clicking on the round button at the bottom left, select "Run" (or press Win + R). A window will open with a line for entering text. Write the command in it: cmd. In the window that opens, enter the command "ping buh" (without quotes).
If answers are received and 0 losses, then you can start connecting, otherwise, if there are no answers, then there are three options: either the firewall blocks incoming connections, or an antivirus, or a problem with the cable or network adapters. In the first case, just try to restart the computer buh, in the second case, you need to configure the antivirus firewall to allow incoming connections. The firewall, on the other hand, should automatically open access to incoming connections, if this does not happen, then you must manually configure the firewall, allowing users to receive incoming connections. In case of problems with the adapters, you should reinstall the network card drivers, and if this does not help, then replace the cards. The cable must be tested and replaced if defective.
So, the answers from the buh computer are received.
Click the round button in the corner of the desktop and select Run (Win+R).
Type the command \\buh (without quotes) and click OK.
An accounting computer will open for you, where you will see a public LaserJet 1200 printer. Right-click on it and select Connect.

Now everything is ready. Print a test page to check. To do this, press the same round button in the corner of the desktop and select "Control Panel", look in the list that opens for "Devices and Printers". Go to it, and there will be your network printer with the name "LaserJet 1200 on buh". Right-click on it and click "Printer Properties". In the window that opens, select Test Print. A task to print a test sheet should appear on the network printer. Look at the result.
| Like |
Nowadays, one can often observe such a situation when some of the computers in the office are still running Windows XP (because their hardware is not powerful enough to install later OSes), and some are already more recent computers running Windows 7 or Windows 8 Just imagine: we have 2 computers - one on Windows XP and one on Windows 7. A printer is connected to each computer via USB. And we need to be able to print to any printer from every computer. If both computers were running an identical OS, then connecting the printer would be more than simple. But when the OS is different, just connect printer will not always succeed.
In this article, I will teach you how to properly connect a printer over a network when the local computer and the remote computer with the desired printer are working under different OS.
So, we have 2 computers: one with Windows XP (comp1), the second with Windows 7 (comp2).
One printer is connected to each computer via USB and drivers for local printing are installed. Those. so far every computer Maybe print to your printer but can't print to someone else's printer over the network.
Step 1. Set up computer #1. As always, the first step is to share the printer for the network, ie. sharing the printer.
For Windows XP: click Start -> Control Panel -> Printers and faxes-> right-click on the desired printer -> select Sharing -> ... and set the network name to our printer.
(For Windows 7 (8) in this case, you need to perform the following actions: click Start -> Control Panel -> Devices and printers-> right-click on the desired printer -> select Printer Properties-> Access tab -> set a network name for our printer.)

Also, for Windows 7 and 8, you need to check if sharing is enabled on the computer.
Step 2 We pass to computer number 2. We go from it to computer No. 1 over the network and check if the printer open to the network is visible. To do this, in the explorer, type \\comp1 and press Enter.

We see that the desired printer on computer #1 is open to the network. But since our computers are running different operating systems, we will not click Connect, because we will most likely get a failure of the print service (spooler.exe) as a result:

We'll just leave this window open so we can see the printer's network name.
Step 3 Download from the official website of the printer manufacturer the driver for the OS of computer No. 2. In our case, this is the Windows 7 driver for the HP LaserJet 1020 printer.
Right-click on the downloaded file and select Extract to hp-lj-1020-xp folder.

The trick is that instead of an exe file we now have a folder with unpacked drivers, which we can point to the installation wizard so that it can take the drivers for the OS we need from there.

Step 4. Manually add a network printer to computer #2. To do this, in the window Printers and faxes for (Windows XP) or Devices and printers(for Windows 7 (8)) click:
Installing the Printer -> local printer(in XP immediately uncheck Automatic PnP Printer Detection) -> set selector to position Create a new port-> in the drop-down menu, select Local Port -> in the window Enter port name manually enter the full address of the printer we need from computer No. 1:
\\comp1\HP1020 (letter for letter, including spaces, if any!)

and click OK
The system creates a new local port.
-> click OK -> select the driver we need from the list -> Next -> select the name for the network printer, under which it will be displayed on computer No. 2 (for example HP1020 ) -> Next -> select No printer sharing (for Windows 7.8). -> Next -> as needed, install or uncheck the checkbox ... Default -> Done.
Printer added!
Similarly, you can add a printer from computer #2 to computer #1. In this case, we need to download the driver for HP LaserJet 1005 MFP under Windows XP and add the printer to computer #1 via Local Port.
Installing a printer on a local computer with Windows 7 is not a problem for most home users: I plugged it in, inserted the driver disk - everything worked in five minutes. But today, quite often each family member has his own PC, and there is only one printer for everyone. How to share? Some solve the problem this way: you need to print something from one computer - they carry it and connect the printer to it, you need it from another - they carry it to another. It is unlikely that at least someone will find it convenient.
Many users have already learned how to combine home computers into a local network to get general access to the Internet. In the same way, it is easy to install a network printer - it will be physically connected to only one of the network nodes, but accessible from each. Let's see how it's done.
Installing a Local Printer on Windows 7
What you need to install
To begin with, briefly about how to connect and install a printer on one computer. In addition to the PC and printer itself, you will need:
- connecting cable, which sometimes needs to be purchased separately;
- Printer Drivers and Utilities CD - usually comes with it, but if you don't have a disk, download the driver from the manufacturer's website.
Almost all modern printers and multifunctional combines (scanner-printer-copier) are connected to a PC via USB. Computer motherboards are no longer equipped with special printer LPT and COM ports. Therefore, to connect older models, you will need an adapter - COM-USB or LPT-USB.

How to connect a USB printer
- place the driver disk in the laser drive of the computer;
- turn on the printer to the mains and connect it to the PC using the connecting cable;
- run the driver installer (usually the Setup.exe file);
- after installation, restart your computer and you can start printing.
To access printer settings and change print settings, click Devices and Printers in the Windows 7 Control Panel.

The same option is available in the right Start panel:

Select the one you just installed from the list of printers. Not only physical devices are displayed here, but also virtual ones, so look carefully.

Clicking on the icon of the selected printer opens its properties: a window for changing settings, a settings window and viewing print results.

Installing a Local COM or LPT Printer
- Navigate from the "Computer" folder to the "Network" folder. Click the Add Printer button on the top bar.

- Select "Add Local Printer".

- Select the printer connection port.

- Select brand and model. If you have a driver disc, click on the "Install from disc" button.

- Open the drive and specify the path to the installation information file - it has an .inf extension and is usually located in the root folder.

- Return to the previous window and click Next. After a message about successful installation, click "Finish".

- For Windows 7 to use the printer driver correctly, restart your computer.
Installing a network printer
In order for all PCs on the home network to use the print function, the computer to which the printer is physically connected must be allowed to share it. And also include all PCs in one workgroup. This is especially true if there are machines on the network not only with Windows 7, but also with earlier releases of this OS.
Working group
To create a shared workgroup, repeat the steps below on each machine on the network.
- Expand the system properties: in the context menu of the “Computer” folder, click on the “Properties” item. Or, through the control panel, open the “System” applet.

- Click on the navigation bar "Advanced system settings".

- Switch to the Computer Name tab. Click Edit. In the next window, write down the name of the new working group and click "OK" to save the changes.

Access permission
- Go to "Network and Sharing Center". Click on the "Change advanced settings..." item in the navigation bar

- In the “Home or work” device group (if you have a home or small office network) - “Network discovery”, check “Turn on printer and file sharing”. Click "Save Changes".

Connecting a network printer
The first step is performed on the computer to which the printer is physically connected.
- Open "Printers and Faxes" through Start or Control Panel. Select a printer for network access and click its icon.
- In the next window, double-click "Printer Setup". In the device properties, go to the “Sharing” tab and check the box next to “Share this printer”. Here it is desirable to note "Drawing print jobs ...". If there are computers on the network not only with Windows 7, you will need to install additional drivers (the button of the same name at the bottom of the window).

The second stage is performed on the remaining computers on the network (Windows 7).
- Go to the "Network" folder. On the top bar, click "Install Printer". This time you will need to select the bottom item - “Add a network, wireless, etc. printer”.

- After searching for network printers available for connection, Windows 7 will display a list of them. If the device you want is there, select it. Click "Next".

- After connecting, the system will notify you about the successful installation.

- This completes the installation of the network printer. It will show up in the list of devices in Devices and Printers.
It happens that Windows 7 cannot find any network printing device, although the sharing is open and all other settings are made correctly. Then you have to manually enter the path to your printer. To do this, in the “Add Printer” window, after the system searches and does not find anything, click “The printer I need is not listed”.

- The next step will prompt you to find the printer by name or network address. Check the box next to "Select printer by name". Examples of the correct entry are indicated right below the line: after the double backslash, the computer name is written (if you forgot, look in the system properties), then a single backslash and the printer name are written. If you do not remember the network name of the printer, look in its properties in the "Sharing" section.

In our example, the correct entry looks like this: \\112-PC\HP Deskjet 1050 J410 series. After confirming the entered name, the system will most likely find the device.
Solving common printer installation problems
Sometimes, despite the literal implementation of all recommendations, the printer is not installed. Neither local nor network. Most often this happens due to the following:
- incorrect or unsupported Windows 7 device drivers - this sometimes happens when trying to connect a very old printer;
- other hardware is conflicting with the printer;
- the printer driver is blocked by security software - this is especially common when installing unsigned drivers;
- a printer of a different brand was previously installed on this computer, and its traces (utilities or drivers) remained in the system;
- the computer is infected with viruses;
- the current user account does not have permission to install hardware;
- the system has security policies that restrict access to certain resources - for example, to temporary folders.
Before attempting troubleshooting, make sure that the available driver is suitable for your version of Windows 7. There are different drivers for 64-bit and 32-bit operating systems. If you are installing from a disk, check if it is damaged - the driver may not be read correctly due to scratches on the surface. It will also not be superfluous to try installing a more recent driver from the hardware developer's website.
Remove any software left over from previously installed printing devices. To do this, use the uninstaller utilities or the system's own tools - "Programs and Features".
Make sure your account has sufficient rights. If you are a member of the Administrators group in Professional, Enterprise, and Ultimate editions of Windows 7, open the Group Policy Management snap-in (command gpedit.msc through the Start search bar) and carefully review all permissions.
To check for hardware conflicts, open System Information (C:\Windows\System32\msinfo32.exe), expand Hardware Resources, and expand Conflicts and Sharing.

If your printer is in the list of devices in the right half of the window, disable the device that shares resources with it. Of course, if there is such an opportunity.
Fixing some bugs
Error 0x000006d9 when sharing a printer

The cause of the error lies in the disabled Windows Firewall service.

Go to the section " Services and Applications