Microsoft Outlook Express is a free basic email application. Mail messages and account information from Outlook Express can be imported into Microsoft Outlook.
In Outlook Express, each mail folder corresponds to one file. For example, the Inbox folder in Outlook Express is represented by a single Inbox.dbx file. In Outlook, on the contrary, each message is a separate file. Knowing this, if necessary, you can find and copy the desired folder if Outlook Express and Outlook are installed on different computers.
To import mail messages, choose the appropriate instructions depending on how Outlook Express and Outlook are installed (on the same computer or on different computers).
Outlook and Outlook Express installed on the same computer
Outlook and Outlook Express are installed on different computers
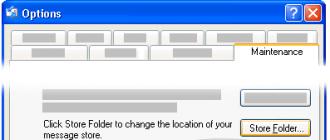
To transfer messages using the Import/Export Wizard, you must first locate and copy the correct files from the computer where Outlook Express is installed to the computer where Outlook is installed.
Note: Copying your Outlook Express data to a shared folder is not enough. You must copy the folder to the computer where Outlook is installed.
Copying an Outlook Express folder

Importing Outlook Express Messages to Outlook
Import account name and settings from Outlook Express
In Outlook 2010 on the tab File select items Open > Import.
In Outlook 2007, the menu File select item Import and export.
Choose one of the options below.
Choose an option Import Internet mail account settings and press the button Further.
Select Outlook Express and press the button Further.
Follow the rest of the instructions in the Import and Export Wizard.
This program allows you to quickly and easily import EML format email message files to any Outlook and Exchange mailboxes and stores. All major Outlook account types are supported: POP3, IMAP, Exchange, Hotmail/Outlook.com (EAS), PST data files, and Exchange Server public folders.
The EML format is a popular way of backing up email as well as transferring messages between different email clients and systems. For example, EML files can be received by Windows Live Mail, Mozilla Thunderbird, Mac Mail, Entourage, Eudora, and most other email programs. Since these programs do not support direct export of email messages to Outlook, the EML format is a great solution for transferring your data.
Our utility doesn't just import EML files into Outlook - it does it the right way, unlike other programs. When importing, all service headers of letters are saved, including the "blind copy" (BCC). Moreover, the utility allows you to create in Outlook an existing folder structure with EML files on your drive. This will allow you to quickly and painlessly transfer all mail from another email client or from a backup while maintaining the entire folder structure.
Additional settings will allow you to import EML files selectively. For example, only containing (or not containing) attachments or limiting the size of imported files.
To save (export) messages to EML format, use our other utility. We also have utilities for importing and exporting messages using the MSG format (native to Outlook). If your task is to transfer messages between multiple instances of Outlook, the MSG format or using the Export Outlook Folders to PST Format utility is a priority.
* This utility is for non-commercial home use only. It does not work in a domain environment. Some of the functions described and support for the domain environment are available only in the extended version of the utility.
| Discuss this utility on the forum We will be happy to help you understand the operation of our utilities and answer any questions related to them. |
|
| How to import messages from EML to Outlook? |
|
The Outlook application, included in the Microsoft Office suite, is one of the most commonly used email clients. The program stores all letters in files of its own format. However, you can export outlook mail as data suitable for further processing.
You will need
- - Outlook program from the Microsoft Office package.
Instruction
You will need
- Mail client.
Instruction
When exporting contacts from Outlook a copy of your contacts saved in a CSV file or another type of file. You can then import contacts from this file to another email account.
- Comma Separated Values.
In Outlook on PC, select Teams File > Setting up accounts > Setting up accounts.
Select the account you want to delete and click the button Delete.
Click the button close.
Open Outlook on your computer and go to the tab File.
If there is no element on the ribbon File in the top left corner, you don't have Outlook on your computer. In this case, you can find export instructions for your version of Outlook in the What version of Outlook do I have article.
Select Teams Open and export > Import and export.

Select an item Export to file.

THIS ACTION IS THE MOST IMPORTANT, especially if you're using a friend's computer. Scroll if necessary Select an export folder up and select a folder in your account Contacts. Click the button Further.

Click the button Review, give the file a name and click the button OK.

Check in which folder the files will be saved and click the button Further.
Ready Import and export disappears.

Locate the new CSV file on your computer and open it in Excel to verify that your contacts have been exported. Most likely, it will have a lot of empty cells. This is fine.

If you're using Outlook on a friend's computer, you can now remove your account from their version of Outlook. Here's how to do it.
You can now import contacts copied to a CSV file to another computer running Outlook for Windows or another email service.
- Options.

-

Click the button OK.
In the dialog box Export to file press the button Further.
To start exporting contacts, click the button Ready. When the export is completed, Outlook does not display any messages, but the Import and export disappears.
When the export is complete, click the button OK to close the Outlook Options window.
Open the folder where you saved your contact list (for example, the Documents folder).

If you exported contacts to a CSV file, view it in Excel to see what was exported from Outlook. Most likely, it will have a lot of empty cells. This is fine.
It is generally recommended to close the file without saving changes. Otherwise, the formatting of the file may be broken and you will not be able to use it for import. If this happens, you can always export again and create a new file.
You can use Excel to update the data in the CSV file. For tips on working with your contact list in Excel, see Create and edit CSV files.
At the top of the Outlook 2010 ribbon, click the tab File.
If there is no element on the ribbon File, you do not have Outlook 2010 . In this case, you can find import instructions for your version of Outlook in What version of Outlook do I have?

In the Outlook Options window, select Additionally.

In chapter Export select Export.
In the window Import and Export Wizard select Export to file and press Further.
Select the desired export type in the field Create a file of the following type. The most commonly used format Comma Separated Values (Windows), also known as a CSV file. Then press the button Further.

If you are going to use the exported contacts in another copy of Outlook, select Outlook Data File (.pst).
In chapter Select an export folderscroll up, if required, and then select the folder containing the contacts you want to export. When finished, click the button Further.
Note: If you didn't choose to export to an Outlook Data File (.pst file), you can only export one folder at a time.

For information about importing contacts into Outlook 2016, see the article
Over time, with frequent use of e-mail, most users form a list of contacts with whom they correspond. And while the user is working with one mail client, he can freely use this very list of contacts. However, what if there is a need to switch to another email client - Outlook 2010?
To avoid having to re-create your contact list, Outlook has a useful feature called "Import". And how to use this function, we will consider in this manual.

So, if you have a need to transfer contacts to Outlook 2010, then you should use the Import / Export Contacts Wizard. To do this, go to the "File" menu and click on the "Open" item. Next, on the right side we find the "Import" button and click it.

Next, before us opens the window of the import / export wizard, which lists a list of possible actions. Since we are interested in importing contacts, here you can select both the “Import Internet addresses and mail” item, and “Import from another program or file”.

If you selected the item "Import Internet addresses and mail", then in this case the import / export wizard will offer you two options - this is import from the Eudora application contacts file, and import from Outlook 4, 5 or 6 versions, as well as Windows mail.

Select the desired source and check the boxes against the desired data. If you are going to import only contact data, then for this it is enough to check only the item "Import address book" (as shown in the screenshot above).

Once you have chosen the appropriate action, click the "Finish" button and wait for the process to end.

Once all the data has been imported, the "Import Results" will appear (see screenshot above), where statistics will be displayed. Also, here you need to click the "Save to Inbox" button or just "OK".
Import from another program or file

If you have selected the "Import from another program or file" item, you will be able to import contacts both from the Lotus Organizer mail client, and data from Access, Excel or a plain text file. You can also import from previous versions of Outlook and the ACT! contact management system.

Having selected the desired import method, click on the "Next" button and here the wizard offers to select a data file (if you are importing from previous versions of Outlook, the wizard will try to find the data on its own). Also, here you need to choose one of the three actions for duplicates.

The next step is to specify where to store the imported data. Once you specify the location where the data will be loaded, you can proceed to the next step.

Here the import / export wizard asks you to confirm the actions.
At this stage, you can check the boxes for the actions that you want to perform. If you change your mind about importing something, then you just need to uncheck the necessary action.

Also at this stage, you can configure the correspondence of the file fields with the Outlook fields. To do this, just drag the name of the file fields (left list) to the corresponding field in Outlook (right list). Once you're done, click "OK".
When all the settings are done, click "Finish" and outlook will start importing data.
So, we have looked at how to import contacts into Outlook 2010. Thanks to the built-in wizard, this is quite easy to do. Thanks to this wizard, you can import contacts both from a specially prepared file and from previous versions of Outlook.