From time to time some customers have a question. Or even a claim. The microphone you sold is cracking, they say! Please, replace. We can replace it without problems, but as practice shows, it's not a microphone at all. To save our time and legs of incompetent buyers in this matter, let's examine the main reasons why a microphone may crack. Once again we will repeat. No microphone is cracking!
Causes of microphone interference
First cause of microphone cracking, which can cause a crack is a poor-quality microphone cable. How can you verify - it is he who is to blame for the tracks or there are some other reasons. Turn on your system. Pull the microphone cable with your hand, pound it. If it is the cable, you will immediately hear a crack. Those. if at rest there is no cracking, and when you pull the cable there is interference, then it is in this - you need to replace the microphone cable.
The second cause of microphone noise - The input signal level is too high. The microphone has a sufficiently weak output signal level. Therefore, between the power amplifier and the microphone there is always a preliminary microphone amplifier. Sometimes it's a separate device, sometimes it's built into a mixer or other device. How to check that the cods that arise when the microphone works, arise precisely because of the high level of the signal in the preamplifier. If the microphone has a toggle switch - 10 dB or - 20 dB or something like that, try to weaken the level of the signal coming from the microphone. If there is not such a switch, try twisting the sensitivity knob or the level knob of the input signal on the mixer or on the device into which the microphone is turned on.
Third cause of microphone interference - it is similar to the second. It appears when you are writing a microphone signal through an audio interface. The fact is that the digital signal has clearly defined characteristics. For example, 44 kHz, 16 bits. And the amplitude of the signal (the lowest, the highest) is some amount of dB. If you go too far with the input signal level, even if the microphone preamplifier of the audio card does it, the analog-to-digital converter may not be able to. "Treatment" in this case is to weaken the input sound signal incoming from the microphone to the audio card input. Typically, this is done either by the switch on the microphone or by the signal level knob in the microphone amplifier of the audio interface.
Only if all the above measures did not help, it is worth paying attention to the microphone itself. As a rule, cod and interference arising in the microphone can also be divided into several components
- Snapped microphone membrane
- Breakage in the electronic microphone circuit
- Bad contact in the microphone connecting wires
It is possible to correct yourself, perhaps, only a bad contact. If you carefully disassemble the housing of the microphone and find a broken connection, then if the place has disappeared, you can solve the problem. A broken membrane can only be replaced, but this is not a budget enterprise. It is justified only by the case, with expensive microphones. In other cases, it is more productive to replace the microphone itself. Well, violations in electronic circuits, which still need to be able to diagnose, can be corrected only by a qualified specialist.
It's unpleasant to communicate in Skype or another messenger for IP-telephony, when there is a noise in the headphones due to software sound amplification. With weak microphones, users often use the software's function to increase the amplitude of the incoming audio signal, which is digitized by entering the recording device. The payment for the fact that the interlocutor will be better to hear the user becomes noise level rise, cod, peep, etc. After reading the article, you will learn how to remove unpleasant noises in a microphone in Windows 10 without resorting to any serious decisions. First of all, we perform the following manipulations:
- reconnect the device to a different port, for example, on the back panel the system unit, if available;
- check the microphone on another computer or smartphone.
The easiest way to trust the problem is to find a tool named Windows 10 called "Troubleshooting." As representatives of Microsoft assure, in the latest OS this tool has become perfect and much better copes with the tasks. There are two ways to diagnose.
Via the Control Panel
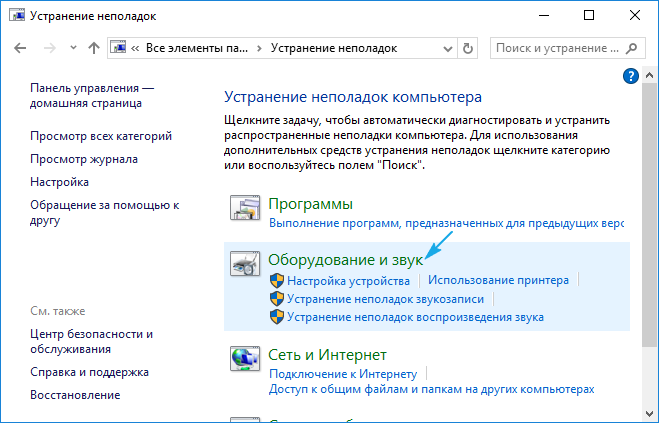
1. We call the "Troubleshooting" applet in the Control Panel.

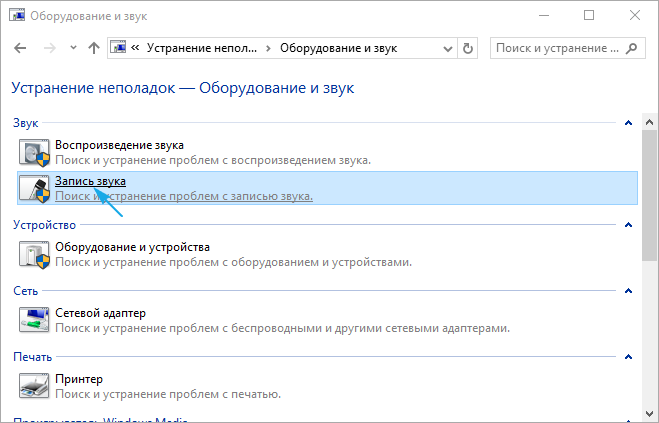
3. Click on the item "Sound recording".
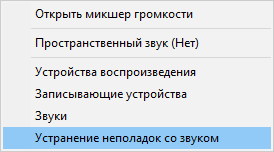
Context menu of the "Dynamics" icon
Across context menu Sound icons open the tool for detecting problems with sound.
In both cases, the OS will fix the problem on its own if it can diagnose it.

We remove the software amplification of the digital audio signal
Suppression of microphone noise, if increased sound amplitude is enabled, is performed in the MMC snap-in called "Sound".
1. Click on the PCM icon for the speakers and call "Recorder".
![]()
2. Select the default microphone for which you want to remove noise and background sounds.
3. We call the properties of equipment.

4. On the Levels tab, set the volume to 100%, and the microphone gain to 0 dB.
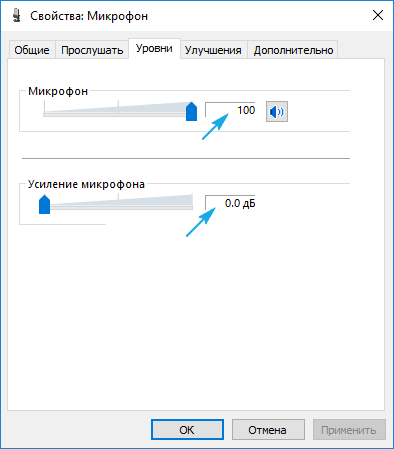
Already if the recording device is very weak, amplification of more than 10 dB is highly not recommended.
5. Go to the "Listen" tab.
6. Mark the checkbox "Listen with this ...".
7. We say something into the microphone and simultaneously listen to the sound through the speakers or headphones.

8. If everything suits you, you can delete the checkmark and save all the settings made.
Setting up a microphone in Skype
Some applications use their own settings for the audio capture devices, so after restarting the computer, the sound in the same Skype can back up. The problem with the following instruction is fixed.
1. Launch Skype.
2. Call it "Options".

3. Go to the "Sound Settings" section.
4. In the first and second paragraphs, we check whether the necessary equipment is installed for playback and broadcasting.

Problem with driver settings
If the problem lies in the audio board, you will most likely have to download a fresh driver for it from the official resource and perform the reinstallation of the software.
When the problem concerns the driver (we will consider on an example of the most widespread - Realtek), here we do the following.
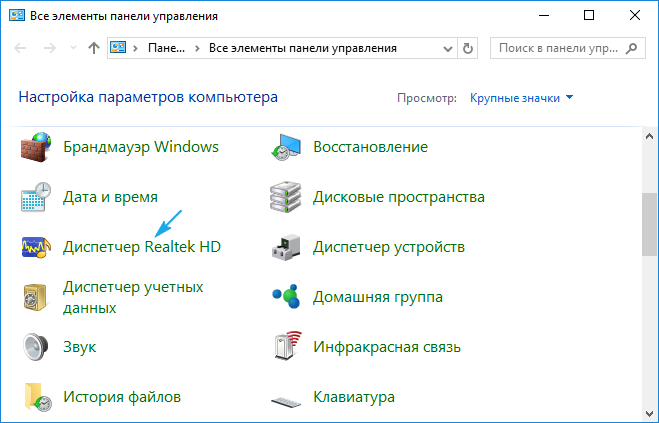
1. Open the "Realtek HD Manager" via the tray icon or the Control Panel.
2. Select the default microphone.
3. Check the "Noise Suppression" and "Echo Cancellation" options to eliminate the corresponding effects that negatively affect the audio quality.

If necessary, amplify the sound gain is set to not more than 10 decibels.
Hello dear and respected readers of the blog. Buying a microphone for chatting on Skype or just for recording sound we most often do not even think about setting it.
Bought put works without problems and discomfort. So all the gut, no need to climb into the jungle of settings.
But this is not always the case. It happens that when you buy not the cheapest microphone you have to dig into the settings to make it right.
As practice shows, far from users often not only do not know how to adjust the sound on the computer, but even how to connect it correctly. In this article we will consider all these points in more detail.
Having bought a microphone, first of all it must be connected to the computer. To do this, you need to connect the microphone to the sound card in a special input.
Usually it is marked with a pink (orange) rim, in contrast to the green entrance next to it, which is needed to connect the speakers or headphones. If the microphone began to hiss or make sounds - take it away from the speakers.
By the way, in one of the following articles I will talk about professional sound cards. What is different, how to choose and much more - so as not to miss.
2 Echo in headphones with a microphone
When you connect headphones with a headset, you can get a pretty unpleasant situation when communicating with a person on Skype, because of the high sensitivity of the microphone, you will hear your echo. In this case it will be necessary to reduce its volume.
To do this, go to start menu -\u003e all programs -\u003e standard -\u003e entertainment -\u003e volume

and reduce the value by about half until the conversation is comfortable without the presence of an echo. In case of problems with sound, I advise you to read the article.
Also I remembered a case where when recording sound on a laptop through a microphone, there was a constant extraneous noise. The problem was manifested when the microphone was on the same desk with the laptop. If you remove the microphone from the laptop, the sound was clear.
The culprit was a leg from the laptop, because of which there was a vibration of the laptop on the table and a sensitive microphone caught an extraneous noise. So here it is, be careful friends 🙂