Today we will talk about how to properly save and optimize a picture in Photoshop and in what format it is better to do it. But after all right choice the save format greatly affects the quality and appearance pictures, as well as the weight of the picture in kilobytes. This is especially important for those who consider traffic consumption. So, let's sort it out in order with jpg, gif and png.
1. In what formats to save pictures
After you have opened your favorite photo in Photoshop and somehow conjured over it or, in general, created a collage of your own production from scratch, you have to save this file on your computer. There are three most common formats for saving a file.
Jpg format. Perhaps the most common format. Suitable for saving complex graphics with many colors and shades and rich texture. That is, photos are best saved in this format. Among its disadvantages - it does not support transparency and is very sensitive to red color. 
GIF format. This format is very good for saving files with a limited number of colors. For example, text pages, tables, diagrams, logos, simple pictures. It turns out much clearer and weighs less. Plus the format supports transparency and animation. However, the format is becoming obsolete and is already inferior to the png format. 
PNG format. Similar to the previous format, but more advanced and more efficiently compressing images. It is very convenient to save cliparts in png transparent background... It exists in two png-8 formats (for simple pictures, supports 256 colors) and png-24 (for more complex images, supports colors well). 
2. We save using the function "Save as ..." (Save as ...)
You can save the picture using the good old way through the menu "File" -\u003e "Save as ..." (Save as ...) or the key combination "Shift + Ctrl + S". The drop-down menu selects the file format in which we want to save the file. (See the picture below) This method is used when the saved image remains on your computer and is not intended for publication on the Internet. 
3. We save using the function "Save for Web" (Save for Web ...)
If your picture is intended to be posted on the Internet, then it is better to use the "Save for Web" function. With this method, the picture is better and better saved for the Internet, and plus there are several convenient features. Choose from the menu "File" -\u003e "Save for Web ..." (Save for Web ...) or the key combination "Alt + Shift + Ctrl + S". A dialog box will open.
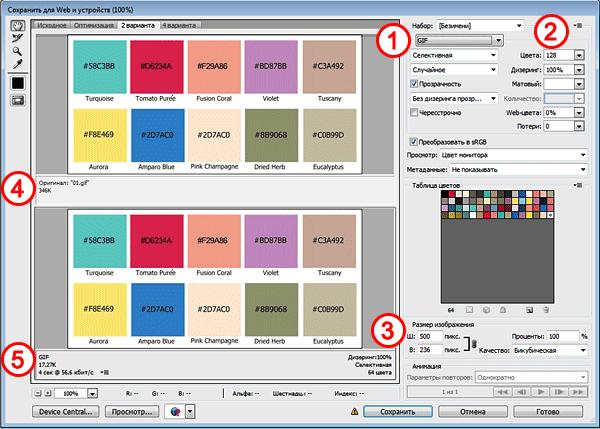
In order to save the picture in jpg format in the drop-down menu (1) select jPEG format... We set the preservation quality (2) from 75% to 95%. I always bet 75%. We set, if necessary, the required size of the picture (3). The windows on the left show the original image size (4) and the optimized image size (5). After that, click "Save". 
In order to save the picture in gif format, select GIF format in the drop-down menu (1). Choose the number of colors to save (2). We set, if necessary, the required size of the picture (3). The windows on the left show the original image size (4) and the optimized image size (5). After that, click "Save". 
In order to save the picture in png format, in the drop-down menu (1) select the PNG-8 format. Choose the number of colors to save (2). Set, if necessary, the required size of the picture (3). The windows on the left show the original image size (4) and the optimized image size (5). We put a tick in the "Transparency" checkbox (6) so that the background is transparent. After that, click "Save". 
If it is not immediately clear in which mode to save, it is best to try all save modes, by eye determining the optimal combination of picture quality and its weight after optimization. In general, it is helpful to experiment with the settings to understand how a particular function works.
06/05/16 26.7KSometimes you need to load an image containing transparent elements through which the original background will show through. In these cases, it would be convenient to load PNG images as they are capable of maintaining transparency.
In this article we will tell you how to make transparency in Photoshop.
File creation
The first step is to create a file. To do this, open Adobe Photoshop and in the File menu ( File) at the top of the page, select "Create" ( New).
Then, in the "New Document" window that appears ( New Document) create the file size you want, and make sure the document resolution is 72 pixels per inch ( since the file is for web use). And also that you have selected the value "Transparent" ( Transparent) in the drop-down list "Background content" ( Background Contents).
* Before making a PNG with transparency in Photoshop, you need to clarify that in this example we are creating an image to upload as a background for the site, so the document size is set as follows: width 3000 pixels, height 1730 pixels, which are the recommended sizes for HD image uploads:
Once you have specified the parameter values, click OK to open a new document.
Then in the Layers panel ( Layers) make sure you are running on transparent layerrather than on the background:

After you have finished creating and are ready to save the transparent image, depending on the used photoshop versions , in the File menu ( File) you can use one of the possible options:
Photoshop versions earlier than CC 2015:
Now we will tell how to make a picture transparent in Photoshopwhich came out earlier than CC 2015. These versions use the Save For Web ( Save for Web & Devices) to save and optimize PNG images. for use on the web. To use this method, simply go to the File menu ( File), and then - "Save for Web" ( Save for Web & Devices):

Then, in the window that appears, select PNG-24 from the drop-down menu of possible values, and then make sure the "Transparency" ( Transparency) and " Convert to sRGB» ( Convert to sRGB). This confirms that the image will contain a transparent background and its color mode will be converted to sRGB, the recommended color space for the web.

The fields " Image size» ( Image Size) are automatically populated with the values \u200b\u200byou specified when you created the file. But if you want to resize the file before saving, you can do so now.
Photoshop CC 2015 version:
Before, how to make a photo transparent in Photoshop, you need to know that as of CC 2015 the "Save for Web" ( Save for Web & Devices) in the File menu ( File) is marked as Legacy. And replaced with a new option "Export" ( Export), which offers identical functionality with faster saving in a smaller file and in better quality... To use the Export option, click the File menu ( File), and then - " Export as» ( Export As).
Note: Adobe still offers a Save For Web ( Save for Web & Devices) in Photoshop CC 2015, and it's available through the File\u003e Export ( File\u003e Export) or using the keyboard shortcut Command + Option + Shift + S (for Mac) or Ctrl + Alt + Shift + S (for PC):

Then, in the window that appears, select PNG from the Format drop-down menu ( Format) and make sure Transparency is selected ( Transparency) and " Convert to sRGB» ( Convert to sRGB).
The fields " Image size» ( Image Size) and Canvas Size ( Canvas Size) should automatically fill in with the values \u200b\u200byou specified when you created the file. But if you wish, you can change these parameters before how to make a transparency effect in Photoshop.
After completing all operations on the image (photograph), it must be saved to your hDDby choosing a place, format and giving some name.
Today we'll talk about how to save finished work in Photoshop.
The first thing to decide on before starting the saving procedure is the format.
There are only three common formats. it Jpeg, PNG and GIF.
Let's start with Jpeg... This format is universal and suitable for saving any photos and images that do not have a transparent background.
A feature of the format is that during the subsequent opening and editing, so-called "JPEG artifacts"which are caused by the loss of a certain number of pixels of intermediate shades.
It follows that this format suitable for those images that will be used "as is", that is, they will no longer be edited by you.
Unlike the previous format, PNG when re-editing (used in other works) does not lose quality (almost).
The last representative of the formats for today - GIF... In terms of quality, this is the worst format, as it has a limit on the number of colors.
Let's practice a little.
To call the save function, go to the menu "File" and find the item "Save as", or use the hot keys CTRL + SHIFT + S.


This is a universal procedure for all formats except GIF.

Substrate
We already know the format Jpeg does not support transparency, so when saving objects on a transparent background, Photoshop offers to replace the transparency with some color. By default, this is white.
Image options
The picture quality is set here.
Variety of format
Basic (standard) displays the image on the screen line by line, that is, in the usual way.
Basic optimized uses the Huffman algorithm for compression. I will not explain what it is, look for yourself on the net, this does not apply to the lesson. I will only say that in our case this will allow us to slightly reduce the file size, which is not relevant today.
Progressive allows you to improve the image quality step by step as it is loaded on a web page.
In practice, the first and third varieties are most often used. If it's not entirely clear what this whole kitchen is for, choose Basic ("standard").
Save to PNG
When saving to this format, a window with settings is also displayed.

Compression
This setting allows you to significantly compress the final PNG file without loss of quality. In the screenshot, compression is configured.
In the pictures below you can see the degree of compression. The first screen is with a compressed image, the second is with an uncompressed one.


As you can see, the difference is significant, so it makes sense to check the box opposite "Smallest / slowest".
Interlaced
Customization "Remove selection" allows you to display the file on the web page only after it has fully loaded, and "Interlaced" displays the image with a gradual improvement in quality.
I use the settings as in the first screenshot.
Save as GIF
To save a file (animation) in the format GIF necessary in the menu "File" select item "Save for Web".

You won't have to change anything in the settings window that opens, since they are optimal. The only thing is that when saving the animation, you need to set the number of repetitions of the playback.

I hope that after studying this lesson, you have gained the most complete understanding of saving images in Photoshop.


