Good day to all! How is your mood? Getting ready for the second holidays? I am. Tomorrow we are going to Yaroslavl until May 9, as I said. But I will not leave you without an article. I was recently asked to make from ordinary photography round, that is, so that the portrait is in an oval frame. It is not difficult and of course I agreed to help.
And I decided to tell you how to make a round photo in Photoshop using the most simple methods... For some decoration, this gizmo will always come in handy. Am I correct? Well, by virtue of the established tradition, I will show you several ways how this can be realized.
Oval selection
You probably already guessed that I'm using an oval selection. Well, in principle, this is logical, and the method is probably the simplest. Ready? Let's go then!
And of course, as I promised, we will consider another way. It is very simple and should not cause you to panic.
Ellipse

DO NOT FORGET! To remember the image with transparency, you need it in PNG format, otherwise you will end up with a rounded image with a white background.
Well, if you want to fully study Photoshop from A to Z and get real knowledge of this wonderful graphic editorthen I highly recommend that you study this video course... These video tutorials are designed for any level of user and listen to in one breath. See for yourself.
Well, for today I'm finishing my lesson. Check out other articles on my blog and you will surely find something interesting for yourself. I wish you success! Bye Bye!
Best regards, Dmitry Kostin.
2 votesGood day, dear readers. The internet frustrates me more and more. I comprehend Photoshop and periodically face all sorts of tasks. I would like to work at the level of a specialist, but the articles that I manage to find are mostly written either by schoolchildren or for schoolchildren, to be done on ... somehow.
I need to cut an object around the edge and the result after these posts is horrible. As if he worked with a hundred years of creaking scissors. A horror that cannot be inserted anywhere. If you want a round photo, they offer you a 500-page manual when everything is much easier.
I'm terribly tired of the same and useless publications far from real life novice designers and developers. We'll have to take on a sacred educational mission.

To be honest, I myself have created long publications on many of these topics, but time goes by. Everything changes and skills improve. This article is not that long, but here are some tips that will help you in real life.
Today we'll talk about one of the most important and frequent tasks: how to cut a picture in Photoshop professionally, smoothly and quickly. We will consider different cases. Somewhere I'll show you how to dig deeper to make the result cool. At some point, on the contrary, I will describe the accelerated process of completing the task.
Image to size in two clicks
I, of course, am a sinner myself. Recently I wrote and the article turned out to be not small, but comprehensive. Now I will describe how to do everything quickly, without unnecessary body movements.
So, open Photoshop, and then the photo that you will work with.

To use the Frame tool.

You can pull the edges to determine the size or cut off something extra.

But, as a rule, the main task of a designer is to work with specific dimensions. You need to either crop the photo to a certain size from all edges, or a suitable picture in width or height. There is a corresponding button for all this.

If you are interested in the ratio, select the top button and insert your values.

If one of the indicators, then choose W x H x Resolution.

We insert our values.

Everything will be smooth, beautiful and in good resolution. By the way, I recommend over cropping, especially if there are a lot of photos, and the one installed on your computer slows down. This is a common story for Photoshop's fat belly, with its super powers. Lightweight online service works much faster.
Making the image round in two minutes
There are many ways to cut a photo in a circle. Now I will talk about the simplest. Literally 2-3 minutes and you're done.
We open the drawing.

And select the Oval Region tool. If you cannot find it, hold down the left mouse button on one or another button of the panel on the left. Perhaps the oval is "hiding" under the rectangle.

To draw an even circle, move the mouse and hold Shift at the same time and the proportions will be preserved.

Naturally, only the desired area of \u200b\u200bthe picture should remain inside the circle. Move it with the arrow and mouse. You don't need to clamp anything else.

Now press Ctrl + C at the same time to copy the area inside the circle and then Ctrl + V to paste it into this picture... Then remove the "eye" from the background.

You get this option. Without background, it will be transparent afterwards.


To keep the transparency and not change to white, you need to select pNG format (). The usual JPG does not understand what transparency is.

You can skip saving and immediately paste it into another photo. Ctrl + V.

To reduce the round picture with a girl, you need to press CTRL and T at the same time, and then move beyond the points along the perimeter of the square. Hold Shift to maintain proportions.

This method is much faster and easier than others.
Normal professional object clipping
We saved time with circles and we have where to spend it. Cutting objects along a path so that it looks great is not so much a complicated process as it is a long process. We'll have to try and dig deeper.
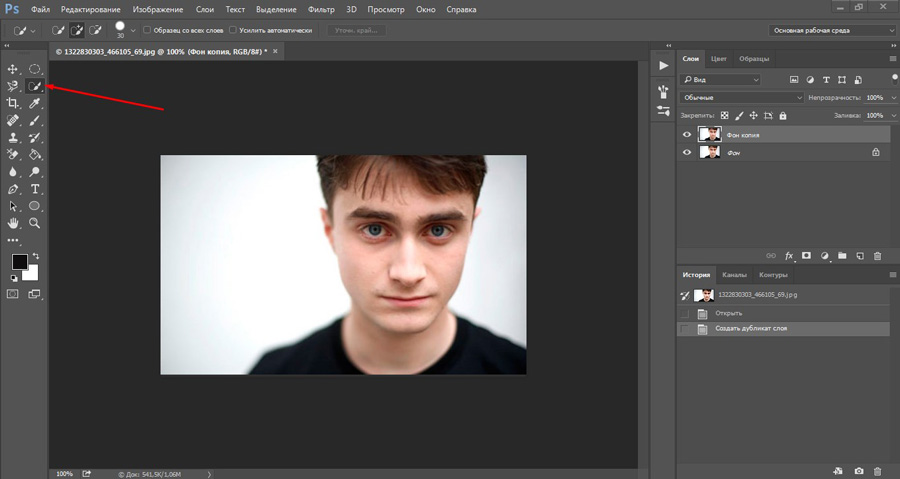
We open the photo.

And the first thing to do is create a duplicate layer. This is necessary to get rid of the background later.

There are a whole bunch of tools for selecting objects. The function that I will talk about further is suitable for any other option. In this photo white backgroundso I can choose my favorite "Quick Selection".
If you want to know more information for beginners about cutting tools, read the article on this topic, it is already on my blog. Then come back to improve your skills and knowledge.
If you can't wait to start with the secrets of the craft, take a picture with a solid background.
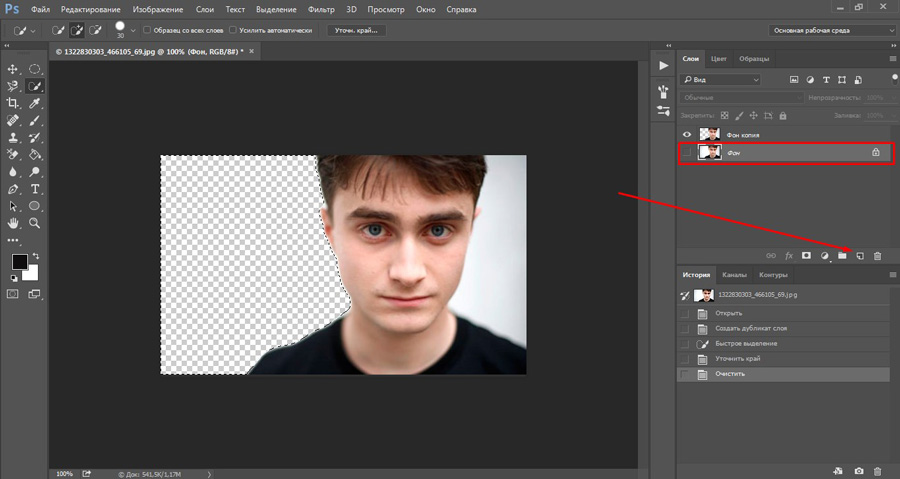
Swipe over the background and ants will crawl along the edge.

Now let's go to the Refine Edge tab.

Pay attention to the "view". You will need it more than once. There are many different options for displaying the changes that you will apply to the photo. Move from one to the next to get the perfect effect and see exactly how it will look. Everyone will love their display option.

Immediately put a tick on the "Smart radius". The indicators will have to be changed at your discretion, by eye. Believe me, it will turn out much better and faster over time.

Adjusting the edges. Use, try, experiment.

Now click "Ok". As it will become clear a little later, these values \u200b\u200bshould be remembered, but we will return to this later.


I don’t know about you, but this checker doesn’t suit me very much. You can't see how everything has changed. Click once on the background to highlight this layer, and then create new layer... This can be done through the menu above "Layer" - "New" or by clicking on the advisory button on the left. I marked it with an arrow.
So now click on the layer we just created and apply a fill to it.

Ideally, of course, immediately put the background on which the picture will be later. But, I will try to work in contrast. It is immediately clear that the option is not the best, but why not? We are learning.
So now go back to the copy layer.

And again we go into the refinement of the edges.

I like the right edge better. What conclusion can be drawn? It was necessary to remember the values \u200b\u200bthat we applied on the left so that both parts look the same. I have already said this. It was not for nothing that I left the article as it is and did not change a word, although I could delete the information about this error.
See how people gain experience, make mistakes, and infer their own rules. It's okay to do something wrong. This is where professionalism is born.
There are many tools that we can use now, and experts do just that. They don't just leave a picture. First, let's use blur. To make anti-aliased edges.

That's how I did it.

I don't really like it. The best option - change the background on the second layer. Agree, it's not bad anymore.

You can download my layout, open it in Photoshop and make it much better. Submit your results in the comments to this post.
If you think that Photoshop is difficult, then you are very much mistaken. This is just a set of tools, and professionalism is developed only through experience, creating pictures one by one.
Imagine you have a garage and it's full of everything: hammers, axes, machine tools. You can walk around them and think about what they are for, you can ask the professionals for advice, but in any case, you will not become a master.
If you want to get to grips with all the Photoshop tools as soon as possible, I can recommend you course for beginners by Zinaida Lukyanova ... You will quickly learn all the methods, techniques, tools. You will understand what is needed and why, what it is used for. All that remains is a small matter - to practice, try and apply in this or that case. So they become masters.

If you are going to become a professional and dream of the money that you can get from creating websites, then you will have to study more and basics in School of Web Design... Within three days you are provided free access to all lessons. Frankly, this is enough to understand a lot.

Well, for those who want to get big money and want to get very high, they will have to invest more seriously. This is a course from gurus, incredibly cool specialists from companies like Kaspersky Lab. Unfortunately, it is unlikely that other names will give you any idea and cause associations. Most likely you haven't even heard of them.
But believe me, as soon as you start spinning in this area and move towards your intended goal, you will find that you missed a lot. "Web designer: effective website from idea to implementation" here you can really learn the profession of a web designer. The course costs a lot, but at the end of it you are given a diploma, thanks to which you can immediately get into the TOP and receive incredible amounts!
What a lovely kid!
Yes, of course, the Photoshop program has the ability to cut a circle of a given diameter, however, like any other shape, from any image, and without any problems, special knowledge and time consuming.
First, take the Eliptical Marque Tool from the tool palette (which is on the left) and create a selection.
Moreover, if you need to create a correct circle, then, before starting to create a selection, you should hold down the Shift key, and if you need the circle to be created from the center, then simultaneously hold down the Shift and Alt keys. Although, when setting the size of the selection, this is not required.
So, we selected the "Oval Region" tool, then at the top of the working window of Photoshop, select the style of the future selection "Fixed Size", as shown in the figure:

And we enter our width and height of the circle in the corresponding fields, as you can see in the example, I entered 250 and 250 pixels.
Then we click on the document, a selection appears, and, using the mouse cursor, which will take the shape of a cross, place the selection in the right place.
Everything.
Alternative ways, for those who are not looking for easy ways)))
But, there are cases when it is impossible to enter the dimensions of the future circle or oval in advance, therefore, if you need to get a figure of a certain size, you need to apply one of two methods.
1. Before creating a selection, open the Info palette, you can do this by going through the main menu tab Window -\u003e Info (Window -\u003e Info) or simply by pressing the F8 key. When you create a circle, the palette shows the circle's dimensions, width and height. To obtain the required size, you need to precisely move the mouse; in order to simplify this procedure, before creating a circle, you need to maximize the scale of the document so that only the desired area is displayed in the frame.

2. If, nevertheless, it was not possible to obtain the specified size of the selection with the mouse, then you can apply the scaling of the selection itself after its creation.
For example, we need a circle with a width and height (in normal language speaking, with a diameter) of 250 pixels, and with the mouse it turns out either more or less, for example, at the output we got a selection with a width and height of 248 pixels, and that's it. As a reminder, see the size in the Info palette.
In this case, we resize the selection using scaling. Go through the main menu tab Selection -\u003e Transform Selection (Select -\u003e Transform Selection). We see that a bounding box has appeared around the selection, and the values \u200b\u200bhave changed at the top of the main Photoshop window. The interface of this tool is identical to the Free Scale tool. Now we need to enter required parameters in the windows H and W (height and width, in English W and H). A small problem - we need pixels, and there are percentages. It must be counted. The size of our selection in the example is 248 pixels, so one percent will be 2.48. Subtract 248 pixels from the desired size (250 pixels), we get 2 pixels. We divide these 2 pixels by the percentage of 2.48 and we get 2 / 2.48 \u003d 0.806, which we round up to 0.81. Therefore, we need to enter a value of 100.81%.
Yes, we first click on the button indicated in the picture, then enter our value 100.81% instead of 100% in the corresponding window and check the result in the Info palette. I have everything as it should, the size turned out to be 250 pixels.
06.08.2016 27.01.2018
In this tutorial, you will learn how to make a circle in Photoshop. This can be done in two ways - with and using the Paint Bucket toolTool) to fill the selection on a new layer.
The first method is faster and simpler, just one tool is enough to create a circle in Photoshop, while the second method will involve several tools and functions. Lesson completed in Adobe Photoshop 2015.5, if you have an earlier version of the program, some settings may differ, especially with regard to instrument Ellipse Tool.
How to make a circle in Photoshop using the Ellipse Tool
Create a new document in Photoshop, File-New (File— New) with size 800x800 pixels:
We choose tool Ellipse Tool.Hotkey tool call - U... After becoming active vector shape toolset, pinch keyShift and click on the tool or simply hover your mouse over group vector tools and clamp left mouse button for a few seconds - a drop-down list will open, from which we select tool Ellipse Tool:

Functions the Ellipse Tool on top panel tools:

1 - window for selecting the type of vector object (shape, contour, pixel);
2 - selection of the color of the vector object;
3 - adding a stroke to an object (there are many options for stroke, stroke with color, gradient, pattern);
4 - the size of the stroke;
5 - type of stroke;
6 - the width of the object;
7 - button to maintain proportions;
8 - object height;
9 - operations with the contour;
10 - alignment of the contour;
11 - ordering the contour;
12 - additional settings for creating a shape (specified proportions and size, creating a shape from the center);
13 - align edges vector shapes on a pixel grid.
Clamp again keyShift and stretch the circle to the size we need. KeyShift used to maintain proportions. Another option to maintain the proportions is to press the button with the chain in the top toolbar Ellipse Tool (Ellipse Tool):
Also, when creating a circle, you can clamp keyAlt - this will draw the shape from the center of the canvas. If you simultaneously press and hold Shift and Alt - the circle will be created proportionally and from the center.
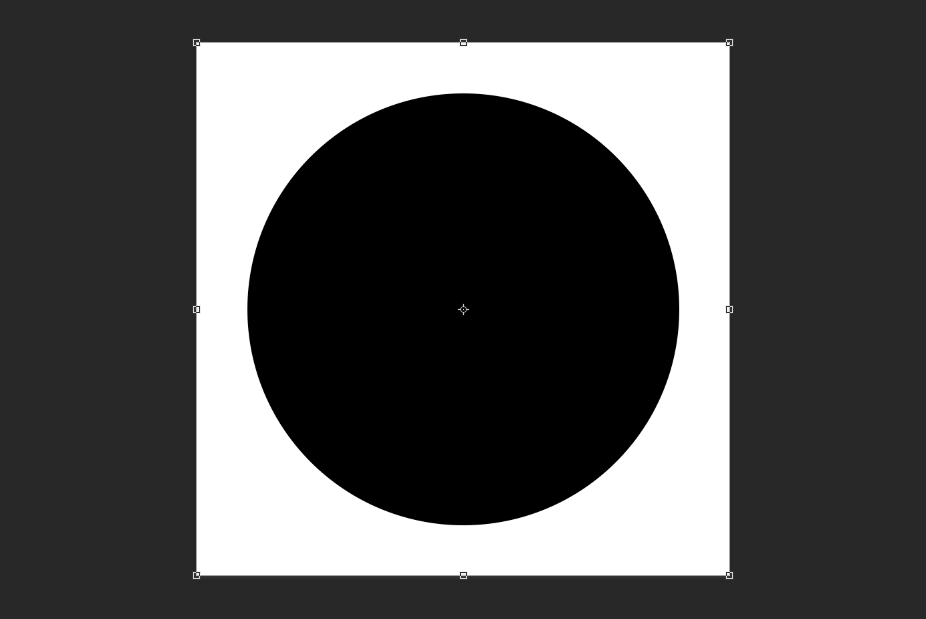
That's how easy and simple we created a circle in Photoshop! IN top settings panel the Ellipse Tool you can change the color of the finished shape, add a stroke to it, and also resize it.
How to make a circle in Photoshop using the Paint Bucket toolTool)
We choose elliptical Marquee tool... Tool hotkey - M (in english layout). Again, as in the previous step, to call the dropdown list with all selection group tools pinch key Shift and click on the group or make a long click on the group of selection tools.

Clamp keyShift to maintain proportions, to create a selection from the center, you can also hold down key Alt... Create a circular selection. Move it across the canvas if necessary the Move tool (Move Tool)
.
Create a new empty layer Layers-New-Layer (Layer-New-Layer). We activate the Paint Bucket Tool... Call hotkey instrument groups — G... I hope you remember how to choose an instrument from a group? Well, check it out, and, at the same time, consolidate your knowledge. 
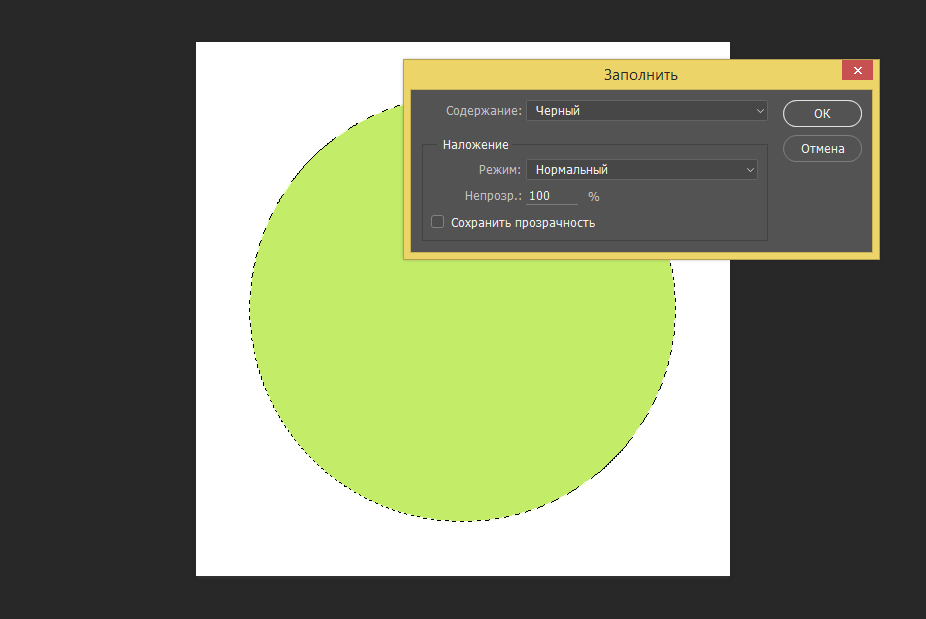
IN toolbars choose the color we want to fill the circle with, let it be lemon:
Clicking left mouse button inside the selection to fill the circle with the selected color:

Remove selection , going to Select-Deselector by pressing the hotkey combination Ctrl + D... While the selection is active, you can change the fill color and fill it with a different color. Unlike the first method, there is no way to change the fill color at any time; you will have to activate the selection each time or not remove it until the desired result is obtained.
Instead the Paint Bucket Toolyou can use the menu item Editing-Run filling (Edit-Fill).The principle of this command is the same - fill the selected area / layer. The only difference is that you can fill not only with color, but also with a pattern, there is also the possibility content-aware fills and changes overlay mode fill.
So we learned how to make a circle in Photoshop. We hope this tutorial was useful to you!

This layer, as a result of which the original photo is displayed in the document:
Now let's create an oval selection. Take the Elliptical Marquee Tool, click in the upper left corner of the photo and drag the cursor to the lower right corner:

Release the left mouse button. The selection is created.
If the oval is out of place and needs to be moved, then this can be done either with the mouse cursor or with the keyboard arrows. One click on the arrow moves the selection one pixel in the direction of the arrow.
In addition, if the shape of the oval is not quite as it should be, you can change the shape of the oval by right-clicking inside the area and then, on the line context menu "Transform Selection" (Transform Selection). This launches the "Free Transform" tool, but it will not transform the layer, but the boundaries of the selected area:

Press Enter to accept the transformation results.
Oval feathering
To get a normal vignette effect, a smooth transition is required, for this you need to feather the boundaries of the selected area. Go Select -\u003e Modify -\u003e Feather and enter the blur value. For photos with different sizes, you have to empirically select individual values. In my case, it will be 30 pixels:

Click OK to exit the dialog box. While the feathering effect is not visible. Let's turn on the visibility of the white layer again.
It remains only to press the Delete key to remove the extra white pixels. The vignette is ready, you can only reduce the opacity of the white layer to 80%. Result:

Cutting and transferring round elements of a photo to another image
The Elliptical Marquee Tool allows us to easily create a selection in the shape of a perfect circle.
There are two ways to create a geometrically correct circle.
The first way is to set options in the options bar at the top of the screen.
For example, I opened a photo of the Moon, in this photo it is full and has a round shape:

When you select the Selection tool (like any other tool), the options bar displays settings specific to this particular tool. One of these settings is Style. By default it is set to Normal, this mode allows us to create an ellipse of any shape and size. To make the selection in the form of a perfect circle with an arbitrary size, we need to select the "Fixed Ratio" mode. By default, Photoshop will set the width and height values \u200b\u200bto one, this sets the width to height ratio to 1: 1, which gives us a perfect circle:

To draw a circular selection around the moon, I'll drag from top left to bottom right:

Constructing a perfectly circular selection using hotkeys
While there is technically nothing wrong with changing the settings in the Options Bar to get a circle, there is one "but". After you are done, Photoshop does not automatically override the settings or set the "Style" option to "Normal", therefore, you must do it yourself, otherwise the selection will be created in fixed aspect ratio.
There is a better way to create the correct circle - clamped shift key when creating a selection. If you hold down Shift before starting to create the oval area, you will get a geometrically correct circle.
However, keep in mind that the keystroke order is very important. First, hold down Shift, then hold down the left mouse button, drag the cursor, creating a selection, release the left mouse button and release shift only at the very end. If you don't follow the correct order, you can get unexpected results.
Create a geometrically correct circular "out of the center" selection
You can also create a circular selection from the center to the periphery, so you can trace a circular object in the photo. Place the cursor exactly at the center of the object, hold down the Alt + Shift keys, hold down the left mouse button and drag the cursor from the center.
When you finish dragging the cursor, first release the left mouse button and only then the Alt + Shift keys:

So, the selection is ready. Now I want to drag it to another photo. To do this, first open the target photo in Photoshop, then select the Move Tool.
Go to the document with the Moon, hold down the Alt key (so that the selection is not cut, but copied) and drag the Moon to the target photo:

Then, using "Free Transform", you can shrink the moon and place it in the right place if necessary:

Removing selection
When you are done with the selection, you should delete it. There are three ways to remove a selection in Photoshop. It:
- Go to the main menu tab Selection -\u003e Deselect (Select -\u003e Deselect)
- Press the key combination Ctrl + D
- With the Elliptical Marquee Tool active, click anywhere in the document


