Where was the method of creating a multiboot flash drive with a set of useful utilities, various systems, etc. described. And everything would be fine, but here the dog is buried - let's pay attention to this comment thread, which discusses the performance of multiboot on systems with UEFI. So I started my own investigation to look for a universal way to solve this problem.
We didn't have to go far - ever since the insane popularity of the Windows XP Zver Edition build, its developers have used a set of utilities called RMPrepUSB to write the build to a USB drive. The assembly has gone from people's memory, but the utility package project itself continues to develop and grow stronger. Well, the basis itself is the Easy2Boot project. While researching their site, I found a universal way to create a multi-boot flash drive that can contain any distribution, LiveCD or floppy images you want to add. So, let's start creating such a wonderful flash drive.
How does it all look?
A working example - I threw different images on the drive, the structure is as follows:- _ISO\LINUX\linuxmint-17-xfce-dvd-64bit.iso
- _ISO\WIN\ru-en_win7_sp1_x86-x64_18in1_activated_v2.imgPTN
- _ISO\WIN\Boot_USB_Sergei_Strelec_2014_v.6.9.imgPTN
- _ISO\WIN\ru_windows_8_1_pro_vl_x86_dvd_LITE_3.iso
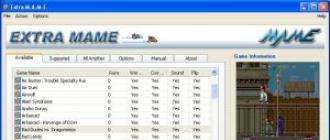
Screenshots
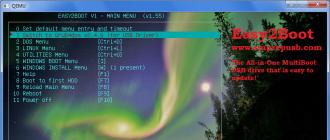
Flash main menu
Linux submenu
Submenu with regular Windows ISO images
Submenu with images for UEFI
When loading an image for UEFI, we will be asked if we really want to overwrite the table with a flash drive partition? Press Enter 
And this is how the loader of any image for UEFI looks like. Instructions for returning to the main menu are below.
We boot into the BIOS, select the desired UEFI image, switch UEFI back and get a flash drive with one partition containing the files of this image. Accordingly, if this image supports booting into UEFI, it will appear in the list of devices from which you can boot.
Attention! If you booted from images prepared for UEFI, then you will notice that the next time you boot from the drive, there will be a boot menu from that image. And where are all those that we sketched on a flash drive? Yes, and the files on the flash drive are not the same ... There are two options - select the top item from the bootloader EASY2BOOT or run the script from the flash drive in the OS e2b\RestoreE2B (run as admin).cmd.
In the dry matter
There were some drawbacks here too - you have to switch to the BIOS in order to connect the desired image. But the functionality of this set of utilities covers all conceivable and unimaginable needs for a multiboot flash drive.To boot from a flash drive on a PC or laptop with an active BIOS UEFI mode, you need, respectively, a bootable UEFI flash drive. How to create it? The installation processes of Windows 8.1, 10 and their respective server editions, some LiveDiscs support booting in distribution-level mode (ISO file downloaded from the Internet). Such distributions initially include an “EFI” folder with program codes that adapt bootable media to work with UEFI. In this case, it will not matter which program the ISO file is written to the USB flash drive. If only the flash drive itself was formatted in the FAT32 file system before recording.
But what if the distribution kit is not adapted to work with the UEFI BIOS? With Live disks, things are simpler: even if the emergency media was not created in the format of a bootable UEFI flash drive, in order to boot from it in emergency cases - for example, in order to destroy viruses or determine the cause of problems with the computer hardware, it is enough to first disable UEFI mode in the BIOS and, accordingly, enable either Legacy mode or CSM (compatibility mode). Then, in the boot order, choose to start from not a UEFI flash drive, but from a regular one. But with a flash drive of the Windows 7 installation process, everything is more complicated. The distribution kit of this version of the system is not adapted for BIOS UEFI, and when you start the computer from a regular bootable USB flash drive in BIOS Legacy (or CSM) mode, the Seven will refuse to install on a GPT disk, working with which is one of the key advantages of BIOS UEFI. To install Windows 7 on a GPT disk, booting from a UEFI flash drive will be of fundamental importance.
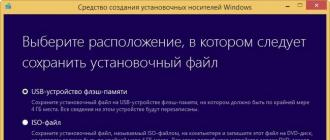
You can create a bootable UEFI flash drive with the Windows 7 installation process and Live disks, the creators of which did not take care of adapting the distribution kit to the BIOS of the new format, using the free Rufus program. Rufus is a portable utility designed to burn ISO images to bootable removable media. The program features include the adaptation of bootable media to the BIOS UEFI format.
Having launched the program, in its first column, select the desired drive, if there are several of them connected to the computer. In the second column, set the value "GPT for computers with UEFI". We check that the value of the FAT32 file system is in the third column. We leave all other values by default and in the column “ISO image” we indicate the path to the image of the Windows 7 distribution kit or Live disk. We press the "Start" button.
We confirm the start of the process.

The progress indicator will notify you of the completion of the process of creating a bootable UEFI flash drive when the scale is completely filled in green. Below the indicator, the status "Ready" will be visible.

That's it - you can close the Rufus program and test the UEFI flash drive.
Recall also that in order to boot software from a UEFI flash drive that does not have certified keys (and such software is the Windows 7 distribution, some Linux distributions, many Live disks), UEFI is required in the BIOS (Secure Boot).
Have a great day!
Installing, reinstalling and restoring the operating system, as well as carrying out certain types of diagnostic work, as a rule, requires the mandatory use of special boot disks or flash drives. But in order for the computer to be able to boot from external media, in the settings of the basic input / output system or otherwise BIOSa, you must set the appropriate priority, that is, literally indicate from which source the system should boot.
The procedure for setting up booting from external media is quite simple, however, it raises many questions for many novice users. And this is quite understandable. Firstly, it is rare to encounter the need for such a boot, and secondly, in different computer models, the procedure for entering the BIOS and changing boot priorities may differ in detail. Let's consider everything in more detail.
At the moment, there are two types of basic input / output system: classic BIOS and its advanced version UEFI. Both of them are special programs written on the motherboard chip and designed to configure and check the readiness of the hardware components, and transfer control of the PC to the operating system. Unlike BIOS, UEFI is more autonomous, it has a convenient graphical interface with mouse support, allows you to integrate drivers, run EFI executable files, and work with GPT disks without restrictions. In addition, computers with UEFI start up an order of magnitude faster than PCs with a regular BIOS.
How to get into BIOS or UEFI
To get into the BIOS or UEFI, immediately after turning on the computer, press and hold the Del, F2, or Esc button. Which button should be used to enter the BIOS / UEFI in your desktop or laptop model should be indicated in the supplied user manual. However, on new computers with Windows 8.1, this may be a problem. If fast boot technology is activated in the system, you simply will not have time to press Del or F2 in time. In this case, you must do the following:
open Settings -> Change PC settings -> Update and recovery -> Recovery -> Advanced boot options, and then click Restart Now. After rebooting, you will be taken to the "Select Action" window. Click Diagnostics -> Advanced Options -> UEFI Firmware Settings. The computer will restart and you will be taken straight to the UEFI interface.

Note
Determining which interface your computer is using is very simple. To do this, press Win + R and in the window that opens, execute the msinfo32 command, and then in the system information window, find the item "BIOS Mode". The old version of the I / O system will be marked "Obsolete", the new one - "UEFI".

Configuring Boot from CD/DVD/USB Flash Drive in BIOS
In most BIOS versions, the Boot section is responsible for configuring boot options.
It contains a list of all devices connected to the computer. Since the hard drive and CD-ROM are built-in components, they will be present in the list for any, but if you want a flash drive to be there, you need to insert it into the USB port in advance, even before entering the BIOS. The first device in the list is the device from which the system is currently booting. Using the arrow keys, you can change the boot priority, and by pressing the F10 key, you can apply the new settings.
In some BIOS versions, the Boot section may have additional options, such as Boot Device Priority, Hard Disk Drives, and so on.
In the case of booting from a CD / DVD-ROM or a regular flash drive, it will be enough to move this device to the top of the list in Boot Device Priority and save the settings. If the flash drive is formatted as an HDD, you will first need to go to Hard Disk Drives, select the first device (1st Drive) in the list, press Enter and select the flash drive in the menu that appears. Then the same will need to be done in the Boot Device Priority subsection. Save the settings with the F10 key. This is about AMI BIOSes.


The procedure for setting up booting from a DVD / USB flash drive in BIOS AWARD or Phoenix is somewhat different. Here, in the BIOS main menu, you need to find the Advanced BIOS Features section, and in it find the First Boot Device item, which is responsible for prioritizing boot devices. Being on the First Boot Device, press Enter and in the menu that opens (list of devices), select the CD-ROM or, if available, a USB flash drive. If there is no flash drive in the list, switch to the first item Hard Disk Boot Priority, press Enter, select our flash drive in the list, move it to the top of the list. To save the settings, press Esc twice, and then Save and Exit Setup and confirm the saving of the parameters with the Y key.


Setting up boot from CD / DVD / flash drive in UEFI
Setting boot priority in UEFI is easier, and not just because you can use a mouse. Most UEFI interfaces have a Boot Priority panel at the bottom of the window, which displays all devices connected to the computer, including flash drives and removable HDDs. To install a boot from a particular device, just drag it with the mouse to the beginning of the panel, and then save the new settings when you exit UEFI.

You can also click the "Exit / Advanced mode" button, go to the Boot tab in the window that opens, select "Boot Option # 1" in the Boot Option Priorities list and set a USB flash drive, hard drive, CD-ROM or other connected to computer device.

The new settings are saved when exiting UEFI or by pressing the F10 key.
Have a great day!
More and more devices are starting to be released not with bios, but with uefi. Therefore, many users are thinking about how to make a boot drive for this option. This article will talk about how to create a bootable flash drive for such firmware. These methods are suitable for versions from Windows 7 and newer, while they must have x64 bit depth, for 32 bit this method will not work. To boot from such a drive, on the device itself in the firmware you need disable secure startup(Secure Boot) and enable Compatibility Support Module. All this is in one place, in the same place where the order of devices for launch is selected.
Create a UEFi flash drive using the system
All actions can be performed without resorting to third-party applications. To do this, you need to run a command prompt with administrator rights, you can do this through the start. After that, it should enter the following operators: diskpart, and then list disk.
In this list, all drives connected to the computer will be presented. The user needs to find the one he is going to make bootable and remember its number. In the future, this number will be denoted by the letter N. After that, you need to enter into the console following statements:
These commands will allow completely clean the disk, create and format a partition, and also mark it as active and assign it a letter. 
Copying Windows Files to a Flash Drive
After the steps taken, you will need to move all the files of the system to a new drive. You need to transfer not the image, but the unpacked files, how to do this will be written later.
If you have a Windows 7 computer
In this case, everything is simple. You should completely unpack the Windows image and move all files to a flash drive. You can also use one of the utilities that can read images, open the OS through it and copy files from there.
After that, you need to move the directory efi\Microsoft\boot, to the very first folder of this path - efi.
Then, it is worth extracting the file sources\install.wim. In the unpacked directories, follow the path 1\Windows\Boot\EFI\bootmgfw.efi, and copy the last file. 
It should be renamed to bootx64.efi, after which, it should be moved to bootable media in a folder efi/boot.
If you are creating a UEFI USB drive on a Windows 10, Windows 8 or 8.1 computer
In this case, everything is much simpler. First, right-click on the disk image and select " To plug". After that, you should open the mounted image and select all the data. After that, right-click again and send to the drive. 
This completes the creation of the flash drive.
Create a bootable UEFI flash drive in Rufus
This is a free utility that will help you create the drive you need. The application should be downloaded from the official website and run, it does not require installation. 
In the second paragraph, choose interface and partition scheme. In chapter " Create boot image”, you should specify the path to the system image. The rest of the settings can be left as standard or set to those that the user considers necessary.
Already somehow dragged on the blog? But what to do if there are several simple and very convenient ways to do this at once. The reader must be given a choice.
And if we take into account the fact that laptops without disk drives are used quite often now, then you won’t get away from this issue. Do you agree? So let's finish off the section about creating a bootable Windows 7 flash drive in UltraISO. Not you know what kind of animal is this (UltraISO)? Yes, this is a free program.
For the sake of a red word, it is worth noting that the solution described in this article is perfect for creating bootable media not only for the seven, but also for Win 10. There is also UEFI support. Therefore, I personally like this alignment very much.
So let's start. The first step is to download an application called UltraISO and install on your computer. The process is quite simple, there is not much to tell. We take and put. Then we launch it and Windows 7. In our case, there will be a 64-bit version:
And here we smoothly proceed to almost the last step. Namely, we follow the path "Hard disk image":

And in the window that opens, set the following options:

- Disk Drive: specify the flash drive to copy files.
- Recording method: choose USB-HDD+.
- Don't forget to click the "Record" button.
Naturally, you need to understand that when formatting the drive, all information on it will be erased. Well, in general, that's all, friends, the creation of a bootable Windows 7 USB flash drive in UltraISO has come to an end.
Again, I repeat that this method can be used to record Windows without any problems. Everything is done by analogy. As the saying goes, exactly- V- exactly.
The only disadvantage of this approach is the inability to add something to such a medium. Rather, you can do this, but you will need to manually edit the ISO image in the program and the boot menu files.
Therefore, write your thoughts and questions in the comments to the article, I always read them and answer whenever possible. I will also be glad to constructive criticism and business proposals. And now everyone bye and let's watch an entertaining video.