Windows compatibility mode allows you to run programs on your computer that were running on previous versions of the operating system. With the release of a new operating system, there are problems with some programs: the program starts with an error, the application cannot work, etc.
Changes made to newer versions of Windows make it impossible to use some programs on that version of the operating system. Not all programs are supported by developers for a long time.
Many programs work fine on a computer for many years, even after support has ended. Due to changes in the Windows code, the application loses its functionality in the new version of the OS. There is no one to rewrite the program code according to the requirements of the new version of Windows, because the developer has stopped supporting the software. Therefore, a way out of this situation is necessary.
Compatibility mode in Windows will come to the rescue. Running in compatibility mode will allow you to run many older programs on your PC that work fine on previous versions of Windows.
Windows Program Compatibility Mode is started in two ways:
- from a property or program shortcut for all versions of Windows
- using the Windows troubleshooter
In the first case, the user right-clicks on the icon of the problematic program, or on the executable file (.exe) of the application. The second method involves using the system's troubleshooting tool.
Keep in mind that some programs will still not work properly after being enabled in compatibility mode for various reasons. In most cases, older applications will still be able to run on the computer.
In the instructions on this page, we will show the compatibility mode in Windows 10. In other versions of Windows (Windows 7, Windows 8, Windows 8.1), setting the compatibility mode of old programs with the version of the system installed on the computer works in a similar way.
How to run a program in compatibility mode from the context menu of a shortcut or application property
If the program refuses to work in the new version of the operating system, you should try to fix the problem using the built-in compatibility mode in Windows.
Right-click on the program shortcut or on the executable file. If there is no application shortcut, then find the file of the program that does not start on your computer. Programs are usually installed on the system drive, depending on the bit depth, in the Program Files or Program Files (x86) folders. In very rare cases, programs are installed in the user's profile location:
C:\Users\UserName\AppData\Roaming
In the locations, look for the program folder by the name of the application, or by the name of the manufacturer of this software. Find the program you want, and then right-click on the application file.
Note:
- In Windows 10, it is not always possible to use the object properties context menu, because the system sometimes does not show the corresponding tab for a particular application, so use another method.
In the context menu, click on the "Properties" item.
In the "Properties: application name" window that opens, go to the "Compatibility" tab.
Here you can immediately run the Compatibility Troubleshooter using the "Run the Compatibility Troubleshooter" button, or select the appropriate options manually.
To do this, activate the setting "Run this program in compatibility mode for:", and then select the version of Windows in which this application worked properly.
Adjust advanced settings for color, screen resolution, and scaling (these settings may not work on 64-bit systems).
If necessary, check the box next to "Run this program as an administrator". Some applications require elevated administrative rights to run.
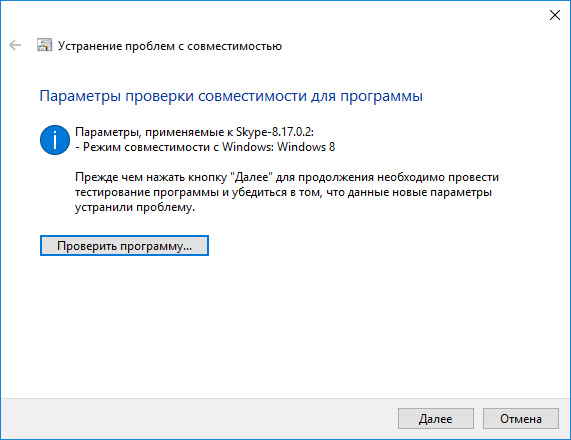
- Here's a case study: On Windows 10, you can't install Skype for Desktop on a PC. After starting the installation of the program, an offer appears to download the Skype application for Windows 10 from the Store (Microsoft Store) (these programs are different from each other). The only way out is to install Skype for Desktop in compatibility mode for Windows 8.
After completing the settings, click on the "OK" button. Check the program in compatibility mode.
How to Run Compatibility Mode Using the Windows Troubleshooter
Program compatibility mode in Windows 10, in Windows 7, Windows 8, Windows 8.1 can be started using the built-in system tool.
To do this, right-click on the shortcut or program file, in the context menu, click on the "Fix compatibility issues" item.
The second way is to launch the tool from the Control Panel, after selecting "Troubleshoot". In the "Troubleshoot your computer" window, click on the "Run programs designed for previous versions of Windows" link.
In Windows 10, there is a third way: launch the Settings app, enter Update & Security. Next, open the "Troubleshooting" section, scroll down to the "Troubleshoot compatibility issues" option, click on the option, and then click on the "Run tool now" button.
Users of Windows 7, Windows 8, Windows 8.1 can additionally use the Microsoft Easy Fix tool (the tool is built into Windows 10), which performs the same functions that you need to download to your computer by selecting the appropriate problem on the Microsoft website page. Read more about this.
Troubleshooting Windows Compatibility Issues
If the tool is launched by Computer Management rather than by a specific program file, then the user will need to select the program with problems starting, installing, or running.
After you run the troubleshooter, it automatically searches for compatibility issues on your computer.
In the next window, you must select the diagnostic mode. There are two options to choose from:
- "Use recommended settings" - test launch of the program with recommended compatibility settings
- "Diagnostics of the program" - the choice of compatibility options based on the problems noticed
Test the program, and then click on the "Next" button.
In the final window, you need to select the appropriate answer to the question about fixing the problem:
- "Yes, save these settings for the program"
- "No, try other options"
- "No, report this issue to Microsoft and look online for a solution"
If you select the "Program Diagnostics" option, the user will be able to offer the troubleshooter specific options for the problems noticed.
In the window "What problems are noticed?" You must select one or more of the most appropriate options:
- "Program worked on previous versions of Windows, but won't install or run"
- "The program opens but does not display correctly"
- "Program requires additional permissions"
- "I don't see my problem listed"
In the window "Which version did the program work with?" select one of the suggested versions of the Windows operating system.
If the issues you noticed are not on this list, the system tool will prompt you to answer clarifying questions.
Then you will be prompted to check the operation of the program using the recommended settings for choosing a system.
After checking in the final window of the tool, answer the question about fixing the problem. If the program still does not work, try all possible options.


Compatibility mode in the new operating system from Microsoft allows you to work with almost any software that ran on Windows XP, 7 or 8, but refuses to work in the new version. However, sometimes it introduces some drawbacks to working with programs. To eliminate the inconvenience, the mode can and should be turned off, which is quite simple to do.
What's happened
Compatibility mode is what allows the operating system to run games or applications that worked well in previous versions, but do not run correctly in the current version of the system.
The check occurs automatically at the first start of any process, and the system independently selects the optimal parameters that allow it to work more or less correctly. However, it also takes away the ability to configure the launch manually, which may be inconvenient for some users.
How to turn off
Compatibility mode is not always needed, so disabling automatic launch settings is possible in several variations:
- Complete service stop.
- For one application only.
- Through the Group Policy Editor.
Stopping a service
Completely stopping the compatibility check and setting options once and for all will solve the problems that are caused by this process. If necessary, you can always not only disable, but also enable the Assistant back.
To open all services, you need to launch the Run tool using the Win + R keyboard shortcut and enter the services.msc command.
Among the extensive list that appears after clicking on "OK", you need to find the "Program Compatibility Assistant Service". This line should be selected, and then right-click on it. There are two possible scenarios here:
- Stop temporarily. This option will disable it only until the computer is restarted, then the Assistant will be enabled again. To do this, just click on "Stop" in the drop-down menu.

- Completely disable on demand. Until the user turns on the Assistant manually, it will not work. In this case, you need to go to "Properties" in the same menu, and then in the "General" tab in the "Startup type" line, enable the "Disabled" option. After that, save the changes.

Shutdown for one program
Compatibility mode in Windows 10 can be stopped for a specific application. Such a selective shutdown can be done with a few simple steps:
- Right-click on the desired shortcut and click on "Properties".
- Go to the section called "Compatibility" and uncheck the box where the frame in the screenshot is.

- Click OK and exit Properties.
Through Group Policy
To disable using group policy, you must enter the gpedit.msc command in the Run tool we already know (Win + R). After clicking on "OK", a new window will open in front of the user called "Local Group Policy Editor". Here you need to find the "Administrative Templates" section, where to open "Windows Components". Then you need to click on the names in sequence (highlighted in the screenshot).
Even if the information about the program says in black on the background color that this application is compatible only with some operating systems, among which yours is not, this is not a reason to refuse this program. Although, if you are only choosing an application for yourself, then it is still better to look for an alternative that is supported by your operating system. But if you definitely need exactly the program that is incompatible with your operating system by default, then you can try to make the program compatible with your operating system.
Windows compatibility modes
Windows operating systems have several built-in compatibility modes. These compatibility modes, with the help of special parameters, allow you to reproduce the environment of the operating system that is necessary for the program to work. Naturally, these modes cannot fully reproduce the environment of the desired operating system. Accordingly, they cannot guarantee program compatibility. But still, in many cases, these modes can be a good help. To achieve 100% results, use tools such as .
What do you need to know about these modes? Probably the fact that among the available modes you will not find operating systems that are not from the Windows family. And also the fact that you can only emulate the environment of previous operating systems of the Windows line. For example, on Windows 7 it is possible to reproduce the environment of operating systems from Windows 95 to 7 itself. Eight is not here.
Where to configure program compatibility?
The ability to configure compatibility for programs is located in the properties of the .exe file, on the tab Compatibility. You can find this tab only in the properties of .exe files. Therefore, in order to configure program compatibility, you need to get to the .exe file itself. And for this, you need to install this application on your computer. You can find the necessary .exe file by going to the address that is registered in the properties of the shortcut of the installed application. If the application does not require installation, then finding the right .exe file is easier.
How to automatically configure the compatibility of the program with the operating system?
In this article, only automatic configuration of application compatibility with the operating system will be considered. You can find an article about manual at the link. When automatically adjusting program compatibility, the operating system itself analyzes the program and sets the parameters necessary for its correct launch. To start automatic configuration, on the Compatibility tab, click the button Run the Compatibility Troubleshooter. After a little check, you will see the following window:

Here you are offered two options for the diagnostic mode. The first of these modes will provide you with a list of parameters proposed by the operating system, using which you need to run the program for its compatibility. In this window, you can test the program with the given parameters, and if everything works, ask the operating system to remember this configuration and use them every time you start this program. This option is the easiest and quietest. You simply check the configuration suggested by the Program Compatibility Troubleshooter.
The second item, presented in the picture, will open a window in front of you, which will ask you a few clarifying questions related to the compatibility problem of this program. After answering the proposed questions, the operating system will analyze them and, based on them, offer a configuration option in which, theoretically, the program should start correctly.

In many cases where there are program compatibility issues with the Windows operating system, the Program Compatibility Troubleshooter helps resolve the issue. This is how a program incompatible with your operating system can be made compatible and used.
Windows OS becomes more convenient and attractive with each new version. But one mistake haunts her in each of them - this is incompatibility with old programs. True, there is one simple and correct solution - running such utilities in compatibility mode.
Old utilities are usually understood as programs that were written for older versions of the OS: Windows 95, Windows 98 and Windows XP. They are divided into the following categories:
- Old games that you want to play and feel nostalgic from time to time.
- Drivers for old devices: printers, scanners or copiers.
- Good utilities that have not had an update for a long time.
- Accounting software that is still used by almost every utility company today.
Sometimes the causes of incompatibility are the most primitive. For example, the utility tries to find its files in the wrong folder, and therefore displays error messages on the device screen. Methods for solving such problems are discussed below.
Compatibility fixes
This method is the simplest, so use it first. The bottom line is simple: the system automatically selects the parameters that will help the old utility start. Right-click your mouse on the icon of the program that does not want to run, issuing error messages over and over again. The menu will have the following item:
Select it. After a couple of moments, this window will open. Select the first option, which will allow the system to automatically generate parameters for running the utility.
Subsequently, it will display the parameters with which you can run the utility. That is, it will “seem” to the old program that it runs on the native OS for which it was written. To check the parameters, just click on the appropriate button.
If the utility has successfully earned, then you should save the settings. This can be done by clicking the "Next" button in the service utility. And after that, you can launch the old utility with a simple double-click.
Compatibility Mode
Using this method, you can run the old utility manually in this mode. To do this, select "Properties" in the program menu, and then - the "Compatibility" tab.
As you can see, there are several options for launching the old program. They include all older versions of the OS. Select the option on which the utility worked exactly.
In addition, you can configure other settings that are visible in the screenshot. After all, some utilities require only 256 colors, while others require a special screen extension. All this depends only on the program itself, and therefore are required only in certain cases. Usually, by selecting the desired version, the utility should immediately start working.
Registry compatibility fix
Open the registry and follow the path shown in the screenshot.
Create a string parameter. In the name, write the full path to the program that does not want to run. And in the value, specify the required compatibility mode (they are shown in the screenshot below). Additionally, add the value "RUNASADMIN" as well. In this case, the utility will run immediately as an administrator.
Do the same steps in the HKEY_LOCAL_MACHINE folder (the rest of the path remains the same). Don't forget to restart your computer and try running the old utility. It will automatically start with the new settings.
In all recent operating systems, compatibility mode works the same way.
As a result, any old program can run in compatibility mode.
Windows 7 compatibility mode designed to install and run applications or drivers written for earlier OS versions, such as Windows Vista, Windows XP, etc.
It is recommended that you first check for a software or driver update on the manufacturer's website. If there is no version for Windows 7, you can try installing and running in compatibility mode a program (or driver) designed for Windows Vista or Windows XP. I’ll make a reservation right away that a program launched in this way may not work correctly or not work at all, but for lack of better options, we try to use this one.
Attention! Do not use compatibility mode for system programs such as antiviruses, disk utilities, tweakers, cleaners, etc., as this may damage the system.
Install or run an application using the Program Compatibility Troubleshooter
Compatibility fixes":
Select " Program diagnostics":
Select the version of Windows the program was running on:
Click " Program launch" and make sure the program works, then " Further":
If the app is running select " Yes, save these settings for the program".
If the error persists, click " No, try other options".
Changing compatibility settings manually
Right-click the application's shortcut or setup file (setup.exe, install.exe, etc.) and select " Properties":

Go to tab " Compatibility".
Note: MSI files can only run in compatibility mode with a previous version of Windows.
Run the program in compatibility mode. Enable this option if you know that the program is designed for one or another previous version of Windows (or worked in it):

Install options(if it is needed):
Note: does not work for 64-bit applications.

Parameter | Description |
Use 256 colors | Restriction of a set of colors in the program. Some older programs use a limited set of colors. |
Use 640×480 screen resolution | Launching the program in a reduced window. Enable this option if the GUI has a jagged outline or does not render correctly. |
Disable visual design | Disabling themes in the program. Enable this option if you have problems with menus or buttons in the program's title bar. |
Disable desktop composition | Turn off transparency and other additional screen features. Enable this option if windows move erratically or if there are other display problems. |
Disable image scaling at high screen resolution | Disable automatic resizing of programs when using large fonts. Enable this option if large fonts disrupt the appearance of the program. |
Run this program as an administrator. Some programs require administrator rights to work properly. This option is available only when logged in with an administrator account.

Change settings for all users. Select settings that will be applied to all users of this computer.

In this article, I have shown how to use Windows 7 Compatibility Mode install an application or driver written for earlier OS versions.
Compatibility mode is not a panacea. To search for other solutions, I invite you to visit our forum, we are always glad to see you.