Updates are intended to improve the performance of the program. Now the developers of the Yandex browser are working hard to ensure that each next version works even better.
For the convenience of users, they have implemented a background update. This feature was supposed to make their lives easier.
Is it really?
Basically, developers have made life easier for users. Here is a list of features that have been introduced recently:
- installing add-ons from Opera Addons;
- video compression that provides comfortable playback even with slow Internet;
- synchronization of open tabs;
- smooth launch of the browser with a large number of open tabs;
- reduced consumption of PC resources and so on.
But developers also make mistakes. For example, one version of Yandex.Browser caused Windows to fail. The company quickly found the bug and fixed it, but some users had to reinstall Windows to get their system back up and running.
Thus, disabling background updates has both advantages and disadvantages. What more is up to you.
Step-by-step instruction
First of all, it is worth noting that in this browser it is impossible to completely disable background refresh. In addition, this is not recommended, because using the latest version of the browser guarantees the safety of your personal data on the network.
Thus, disabling updates in the background will only help save traffic and reduce the load on the processor from low-powered computers.
To do this, open the main menu (three horizontal lines in the upper right corner) and click "Settings".
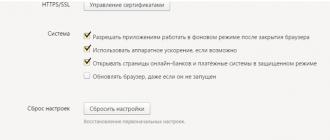
Scroll to the very end of the list and click on the button " Show advanced settings». In the "System" section, uncheck the box next to "Update Yandex.Browser, even if it is not running."
Please note: the changes made do not affect automatic updates of installed extensions.

This way you will disable automatic browser updates in the background. However, it will automatically check for them every time it starts. You will see a notification when a new version is available.
Disabling mail
Perhaps, after reading this, some users will decide to completely abandon Yandex.Mail. Or maybe you just want to sort through a lot of mailboxes. In this case, you can disable mail on Yandex. Please note: disabling (or rather, deleting) your mailbox will also affect all your data, including:
- details of the created electronic wallet;
- geographical maps with laid routes;
- files uploaded to Yandex.Disk;
- hosted videos.
To delete a mail, go to your account and click on the gear.


Please note: the mail cannot be restored after deletion, and you can register a new mail only after a month.
To disable updating in the background, you need to open advanced settings and uncheck the box next to "Update the browser, even if it's not running."
It is recommended that you install new versions of Yandex.Browser yourself if possible. As they appear, you will receive appropriate notifications. Please note that it is not possible to completely disable checking for new versions.
To delete your mailbox, you need to open "All settings" - "Specify your data" - "Personal data" - "Delete account". In this case, the information cannot be deleted. This procedure will also affect files located on Yandex.Disk and your other data.
There are several ways to disable auto-update in Google Chrome. Before applying them, consider whether you really need it. After all, older versions of the browser are vulnerable and unsafe.
Do I need to disable auto-updates?
Automatic updating is an important feature, so you should turn it off only when absolutely necessary. If, for example, you need a certain version of the program or in order to temporarily free up Internet traffic for more urgent actions.
Only an updated browser can guarantee the high level of protection promised by the developers.
Please note that all further manipulations are performed only at your own peril and risk. In order to correct situations if Google Chrome or a PC starts to work incorrectly, create a restore point in advance that will allow you to roll back the system.
Google won't update to new versions
Method number 1: the msconfig command to help
The first method is to disable the Google Chrome update services in a special window. How to go to it?
1. In Start, enter the msconfig command in the search box and press Enter. You can also hold down Win+R. The Run window will appear. In the line write the same word msconfig.
2. Switch to "Services". Check the box next to "Do not display Microsoft services" for a faster search.
3. Among all the items that are important to us: Google Update (gupdate) and Google Update (gupdatem).
4. Click on "Apply" and then on OK. In the next window, confirm the restart of the PC.

Method number 2: deleting the update file
1. Right-click on the Google Chrome icon on the desktop. Select the second item "File Location".

2.Click on "Google" in the address bar of the folder.

3. Open the Update folder in Google.

4. A separate file will be GoogleUpdate. Call the context menu and click on the "Delete" item.
The folder can also be renamed, for example to Update.old. Then deleting the file is not required.

5.Restart PC.
This method has one significant disadvantage: auto-update can only be returned by re-downloading the distribution and installing the program. Before that, it will need to be properly uninstalled.
Method number 3: through browser settings
1. In the browser settings, scroll to the item "Show advanced settings". In the "Personal data" section, click on the first button "Content settings".

2. A new "Plugins" window will open. Click on "Disable individual plugins..."

3.Find the Google Update item. Disable feature.

Method #4: Local Group Policy Editor
A more complex method, designed for computer-savvy people.
1.Download the archive in ADMX format on the browser's official resource in the block, which in English looks like Obtaining the Administrative Template.
2. Unzip the GoogleUpdateAdmx folder and transfer its files to the folder at the following address: C:\Windows\PolicyDefinitions\

3. Open the policy editor: hold down Win + R and write gpedit.msc in a line.
4.Go to Chrome through the initial "Computer Configuration" folder on the left side of the window, where the branching system is located. To do this, bypass Administrative Templates - Google - Google Update - Applications.

5. Double-click Allow installation and put "Disabled".
6. Also open the second item Update Policy Override. Set the "Enabled" option for this element, and select "Updates disabled" in the Policy section. Save changes.

Additionally, you can remove the GoogleUpdate task. To do this, start the Windows Task Scheduler. The instructions have already been given above.
Get rid of auto-refresh tabs
In new versions of the browser, one not very convenient option has appeared: auto-refresh tabs. When idle, the browser's background tabs start to automatically reload. This “eats” the traffic, and when you leave the video in one tab for a while, the entire media content load may crash due to page reload. You also often have to flip through the news feeds again. How to solve a problem? You just need to disable tab refresh:
1. Enter chrome://flags/#automatic-tab-discarding into the line.
2. In the drop-down menu, put "Disabled" (Disabled).

3. Restart the browser.
There are at least four ways to disable auto-update, including manually deleting the file that helps update the browser. Before the procedure, make sure that you really need it, and get down to business.
Yandex.Browser has been actively developing since the release of its first version. All new features, features and bug fixes, users receive along with a browser update. But if the user is satisfied with the current version, and he does not want to upgrade to the new one, then it would be logical to disable the Yandex Browser update. How to do this and is it possible to turn it off in principle?
Browser developers do not provide the ability to disable auto-update. What's more, they specifically included a forced browser refresh even if you're not using it. This was done, they said, "for security reasons." On the one hand, this is, of course, correct. Along with new threats, vulnerabilities are patched and new ways of protection are added. However, if an experienced user wants to stay on the current version or does not want to update because of the Internet with traffic, then it would be more correct to provide for the possibility to remove the Yandex browser update.
However, this unpleasant feature can be bypassed by all those who want to stay on the current version of the browser. To do this, you will have to work a little with the files of the browser itself.
Step 1
Go to C:\Program Files (x86)\Yandex\YandexBrowser. There will probably be several folders with browser versions, each of which contains nothing but a file service_update.exe. Delete these folders.
Step 2
Open hidden files and folders if they are not already open. We pass along the way C:\Users\USER_NAME\AppData\Local\Yandex\YandexBrowser\Application, where USERNAME is the name of your account.
In the list of files you will see a folder with the name of the current version of the browser. This is what I have, yours may be different:

We go into it, go down below and delete two files: service_update.exe And yupdate-exec.exe.

Even after deleting the files, you can upgrade to the new version. You can do this in the standard way. But if you still do not want to update, then manually checking for updates is not recommended. Since the browser will then be updated anyway.
This way of disabling the update is rather inconvenient, but effective. Moreover, all deleted files will be returned as soon as you want.
Provides a set of browsers of different versions on different operating systems. We use several Xen Windows images with different sets of browsers, and run copies of the desired images.
Naturally, auto-update of browsers should be disabled. If browsers start updating on their own, then:
1) we cannot guarantee users that their tests were run on the correct version of the browser
2) running tests may be delayed due to a browser update
3) browser update uses resources (traffic and processor), which can also affect the speed of test execution
Of course, Google Chrome is also included in the set of browsers. And with disabling its auto-update, there may be a hitch, even if you follow the official instructions. In this short post, I will talk about how to really prevent Chrome from updating.
So the instructions say:
To disable automatic updates for Google Chrome on Windows, disable Google Updates from updating. To do this, use one of the methods below.
1) Use the Google Update ADM template as described in the Google Update for Organizations article.
2) Set HKEY_LOCAL_MACHINE\SOFTWARE\Policies\Google\Update\UpdateDefault REG_SZ (string) to “0″.
| reg ADD "HKEY_LOCAL_MACHINE\SOFTWARE\Policies\Google\Update" /v UpdateDefault /t REG_SZ /d "0 " /f |
and relaxed.
It turned out - early, because after a while I discovered that Chrome continues to update perfectly.
I double-checked the value in the registry - it was there. I added it to HKEY_CURRENT_USER at the same time - it didn't help.
14 comments
Stas, thanks for the comment.
Pay attention - in the post I quote just from the page to which you gave the link. At the time of writing the article, a completely different, non-working parameter was indicated there
I hope the submitted bug report worked.
Now it will be necessary to carefully test the operation of this key, and use it.
I managed to find a way to completely stop google chrome from auto
updating itself and you can still re-enable it to update when needed.
Just follow the steps below:
1. First, you need to find where the google chrome updater is located
(they keep on moving it every once in a while), you can either search
for it with windows search or you can right click on the google chrome
shortcut then hit “properties” and on the shortcut tab hit “Open file
location” the “Update” folder is usually in the google folder just 2
folders back from the location of the google launcher where the
shortcut will bring you.
2. Make a backup/archive of the “Update” folder using winrar or any
similar application you prefer.
3. Delete the “Update” folder (I’m not sure if you need to close chrome
first, but to be sure just close any running google application first
including the updater from the task manager if you can.).
4. Open chrome, then hit on “The Generals” Button?? which is the former
“wrench” icon. and click on the “About Google Chrome” button from the
drop down to see this “Update failed (error: 3)” which will verify that
the updater is no longer working.
Then, in the case that you need to update chrome again just extract the
“Update” folder from step 2 in its proper location (so, make sure that
you note where that is before deleting the folder) and you will be able
to update google chrome again.
sorry the english,
goodluck..
Thanks, Ralph, for your method.
I should note that Google has changed documentation – the “UpdateDefault” parameter in registry is present instead of AutoUpdateCheckPeriodMinutes.
Later I will test if it works and update the post.
I checked new registry key from chrome documentation-
reg ADD “HKEY_LOCAL_MACHINE\SOFTWARE\Policies\Google\Update” /v UpdateDefault /t REG_DWORD /d 0 /f
it seems that it works.
But in Russian version wrong registry parameter type is still used – REG_SZ instead of REG_DWORD, so post is still actual for Russian-speaking people.
Using the autoruns utility, remove 2 checkboxes from update
Daws and services can no longer get off. you need to delete the Update folder in the Google folder.
Google Chrome, the market leader in browsers, owes its popularity to many things, and functionality is one of them. Chrome is a fairly self-sufficient product, so much so that an entire Chrome OS operating system is based on it. And, by the way, the latter in terms of capabilities is not much different from the browser itself. Previously, Chrome, like Windows, Android and other operating systems, even had its own notification center, now abolished.
When running on Windows, Chrome is configured to run in the background by default to ensure the functionality of its built-in extensions and applications based on it. Also, by default, the browser provides for displaying notifications from individual sites in the Windows system tray. In most cases, these are various kinds of web services, online stores, trading platforms and similar resources. But, Chrome delivers notifications to the operating system tray not from all sites on the Internet in a row, but only from those that the user himself gave permission to do this. The request to deliver alerts from each individual site is another preset Chrome setting. Such requests when working with certain sites first appear, as a rule, either at the bottom of the browser page on a dark background,
or an inconspicuous message at the top.

The Chrome notification center mentioned above - the familiar bell-shaped icon in the Windows system tray - was convenient in that it was possible to quickly enable and disable browser background work in its context menu. The Chrome Notification Center has also been implemented with quick access to enable / disable alerts and settings for blocking alerts for individual sites. The abolition of the notification center did not produce much excitement among the Chrome audience, because few people had previously used the bell-shaped icon to quickly access the browser settings of interest. If necessary, the background operation of the browser and the delivery of notifications (from all sites in a row or only from certain of them) can be turned on and off in the Google Chrome settings.

How it's done?
Enable/disable Chrome background work
In the settings section, we will resort to the help of an internal search engine. In the search field, enter the initial characters of the desired parameter and find the browser background control in the "System" settings section. To disable the background work of Chrome, remove the pre-checked box, as indicated in the screenshot.

Enable/Disable Chrome Alerts
The easiest way to get into the Google alert settings is to wait for one of the alerts to appear in the Windows system tray and press the little settings button.

An alternative path lies through the same browser settings. And in this case, we prescribe the initial characters of the desired parameter in the Chrome settings search field, as indicated in the screenshot, then in the "Personal data" section, click the "Content settings" button.

Inside the "Content Settings" look for "Alerts". To completely opt out of Chrome notifications, you should enable the option "Do not show notifications on sites" and click the button at the bottom of the "Done" window. If you want to turn off alerts only for certain sites, click "Configure exclusions".

In a separate window, select one or another site for which notifications were previously allowed. From the drop-down list at the end of its line, instead of the “Allow” value, set “Block” and click the “Finish” button.

Then click "Finish" again in the "Content Settings" window.

Now notifications from a blocked site will no longer appear in the Windows system tray. The process of enabling alerts is the reverse.
Have a great day!
There was one condition. I definitely needed Chrome version 25.0 ... I installed Google Chrome and decided to disable the update function, as I usually do (if not disabled, the browser will automatically update to the newest version).
In Chrome, I did not find disabling updates and just quickly did it through msconfig and, just in case, autoloading in CCleaner, thinking that these manipulations would be enough.
Imagine my surprise when I saw, after some time, that the browser had been updated to the latest version.
Wow. Not only did these guys from Google hide the disabling of updates somewhere, but also the commands in msconfig are not an order for them.
When I take on something, I usually bring it to completion. I undertook to find this disabling updates in Google Chrome and did it.
Here is a short manual. After disabling in this way, everything works fine for me, nothing is updated.
1. Click "Customize and manage Google Chrome" at the top right in the browser (a square with three horizontal stripes). Click "Settings".

2. At the bottom there is a blue inscription in small print "Show advanced settings". We press it.

3. Immediately we see "Personal data" and a gray button labeled "Content Settings". We click on this button.

4. We get into the "Page content settings" window. Scroll down until your eye catches on the blue inscription in small print "Disable individual modules." We press.

5. We get to the "Plug-in modules" page. The Google Update module will be visible at the bottom. This is what we are looking for. This feature is enabled by default. Click the blue inscription "Disable". Once disabled, the module becomes inactive and turns gray.

Problem solved.
Of course, for many people, as they say, in a drum, their browser is updated or not. But, nevertheless, it is more pleasant when you manage the process yourself.
Software for the new Windows, read.
38 reviews so far...
Svetlana writes:
I like Google, it's my main one, but I didn't know how to disable updates either, thanks for the science.
admin replied:
April 6th, 2015 at 06:45 pm
@Svetlana, good browser. I had to switch to Mozilla for only one reason - the constant crashes of the flash player.
Glory writes:
Didn't find m in version 42.0.2311.90?
admin replied:
April 24th, 2015 at 06:53 pm
@Slava, now the same version of Chrome is installed and also did not find the updates disabled. Looks like they did it without a hitch. If I find a way to turn it off, I'll post it.
Glory replied:
April 24th, 2015 at 07:11 pm
@admin, yes, it should be somewhere, but where…
admin replied:
April 24th, 2015 at 08:11 pm
@Slava, they are doing something weird. More recently, after all, there was an opportunity to turn it off, but now it is no longer there. Most likely, they removed this feature. Well, I'll try to find a way to turn it off.
Sergey writes:
Wow.Admin! I have version 22, I did not find the google update plugin. Will chrome update itself in this case? If so, I need your advice. THANK YOU!
admin replied:
June 6th, 2015 at 11:19 am
@sergey thank you. They removed the option to disable updates. Apparently, now there is an automatic update. Nothing can be set: neither the frequency of the update, nor the shutdown.
There are ways to block the update, but you need to install some special ones. applications or picking Windows group policies, but I didn’t do it.
Alexander writes:
This hasn't been working for a long time ... We deny access to the system to the google update folder. and only then the updates will stop...
sergey replied:
June 28th, 2015 at 11:53 pm
@Alexander, I am far from these troubles, but explain how to prevent the system from accessing the google update folder. Thank you in advance.
Alexander replied:
June 29th, 2015 at 1:09 am
@sergey, We follow the path C: / Program Files (x86) / google chrome / there is the Update folder (the body of the update virus lives there), right cl. mouse on it properties, security tab, point the arrow at the system (in the window), then change, put the daws on the ban, agree, confirm everything .... here is a link to the fortieth version (link removed automatically). After installation in c:\Users\account\AppData\google chrome, just copy this folder immediately after installation without logging into your chrome account), and wait for the update to appear there, how to update chrome, deny access, and change everything there to the previously copied Chrome \ Application \ folder further to taste ... or download a portable one, it is not updated (you just need to get a shortcut) Works from any disk from the folder (link removed automatically) put the Google Chrome Portable folder anywhere inside the program launch, or make a shortcut from the folder.
admin replied:
June 29th, 2015 at 8:22 am
@Alexander, thanks. For some time now, it has become all the same for all these chrome updates, but I think the recipe is effective and will help those in need.
Alexander replied:
June 29th, 2015 at 07:15 pm
@admin, With pleasure. Thanks for posting. I'm glad to help, everything definitely works ... And I'm also very glad to help people in the fight against this serious adversary. Because, they have already become insolent to the limit with their buggy updates, which they turned into a virus (very similar to the mail.ru agent), whoever gets infected will understand how difficult it is to remove it. Good luck to you!
admin replied:
June 30th, 2015 at 08:29 pm
@Alexander, here are the villains, these guys, and viruses are planted here. Thank you, your system for disabling updates will also come in handy.
sergey replied:
June 29th, 2015 at 9:50 am
One of the most attractive features Google Chrome is an automatic update option that makes your life easier by managing software updates without bothering you about anything related to it. However, this useful feature can also create problems. If you do not have enough bandwidth or work in a corporate environment , automatic updates is not a good feature for you, you can disable automatic updatesgoogle chrome and then manually update google chrome whenever you want. For example, if a company decides to install Google Chrome on all computers and asks all of its employees to start using it, we will have a situation where thousands of Google Chrome installations in the same office, try to check for updates and download updates. This will create problems for network administrators!
So here's how I speculate on how you can disable this feature, on the Google help page.
Disabling automatic updates of Google Chrome
- Launch Terminal located in /Applications/Utilities/
- Enter the following defaults, write the command, and press return:
defaults write com.google.Keystone.Agent checkInterval 0
- Exit Terminal and restart Google Chrome
Note that this setting disables all automatic updates for all Google apps on the computer, not just Chrome. Perhaps there is a way to disable chrome auto-update elements, I did not find it, even though Google offers a broader solution, described above.
Disable Chrome update manually after automatic update
Now that you have disabled the automatic update features, you want to update google chrome manually. The easiest way would be to just download the latest version Chrome from the site, but you can also start the upgrade process from the command line by following the steps below:
- In the OS X Finder, press Command+Shift+G to open the Select Folders window, enter the following path:
/Library/Google/GoogleSoftwareUpdate/GoogleSoftwareUpdate.bundle/Contents/Resources/
- Find “CheckForUpdatesNow.command” and double click on it to launch Terminal and run Google software update manually
If you're tired of struggling with manual updating, it's easy to turn around again:
Enable Automatic Google Chrome Update
- Launch the Terminal located in /Applications/Utilities/ and enter the following default values, write the command:
defaults write com.google.Keystone.Agent checkInterval 18000
- Exit the Terminal and restart Google Chrome to automatically update
The numbers at the end are the number of interval seconds between version checks, 18000 is the default, but if you want to be more or less aggressive choose more or less accordingly.
Note: Do not turn off automatic updates, otherwise you will not be able to get updated to the latest security updates. You will need to keep your eyes closed Google Chrome releases from time to time and keep a set of security settings.
This browser has a built-in function program updates. At the same time, every time you connect to the Internet, the browser will check for updates and immediately download and install them on your computer. Not all users like it, the reason may be limited traffic or that only a certain version of the browser is required.
In previous versions, it was possible to disable the download of new versions through standard tools, however, this feature was removed. This article will provide several methods for turning off updates in Google Chrome.
Disabling services at startup
The first method involves disabling some services. First you need to press win + r and write msconfig in the window that opens. In a new window, open the "Services" tab, for a faster search for the desired service, you can check the box " Do not display servicesmicrosoft". Then you can sort the list by name or by developer and find Google Update Service. You will need to uncheck them, after which, at the bottom of the menu, click on the " Apply". Next, you should restart your computer, after which the browser will not be updated.
Disable update services
The same services can be turned off in another way in the place where their complete list is located. To get there, you can apply two methods, in the first case, you need to go to the control panel, then go to administration and click on services. In the second case, you can right-click on the computer icon, and then select control. In the window that opens, select Services and Applications- Services.
Next, you need to find the same two services as in the previous paragraph. Then double-click on each of them. A window will open with properties. In it, you need to stop the service and transfer it start in manual mode.
After that, they will not start until the user himself comes here and starts them. This may be required in case some applications stop working on the old version. Or you can do it when you have access to unlimited traffic.
Using the Task Scheduler
Disabling updates can also be done through this utility. To find it, just type its name in the search bar in the parameters in Windows 10 or in the start menu in Windows 7. Next, the user will have to go to the full list of tasks in which to find googleupdate. Next, you will need to click on it and select the item " Disable». 
After a reboot, the browser will stop receiving updates at any time.
Removing Google Update
One of the easiest ways that is suitable for any user. You need to open the explorer and find the directory update, which is located in C:\Program Files (x86)\Google\(or C:\Program Files\Google\). After that, it can be completely deleted or renamed to any other directory. Can be in the same as in the picture. 
Now the browser will not be able to update either through automatic updating or manually, as will be written in the program's help. 
Using the Registry Editor
If for some reason the other methods did not help the user turn off the chrome browser update, then you can work through the registry editing utility. To open it, it's best to press win + r and write regedit. In a new window, in its left part, navigating through the directories, you will need to get to HKEY_LOCAL_MACHINE\ SOFTWARE\ Policies, create the google directory in the last directory. You can do this simply by right-clicking on the catalog and select the item " Create". In this directory, you will need to create another one named Update, and already in it you need to create variablesdword. Their detailed description is given below. 
These parameters in a more expanded form: 
If the user has a 64-bit system, then all the same actions with the creation of directories and parameters should be done with the folder HKEY_LOCAL_MACHINE\ SOFTWARE\ WOW6432Node\ Policies.
Group Policy Editor to disable updates
This method is simpler than the previous one, but it is only available to owners of professional versions of the OS, in which it is allowed to produce policy editing. The user will need to go to https://support.google.com/chrome/a/answer/6350036 . From which you can download the archive with files. Data should be extracted and moved out of the directory GoogleUpdateAdmx V C:\Windows\PolicyDefinitions\.
Next, press win + r and enter in the line gpedit.msc. In the window that appears, follow the path Computer configuration- Administrative Templates - Google - Google Update - Applications - Google Chrome. In this directory, the first parameter should be set to disabled, and the second to enabled. 
At the same time, if the user does not plan to update at all, then you need to install everything at the bottom as well as in the picture. If updates will occur manually, then you should put Manual updates only.
Now you can restart your computer.
Disabling auto-update on MacOS
You should click on " Transition”, if it is not there, then you need to go to finder. Next, press and hold Option, then, in the drop-down menu, select Libraries. You should find the google folder. In it you should find the directory " GoogleSoftwareUpdate”, then click File - Properties and rename this folder to any other. After that you can reboot device.
How to Block Updates on iPhone
Here you need to go to the settings and select iTunes and the App Store. After that, it remains to turn off the slider at the Updates label. Once disabled, no app, including chrome, will be updated.
Blocking on Android
To get started, the user will have to go to the play market. Here you should go to the menu that is called up by clicking on the three horizontal bars in the upper corner. Next, select Settings - Auto-update apps, put Never.