A screenshot - a screenshot - is most often taken in order to show someone else. However, a snapshot taken using the Print Screen key also contains a lot of unnecessary stuff. It is advisable to remove unnecessary areas from the screenshot, especially when the size of the image file matters or any private information gets into the picture. The easiest way to do this is using the regular editor of Windows OS - it is called MS Paint.
You will need
- Graphic editor MS Paint.
Instruction
Launch the graphics editor. In the latest versions of Windows - 7 and Vista - just press the Win key, type pai and press Enter.
Upload a screenshot in Paint. If it's already saved, just drag the file onto the application window. If the screenshot was taken using the Print Screen button and is still in the clipboard, use the paste operation - press the keyboard shortcut Ctrl + V.
You can use several functions of the image editor to crop an image. If you want to reduce the height by cutting off the bottom, or make it narrower by removing the vertical rectangle on the right, you can use the change image properties function. To do this, click on the blue button at the upper left edge of the program window and select "Properties" from the menu. This command has been assigned hotkeys Ctrl + E - you can use them too.
In the image properties window, change the numbers in the Width and Height fields. By default, these parameters are measured in points, but you can check the "centimeters" field - these units are more convenient if the screenshot is supposed to be printed. Click OK and the image will be resized.
Another method allows you to more accurately select the area that should remain on the screenshot. You need to do this using the selection tool. Open the "Select" drop-down list on the "Home" tab in the menu and select the "Rectangular area" item. Then, using the mouse, select the area that should be left, and click on the "Crop" button - it is placed in the menu to the right of the "Select" button. Paint will resize to match the selection you've made.
You can leave on the screenshot not a rectangular area, but an area of any shape. To do this, instead of the "Rectangular area" item in the list of the "Select" button, select the "Custom area" item. Then, using the mouse pointer, circle the desired area and click the "Delete" button. Paint will first erase everything that is left outside the outlined area, and then resize the image to fit the new screenshot dimensions.
Save the edited picture. The corresponding dialog is called up by pressing Ctrl + S. If you opened a screenshot from a file, Paint will do without asking for the file name and where to save it, but simply overwrite the original file.
When shooting with a pocket digital camera or mobile phone, not everyone thinks about how to build a frame, what is happening in the background and other similar issues. As a result, when viewing the pictures, it turns out that next to the girl demonstrating a new stylish hairstyle, there was someone's protruding ear, which spoils the frame. In such a situation, cropping the image, which can be done in any graphics editor, can help.

You will need
- - Photoshop program;
- - photo for processing.
Instruction
Open the photo you want to crop in Photoshop. The easiest way to do this is to open the image folder and right-click on the file. Select "Open With" from the menu that appears, and select Photoshop from the list of programs.
Place the cursor on the photo to be cropped, hold down the left mouse button and drag out the cropping frame. Release the button. The fragment of the photo that will remain after cropping retains its colors, and those parts of the image that will be removed are covered with a semi-transparent mask. By default, the mask color is black, but you can choose a different color by clicking on the colored rectangle, which can be found in the panel under the main menu.
If the first time you didn’t manage to fine-tune cropping, there is no reason to be upset. You have the ability, by dragging the borders of the frame with the mouse, to crop exactly what you want. To move the cropping frame to the side, hold down the left mouse button and drag the side border of the frame. To move the frame up or down, you need to drag the bottom or top border. Dragging a corner of the frame will increase or decrease its size.
The crop frame can be rotated around the anchor point, which is in the middle of the frame by default. To rotate the frame, hover over the area of the photo outside the crop boundary near the corner of the frame. The pointer changes to a curved arrow. Hold down the left mouse button and rotate the frame as you like.
Apply the transformation. To do this, press the Enter key on your keyboard.
Save the cropped photo with the Save As command, which can be found in the File menu. When saving, enter a file name that is different from the original.
A screenshot - a screenshot - is most often taken in order to show someone else. However, a snapshot taken using the Print Screen key also contains a lot of unnecessary stuff. It is advisable to remove unnecessary areas from the screenshot, especially when the size of the image file matters or any private information gets into the picture. The easiest way to do this is using the regular editor of Windows OS - it is called MS Paint.
You will need
- Graphic editor MS Paint.
Instruction
A new lesson in which we will look at the process of creating a screenshot of the screen with a standard Windows program - Scissors
What is the Scissors program.
Scissors program is a standard program that comes with the Windows operating system and is designed to create screenshots (screenshots).
The program itself does not ship with all Windows, but only with Home Premium, Professional, Enterprise, and Ultimate versions. If you have a version different from these, then you will not find this tool on your computer. Find the tool on your computer can be found in the "Start" menu -> "All Programs" -> "Accessories".
In fact, this item may not be, so let's figure out where her tool is in order to use it and how to add it to the "Standard" folder. You can find it at "Local Disk C" -> "Windows" -> "System32". In this folder, look for a file called "SnippingTool.exe".

This file, through the right mouse button, we can send to the desktop as a shortcut, we can pin it to the Start menu or taskbar, and also add it to the "Accessories" folder. In order to place it in the "Accessories" folder, we hold down the scissors program icon and, without releasing the left mouse button, drag it to the "Start" menu, then to the "All Programs" folder, then to the "Accessories" folder and at the end just we place it somewhere between the points that are there.

We can also, by clicking the right mouse button on the tool, give it a name, for example, Scissors.

The last point that will be convenient when working with the standard Scissors program is a hot key. With it, we can call the tool without going to the Start menu. To do this, right-click on the item, select "Properties" from the drop-down menu. In the window that opens, on the "Shortcut" tab, place the mouse cursor on the "Shortcut" item and press any key that you want to launch the program, for example, F7. Next, click the "Apply" and "OK" buttons. Now, by pressing the F7 key on the keyboard, the Scissors program will automatically start.

Now it's time to look at how screenshots are created using the program. Run the program and start parsing it. In the window that opens, click on "Settings". There are very few of them and they are very light, so we will skip them and will not consider them.


Most of all we are interested in the "Create Snapshot" item. By clicking on it, we take a screenshot. Before proceeding with its creation, it is necessary, through the arrow located to the right of this item, to select the area that we will shoot.

Here we have 4 options to choose from:
1. Arbitrary shape - Create a screenshot of absolutely any shape;
2. Rectangle - creating a snapshot of a regular rectangular shape;
3. Window - take a screenshot of the selected open window. Here you do not need to select an area, but to take a snapshot of it, just move the cursor to the open active window and click the left mouse button. The active window in this case, when hovering the mouse cursor, is highlighted in red;
4. Full screen - everything is simple here, a screenshot of the entire screen is taken.
For example, I'll choose the "Rectangle" survey area. Further, holding down the left mouse button, we move the cursor, choosing which area will be in the picture.

After we have selected the area, a new window opens in which we can edit the resulting image - you can crop the already received screenshot, if there is something extra on it, copy it in order to use it in another editor, for example, in Paint, write something on it, draw or send by mail.


If you still have questions, you can watch the video tutorial below.
In this tutorial, we will show you how to install the Adobe Reader program, with which you can view pdf files.
In this tutorial, I'll show you how to delete a skype chat.
Many are still using Windows version 7 or 8 and do not plan to upgrade to version 10 yet. However, one feature that appeared in the latest version of Windows and allows you to make multiple desktops is still missing for many. With the help of a special program, this can be fixed and made several desktops in both 7 and 8 versions of Windows
DjVu (from the French "déjà vu") is a popular format for storing scanned documents, which contain many formulas, drawings, handwritten symbols and diagrams. Encyclopedias, books, journals and manuscripts are often distributed in this format. Just today we will try to figure out in what ways they can be opened.
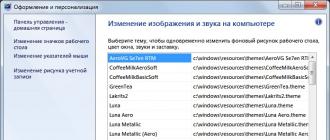
I already talked about how easy it is to change the appearance of a folder icon using standard tools in one of my articles. Today it's time to talk about a third-party program that will allow you to change the color of a folder icon. It allows you not only to perform manipulations to change the appearance of the folder, but also to do it as quickly and conveniently as possible.
How to take a screenshot and cut out the desired image in Paint.NET. This program most likely already exists in your operating system.
Even if you do not own Photoshop, then with its help you can do:
- Screenshots
- Cut out the moments you need from photos and pictures
- Reduce and enlarge images
- Change photo extensions
- Edit photos, remove minor defects
- Insert text into pictures and photos
And much more…
How to find the standard Paint program on your computer.
To do this, go to Start -> All Programs -> Accessories. And it's there by default.
But even if you found it on your computer, I still advise you to download it from the official website HERE : https://paintnet.ru/. Why download? Because the Paint attached to the Operating System is most often already an outdated version, it is not associated with the official site and will not be updated, and the downloaded program contacts the site every 5 days to check for updates. And it is much more convenient than the standard Paint.
And then there are lessons on the site that tell how to use the program https://paintnet.ru/category/lessons/, and they are constantly added and updated. It was created by students at the University of Washington as a test. And now she is an indispensable assistant for us.
For example you need take a screenshot, you need to open the page from which you want to take a screenshot, then simultaneously press ctrl and at the same time on the button printScreenSysRq, it may also be called PrtScSysRq. On the keyboard, it can also be placed in different places, but always closer to the right edge of the keyboard.
Thus, we save the screenshot to the clipboard of our computer. This means that we can paste it into any program that has a paste from clipboard function.
The image will enlarge if you click on it! Like all other pictures.
If the image is too large, then this window will appear in front of you. And if you want to save the photo in its original form, then click Enlarge canvas. Since the next option is “Keep canvas size”, it will crop it as you wish.

After you do whatever you want with the screenshot, you need to save it. Choose "Save As".

When the save window pops up, we:
- We write the name of the file.
- Select the format, for this, simply click on the desired one.

If you select the PNG format, the following window will appear. There you need to choose the quality of the picture. The larger the number in bits, the better and heavier the image will be. So here already decide what you need it for, if for social networks, then there is not much difference.
But if for the site, then the weight of the photo is of great importance. A heavy one will slow down page loading. If you want to learn how to take a photo easier with one easy and multifunctional program, then. If you are more comfortable using online services, then.

After you have noted the need for a checkbox, you can immediately look at the quality. If everything suits, then click OK.
How to insert a screenshot in a graphic editor.
In the same way, we paste the screenshot into any graphics editor, or into Microsoft Word. This is done while the image is saved to the clipboard. If you were told that there is nothing in the buffer. Then you will have to repeat the procedure again, that is, press the two buttons on the keyboard, with which we made the screen.

I recorded a short video tutorial, it shows several necessary application examples, including how to cut out the desired area from the screenshot.
So, in this article I said:
- How to take a screenshot with Paint
- How to cut an image from a screenshot
Now there is a wonderful free program from the Yandex.Disk service, it's called. It will not only take a screenshot for you, but also allow you to add beautiful arrows, inscriptions, and so on.
A screenshot - a screenshot - is most often taken in order to show someone else. However, a snapshot taken using the Print Screen key also contains a lot of unnecessary stuff. It is advisable to remove unnecessary areas from the screenshot, especially when the size of the image file matters or any private information gets into the picture. The easiest way to do this is using the regular editor of Windows OS - it is called MS Paint.
You will need
- Graphic editor MS Paint.
Instruction
Launch the graphics editor. In the latest versions of Windows - 7 and Vista - just press the Win key, type pai and press Enter.
Upload a screenshot in Paint. If it's already saved, just drag the file onto the application window. If the screenshot was taken using the Print Screen button and is still in the clipboard, use the paste operation - press the keyboard shortcut Ctrl + V.
You can use several functions of the image editor to crop an image. If you want to reduce the height by cutting off the bottom, or make it narrower by removing the vertical rectangle on the right, you can use the change image properties function. To do this, click on the blue button at the upper left edge of the program window and select "Properties" from the menu. This command has been assigned hotkeys Ctrl + E - you can use them too.
In the image properties window, change the numbers in the Width and Height fields. By default, these parameters are measured in points, but you can check the "centimeters" field - these units are more convenient if the screenshot is supposed to be printed. Click OK and the image will be resized.
Another method allows you to more accurately select the area that should remain on the screenshot. You need to do this using the selection tool. Open the "Select" drop-down list on the "Home" tab in the menu and select the "Rectangular area" item. Then, using the mouse, select the area that should be left, and click on the "Crop" button - it is placed in the menu to the right of the "Select" button. Paint will resize to match the selection you've made.
You can leave on the screenshot not a rectangular area, but an area of any shape. To do this, instead of the "Rectangular area" item in the list of the "Select" button, select the "Custom area" item. Then, using the mouse pointer, circle the desired area and click the "Delete" button. Paint will first erase everything that is left outside the outlined area, and then resize the image to fit the new screenshot dimensions.
Save the edited picture. The corresponding dialog is called up by pressing Ctrl + S. If you opened a screenshot from a file, Paint will do without asking for the file name and where to save it, but simply overwrite the original file.
When shooting with a pocket digital camera or mobile phone, not everyone thinks about how to build a frame, what is happening in the background and other similar issues. As a result, when viewing the pictures, it turns out that next to the girl demonstrating a new stylish hairstyle, there was someone's protruding ear, which spoils the frame. In such a situation, cropping the image, which can be done in any graphics editor, can help.
You will need
- - Photoshop program;
- - photo for processing.
Instruction
Open the photo you want to crop in Photoshop. The easiest way to do this is to open the image folder and right-click on the file. Select "Open With" from the menu that appears, and select Photoshop from the list of programs.
Place the cursor on the photo to be cropped, hold down the left mouse button and drag out the cropping frame. Release the button. The fragment of the photo that will remain after cropping retains its colors, and those parts of the image that will be removed are covered with a semi-transparent mask. By default, the mask color is black, but you can choose a different color by clicking on the colored rectangle, which can be found in the panel under the main menu.
If the first time you didn’t manage to fine-tune cropping, there is no reason to be upset. You have the ability, by dragging the borders of the frame with the mouse, to crop exactly what you want. To move the cropping frame to the side, hold down the left mouse button and drag the side border of the frame. To move the frame up or down, you need to drag the bottom or top border. Dragging a corner of the frame will increase or decrease its size.
The crop frame can be rotated around the anchor point, which is in the middle of the frame by default. To rotate the frame, hover over the area of the photo outside the crop boundary near the corner of the frame. The pointer changes to a curved arrow. Hold down the left mouse button and rotate the frame as you like.
Apply the transformation. To do this, press the Enter key on your keyboard.
Save the cropped photo with the Save As command, which can be found in the File menu. When saving, enter a file name that is different from the original.
There are many advanced photo editing programs out there. Such programs are equipped with many functions, and they are much more convenient to use than the Paint program. However, these programs are not always at hand, while the Paint graphics editor is built into the Windows operating system and is on every computer.
Now we will talk about how to crop a photo in Paint. Cropping is one of the basic photo manipulations. Therefore, the ability to crop a photo using improvised means is the most popular among users.
Step #1: Open your photo with Paint.
In order to open a photo using the Paint program, right-click on it and select the menu item "Open with - Paint".
You can also start the Paint program first, and then open the photo using the File - Open menu.
Step #2 Zoom out the photo.
Reduce the scale of the photo so that your entire photo fits in the program window.

This can be done using a special slider, which is located in the lower right corner of the program window. You can also zoom out the photo by pressing the CTRL key and turning the mouse wheel towards you.
Step #3 Select the part of the photo you want to cut out.
Click on the "Select" button and mark the part of the photo that should remain after cropping.

Note that the image area is selected using a rectangle with a dotted line.
Step #4: Crop your photo in Paint.
After you have selected the desired area of the image, you need to click on the "Crop" button. This little button is next to the Cut button.

Also, after selection, you can activate the cropping function using the keyboard. To do this, use the key combination CTRL + SHIFT + X.
Step #5: Save the cropped image.

To save, you can choose one of the available formats: PNG, JPG, BMP or GIF.
First you need to know what Paint is. Paint is a very easy-to-use graphics editor created by the world famous Microsoft company, founded by Bill Gates. This editor is included in programs in any Windows operating system. The main advantage of the application is simplicity and clarity for the user.
How to crop a screenshot in Paint? Many want to know the answer to this question, because everyone has ever wanted to crop a photo, picture or screenshot (screen). Remove from her / him something superfluous or not to your liking. But not everyone knows how to use such complex editors as Xara or Corel Draw. And Paint is a very easy to use and accessible program for everyone. So how do you crop a screen in Paint?
First, create it. A screenshot can be created by pressing the "Print Screen" button. It is located on the right side of the keyboard. You can do it at any time, whether you are playing a video game or watching a movie. When you press the "Print Screen" key, the computer takes a snapshot of the image that the monitor is currently displaying, that is, what you see on the monitor at the moment you press it. This is the screenshot. The picture taken is placed on the clipboard.
Next, you need to open Paint itself. To do this, go to the "Start" menu, which is located at the bottom left of the desktop and click on the "All Programs" item in the window that appears. The computer will open a list of programs installed on your computer, at the very bottom of which is the "Accessories" folder. Open it and find the Paint program in it. By pressing the left mouse button (LMB), you will open the program.
In the open window you will see a blank sheet and a variety of various tools for working with pictures and text. Now let's start cropping the screenshot. First, you need to open the image you made earlier. To do this, you need to find and click on the "Paste" button at the top or use the "Ctrl + V" command. Your picture will open.
To crop a screenshot, you will need the Selection tool. It is located at the top and is indicated by a dotted square. We click on it. Next, you can start cropping the image.
By pressing "LMB" at the beginning of the selected area, without releasing, we lead the pointer to the end of this area, where it should be released. Then you can do with the selected area as you please.
In order to delete the selected area, you need to click on it with the right mouse button (RMB) and select the "Delete" item in the menu that appears or click the "Delete" button
In order to cut out the marked area and be able to work with it further, you need to move the cursor over it and press "RMB". Select "Cut" or press the key combination "Ctrl + X". After that, you can paste the cut out section anywhere in the picture by pressing the "Ctrl + V" buttons.
In order to leave the selected area, and delete everything else, you need to right-click on the selected area and select the "Crop" item. When performing this action, the program will leave the area of the image you selected, and delete everything else.
Now you know how to crop a screenshot in Paint. In addition, all of the above will not take much time for the user, even for a beginner. After a few tries, you will realize how easy the Paint editor is to use.
I wish you success in creating screenshots!