A microphone is one of the important components in a home recording studio. I think that I will not even explain in this post to an inexperienced newcomer about what a microphone is. However, I think it is necessary to tell you about what types of microphones exist and how to choose the right microphone for recording. Here we will talk about this in sufficient detail.
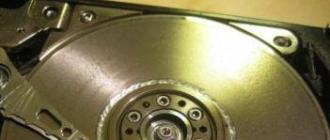
Although they look very different, speakers and microphones use the same principle and components as electrical signals to sound and vice versa. The speaker column can act as a giant microphone diaphragm, and when connected to a recording device or amplifier, it can be used to record sound. With very little change, you can make a “speaker microphone” for use in your recording and live sound applications.
Pros and cons of microphones
You can use the speaker as a unique microphone. Cut the microphone connector from the microphone cable with a cutter. Leave the output connector intact at the other end. Drain several inches of shielding cable from the cut end of the microphone cable using a stripper. This will open three internal wires.
Many people unconsciously relate to the choice of studio microphones. As a result, these people start all sorts of problems with recording music. There are all sorts of noises, distortions and the like. Other problems also arise.
For example, inconvenience in use or various mechanical damage. As a result, a person begins to look for and spend additional money on the purchase of new studio equipment. So that this was not, carefully consider the correct choice of the microphone and for it. There are a lot of nuances here, which we will discuss below.
Drain the white wire with electrical tape; This wire will not be used in this application. Connect the red wire to the positive terminal of the loudspeaker and the black wire to the negative terminal. Connect the microphone cable to the recording device or amplifier. Adjust the input volume of your device by tapping the speaker cone to make sure the speaker captures the sound. The microphone output of the speaker, as a rule, will be significantly less than that of a specially designed microphone.
Parties or a small interlocutor, we all need music to ease the mood and thanks to our smartphones and speakers, everything will take care quite easily. But while you are addressing your guests or even playing the game of Tambola, do you need to scream to make yourself hear? But before that you have to remember that due to system limitations, the sound from the speaker will linger for a fraction of seconds. For those who have not met this idea before, the concept is quite simple. Mechanically speaking, there is not much difference between the dynamic dynamics of a dynamic coil and the dynamic microphone of a moving coil.
Types of microphones on the principle of operation
To begin with, I will first talk about the types of microphone on the principle of action. Just want to emphasize that we will not go into all the technical details of the device and the principle of operation of the device. As a result, we will try to illuminate only those moments that are extremely necessary for us. I also want to say that we will not consider those types of microphones that are usually not used in home recording studios. Usually they are not intended to record vocals and instruments.
Both rely on electromagnetic transduction theory to convert voltage into sound or sound into voltage. The theory states: “When a part of a conducting metal crosses an electromagnetic flux, the corresponding voltage of a certain polarity and amplitude will be created in this metal.”
Dynamic coil dynamics are a great example of how this theory is used in audio applications. As a rule, they are used to convert the electronic representation of sound into something that can be heard. Simplify its main working mechanism; A beep is sent to a coil of wire that is suspended around a permanent magnet. As the audio signal changes from positive to negative, the coil reacts, moving back and forth in the direction of the different poles of the magnet, which propagate the pulling force.
First of all, let's look at the microphones with you on the principle of operation:
- - it is similar in construction to the dynamics of a conventional column. Hence its name. Only the main difference is that instead of applying voltage to the speaker coil to create a sound, we simply remove the voltage generated by the external sound from this coil. For example, we record with instrument or vocal. However, a dynamic microphone is slightly different in construction from a speaker. It has a different design of the diaphragm, its coil contains a greater number of turns and is wound with a much thinner wire. But this is me by the way. So let's not focus on this.
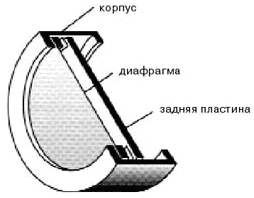
- - is a capacitor, one of the plates of which consists of an elastic material. It under sound vibrations changes the capacitance of this capacitor itself. If the capacitor is charged, a change in capacitance leads to a change in voltage, which is a useful signal from a microphone. For the operation of such equipment between the plates should be applied so-called polarizing voltage (48 V phantom power).
I hope that this is all clear. Now the question! Which one is better and which one is worse? In this case, I thought it right to list the advantages and disadvantages of each of them. This way you can compare microphones and draw certain conclusions based on these advantages and disadvantages.
The other end of this coil is attached to the diaphragm, which is sometimes referred to as a cone or driver. When a coil moves from one pole to another, it forces the air in front of and around the cone to either increase the pressure as it moves forward or create a vacuum of pressure when the cone recedes backward. These fluctuations in air pressure create what we perceive as audible sound.
Dynamic microphone, in essence, is one and the same working mechanism. The only difference is that the microphone must capture acoustic energy and convert it into an electrical audio signal. In this case, the design is more or less the same, except that the diaphragm is much smaller than the cone of a typical loudspeaker. Violations of air pressure cause the diaphragm to move back and forth. Since the diaphragm is connected to the coil of the wire, this causes the coil to move along the magnet, creating an alternating current in the coil.
Pros and cons of microphones:
First, let's take a look at the benefits of a dynamic microphone:
1 High overload capacity - this advantage allows you to use the equipment to remove the loud sound sources (e.g. guitar amp) without the risk of damaging anything in this microphone.
2 Reliability and robust design - dynamic microphones are much less susceptible to damage upon impact, which makes this type of equipment more suitable for the stage. Such equipment is more versatile in the sense that it can be used at home, on stage, on the road, and at rehearsals without the risk of damage.
Lose allegiance to the transfer of timbre
Although transduction can be achieved using a speaker as a microphone, the fact is that, in general, the speakers do not sound as good as the other way around. In fact, they ring true like a vocal microphone. But in certain circumstances they suggest that most vocal microphones cannot. This is due to the fact that large cones inherently respond better to lower frequencies than smaller apertures, such as those found in most vocal microphones.
This has much in common with the correlation of the wavelength of lower frequencies, which corresponds to the circumference of the cone. When recording instruments where low frequencies are crucial, such as a drum drum or bass amplifier, the drivers of the speakers can actually provide tons of glorious sub frequencies that most dynamic microphones, as well as large aperture capacitors, simply cannot be replayed. The microphones with the subfox used on their own are not so clear, but when you add moderation to standard kick-drum microphones closer to the head of the drum pedal gun, they add a muscular, percussive and quivering skull which can be heard at a variety of popular drum records.
3 less sensitivity - less susceptible to the perception of other people's noise and less sensitive to the occurrence of feedback. If you do not know what feedback is, then I will explain in simple language. This connection is expressed in a loud, gradually increasing voice as the microphone approaches the speaker.
Now let's look at the shortcomings of dynamic microphones:
Engineers have been building these things for decades, so this is not a new idea. So, without further ado, here's how to make your own sub-sound functional work. 10 inch subwoofer driver. Mini mockup Power drills and bits. Spray paint.
Which is better?
A roll of white, sticky contact paper. A roll of blue ink ribbon. Firstly, there is no need to buy anything expensive. The main thing is to consider the size of the cone and the rigidity of the material from which the cone is made. Anything greater than 10 is really big enough to be in the way of other microphones and is likely to get a little heavy. Electrical components: do not go overboard on them.
1 sound is inferior to condenser in transparency, purity and naturalness.
2 smallest frequency range.
3 are inferior in fidelity timbre transmission.
Now let's take a look at the advantages of a condenser microphone:
1 Wider frequency range.
2 Availability of models of any size - there are even the smallest models (for example, children's microphones).
Which microphone is better to choose?
Body of the body: some people prefer to make the body of the speakers from a wooden drum shell. If you cut corners or agree to a sloppy job at this stage, it will really have a negative effect on the strength of your completed part, so make sure you have enough time for this step.
The first thing to do is measure and cut the shell materials. This means that if you buy a 10-inch form, there is a good chance that it can be or -10. If you plan to use a 10-inch speaker, try to find a form that is slightly wider than 10. If you get a 10-inch handset, The loudspeaker will not be completely ribbed. Otherwise, just be prepared to have plenty of daylight in your body. Once you secure the tube, you will need to measure the depth to cut it.
3 More transparent and natural sound. - This is due to the greatest sensitivity. This is the most important advantage of condenser microphones.
Let's look at the shortcomings of condenser microphones:
1 Needs additional nutrition - usually the role of phantom power is 48 V. This imposes a significant limitation on the breadth of use. For example, the power of 48 V is not on. If you want to connect a microphone outside your studio, then maybe you will not succeed.
To measure the correct cutting depth so that it matches your dynamics, place your driver on a flat surface on a magnet with the speaker pointing upwards. Then, using your measuring tape, record the distance from the surface to the top edge of the speaker. Add about half an inch to this number. This is how deep your pipe should be cut. Starting with a clean square of the end of the tube, measure the depth and mark it with a sharp or pencil.
Types of microphones on the principle of operation
If you have not used a table saw before, do not try it! If you need to use a hand saw, try to make your cut as square as possible. If it is convenient enough for you to use the table, set the fence to the depth of the cut and press the square edge on the fence. Slide the tube along the blade until the blade is in the middle of the tube, then twist the tube several centimeters at a time and continue feeding through the blade until the entire circumference is cut.
2 Very fragile - I immediately warn everyone that once falling, such equipment can fail.
3 Sensitive to temperature and humidity variations. - this can lead to breakage or temporary inoperability of the equipment.
So, having considered the advantages and disadvantages of dynamic and condenser microphones, do not rush to make a decision. I have not finished the description yet and then I will talk about such an important detail as the directivity pattern. In fact, do not be afraid of this terrible word. When I explain what it is, you will immediately understand everything.
This will make the outer shell. To make the shell 2-layer, you will need to cut the second section to the same depth as the first. Then orient the second shell so that it is now 90 degrees from the original incision and cut along the edge of the shell.
Now this should allow you to roll the diameter of the second shell and put it in the first one. There will be some overlapping edges. Take a box knife for cutting and carefully cut off the excess so that there is no overlap. This is thick cardboard, so the trick is to make several passes along the same cut.
Directional pattern
The directivity pattern of a microphone simply shows the dependence of its sensitivity to the sound signal on the location of its source. In total there are 5 basic microphone patterns:
- Circular - The circular microphone is sensitive to signals coming from all directions. That is, pay attention, as shown in the figure. In the center is a microphone and a circle indicates the signal. So the equipment catches the signal no matter where the signal source is.

In the end, you will break through and be rewarded with a clean stitch. Then you will need to lock the split inside. It is important to use glue with a slower one. This will give you extra adjustment time to help position the two inside each other so that the edges are in order.
Start by applying glue to the wave pattern around the inner shell. In fact, make sure you cover the surface as much as you can. When it comes to lamination with glue, it’s better to be gratuitous than stingy. Make sure your seams are aligned and try to twist the inner layer against the outer layer. This should help spread the glue around and help join the two layers together when the glue dries.
- - equipment with such directivity is practically insensitive to the sound coming from behind.
You will need approximately every clamp that you can use for this next part. There must be some kind of elastic force from the inside to the inside of the outer shell, but in order to be sure that there is enough pressure, use some moderately tightened clamps about every 4-5 inches all the way around the shell.
Medium price category
Because we work with a cardboard box, there will be permanent indents of the circle where the clamps would be if you squeeze too much. Leave this child clamped for at least 12 hours. It is also a good idea to leave it in a dry place. Humidity in the atmosphere leads to an increase in drying time. Avoid basements and garages if you can, as they tend to be quite wet and damp.
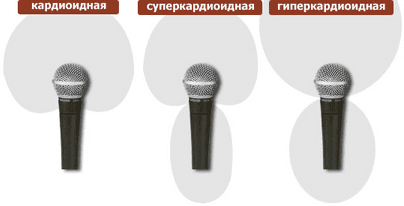
- Supercardioid - equipment with such directivity has a narrower sound capture zone in front than a microphone with a cardioid directivity. In this case, the equipment partially captures the sound coming from behind, but has two dead zones on the sides.

- Hypercardioid - it looks like a supercardioid one, but differs in that it has a narrower zone of sensitivity in the front and a wider one in the back. Equipment with such directivity also have two dead zones on each side. (in the figure these are two intersection points of the circles on the sides of the microphone).

- Eight - this is the name of the radiation pattern, in which a studio microphone is equally sensitive to signals coming from both the front and the back. Also absolutely not sensitive to the sound on the sides.
Now I will say, as regards directly the properties of the differences of these different radiation patterns. Circular Microphones (omni-directional microphones) sensitive to . They provide acoustic isolation only with a small distance from the sound source to the microphone. They have low sensitivity to breath sounds.
There is also practically no presence effect, that is, when a vocalist or instrumentalist is recorded, it is as if they are present in the listening room. And also omnidirectional microphones have an extended low-frequency range, which by the way, is useful when working with instruments such as organ, double bass and other low-frequency instruments.
As for unidirectional microphones with cardioid, super and hypercardioid directivity, I can say the following for them. They provide protection from the negative effects of room acoustics, unlike circular omnidirectional microphones. They also provide good isolation, which contributes to easier separation of recorded music tracks.
They usually lead to the appearance of the presence effect and are less sensitive to the appearance of feedback, which I mentioned a little earlier. They are also suitable for recording synchronous stereo signal. This means that such microphones can be used in pairs to record one or more instruments in stereo.
Regarding the equipment with the pattern of eight, I will say that they are excellent for recording duets (when performers are opposite each other). However, I will immediately say that the recording will be mono in any case. (when one microphone), but the equipment will pick up the signal of the performer sitting in front of the microphone, and behind it is equally good. Also, equipment with directional eight provides good isolation, which contributes to easier separation of recorded tracks. Such equipment is suitable for recording synchronous stereo signal.
Which is better?
So, after reading all this boring theory, you ask: " Which radiation pattern is better to choose?"Here I will answer that it is not so necessary for you to know exactly how this or that diagram is achieved and why it is different on other microphones and different on other microphones. You need to know in what situation this or that type of equipment should be applied. Now I will explain it to you:
- Omnidirectional microphone It makes sense to use when recording in a very dull room. The microphone is very sensitive to room acoustics. If you have the opposite, good acoustics in the room and you want to emphasize it, then the use of such a studio microphone to transmit the general acoustic atmosphere is fully justified.
- Unidirectional microphoneit is advisable to use them when recording in a room with a large number of sound reflections or in case you are not sure that you have done well enough. Also, if you want to reduce the penetration of its influence on the tone of the signal and on its penetration into the recording equipment, such unidirectional microphones should be used. They are also used in the case when extraneous noises get into the recording room. (insufficient insulation). The microphone installed by the back side of the noise source will only catch the useful signal, that is, the performer himself.
- Microphone with eight direction It should be used when recording in a muffled room when it is necessary to increase the relative level of over-reflected signals, as well as when recording individual musical instruments and singers to distinguish low frequencies, but in conditions of close accommodation of performers at the microphone. This type of equipment is also used in the case when it is necessary to separate from the intended ones. To do this, the microphone is directed to its dead zones of the noise source, excluding the penetration of extraneous noise on the recording.
I personally recommend using a unidirectional microphone for recording solo vocals in my home studio. This will prevent the entry of noise and noise from behind and from the sides to the recording. But it will also minimize the influence of room acoustics, the quality of which is usually poor in a home recording studio.
Which microphone is better to choose?
On it we will finish with directional patterns. Let's now go back to the types of microphone on their device, where I will tell which one to prefer dynamic or condenser. Dynamic microphones are relatively cheap and at the same time reliable. Therefore, they can work successfully in areas of high sound pressure.
This makes them more suitable for vocals with a loud and coarse timbre, singing in such musical styles as pank, and so on. If you want to get a powerful, dense, but not too voluminous vocals, then a dynamic microphone will suit you.
As for the condenser microphone, it is designed so that the diaphragm helps to achieve higher sensitivity and ability to reproduce high frequencies. In addition, condenser microphones may have more radiation patterns. And some may be able to switch these diagrams. Well, the very low resistance to mechanical damage makes them, alas, unsuitable for live performances.
But in the recording studio they are indispensable, since their high degree of believability makes them the most versatile and suitable for making sound from any musical instruments and voices. The versatility and technological complexity of condenser microphones leads to the fact that their cost is significantly high.
When compared to dynamic, this is the main disadvantage. But despite this, I personally believe that a condenser microphone is most suitable for use even in a home recording studio rather than a dynamic one. In addition, among the condenser microphones there are low-end models. Their quality is not always low.

There are still a few specific nuances of advice on choice, with which I will now share with you. Tips and tricks on how to choose a microphone:
- Notice microphones with multiple directivity patterns. - as I said earlier, some models of condenser microphones have the ability to include a radiation pattern with one movement of the lever. They can be up to 9 pieces. Such equipment would be preferable from the point of view of universality rather than a microphone with one fixed directivity.
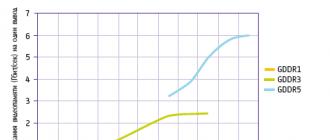
- frequency range - here, as is the case with monitors and. The wider the frequency range, the more evenly ochah in the frequency range available for the perception of the human ear.
- Attenuator - on some models of condenser microphones there is a special attenuation switch. This switch attenuates the signal. (usually 10 - 12 dCb), which allows the equipment to operate with a high sound pressure level without causing distortion and overload.
- Cut filter - on some models of condenser microphones it is present. When turned on, it cuts off frequencies, for example, below 70 - 100 Hz (sometimes 200 - 300 Hz) and this function allows you to cut off from the signal all kinds of frequency interference. For example, the rumble of some tools or remove the effect of nasal, staggered, reduce the effect of the vibration of the stamping of feet, and so on. This feature is very useful and I recommend paying close attention to its presence in the microphone.
- Microphones are not divided into purpose types for specific instruments. - here we have in mind that the division into groups such as microphones for voice recording, guitar microphones, drum and so on. This is only a conditional division. Therefore, nothing prohibits the use of a vocal microphone to record a trumpet or a guitar microphone to record vocals. Most importantly, the studio equipment is suitable for the pattern and the nature of its sound.
- Universal microphones do not exist - this is actually the most important moment and it should be understood. A microphone that is perfect for one vocalist may not be suitable for another at all. This occurs for various reasons: due to differences in timbre, in the dynamic range of the voice, in the style and manner of singing and so on. Therefore, if possible, have more than one microphone in your recording studio.
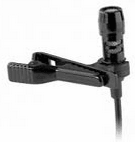
Examples of microphones:
At the end of this material I want to present some models of microphones of various price categories. I will show you both dynamic and capacitor. You can buy microphones here.
Cheap microphones
Let's start, as always consider cheap microphones. If you do not have much money, that is, your budget is strictly limited, then I recommend that you start with this category of goods. Here the equipment at its price can be suitable for many people.
Condenser Microphones:
Medium price category
Here I offer already products of higher rank. As a rule, this category is suitable for those who want a more acceptable quality, but at the same time do not want to overpay. This is the so-called value for money. The price is not too high, but at the same time the quality is not so bad. Of course, with a professional look it doesn’t compare. However, there are quite a few people who simply cannot afford to buy expensive equipment.
Condenser Microphones:
Dynamic microphones:
Well, now you can complete this topic. Now you know what types of microphones exist by the principle of operation. We also looked at the advantages and disadvantages of both dynamic and condenser microphones. We learned what a directional pattern is and what types of it exist. Considered very useful tips on choosing a microphone. Now you know about which microphone is best for you. Well, at the end we looked at the optimal types of equipment for each price category. Also, in addition to this material, I recommend you look at the tips on. I am sure they will be useful to you!