In fact, installing Win 7 on a new Win 8.1 laptop without converting the hard drive to MBR is not so easy due to the UEFI interface, and the Secure Boot protocol. The revolutionary UEFI BIOS was not developed for Windows 7, but for the latest Windows 8, 10 operating systems, but despite this, the seven works fine on GPT disks and you can still install it with the second Windows on a new laptop.
Let's solve the problem like this.
1. Let's create a partition on the new hard drive to install Windows 7.
2. Install Windows 7 on this partition directly in a running Windows 8.1 using the WinNTSetup program, you need an ISO image of Win 7.
3. It will not work to boot Windows 7 from a GPT hard disk, so we will create a Win 7 and Win 8.1 boot manager using diskpart on a USB flash drive and it will work in Legacy. Both operating systems will boot without unnecessary manipulations with the BIOS.
We also need another USB flash drive with Windows 7 or a seven installation disk.
Before work, you can play it safe and create a backup of the BCD download storage.
Preparing a flash drive with a boot manager (1 step)
We turn on the laptop with Windows 8.1, connect the USB flash drive
and run the command prompt as administrator, enter the commands:
diskpart
lis dis
In this window, select a flash drive to create a boot manager for Win 7 and Win 8.1. In my case, a 4 GB (3822 MB) Silicon Power flash drive is marked as Disk 1, so we enter the command
sel dis 1
Disk 1 selected.
DiskPart: Disk cleanup completed successfully.
convert mb r
DiskPart: The selected disk has been successfully converted to MBR format.
create par prim
DiskPart: The specified partition was successfully created.
format quick fs=ntfs
Completed (Percentage): 100
DiskPart successfully formatted the volume.
DiskPart: The partition is marked as active.
DiskPart: Disk name or mount point assigned successfully.
Temporarily disconnect the flash drive from the laptop.
Installing Windows 7
Now it's the turn of installing Windows 7. I suggest doing it right in Windows 8.1 using the cool WinNTSetup program, download and run it.
On a laptop with Windows 8.1, I previously created a partition (D:) to install Win 7.
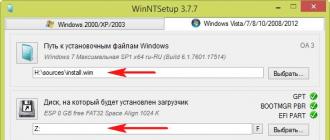
In WinNTSetup we specify:
Path to Windows installation files- click on the button Choose and specify the install.wim file located in the sources folder of the Win 7 distribution, in my case the system distribution is located in the H: virtual drive.
Drive where the bootloader will be installed- we don't change anything.
The drive where Windows will be installed - select the previously created partition and click Installation.

Select Do not update boot code and click OK.

The installation of Windows 7 begins on the drive (D:) of a laptop with Windows 8.1.


We reboot, we enter the BIOS of the laptop.
We switch the UEFI interface to Legacy OS advanced boot mode and disable the Secure Boot option,
Press F10 (save changes in BIOS) and reboot.
In the menu that appears, select Windows 7
and immediately get into the final phase of the installation of Win 7.

We think you know how to complete the installation of the system.
The Windows 7 desktop is loading.

We go to Disk Management and see that our seven, as we planned, was installed on the disk (D :), which is natural here (C :).
Preparing a flash drive with a boot manager (stage 2)
There are a few more steps left. We connect both of our flash drives to the laptop, the first with Windows 7 files (you may have an installed disk), and the second (4 GB Silicon Power) with the boot manager that we started creating at the beginning of the article.
We boot the laptop from the Win 7 boot disk or flash drive. When the very first Windows Setup window appears, press Shift + F10, the command line opens.
We are finishing creating a boot manager for Win7 and Win8.1 on a USB flash drive (4 GB Silicon Power).
We enter the commands:
diskpart
Shutdown DiskPart...
Please note that both operating systems are installed on drives (C :) and (D :), and the drive letterSilicon Power 4 GB (3822 MB) with the future boot manager (F:), respectively, enter the commands
The problem with how to enter BIOS on Windows 8 may arise for users who need to hardware enable or disable some computer components.
And, if Windows 8 or 8.1 is installed on the PC, there are several ways to do this, including even logging in from the OS itself.
The main reason why you may need to enter the BIOS directly from Windows 8 is that the OS boot speed is too fast.
New motherboards are equipped with improved BIOS (and their UEFI counterparts), thanks to which the system starts to boot not in seconds, but in milliseconds.
As a result, you can simply not have time to click on the familiar quick entry buttons that you used before.
And yet there is a solution. The developers of the 8th generation of the operating system from Microsoft provided the ability to enter BIOS (UEFI) after it was loaded.
Special download options
The main way to solve the problem with the inability to enter the BIOS, which often occurs with owners of new computers and laptops from certain manufacturers, such as Lenovo and Hewlett Packard, is to use special options to boot the system.
This method does not require much time, and, after familiarizing yourself with it, entering BIOS will take the user only a few minutes.
To use the first and most popular way to get into the BIOS before booting the entire system, you need:
- Open the right panel of the system;
- Select the item "Parameters" and "Change parameters";
- Click on the inscription "Recovery";
- Find the point of special boot options and choose to reboot the system.
When the computer restarts, a sign like this will appear on the screen:

If a USB flash drive is inserted into the USB port of the computer or there is a boot disk in the drive, the menu may differ slightly.
The “Use Device” icon will appear in it, by clicking on which you can boot not from the HDD, but from external media.
However, to load the BIOS and change system settings, you must select the "Diagnostics" item.

Here you can restore the computer to working capacity or continue accessing the BIOS by clicking the "Advanced options" item.
A new menu specially designed for troubleshooting will appear on the screen.

After selecting the "Firmware Settings" item, you should confirm the BIOS boot and reboot the system. After the reboot, the user gets access to the BIOS settings.
The method is quite simple, although it takes some time, however, as a result, it is possible to achieve the desired in about 90% of cases.
BIOS settings
Using the settings of the BIOS itself, you can also get into the advanced options menu. There are 2 ways to do this:
- Use command line;
- Reboot with the "Shift" key pressed.
Using the command line
The first option may seem easier than choosing different panels and menus. It is carried out just by calling the command line and entering the command shutdown.exe / r / o into it.
The computer should restart and show the same boot options as described in the previous paragraphs.
A feature of using the command line is the ability to create a special button for this download.

Reboot with "Shift"
You can also get to the advanced options menu by simply restarting your computer while holding down the Shift key.
True, it only works on Windows 8.1. and later versions of the system.
Quick Login Options
If there are no firmware options in the advanced settings menu (this occurs, for example, in some laptops), you should try other methods.
For example, return to the quick entry options by trying to randomly press the function keys of the top row of the keyboard. This method works for all versions of Windows.
But for new computers, it is associated with the need to quickly press, but rather just hold down the keys, choosing them in turn or using a well-known list for popular device brands for this.
To quickly enter the BIOS of HP laptops, press either Esc or F10.
After pressing these keys when the system boots, the user enters a menu that allows you to change hardware settings. The option is suitable for most models of the brand.

On laptops from other manufacturers, you need to press other keys - for example, for Asus it can be F12. For Toshiba, first press Esc and then F1 or F10 .
For Lenovo, F1 and F12 are most often suitable.
Sony and Dell products require pressing F3 to get into BIOS, sometimes F8.
Thematic video:
We are trying to enter the BIOS. The task is elementary. And (shock!) does not depend on your operating system. But people ask, so...
Here it is, the final goal of our journey.
Reader, in order to start the BIOS (and it doesn’t matter if you have windows 8 or something else), do the following:
1) Turn on your computer (or reboot).
2) Press one of these keys:
del, F8, F2, F7 are four options, but there is only one suitable for your computer. Therefore, when you first boot, use one key. If it doesn't help, reboot again and use another button.
Some startup details
1) Choose the right moment. The fact is that you can start bios only at the initial stage of turning on the computer (these are those few seconds when inscriptions, numbers, hardware configuration appear on the screen). But when the Windows boot window appears, or moreover, the windows welcome window - then that's it, the train has left, the moment of entering the bios is skipped - reboot.

2) What to press then? Some keys have been given above. Which one to press? It all depends on your motherboard. Which board - this and the BIOS - those buttons and press. BUT! Do not be afraid to press something wrong, the computer will not explode from this, it will not break, and even nothing will happen to Windows.
3) How many times to click? My answer: hammer on the key, nothing will happen to it, as well as to the computer. In other words, if you click 5 times, 10 times, or more, it doesn't matter at all. No, of course, with a clear and precise movement made at the ideal moment - you can enter bios on the first try, but why such difficulties? Turn on the computer, and click on the button.
P.S. The computer may not have Windows at all, but the BIOS is always installed in it! The fact is that bios is “hardwired” into the motherboard, it is NOT RELATED TO WINDOWS 8 or another OS in any way. Therefore, questions related to how to enter it under a certain axis are tritely incorrect.
With the advent of Windows 8, owners of new computers got acquainted with another innovation - UEFI. UEFI (translated and stands for “Unified Extensible Firmware Interface”) is motherboard firmware designed for the same purposes as BIOS and replacing it.
UEFI and BIOS are a software “layer” between the operating system and computer hardware. And that's where their similarity ends. The differences between them are about as big as between Windows 98 and Windows 8.
This is how the graphical shell of the UEFI motherboard Gigabite looks like:

For comparison, here is an image of the BIOS:

There are changes, right? And they affected not only the appearance.
The main differences between UEFI and BIOS
- Support for partitioning GPT drives. HDDs and SSDs partitioned according to this standard can address more than 2.2 TiB of space and contain an unlimited number of partitions. The old MBR markup type is supported by the new interface only indirectly - through the CSM extension (BIOS emulator).
- Built-in boot manager for operating systems of various types. UEFI allows you to boot operating systems that do not have their own bootloader at all - just add them to the boot menu.
- Secure Boot technology, which prohibits the execution of unauthorized code at the OS startup stage. Provides protection against viruses that activate before Windows loads.
- Support for 64-bit firmware device drivers and native platform-independent driver environment.
- The ability to install extensions that complement the standard UEFI functions. Extensions can be added by the computer manufacturer or by the user.
- A colorful graphical interface (only on desktop motherboards so far) that allows you to use a mouse.
- Support for Russian and other national languages.
- A significant increase in the speed of booting the OS and resuming from hibernation.
Acceleration of system startup from the moment the computer is turned on, on the one hand, is convenient for the user, and on the other hand, it makes it difficult to enter the BIOS when necessary. Because the time for which you need to have time to press the Delete key, F2, etc., is reduced to an instant. However, now you can enter the BIOS from under the OS itself, but not any, but only pre-installed on the Windows 8 computer. We will talk about how this is done further. So…
How to enter the BIOS from a running Windows 8
- Press the Windows key + C or move the mouse cursor to the upper right corner of the screen and move down a little to open the sidebar. Click the Options icon.

- Then click "Change PC settings".

- Select "Update and Recovery" from the list of PC options.

- Click the Recovery option, then in the right half of the window, in the Special Boot Options section, click Restart Now.

- The computer will restart and the “Select Action” menu will open in front of you on a blue screen. Click on "Diagnostics".

- Then click "Advanced Options".

- And then - "UEFI Firmware Settings".

- After that, the main UEFI menu (BIOS) will open for you.

If your PC does not have the “UEFI Firmware Settings” item, then you cannot enter the BIOS settings from under Windows on it. This happens because:
- Windows 8 was not preinstalled on this computer;
- the disk on which the system is located is marked as MBR (UEFI is used in BIOS mode).
In such cases, you will most likely be able to get into the UEFI settings the way you did before - by pressing the key indicated on the motherboard splash screen after turning on the PC. You will have enough time, because in this mode the system does not start at an accelerated pace, but as usual.

How else can you go to "UEFI Settings"
You can go to the “Select action” menu, from there to “Advanced options” and “UEFI firmware settings” in several more ways.
Using the command line
- Open desktop. Right-click on the Windows icon in the lower left corner of the screen or press the Windows + X keys. From the menu that opens, select Command Prompt.

- Type the command in the console shutdown /r /o and click Enter. The computer will restart and you will be in Advanced Options.

Using the item "Reboot"
- Open the right sidebar, select "Settings" and then "Shutdown".
- Press Shift on your keyboard and click Restart.

- Once in the “Select action” menu, go to the “Diagnostics” and “Advanced options” section.
With a label
If you need to frequently switch from Windows to UEFI, it is most convenient to create a shortcut for this. It will take you to the “Advanced Options” section with a click of the mouse.
- Right-click on an empty area of the desktop. Select “New” and “Shortcut” from the context menu.

- In the line "Specify the location of the object" enter C:WINDOWSsystem32shutdown.exe /r /o /f /t 00 and click "Next".

- Give the shortcut a friendly name and click Finish. It will be created and saved to your desktop.
Before wondering how to enter the BIOS (BIOS) on Windows 8, you should understand what is hidden under this abbreviation and whether there is a need to do this at all.
What is BIOS (BIOS)?
The Basic Input/Output System, or BIOS for short, is a microchip located on a computer's motherboard and required to boot it up. How does this happen. The BIOS is embedded with a program code with primary drivers and settings, with the help of which the computer hardware is launched and checked, its basic configuration is performed, and the installed operating system (OS) is loaded. Many BIOS settings can be changed by the user. To do this, you need to go to a special interface called BIOS Setup, with which most users associate the concept of BIOS. Here, in addition to the basic settings laid down, the date and time are configured, the components integrated into the motherboard are turned on and off, the drive from which the operating system is loaded is selected, the voltage and clock frequencies of the processor, RAM timings, and much more. To enter the BIOS Setup, a certain key combination is used, which may be different for different models of computers and laptops.
BIOS chip with embedded program code
Table: Keyboard shortcuts for entering BIOS Setup for various BIOS manufacturers
Manufacturer | Key combination |
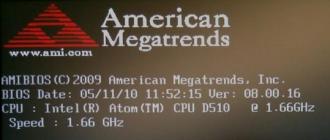
American Megatrends (AMI) | |
ATi Radeon BIOS (ARI) | |
Advanced Logic Research (ALR) | |
Advanced Micro Devices (AMD) | |
Dalatech Enterprises (DTK) |
Usually, to enter the BIOS of a computer, it is enough to press one of the keys at the very beginning of its boot: F1, F2, Del, Esc.
On modern motherboards, another chip is already installed, called the Unified Extensible Firmware Interface (UEFI). It performs the same functions as BIOS, but has a more advanced software interface, interacts better with the OS bootloader, and has a host of other advantages.
Since Windows 8 is mainly installed on computers with modern motherboards, the type of BIOS - UEFI should be considered in more detail. Entering such a BIOS is not easy, because the boot is very fast.
How to enter BIOS UEFI through the control panel
Direct login is not possible in this case. In the control panel, we can change some settings in order to increase the computer test time by a few seconds before Windows 8 starts loading. Now you will see OS boot options and hot keys for entering BIOS UEFI and any other on the screen, which you can immediately do .
- Click in Windows 8 "Start -> Control Panel -> Power Options".
Selecting a power section
- In the window that opens, sequentially click on the links "Additional information about power schemes -> Action of the power button".
Selecting advanced settings
- On the tab that opens, enable the function of changing inaccessible settings opposite the icon with the image of the shield, at the bottom, uncheck the checkbox for enabling fast computer startup and click the "Save changes" button.
Disabling fast startup
Now it will not be difficult to get into the BIOS while the computer is booting, since all the necessary options for key combinations and tips will be visible.
Login via parameters
This option is used to enter BIOS UEFI.
- Open the right sidebar and select Settings -> Change PC settings.
Choice of options
- A tab will open where, at the end of the list, select the Update and Recovery link.
Switching to recovery mode
- In the new window on the left side, select "Recovery", and in the section of special boot options, click on "Restart now".
Selecting a download option
- After restarting the computer, a window will open where select "Diagnostics" and then "Advanced options".
Selecting advanced options
- Next, click on the "UEFI Firmware Settings" tab and confirm the restart of the computer.
Going to BIOS settings
- The computer will restart again and automatically enter the BIOS UEFI.
System settings
Video instruction: how to enter BIOS on Windows 8
Login via command line
First, go to the main menu of Windows 8 and select "Applications".
Command line selection
In the window that opens, type in the command line - shutdown.exe / r / o and press Enter on the keyboard. The computer will reboot in the boot options selection mode, where you can specify the parameters necessary to enter the BIOS, as in the option shown above.
Executable command set
other methods
You can use a reboot in safe mode to enter the BIOS, for which, while holding down the Shift key, press the Reboot drop-down list item from the On / Off menu, which can be accessed through the main Start menu. After the reboot, a menu with an entry point to BIOS.Acer will become available
HP (Hewlett-Packard)
[from DOS -> Ctrl+Alt+F11]
Possible problems and solutions
There are usually no problems with entering the BIOS, except for the situation if the entry is password-protected and the password is lost. Also, often users try to unacceptably increase the speed of the computer (overclock) using special programs or directly through the BIOS, resulting in hardware failures, which can lead to disruption of Windows 8.
In these cases, the best way out of the situation is to reset the BIOS settings to factory settings. It's easy to do. Enter the BIOS using one of the methods discussed above and press the Esc key. A window will appear with a list of links, one of which will contain the word Defaults. This link will need to be clicked, after which the BIOS settings will be reset to factory settings and the computer will reboot. But if the input is password-protected, then you simply cannot enter the BIOS in this way. Are there any other options.
You can also reset the settings using a jumper on the motherboard, the location of which can be found in the motherboard diagram available in the instructions that came with the computer.
BIOS reset jumper
The BIOS will also reset if you remove and then reinsert the coin cell battery on the motherboard.
BIOS power battery
The article discusses in detail the options for how you can enter BIOS on Windows 8 and not only. Having a list of "hot keys" at hand at all times, the user of any computer or laptop can easily get into BIOS and this procedure will take quite a bit of time.